


In some of my last blog posts, we covered the installation of pfSense on BareMetal, meaning on old physical PC, and different hypervisors such as pfSense on KVM, VMware workstation, and so on.
In this blog, we will cover how you can install pfSense on a virtual box hypervisor. Since Oracle VirtualBox is free and supports Windows, MAC, and Linux operating systems, it is a great choice for someone who wanted to start with pfSense.
However, if you want a good performance, I recommend you to try Pfsense on either in KVM if you are a Linux user or a VMware workstation if you are a windows or MAC user.
I have also covered how you can get started with pfsense using labs with different scenarios here, I highly recommend checking out the article if you are new to pfsense and wanted to learn more.
Can I install pfSense on VirtualBox to replace my home router?
Though it can be done, it’s not the recommended method, as you would virtualize the network stack, and you won’t get good throughput. Moreover, it adds more latency to the network. If you are still planning to virtualize the PfSense to replace your home router, then the recommended method is to use KVM with a PCI passthrough to give a good performance as we connect the network interface directly to the VM that is running in the KVM hypervisor. And we will not be virtualizing the network.
Related Articles,
How To Configure Port Forwarding in pfSense?
How To Configure OpenVPN On PfSense?
How to Install PfSense on VMware ESXi? – Step by Step Guide.
How to Setup IPsec Tunnel between Paloalto and PFsense?
How to Install PfSense on Proxmox? | Step by Step.
LAB objective.
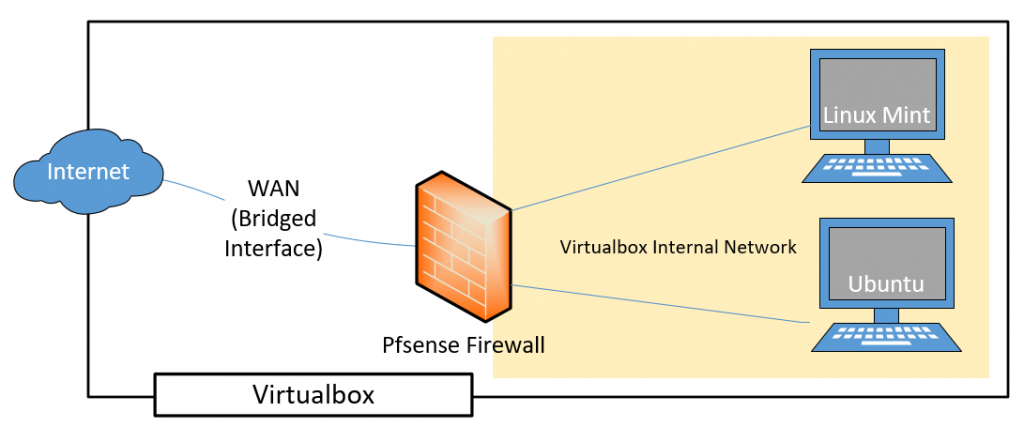
Below is the topology that we will work on. First, we will install the pfSense firewall on the Virtualbox and configure it with WAN and LAN interfaces. After Pfsense is connected to the internet, we can then go ahead and simulate the end-user machine by using the Linux mint and the Ubuntu on the LAN side and test the connectivity further.

Prerequisite.
- Download and install the latest Oracle VirtualBox software.
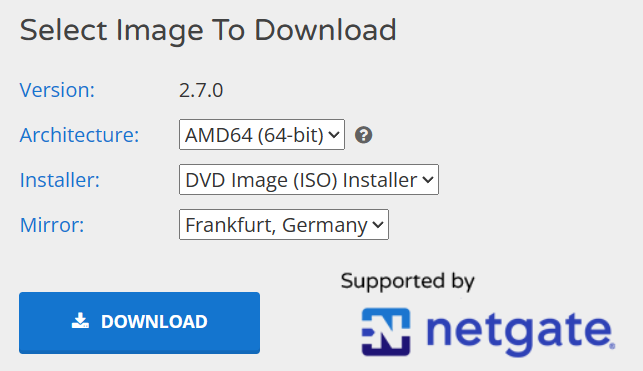
- pfSense image, you can download it here.
Note: While downloading, make sure to select DVD Image (ISO) Installer and the mirror nearest to you.

Steps to install pfSense on VirtualBox.
I will install pfSense on VirtualBox in Windows 10. However, the steps mentioned here are similar to other operating systems, such as MAC or Linux, just that you will have to download and install the respective Virtualbox software packages.
For those who prefer to watch the video, Here is the video with the step by step instructions.
1. Setup the pfSense VM in VirtualBox.
Open VirtualBox software and click on New to create new virtual machine.
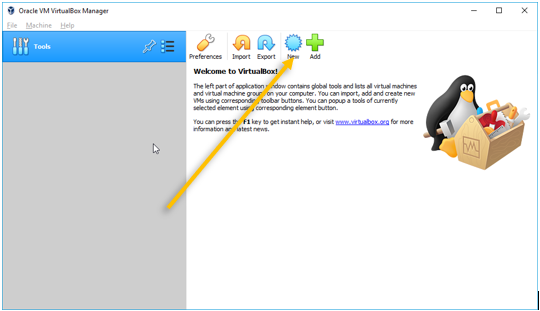

A new window will pop up.
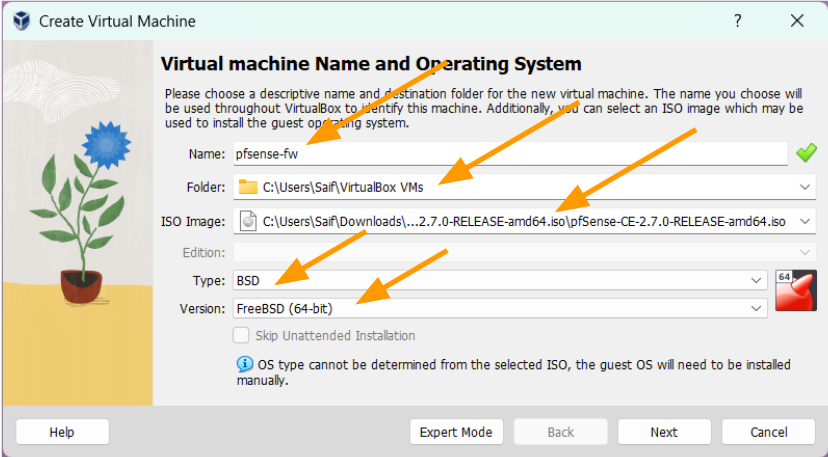
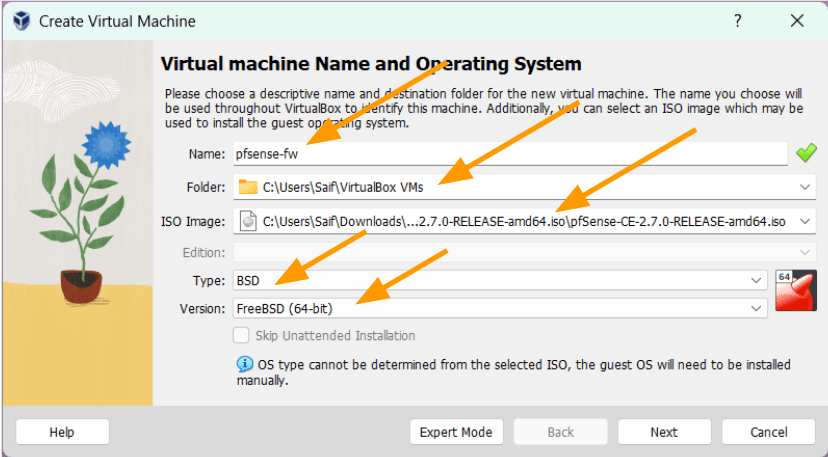
- Enter the name of the VM, for example, pfSense-fw.
- Choose the location where you wanted to save the pfSense virtual machine files.
- ISO image: Attach the pfsense ISO image that you have downloaded earlier.
- Type: You need to make sure that you select BSD as the type and FreeBSD (64bit) as the version.
Click on Next.
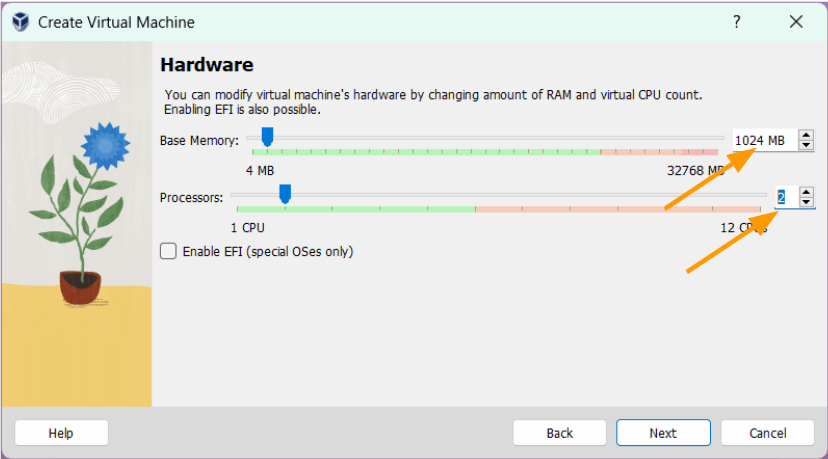
2. Configure the pfSense Memory and CPU.
You need to define the memory and the CPU for the pfSense virtual machine here.
Base Memory: Give 1GB (1024) of Memory.
Processors: Enter 2 CPU.
I have previously installed pfSense with a single CPU, and it used to work just fine. However, when I attempted to use a single CPU in pfSense within VirtualBox on Windows 11, it ended up in a reboot loop.
So better to give 2 CPU’s.
Click on Next.

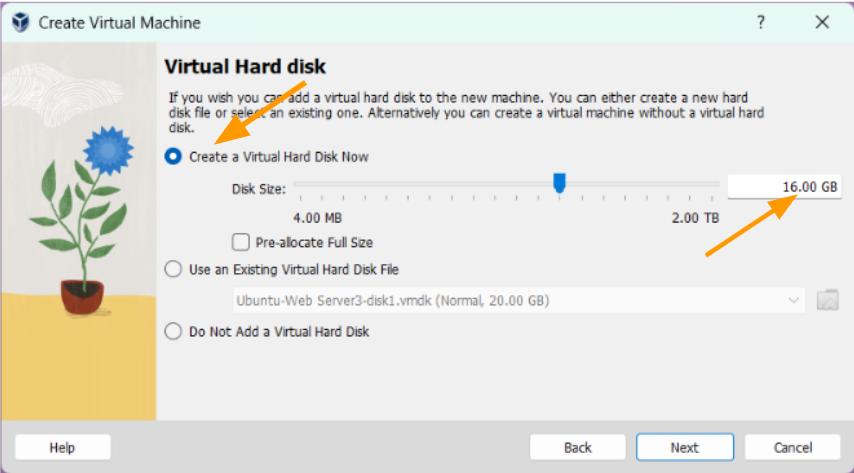
3. Setup the hard disk.
Next, we are going to configure the virtual Hard Disk for the VM, choose Create a virtual hard disk now and enter the size of the virtual hard disk storage size in GB’s.
The default virtual hard disk size is 16GB, I am leaving the default.
Click on Next.

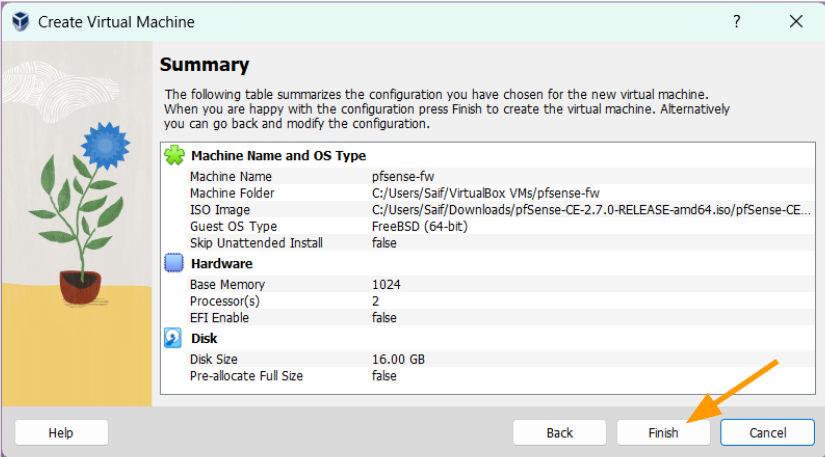
You will get the summary of the pfsense virtual machine installation, if you are okay with the configuration you may click on Finish, else click on back to make further changes.
I am good here, hence clicked on Finish.

4. Set up the Network.
Before you start the VM, you need to configure the Pfsense Network adapter in VirtualBox to use for the pfSense VM.
Does pfsense need two nics?
The Pfsense firewall has two interfaces: the outside interface that connects to the internet, and another is the LAN side interface that connects to the inside users, basically the Virtual machines in our case.
So you must use two NICs (network interface cards) while deploying the pfSense.
When you are in a physical enviroment with a single NIC, you will have to split the interface and create VLANs to separate the traffic. Alternatively, use the USB to ethernet adapter along with the RJ45.
Things are very easy and different in a virtualized environment; those two NICs will act as a vnic (virtualnic) on the VirtualBox helps us connect the pfsense WAN and the LAN interfaces virtually.
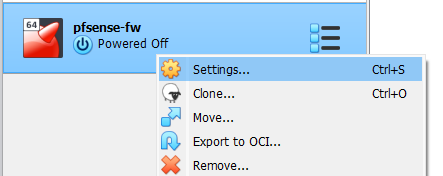
As we would require two interfaces, one for the WAN and another for the LAN. Select the pfSense VM and click on Settings.
The internet connection is through the WAN link, and you can either configure the WAN interface as NAT or a Bridged interface.
If you choose the NAT interface, then the VirtualBox NAT engine has to translate the WAN IP address to the Host machine IP, which adds more overhead on the packet.
Also, you cannot initiate traffic towards the pfsense (inbound on WAN), in case if you want to deal with port forwarding.
However, you can still work around a way to use port forwarding in virtualbox while on the NAT as well, I have covered the article here on how you can setup virtualbox port forwarding in detail here, also pfsense port forwarding, you may check them out if you are interested.
And if you choose the Bridge interface, it acts as a switch between the local network and the Virtualbox bridge interface; since your local area network router act as a DHCP server, it also provide an IP address to the pfsense WAN interface. With that IP, the pfsense can go out to the internet.
You can learn more about VirtualBox Networking here with examples. So you should be able to make the right choice based on your requirement.
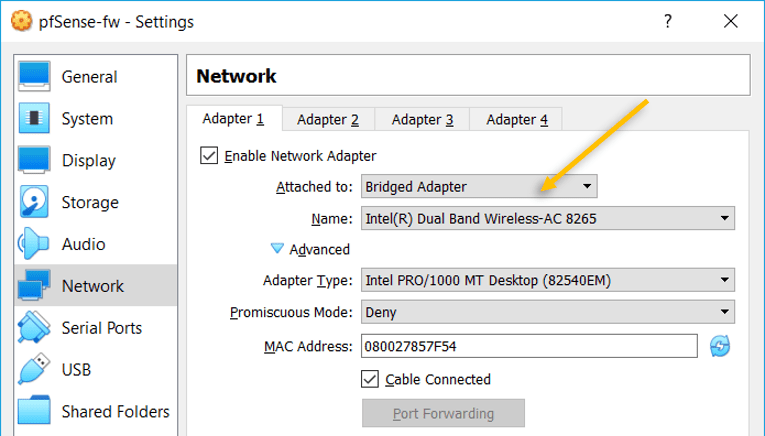
Connect the WAN interface.
In the Settings window, choose Network, in the first adapter check the box, Enable network adapter.
Attahed to: Bridge Adapter which is the WAN interface.
Note: Under name ensure you choose the right physical interface that you are using it to connect to the LAN network on the Host machine.

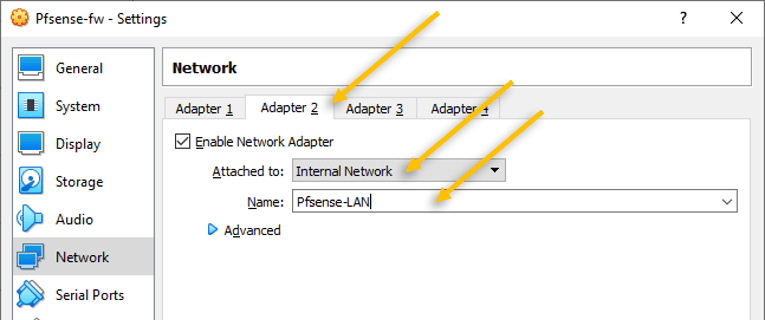
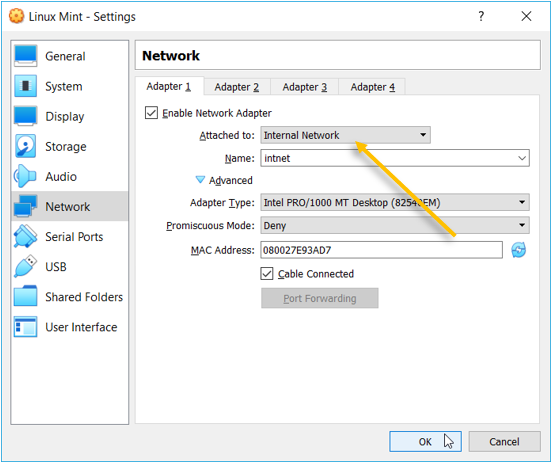
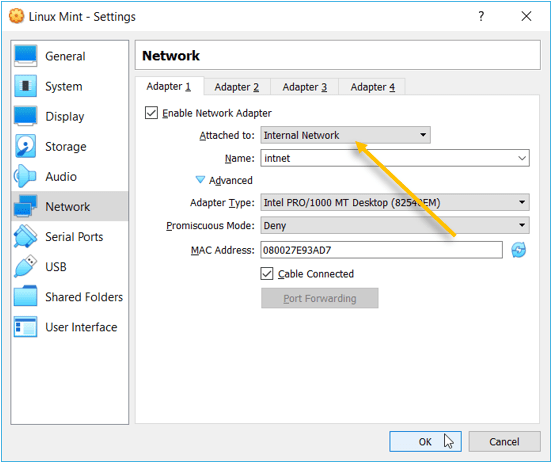
Connect the LAN interface.
Click on Adapter 2 tab.
The second adapter is VirtualBox Internal Network, which will act as a LAN adapter.
As the name suggests, the internal Network creates an internal network where only the VMs that are part of the network can talk to each other, and it isolates from the Host machine.
If those machines wanted to go out, it has to be via the pfsense.
In the name, I changed to Pfsense-LAN so it is easy to identify.
So basically, the only way the host machine or anyone on the physical local area network wanted to talk to the internal network, it has to come via the pfsense WAN interface, and it should be allowed by the pfsense.

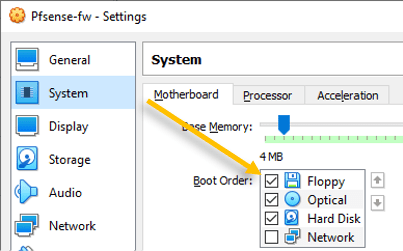
5. Change the Boot Order.
Click on System and check out the boot order.
As you can see, Floppy is the primary boot device, CD Drive is the secondary, and Virtual hard disk is tertiary.

When you boot the Pfsense VM, Virtualbox will try to boot from the Floppy disk. Since it is empty, it will then choose the CD Drive, which has Pfsense iso, it will load the pfsense installer. All good.
However, there is a problem. After the installation, it will follow the same sequence, and we would end up getting into a loop where we are going back to the pfsense installation screen again and again.
Note: You can remove the pfsense cd image right after the installation, but you might get an error message. And the step we are going to do here is the easiest.
We will make the virtual hard disk the primary boot device, CD as the secondary boot device.
That way, when the VirtualBox starts the pfsense firewall VM, it will first boot from the virtual hard disk, as is it is empty, It will then boot to the CD drive and proceed with the installation.
After the installation, the virtual hard disk becomes bootable, and being the primary device, when you reboot the pfsense, it will always load from the virtual hard disk.
Change the boot order to the following.
Unselect the Floppy, move the Hard disk as primary and Optical as secondary.
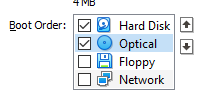

Click on OK.
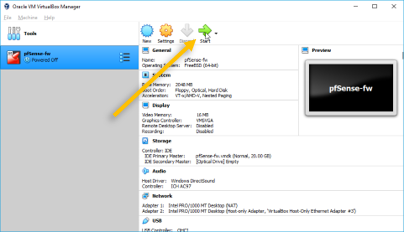
6. Start the pfSense VM instance.
Our prerequisite configuration has been completed now; let’s go ahead and start the VM by selecting the VM and clicking on Start.
Alternatively, you could double click on the firewall to boot as well.

7. Initiate the pfSense installation.
After a few seconds, you will get a pfSense installer prompt, you may click on Accept to begin the installation.


Click on install now to begin the installation.


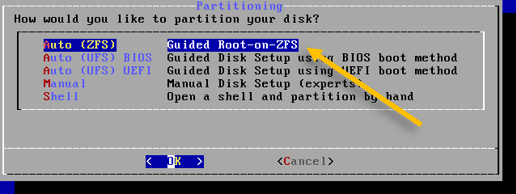
In the partitioning wizard, choose Auto (ZFS)and click on Ok.

- Hit enter on Install.
- Choose Stripe.
- Select the virtual hard disk by pressing the spacebar.

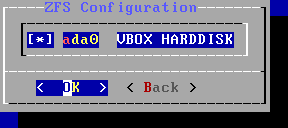
- In the ZFS configuration warning, say yes.
It basically tells you that it’s going to format the virtual hard disk.
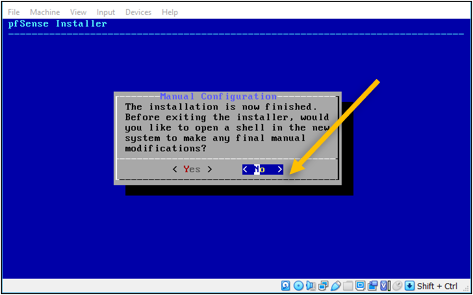
The installation will now proceed automatically and will finish in a few seconds. Once completed, it would ask you whether you want to get into the shell to make further changes or not. Click on No.

On the next screen, choose Reboot.
This will reboot the pfsense VM, and boot into the virtual hard disk where we have installed the firewall.
8. Validate the configuration.
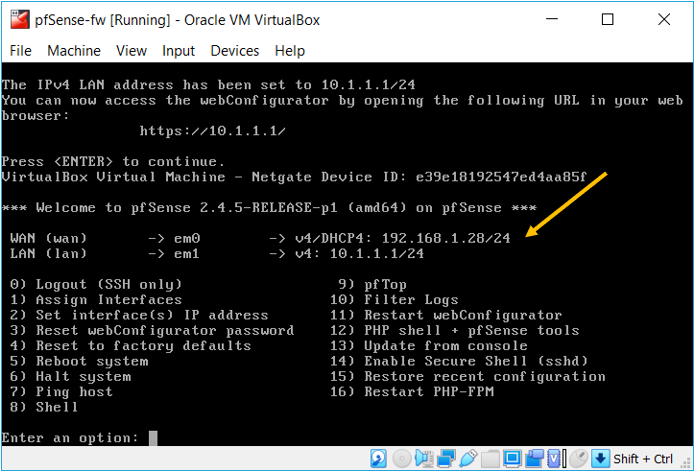
Once rebooted the pfsense firewall would get an IP address from the local internet router.
As you can see, I got the IP address 192.168.1.28 from my wifi router. But the other problem is that both the WAN side and the LAN are in the same network; we will go ahead and change that now.

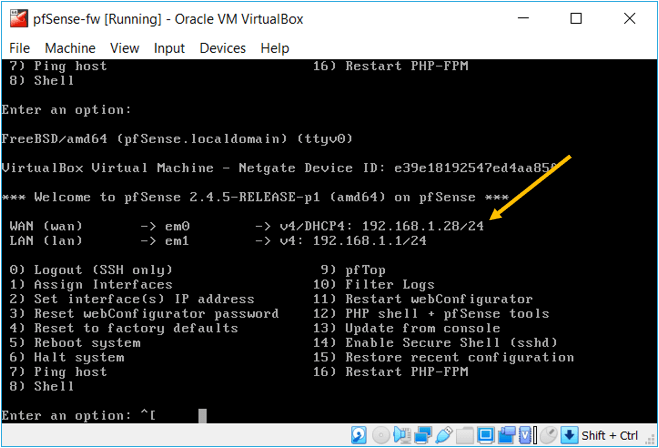
Type 2 to change the IP address of the LAN side.
After choosing 2, you will get a prompt to choose the interface for which the IP address needs to be changed. Press 2 again as the LAN side represents 2.
In the configure IPv4 address LAN interface via DHCP, choose n.
Enter the IP address, which is a default gateway for the LAN users; I choose 10.1.1.1; you may choose whatever network you want to.
Subsequently, the subnet mask and hit enter.
As we dont have gateway for LAN, you may hit enter for none.

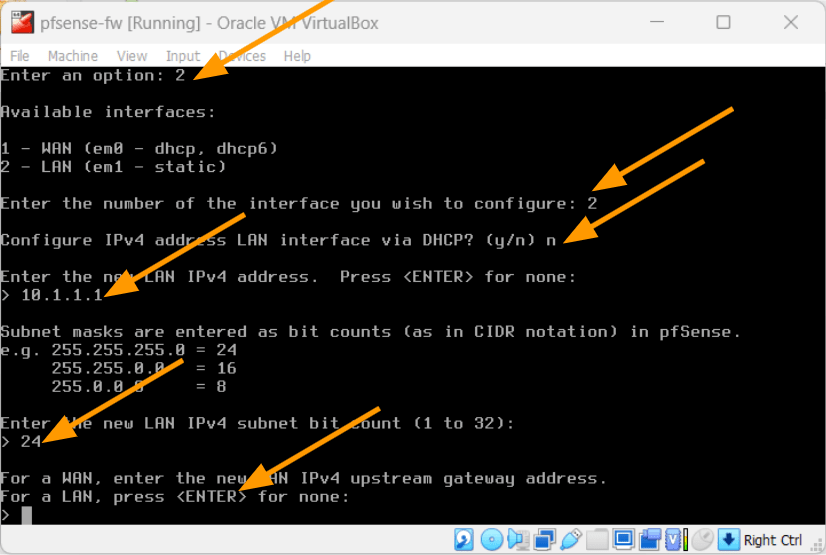
I am not configuring the ipv6 hence I hit enter for none.
We also need to configure the DHCP address for the LAN side, press ‘y’ for the prompt.
Enter the start of the DHCP address and the end of the address and hit enter.
You will also get a prompt that says, do you want to change the web gui protocol, say no to that.
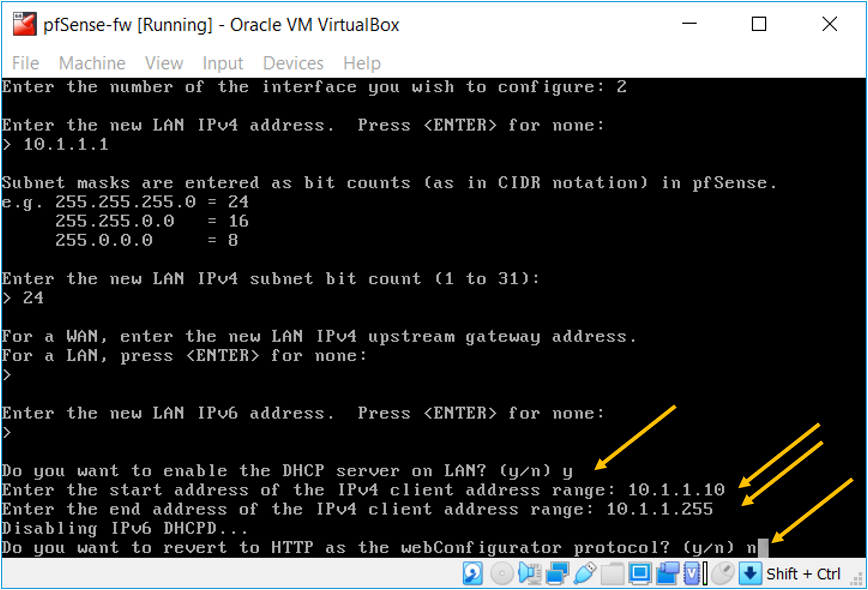
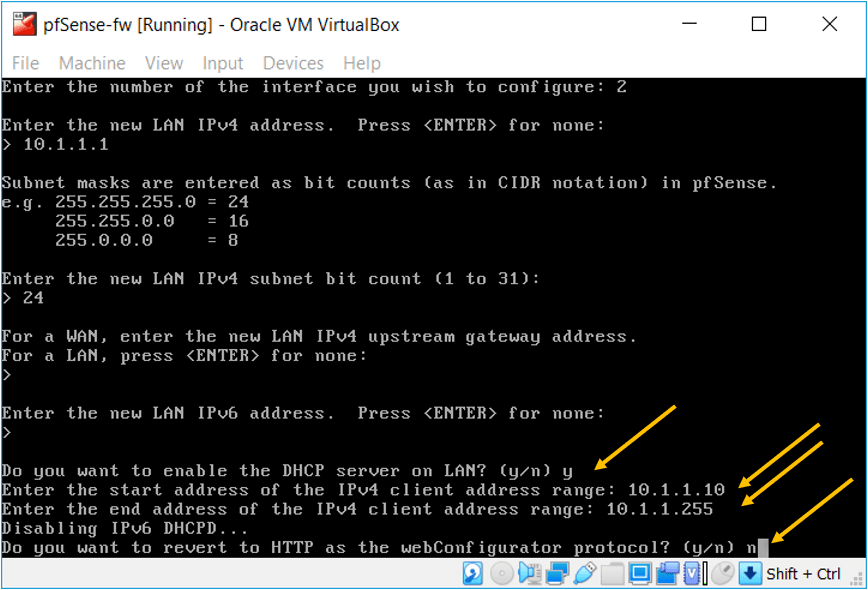
After you configured everything, you will have the WAN address from your local network, and the LAN side address specified a minute ago, which is 10.1.1.1/24.

Basically, we have configured the pfSense on the VirtualBox successfully. One advantage of pfSense is that it is very easy to configure, and you don’t need to configure any policies or Nat if you want to access the internet. The NAT and the security policy to allow traffic from LAN to WAN are already pre-configured out of the box.
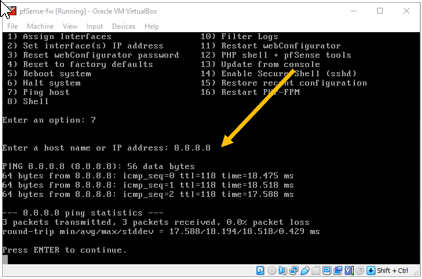
Let’s try to ping the internet IP address by pressing the 7, and as you can see, I can reach the internet IP just fine.

9. Access the pfSense web GUI in VirtualBox.
Post-installation of the PfSense for any other configurations you will have to do via the Web GUI.
So how do we access the pfSense web GUI in VirtualBox?
We have already configured the Linux Mint operating system on the VirtualBox, and I will use the same virtual machine to access the pfSense web GUI.
Connect the Linux mint to the PfSense LAN side.
Right-click on the Linux mint, and click on settings.
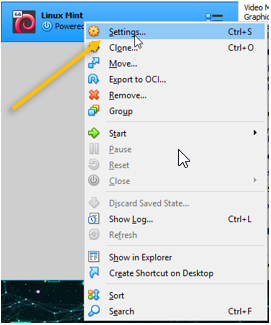

By default, the Network is configured with the NAT; you must change that to the internal network where we have connected the Pfsense LAN adapter.
This will bring both the pfsense LAN side and the VirtualBox VM on the same network.
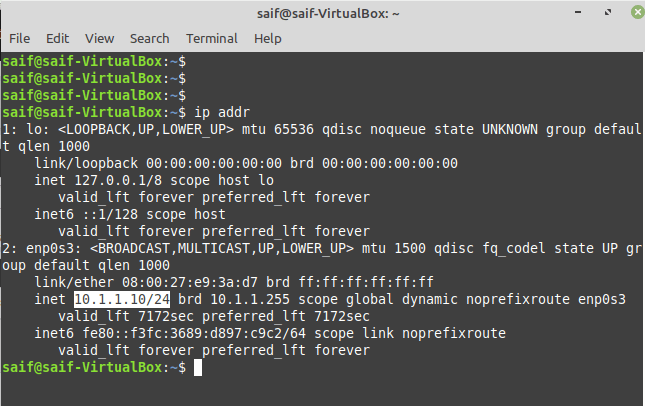
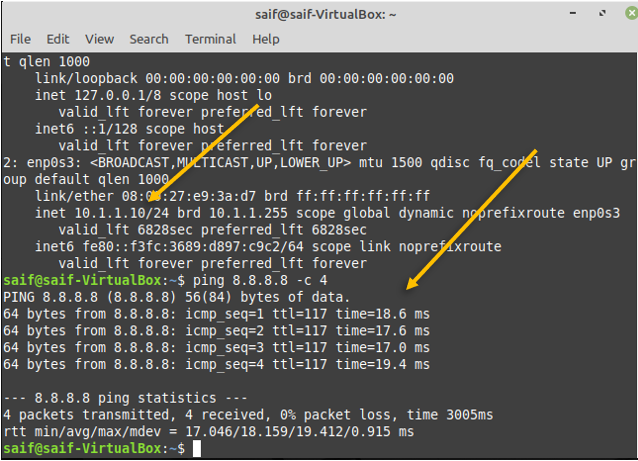
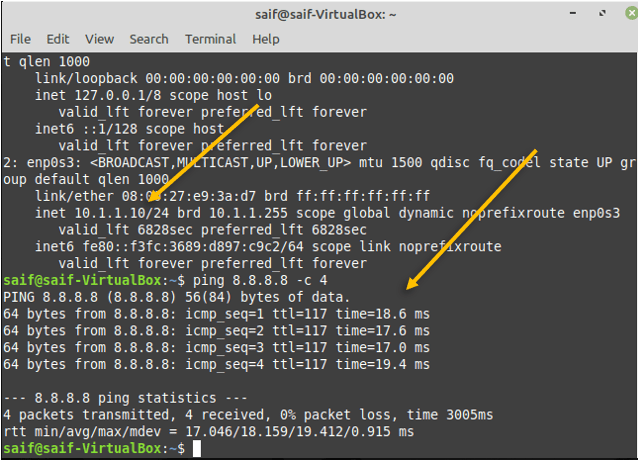
Verify the IP address.
First, you need to make sure you got the IP address from the Pfsense DHCP service.
Start the VM, open the terminal, and type ip addr to see the IP address configuration. As you can see, I got the first IP address from the range.

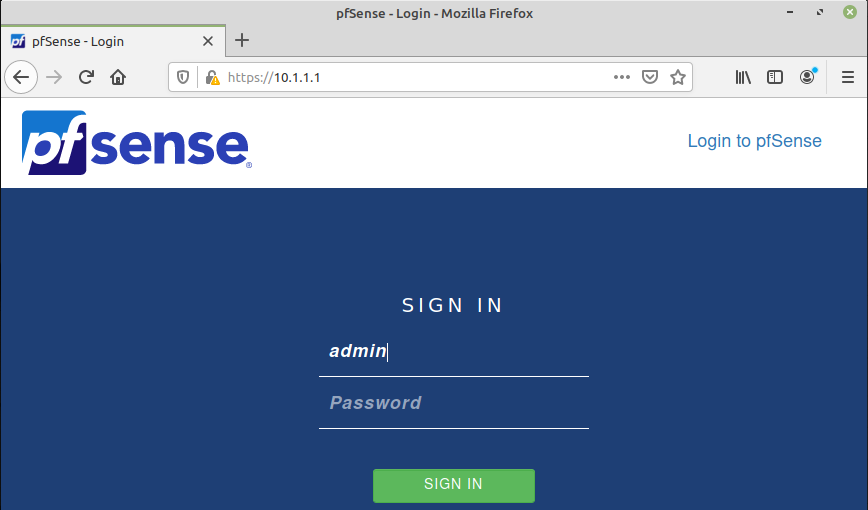
Open Firefox and access the pfSense web GUI by typing https://10.1.1.1
You may ignore the security warning and you will get the login prompt.
Enter the username as admin and password as admin and click on Sign in.

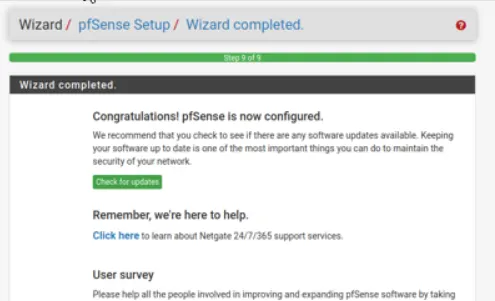
10. Finish the initial setup wizard.
The initial setup wizard page will open, and the default settings will remain as it is. Only, In step 6, to configure the admin password, you may set your own admin password.
Note: Though I left the default settings in the setup wizard, you may change it if needed.
At the end of the wizard, you will get a message that says the pfSense installed successfully.
Click on Finish on the screen.

We have now successfully installed the pfSense firewall in the VirtualBox; you can now start making configuration changes using the web GUI; let’s go ahead and do one more test to make sure everything is working fine.
11. Test the connectivity with the end-user machine.
To test the connectivity, I will use Linux mint and Ubuntu desktop as end-user hosts that I have deployed previously on the VirtualBox.
Like Linux mint, I have also changed the Ubuntu desktop network configuration to be part of the VirtualBox internal network configured on the pfSense LAN side.
- Check the IP configuration.
As you can see, I have got the first IP from the pfSense DHCP server to the Linux mint, and I can also ping the public IP address.
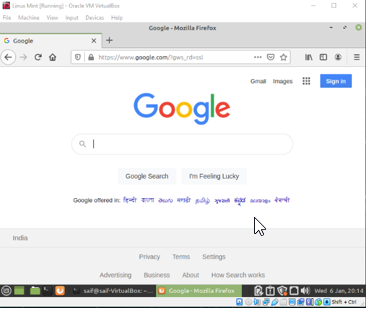
And we can also browse the internet on the Linux mint box.

Similarly, on the Ubuntu desktop, I have already got the IP address 10.1.1.11 from the pfSense DHCP server, which is the second IP from the subnet.
I can also ping the internet Public IP.
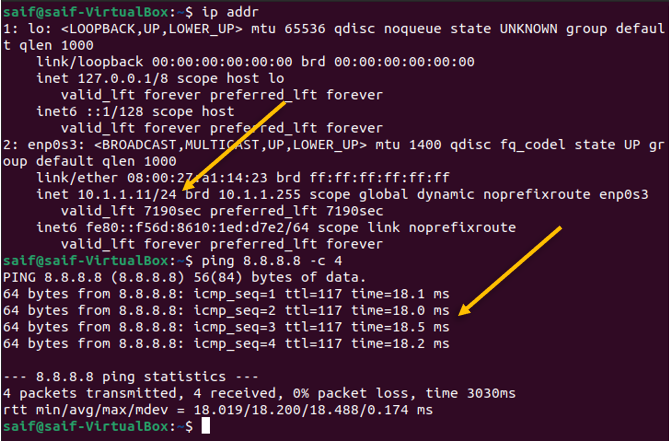
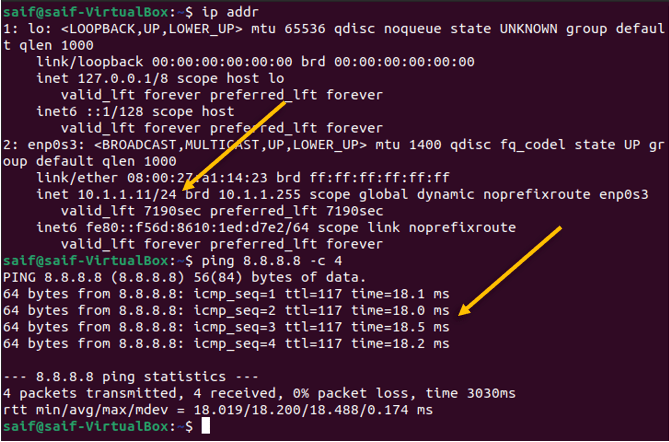
I can ping the internet IP to make sure it is taking the correct path, you can do a traceroute on the Ubuntu machine, and it will show you the path that the packet is taking.
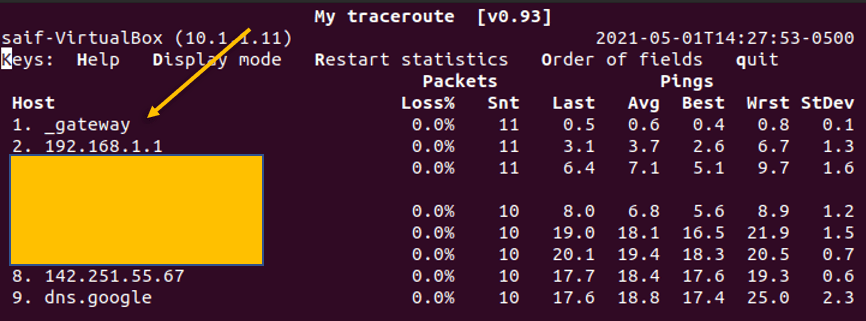
You can type the command mtr 8.8.8.8 to see the traceroute in Ubuntu.
And the traceroute shows it is going via pfSense firewall.

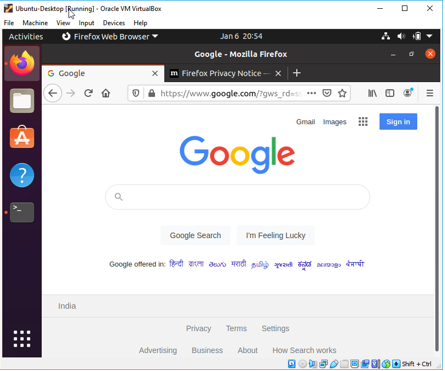
Also, I can browse the internet using the Firefox browser.

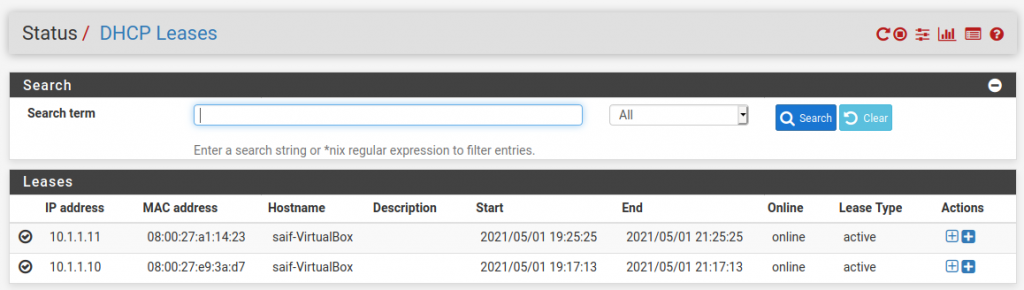
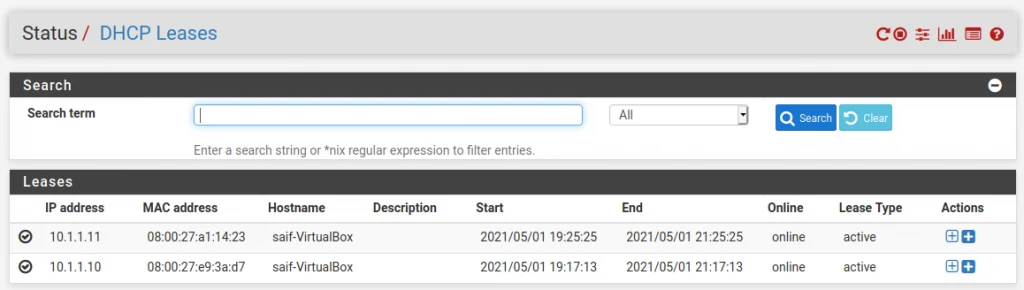
12. Verify the DHCP lease.
When we set up the VMs it automatically got the IP address right?
The pfSense assigned that on the LAN side of the firewall; The same can be verified using the DHCP lease on the PfSense firewall by clicking on the status > DHCP leases; as you can see, I have two IP’s that I received from the DHCP server.
If you want to connect more VMs to the firewall, all you got to do is deploy the VM in VirtualBox and change its the adapter to the internal network, and the host will become part of the network by getting an IP address from the pfsense firewall.
-mar
Saturday 9th of November 2024
Good day, sir I follow the steps but I can't browse the Google.com
Inas
Saturday 3rd of August 2024
Thank you very much for those instructions. I followed all the steps and everything is working fine. appreciated.