
We have looked at how you can install PFSense Firewall on an old PC in my previous blog, which works well. The only problem with that is the PC has only one single interface. So, if you have a setup where you have a PFsense firewall, and you got only one interface, but you got to take care of multiple services so how do you do that with a single interface?
Well. In PFsense, we can use something called VLAN, with which you can create multiple VLANs on a single interface and dedicate each VLAN for different services.
How does the PfSense VLAN to VLAN routing work?
There are many instances where we use VLANs on Pfsense, and we would want the VLAN to VLAN ( also known as inter-VLAN routing) routing to happen. Before we get into the VLAN configuration on pfSense, let me give a small high level on how the VLAN works in general and how we can use pfSense to allow communication to different VLANs either through, single interface or multiple interfaces.
VLAN is an industry-standard used by Layer 2 switches to separate the LAN network. By default, there will be a single broadcast domain in a switch. When a machine sends a frame to a switch on port 1, it will broadcast to all the ports on the switch. We can divide those broadcast domains into multiple ones by using VLAN, known as virtual LAN. So you could create VLAN 300 and 500 on a switch and assign the switch ports to those specific VLANs. Devices in VLAN 300, will not communicate with the devices in VLAN 500 on a Layer 2 switch. Because it’s two different broadcast domains. You could think of VLAN as logically separating a single switch into multiple ones.
What if you want to route the packet from one VLAN to another?. You could either use a router on a stick method or layer3 switches to make the communication happen.
In Pfsense, we use a similar router on a stick method to allow VLAN to VLAN communication on single or multiple interfaces.
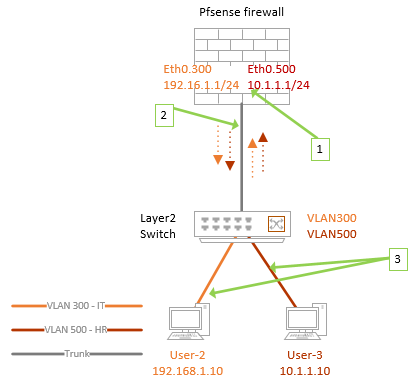
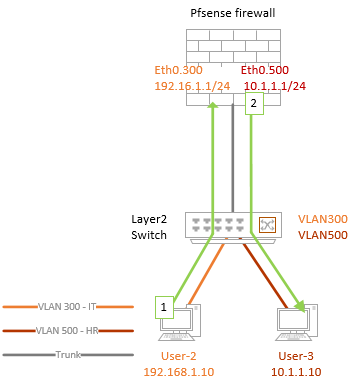
Let’s assume we have a setup where layer 2 Switch is connected to a pfSense using a single interface. So you need to allow multiple services right?
For the multiple services to talk to each other, we use multiple VLANs. Let’s look at the below example.
- Apart from creating the VLAN on the layer2 switch, we would also create a layer3 VLAN gateway on the pfSense firewall as well.
- The connection between the switch and the pfSense firewall will act as a trunk, where we tag both VLAN 300 and 500. That’s the only way you can permit multiple VLANs.
- And the devices that are connected directly to the switch are called access ports, where only a single VLAN is allowed.

You can configure switch ports as either trunk or access. The trunk interfaces are configured mostly towards another switch or a server or machine where you need to allow multiple VLANs. Similar to the one I explained above.
If the VLAN 300 host wanted to talk to the devices on VLAN 500;
- It will send the frame out to its gateway on the pfSense VLAN interface on 300 because the destination is VLAN 500, and it is on a different network altogether.
- PfSense will look into its connected interfaces and see that the VLAN 500 is configured as a subinterface, sending the packet out to the VLAN 500 through the trunk. When the switch receives the frame, it will forward to the devices on VLAN 500.

Note : The above explanation is a high level, If I have to write about VLAN, I could spend multiple blog posts for the same, so I hope it made sense to you.
So you could create up to 4094 VLANs in a switch. However, no one uses that many VLANs on a regular office network unless you are building a data center, where you won’t be thinking about a single interface on a firewall, won’t you? 😊
Configure VLANs on PfSense step by step.
You got a pfSense firewall with a single interface, and you wanted to connect your pfSense to the internet plus, you need to serve the LAN traffic and the DMZ traffic. When you use a single interface with VLAN configuration on Pfsense, don’t use a 100Mbps NIC, you need to make sure at least you have a 1Gig interface to manage all the VLAN traffic; if you have 10Gig, perfect!
We need to configure WAN and LAN and DMZ Network, so to separate each of these networks, you could use VLAN 100 for WAN, 300 for LAN, and 500 for DMZ.
And for the switching, I am using a cisco layer 2 switch.
Below is the topology that we are going to use.
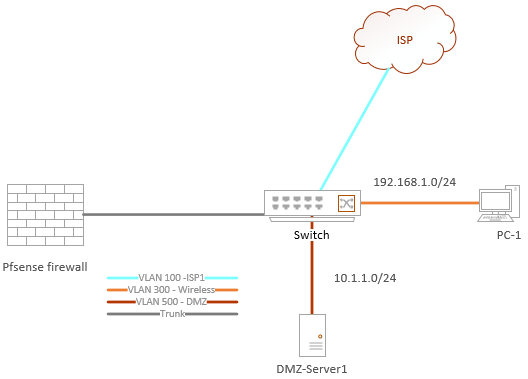

We will configure the LAN and WAN first using the CLI, and after everything is confirmed working, we will configure the DMZ side.
Let’s get into the configuration in detail.
Before you proceed there are some pre-requisites.
- Pfsense firewall with a single interface.
- A switch – We are using a cisco switch.
- 3/4- Ethernet cable to connect the device together.
- A PC to test the network.
1. Configure the VLAN interface 100 and 300 in pfSense.
Power on the pfSense firewall, if it already has the previous configurations, you may reset to default by pressing 4. THIS WILL WIPE OUT ALL THE CONFIGURATION ON THE PFSENSE.
When the pfsense power up for the first time with a single interface and if it doesn’t have any configuration present, it will ask you Should the VLAN be set up Now? Say Y to that.
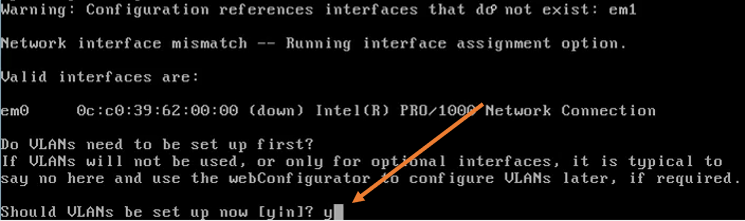
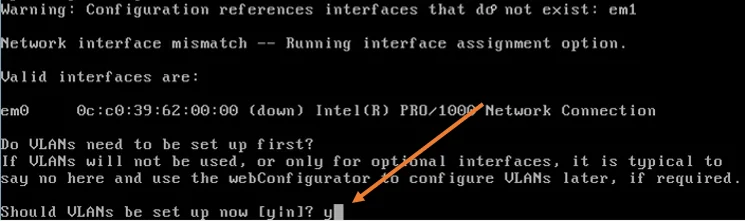
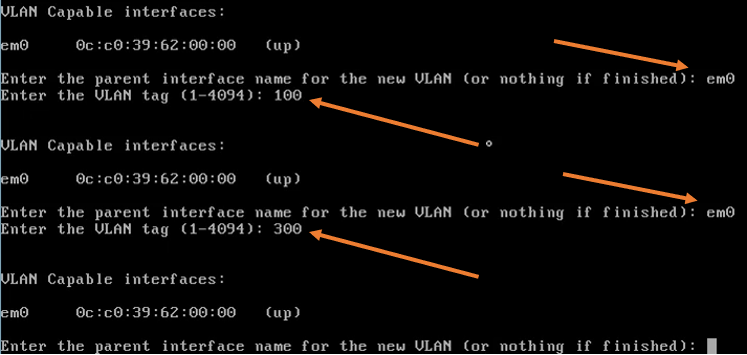
- Enter the parent interface name of the new VLAN, type the name under VLAN capable interfaces. In my case it is em0.
- Type that and hit enter.
- Type the VLAN number 100 and hit enter.
Do the same thing for the second VLAN.
- Type the parent interface name and hit enter.
- Type the VLAN number as 300 and hit enter.
We will configure the DMZ interface later using GUI. Hence it enter.

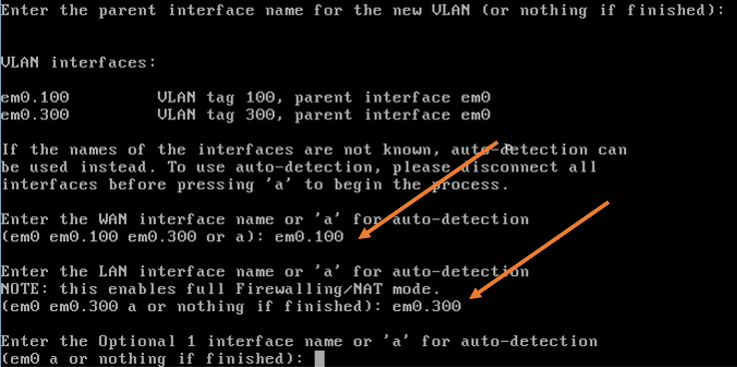
Configure the VLAN 100 as WAN and the LAN interface.
First, we need to configure the WAN side.
- Enter the WAN interface name…, type the VLAN 100 interface that we created, In this case it is em0.100, and hit enter.
- Enter the LAN interface name.., type vlan 300 interface and hit enter, which is em0.300.
- We will not create any optional interface now, so you may hit enter again.

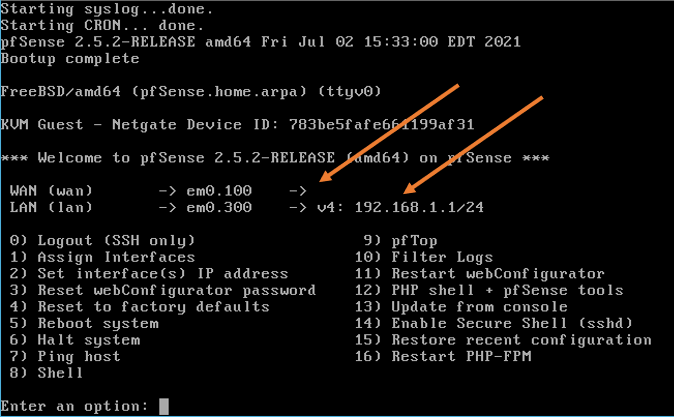
You will get confirmation on the VLAN interfaces that we configured. The pfsense VLAN interface creation will now happen. Wait for a few seconds for everything to complete.
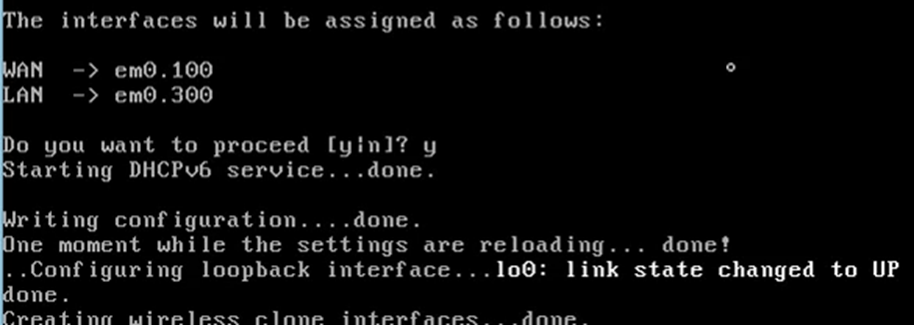

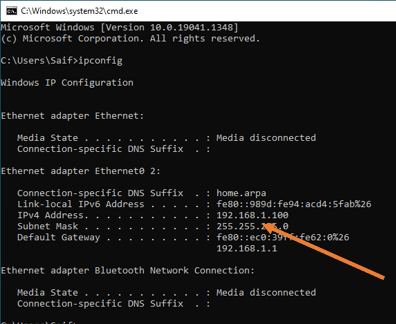
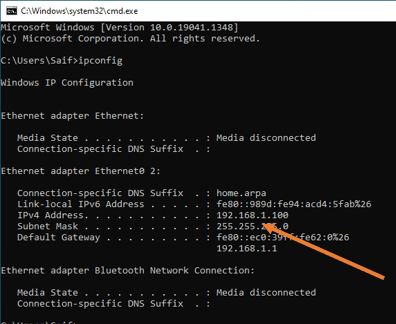
After the configuration, you will get a screen with a WAN interface with no IP address and the LAN interface with 192.168.1.1/24, which is expected.

2. Configure VLAN 100 and 300 on the switch.
We will now configure VLAN 100 and 300 on the switch and assign the VLAN to the ports as below. As I said earlier, I will use the Cisco switch in this tutorial.
| VLAN | Access port | Trunk |
| VLAN 100 | G1/1 – Port connected to the ISP | G1/2 – Connection to pfSense VLAN 100 and 300 should be tagged |
| VLAN 300 | G1/3 – Port connected to the Wifi Access point | G1/2 – Connection to pfSense |
Configure the VLAN.
configure terminal
 VLAN 100
 VLAN 300
 exit
Configuring the access port.
interface gigabitEthernet 1/1
 switchport mode access
 switchport access vlan 100
 exit
interface gigabitEthernet 1/3
 switchport mode access
 switchport access vlan 300
exit
Configure the Trunk port.
By default, when you configure a trunk interface on the cisco switch, it will allow all the ports. Hence you don’t have to permit each VLAN’s specifically. If you want to secure the environment, it is recommended to allow only the required VLAN.
interface gigabitEthernet 1/2
 switchport mode trunk
exit
Save the configuration.
write memory
3. Connect the pfSense port to the switch.
We need to connect the pfsense port to the switch on gig1/2, configured as trunk.
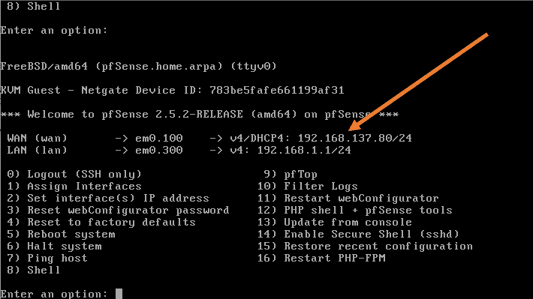
My WAN link is configured with a DHCP server, and it is behind a NAT, and as soon as the port plugged in, I got an IP address from the DHCP server.
This means the connectivity to the WAN is successful.

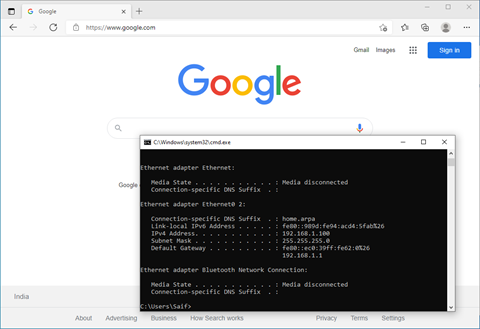
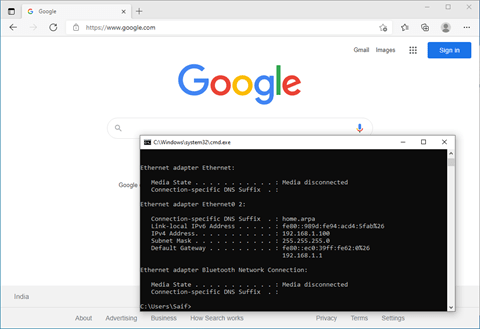
Try to ping the internet and see if you can get to the internet.

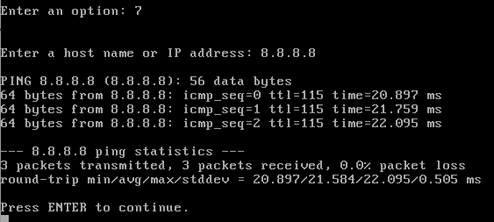
I can ping the internet just fine.
How can I ping the internet when I have not configured the default route?
Whenever you configure the IP address as DHCP, the interface would also get a default gateway, and the default route would work the same way as the default route in the end.
You could go to the shell by pressing 8, and on the shell, type the command netstate -rn
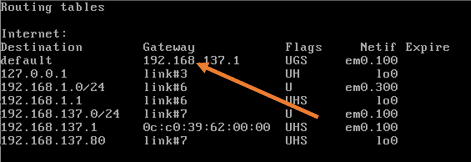

As you can see, there is a default route pointed to my gateway to the VLAN interface.
4. Connect the end-user machine.
We have configured the port gig1/3 for the end-user port on VLAN 300 as an access port.
As soon as the device connected to the LAN, it got an IP address from the pfsense DHCP service.
Test the internet access.
As you can see, the internet access also worked fine.
5. Finish the pfsense initial setup wizard.
As you have installed the brand new pfsense firewall, you will have to finish the initial setup wizard. So go to https://192.168.1.1
Ignore the security warning and complete the setup wizard.
6. Configure the pfsense VLAN using GUI.
The network is up and running, and your LAN users are able to access the interface.
Next, wou want to create a DMZ network and add a server in the DMZ.
We would need to add another VLAN that represents the DMZ.
As per the diagram, it is VLAN 500.
If you had to add another VLAN subinterface on the pfsense using CLI, you could go back to the CLI and type 1 (assign interfaces ). You will get a prompt similar to the previous asking should VLANs be set up now? Say y to that. However, we will not use CLI this time. Instead, use the GUI.
Let’s go ahead and configure the VLAN for the DMZ.
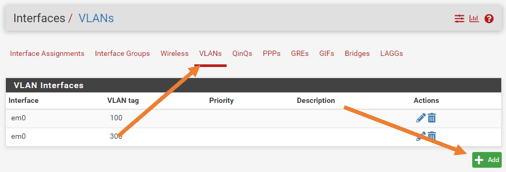
In the GUI goto Interfaces-> Assignments
On the interface Assignment screen, click on VLANs tab, you can see existing VLANs there.
Click on Add to add a new VLAN.

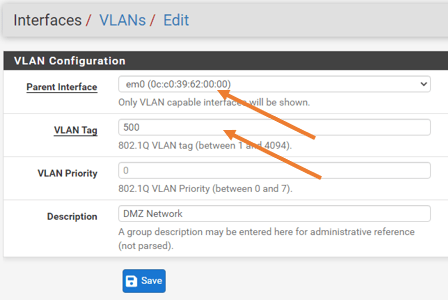
Under VLAN configuration.
Parent interface: Choose the same interface, cos we don’t have any other interface to choose from.
VLAN Tag: 500.
Description: DMZ network.
Click on Save.

Note: In some scenarios, you might have two interfaces, and you want to take care of the WAN and the LAN network using the first interface with VLANs like we did before and the second interface for the DMZ. In that case, you can choose a secondary interface during the VLAN creation.
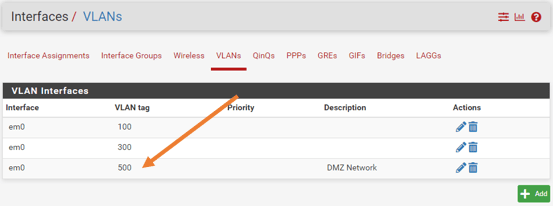
You will see the DMZ VLAN is now created.

Click on the Interface Assignments tab.
Under Available network ports, choose the new VLAN interface that we added from the drop-down, and click on Add.

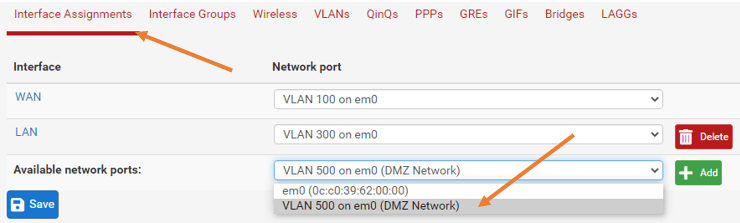
A new OPT1 interface will be created, click on that.
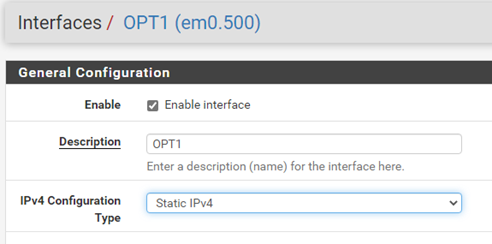
7. Configure the OPT1 interface.
By default, the any newly created interface on pfsense will be disabled. Check the box to enable the interface.
IPv4 configuration type as Static IPv4.

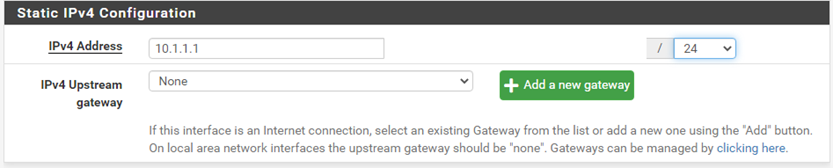
Under static IPv4 configuration, configure the static IP address that you reserved.
In my case, it is 10.1.1.1/24
Click on Save and Apply Changes.

8. Configure the port Gig1/4 as access port on VLAN 500.
configure terminal
 VLAN 100
 interface gigabitEthernet 1/4
 switchport mode access
 switchport access vlan 500
 exit
write memory
9. Allow Firewall rules for the DMZ traffic.
By default, all the network traffic will be blocked on the interface OPT1 that represents the DMZ network. We are going to allow all traffic sourcing from the DMZ to outside.
Goto->Firewall->Rules->OPT1.
You will see the rules are blank now.
Click on Add.
Action : Pass.
Interface : OPT1
Address Family :IPv4
Protocol : Any.
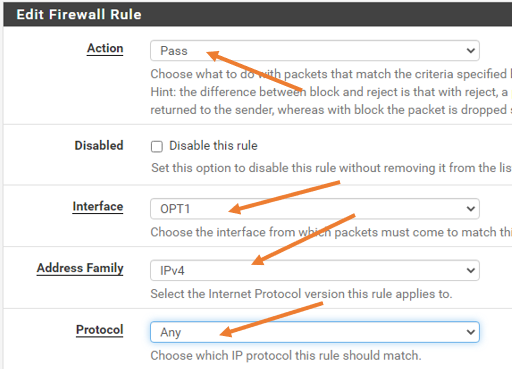

You can leave the source and destination as ANY, and save the configuration.
Click on Save->Apply configuration.
10. Enable the DHCP service for the new interface.
Click on Services->DHCP Server
Click on OPT1.
Check the box that says Enable DHCP server on OPT1 interface.
I am going to allocate about 40 addresses from 10.1.1.0/24 that is, 10.1.1.10-10.1.1.50
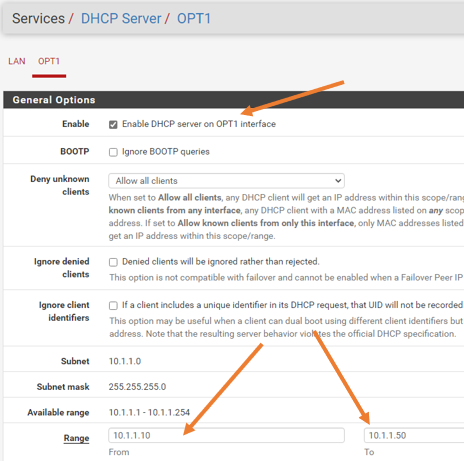
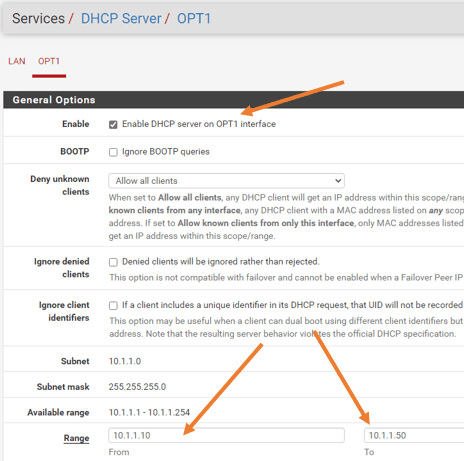
Leave everything else to default and click on Save.
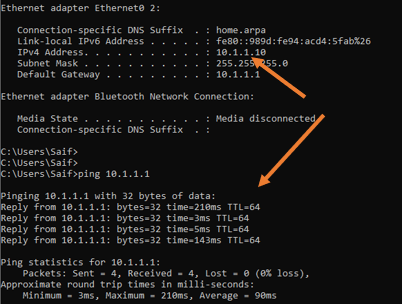
11. Test the connectivity on the new VLAN interface.
Connect a host on the interface 1/4 , if you have done everything correctly, you should get the IP address from the DHCP service, and the host will be able to ping its gateway.
Though we configured the host to go out of the local network, you cannot still access the internet because we have not configured the NAT for it, which will discuss further for another blog article dedicated to the DMZ network.

Conclusion.
For a home office and even a small office, you should be able to use the pfsense with a single interface for multiple services. When new services are added, You have to keep adding the VLANs on the pfsense and take care of its rules and IP address assignments, add the newly added VLAN to the switch. After that you should be good to go. However, there are some caveats you need to keep in mind. When we use a single interface for everything, you add a single point of failure, meaning everything will go down when the interface goes down.