

Port forwarding is one of the features that is useful if you wanted to allow the external users to specific ports on the LAN side or inside the network. And many people get confused when it comes to the port forwarding configuration on the pfSense firewall.
As you know the pfSense firewall is an open-source firewall that you can spin up in an organization with a tighter budget. I have covered some blogs related to pfSense previously, and you may check them out if you are not familiar with the pfSense firewall and how to get started.
In this blog, we are going to configure the web port forwarding using the pfSense firewall step by step.
We will test the pfSense port forwarding with HTTP, and HTTPS WEB traffic and see how each protocol behaves. And the same steps performed here are exactly identical to other protocols such as FTP, SFTP, and so on.
Related articles,
How To Configure IPsec VPN Between pfSense And Cisco Router?
How To Configure OpenVPN On PfSense?
How To Fix USB Ethernet Not Recognized By pfSense?
How To Install Pfsense On KVM?
How To Configure IPsec Site To Site Tunnel In PfSense?
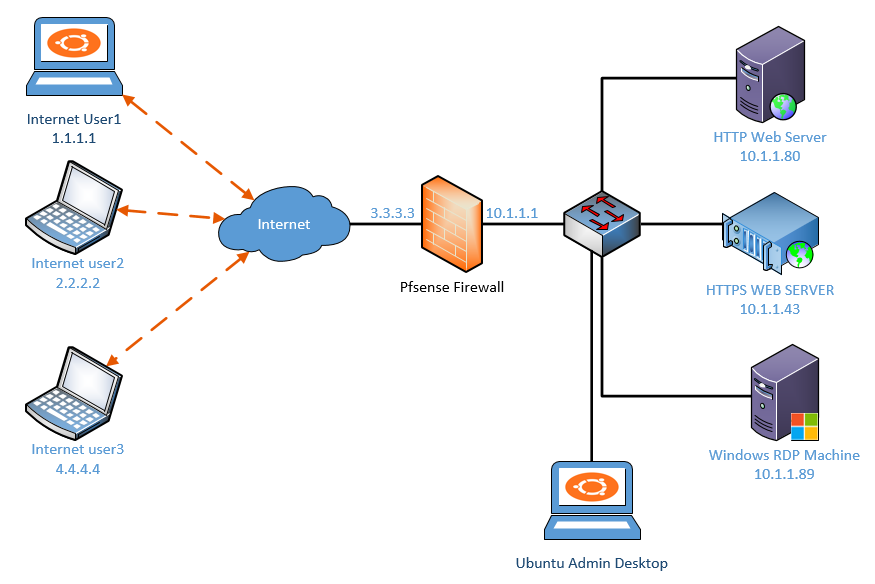
Below is the topology that we are going to use.
We have a pfSense firewall configured and on the LAN side (10.1.1.0/24) network, of the firewall we have two web servers one with HTTP ( 10.1.1.80) and another with HTTPS (10.1.1.43).

The Pfsense firewall is also configured and connected on the WAN side with the internet.
And three external users who are on the internet, we need to allow access to the services. We can configure the Pfsense port forwarding to accomplish this.
Steps to configure Pfsense http and https port forwarding.
Test the web service locally.
As I mentioned, we have two web servers, when you configure port forwarding for web service it is important that you first verify the services locally before you proceed witht the pfsense firewall configuraiton.
If you dont do that, you will end up with a situation where port forwarding is not working and you stuck at troubleshooting.
Let’s check the connectivity to the webservers from one of the LAN hosts (10.1.1.11)
As you can see I can access the http server 10.1.1.80, let also check the https access.
Even the https server 10.1.1.43 also working fine.


You can also test the port connectivity using the telnet command as well.
You can type the command telnet <IP address> <port number> to see whether a specific port is open or not.
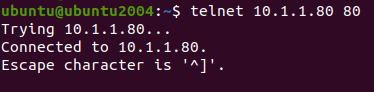

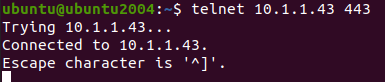
As you can see from above, I can connect both the HTTP and HTTPS server on the LAN side just fine,
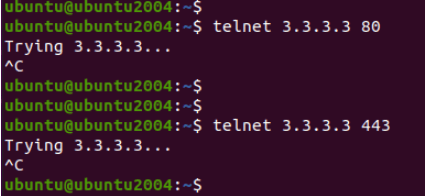
Test the http/https connectivity from the external side.
Let’s do the same test from the external users, by default it will not work as the pfSense will block any traffic that is initiated from the outside.
Moreover, you need to remember that from the internet you will not be able to access the private IP address on the pfSense LAN side.
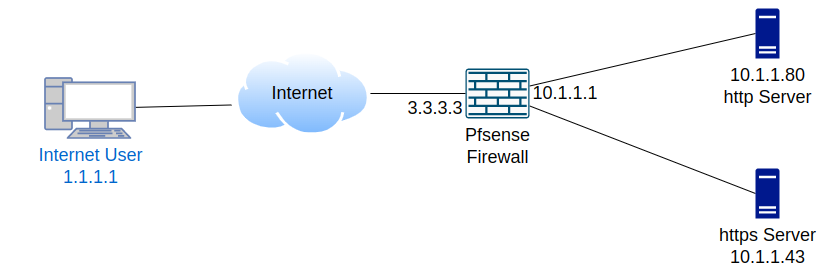
So instead of testing with the private IP address on the remote internet user, we are going to test using the wan side IP of the pfSense which is 3.3.3.3.
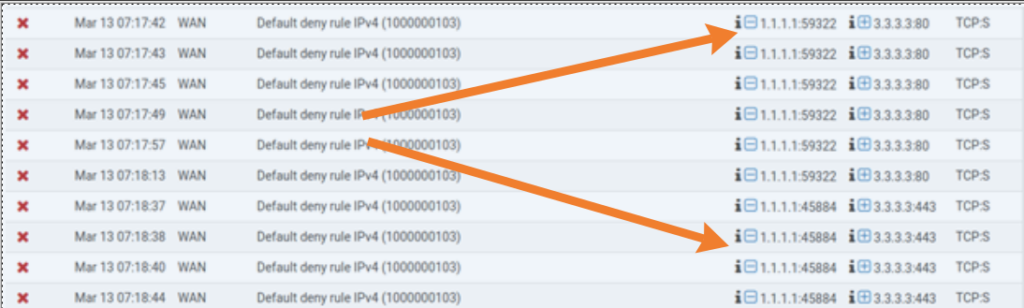
As you can see, none of the ports are open on the firewall WAN side, and keeps trying until I stopped the session manually.

Check the http/https logs in pfsense.
Let’s see the logs (status>system logs>firewall ) on the firewall, and see if we are getting any logs for the same.
As you can see below, there are multiple attempts from the outside user however it was blocked by the firewall.
Using pfSense port forwarding we are going to allow external users who are on the internet to be able to access there internal network services.
In this lab, we are going to perform the following,
- First, we will allow HTTP traffic from the remote to our internal network.
- Second, we will enable HTTPS traffic.
We are going to configure a single remote user to be able to access the network.
Setup HTTP Port Forwarding in pfSense.
To configure the port forwarding goto firewall>NAT>Port forwarding.
Since this is a lab environment, It is now showing empty, If you have configured port forwarding before, it will show up here.
Click on the Up arrow with add to add a rule to the top of the list.


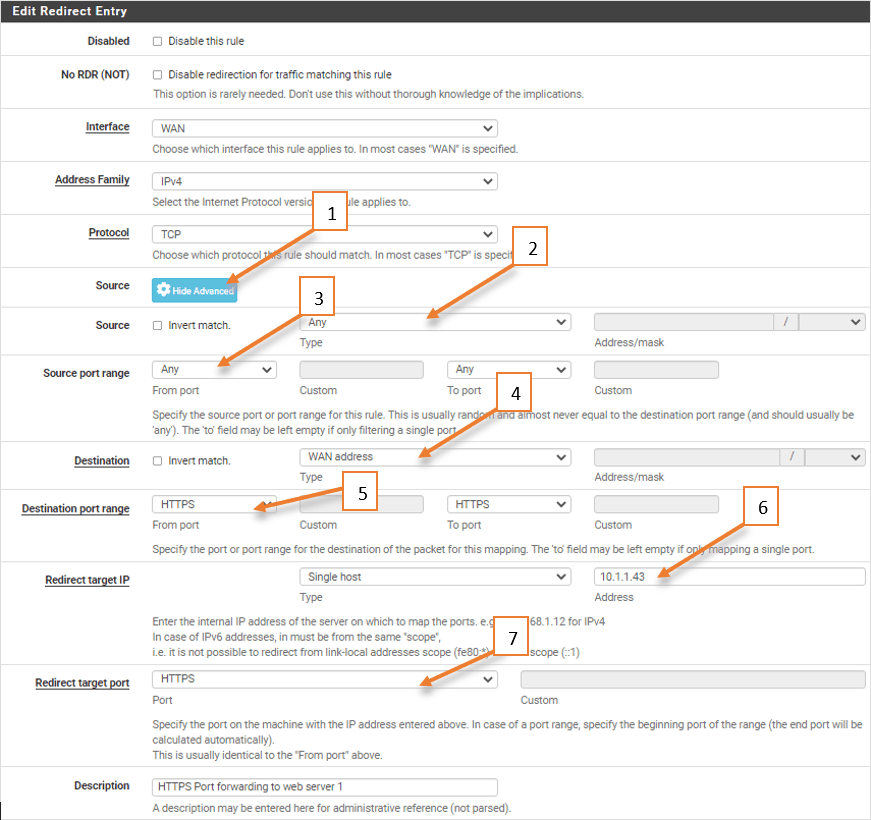
Leave Interface, Protocol to the TCP, as the HTTP and HTTPS are TCP traffic.
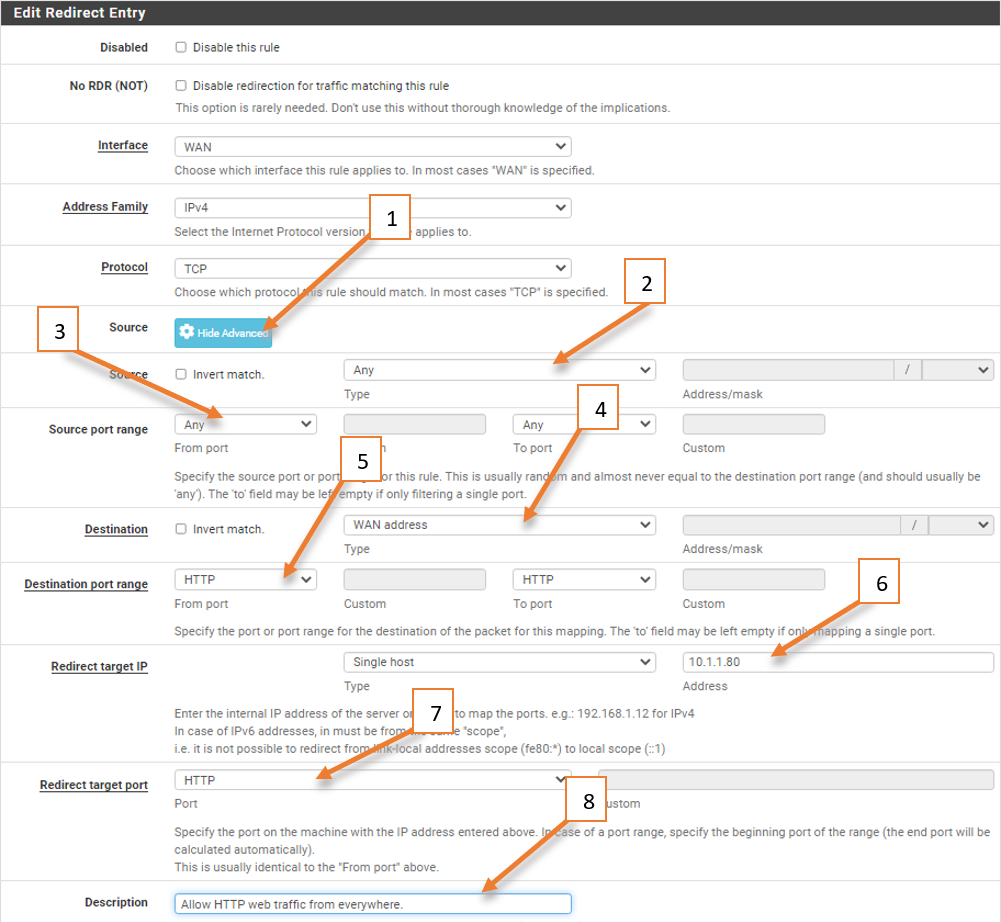
- And Click on Display Advanced.
- On the source, the interface selects any from the drop-down – since it is a web traffic I want to allow from everywhere on the internet.
- Source port is always random hence leave the default any.
- The destination should be the WAN address.
- Destination port range chooses HTTP.
- Redirect target IP – 10.1.1.80 (This is our internal HTTP webserver)
- Redirect target port – HTTP.
In case if your web server is listening on a different port number, you may choose other and define the port number that your server is listening. - You can also describe the rule and save it.

You may now click on Apply changes.
Verify the HTTP access after port-forwarding.
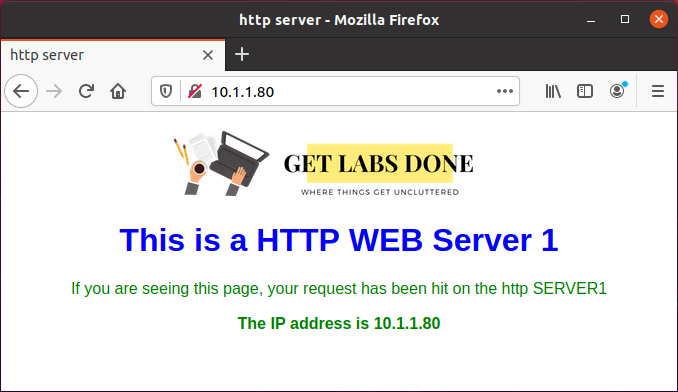
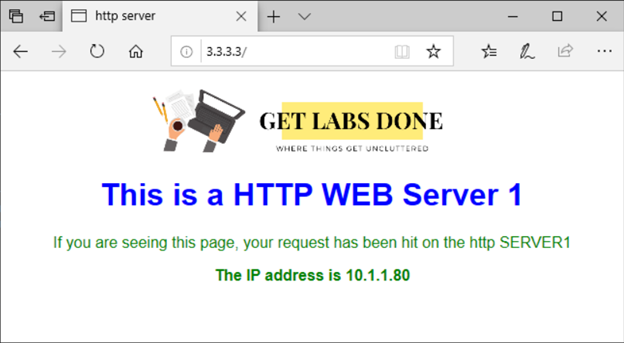
From the internet host which is a Windows machine, let’s go ahead and test the HTTP access. As you can see we are able to access the HTTP server just fine with the pfSense public IP.
And if you look into the IP address on the body of the site you know that it is our private IP address that we have assigned for the HTTP web server.

Enable and check portforwarding logs with pfsense.
To validate whether traffic is allowed or not using port-forwarding let’s check the logs on the firewall. However, logs are not enabled by default.
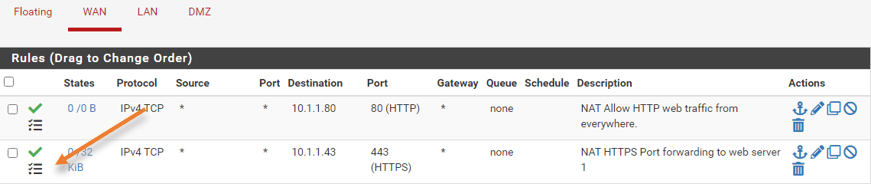
When you added this port forward rule, there was another rule that was automatically added by the pfSense firewall on the WAN side. which basically permits the traffic from the internet to a specific port (80) on the WAN side.
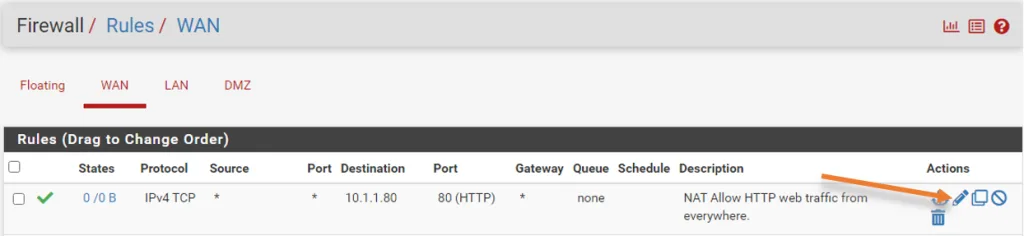
By default, this rule doesn’t log the session, so you can click on edit on this rule by clicking on the pencil icon.
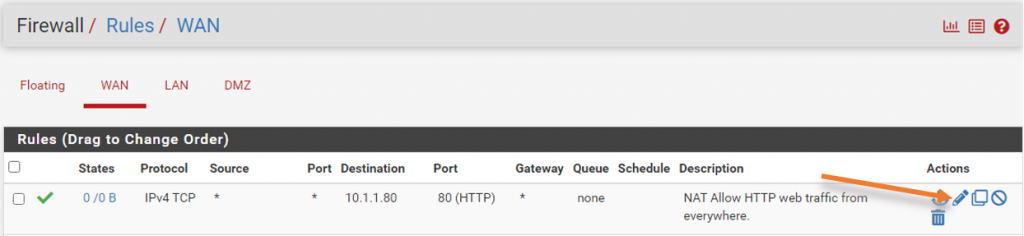
Under the extra option check the box that says log the packet that are handled by this rule.


Click on save and apply the configuration.
You can perform the test again from the external remote machine 1. After you are able to access the HTTP web page, you can then go to status>system logs> Firewall.
You should be able to see the log that says, traffic from 1.1.1.1 to 10.1.1.80 on port 80 is permitted.


Though from the remote side we are communicating with the WAN address, As a result of port forwarding the firewall is doing the NAT towards the private IP address as we configured.
Port forwarding traffic on the LAN side using packet capture.
Let’s go ahead and do a packet capture on the webserver interface using Wireshark.
As you can see on the packet capture below the source IP remains the same as 1.1.1.1 and talking to the webserver 10.1.1.80 on port 80.


We successfully configured the port forwarding on pfSense for the HTTP traffic that was initiated from the WAN side to the LAN and it is working as expected.
Enable Pfsense port forwarding for HTTPS traffic.
Let’s go ahead and configure the HTTPS traffic using the same method.
Goto Firewall>NAT>Portforward.
Click on the down arrow with Add to add the rule below the previous rule.
Leaving the Protocol as TCP, like before.
- Click Display advanced on the source.
- As it is web traffic, we wanted to allow any.
- Leave the source port as default to any. Because source port is always random.
- The destination port ranges to HTTPS.
- Redirect target IP to web server IP which is 10.1.1.43
- Redirect target port to HTTPS. In case your web server is listening on another port, you may choose ‘Other’ and the port number.
- Give the description and save the NAT rule.

Access the HTTPS web server from remote.
Test the connection now to the IP address 3.3.3.3 on port 443, for that simply access the webpage with HTTPS.
If you don’t have proper certificate, you will get a security warning, click on yes to continue.

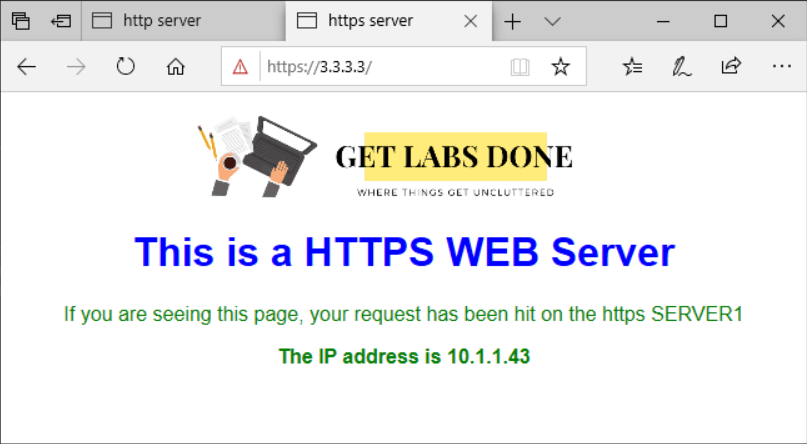
As you can see I am also able to access, the secure HTTPS web server as well, and you can see the private IP address of the web server which is 10.1.1.143 that we have configured earlier.
Validate the HTTPS traffic on the firewall.
To see the logs, you can click on firewall>rules, just like before you should be able to see a new rule that is added automatically on the WAN side rules as well.
I have edited the rule to log the traffic.

Initiate the traffic again and head over to the status>system logs>firewall.
You should be able to see the logs that indicate the traffic from the internet user1 (1.1.1.1) trying to access 10.1.1.43 on port 443 which is allowed.


Conclusion.
Port forwarding can be a helpful tool for allowing external users to access specific internal resources or services. However, it’s important to remember to remove the configuration once it’s no longer needed.
From WAN to LAN port forwarding, it’s recommended to first check if an IPsec tunnel can be built from the remote network to the Pfsense firewall as an alternate solution.
If port forwarding is the only option, ask the customer how long they require access and set a reminder to remove the external IP addresses once the access is no longer needed.
If you followed this guide, and still port forwarding didnt work, you may check out this article to fix the issue.