
In our last blog, we took a look at how you can set up a pfSense firewall on an old computer. The problem with that setup is, it had only a single 100Mb NIC which means I had to split the interface into the VLANs. So I can have the WAN and LAN separately. It should work great if you have a 1Gig NIC but having 100Mbps internet on 100Mbps NIC. I won’t recommend that setup, as I couldn’t take full advantage of my ISP bandwidth. Unless your internet bandwidth is less than 100Mbps.
Hence, I decided to use USB ethernet for that purpose.
The USB 3.0 ethernet adapter I was planning to use was detected but not available in the pfSense interface list. Let’s find out how I was able to fix the issue in this blog.
Does pfsense support USB NIC?
If you are looking for support with respect to USB ethernet in the PfSense communities, you would know that USB ethernet is not a recommended option by many, but for those who got only one port which has only 100Mbps, and wanted to run something in their home without spending much, I would say USB 3.0 Ethernet is the place to start.
However, Do I recommend this to the enterprise network? The answer is NO!!
For an enterprise users it is recommended to use real pfSense hardware by netgate.
If you have a 1Gig port on your old laptop (which is common now), then you should try splitting them using VLAN’s, which I covered here.
So, keeping above in mind let’s get started.
My initial plan was to order a USB3 one gig adapter, that way I can split them as VLAN’s and use one VLAN for the WAN and another for the LAN. So, I ordered blue rigger adapter.
The blue rigger adapter was fine, I plugged in the USB and the PfSense detected automatically without me doing any other configuration. But the adapter gets heated up quickly but still, I wanted to continue, and I decided to stick with it.
The problem started when I try to create the VLAN interface, though it picked up as a USB ethernet adapter, it was not detected as a VLAN capable interface. After doing some research, I realized that these USB adapters don’t support VLAN tagging. hence, I planned to buy another one just because of the heating as well as the VLAN issue, this time I decided to use a TPlink USB ethernet adapter.
I went through some of the amazon reviews and found that it does support VLAN tagging as well, which I later found out it doesn’t. anyways I ordered from Amazon.

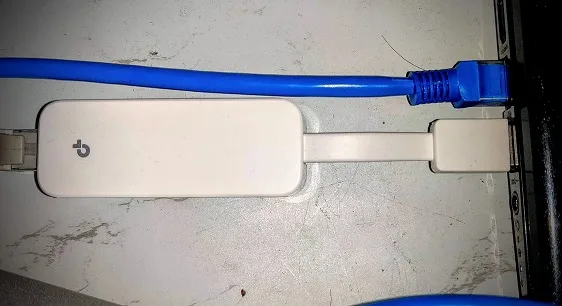
The package has arrived, and when I plugged the TPlink U300 USB to ethernet adapter into the system, it was detecting and showing the below message.


The message indicates that the adapter was detected by the pfSense. However, when I try to assign and interface, I could only see my single Realtec NIC and I could not find the USB ethernet adapter in the list.
Aha!… I was little disappointed. Because, I had the working adapter which I have returned and now I am stuck with the one that doesn’t even get picked up as USB ethernet by the pfSense.
But I wasn’t ready to give up, and finally I was able to get the TPLlink U300 adapter working with pfSense, so if you are stuck with the TPlink adapter, or any other USB to ethernet adapter and don’t know how to get it working with PfSense, follow the steps below.
Then another question you might have is, does the TPlink adapter support VLAN’s, it also doesn’t support VLAN’s.
Update: On Jan 18/2021
What USB Ethernet support VLAN?
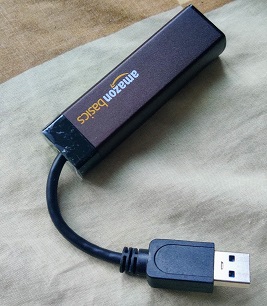
The other big question that comes to everyone’s mind is that what USB ethernet support VLAN creation. After trying multiple USB to ethernet adapter, I was finally able to get the USB ethernet adapter that supports VLANs on Pfsense. It is an amazon basics USB to ethernet adapter.

How’s the performance with this adapter?
I plugged this port into a USB3 port, and it detected automatically without me doing much of the work. That was good.
I was able to split them with two different VLANs, one for WAN and another for LAN. And Yes, I was able to get this USB in the list for VLAN capable interface apart from inbuilt NIC in Pfsense.
However, I was not getting good throughput with it. So the performance was not so good. Maybe, I have an internet bandwidth of 100Mbps, so I was hoping to get the same bandwidth but I didn’t get the full throughput, I was getting about 70Mbps :(.
After a few days, I removed the VLAN and used the WAN connection to the built-in NIC and LAN to USB to ethernet, that was giving a decent performance.
So if you have Less than 100Mbps bandwidth for your internet, you may check out this adapter for pfSense.
It can get the work done by splitting the VLAN’s in pfSense.
Another problem with this setup I noticed that, sometimes, when the modem goes down due to power, and when it comes back up, I had to restart the machine to get the USB adapter to work.
Now, lets go ahead and fix the TPlink usb ethernet not recognized.
How to fix pfSense USB ethernet not recognized?
- Plug in the USB adapter.
- Get the list of USB drives.
- Attach the USB ethernet to the Pfsense.
- Assign the interfaces in Pfsense.
1. Plug in the USB adapter.
The first step is to plugin the TPlink USB adapter. As soon as you plugged in, you should see the message that read the USB adapter has been plugged in.
Ugen0.5 <TP-LINK USB 101001000 LAN> at usbus0
2. Get the list of USB drives.
On the pfSense type 8 to get to the shell and type the command usbconfig to get the list of USB devices on the pfSense Firewall.
As you can see, my TPLInk is showed as USB0.5. You need to make it to be available so the pfSense can use them.
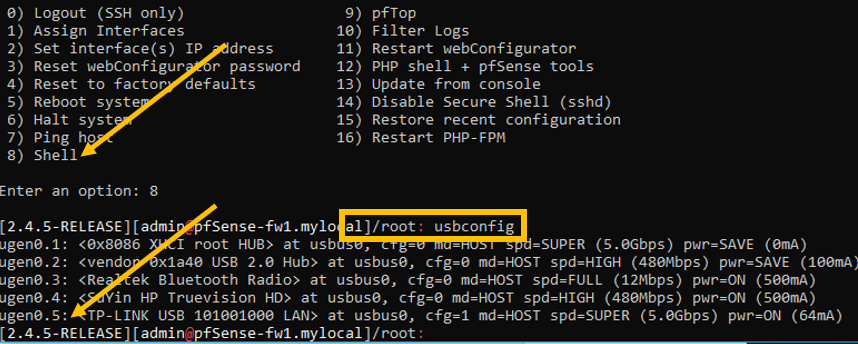

Note: When you plug in the adapter different USB port, the USB identifier will change from USB0.5 to USB0.4 or even UBS0.3. So you must choose the right one.
If you wanted to get more details about those USB devices, you may enter the command below and you should get more details about those devices.
usbconfig dump_device_desc
3. Attach the USB ethernet to the Pfsense.
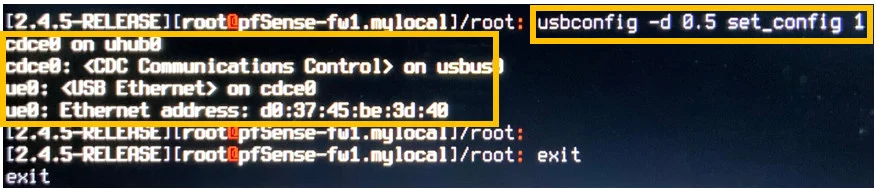
Since my interface ID is ugen0.5, type the below command to attach the USB ethernet port to the pfSense. Make sure you choose the right USB id here.
usbconfig -d 0.5 set_config 1
As soon as you enter the command you should see the pfSense detected the interface as ue0 and its mac addresses. Which is good.

4. Assign the interfaces in Pfsense.
The new USB interface now will be available for you to use, and you need to assign it to either the WAN side or the LAN. I am going to assign the interface on the LAN side.
You may now go back to the pfSense main screen by exiting from the shell by typing ‘exit’, and choose number 1 which is assign the interfaces. And you should be able to configure the built-in NIC Ethernet re0 as the WAN and the USB ethernet ue0 as the LAN.
When I pressed the number 1, as you can see it is showing the list of available valid interfaces, that include the USB adapter as well.
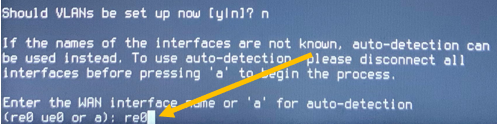
You may chose, not to setup VLAN’s by typing n.
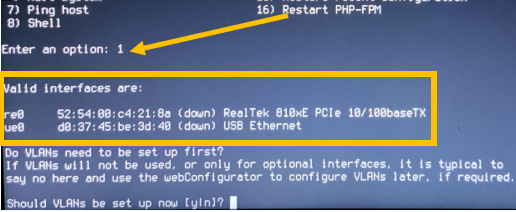
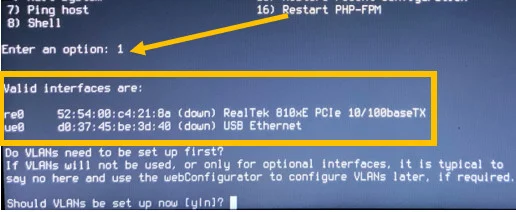
Configure the WAN interface as re0.
In the LAN interface choose USB ethernet.


You now will be able to see the list of interfaces as WAN and the LAN. You can proceed by typing y now.
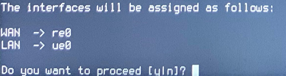
After the USB interface has come up, the PfSense should assign an IP address from the range 192.168.1.1/24 automatically. And you should now be able to access the LAN side using the same IP.
After reboot pfSense no longer detecting USB ethernet
Everything was working fine, and the pfSense firewall had to be rebooted, maybe due to a power issue or you manually rebooted it. And you are back to the same place again where pfSense no longer recognizing the USB ethernet again.
How do we fix USB issue in Pfsense?
Every time when you reboot the machine you will have to enter the same command again and again on each reboot. So there is another way to fix this as well by Adding the same usbconfig command as earlyshellcmd option.
In pfSense you can add the command that you would like to run begging of the boot process called earlyshellcmd. The configuration file on the pfSense is on an XML file, which is located under config/config.xml.
You can make changes to the XML file within the shell or using GUI and we are going to use the GUI method as it is the easiest option.
Follow the steps below to add Earlyshellcmd to load the USB ethernet during the boot in pfSense.
- Download the PfSense backup file.
- Add the earlyshellcmd command in the XML.
- Restore the file using the new XML file.
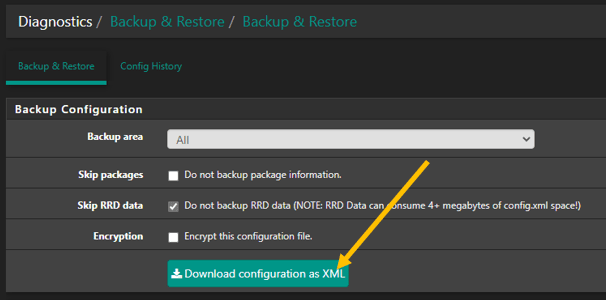
1. Download the PfSense backup file.
First go to diagnostic and click on Backup and restore. And click on Download configuration as XML.

2. Add the earlyshellcmd command in the XML.
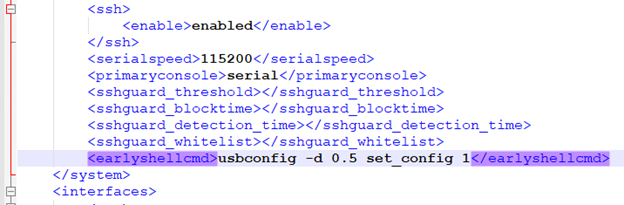
Open the xml file in notepad++ and In the file, just above (/system) line add the earlyshellcmd in there.
As you can see, I added the command in there.

3. Restore the file using the new XML file.
You can save the xml file and restore it by going to the same diagnostic- Backup and restore.
Under restore, select the new xml file that you just modified.
And click on restore.

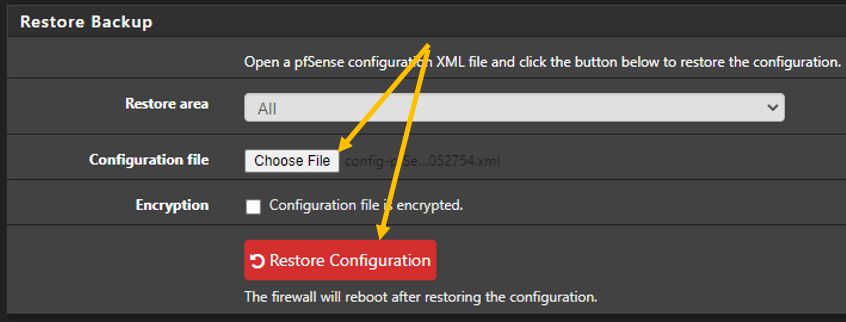
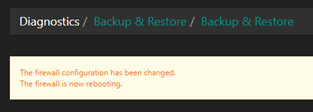
Right after you clicked on the restore the pfSense will go ahead and reboot itself.

During the reboot, you should be able to see the USB interface ue0 has picked up automatically by the pfSense firewall. Which was not the case before.

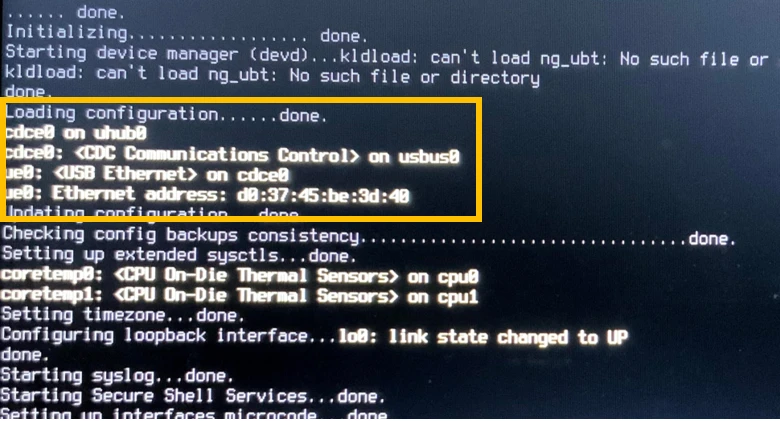
And the LAN interface also assigned to the USB interface and you should be good to go.
Anytime now when the pfSense reboots, along with the single NIC, it should pick up the USB Ethernet adapter as well.
One downside of this setup is that, whenever you unplug the USB drive then you need to run the command again for the USB to get detect again. Since you are going to keep the USB adapter forever on this laptop, chances are low that you unplug them from the firewall.