
I have been running pfSense as my home firewall for quite some time now. Setting up for the first time would be the difficult part for many. But once you make it up and running, it works just great. Since it is open-source, there is no cost associated with it, and you can build a zero-dollar firewall setup by using the old computer as the firewall.
However, some of you out there, may not have an old PC lying around, and if that’s the case and you wanted to start the pfSense firewall journey, the option you have is by virtualizing them. If you are using Linux, you can prefer the KVM method to virtualize the PfSense in your environment.
What if you have windows or a MAC machine, how do you virtualize PfSense on them?
You can virtualize PfSense on windows in multiple ways. You could use VMware workstation pro, VirtualBox, or a Hyper-V.
If it is MAC, then VMware fusion (follow the same guide here) or VirtualBox.
In this blog, we are going to install the pfSense firewall on a VMware workstation. Since the VMware fusion works the same way as the workstation, the steps performed here are identical for MAC machines.
Does PfSense work well with VMware workstation?
In VMware, you can pretty much run any operating system virtually. And the pfSense is based on FreeBSD operating system, and free BSD is the supported operating system by the VMware workstation. The pfSense firewall will work just fine with the VMware workstation pro.
Read also,
How to Setup a pfSense LAB? – Multiple Options Explained.
How to Install PfSense on Proxmox? | Step by Step.
How to Install PfSense on VMware ESXi? – Step by Step Guide.
How to Configure PfSense DMZ Setup? | Step by Step
How to Install PfSense on Hyper-V?
Objective.
We will install the pfSense with WAN and the LAN interface and connect two boxes on the LAN side of the firewall and validate the internet connectivity from both. Once verified the internet access, block internet access from one of the LAN hosts, so let’s begin.
Prerequisite.
- You need to have VMware workstation pro.
Any version of the VMware workstation will work; however, I am using VMware workstation 16, which you can get it from here.
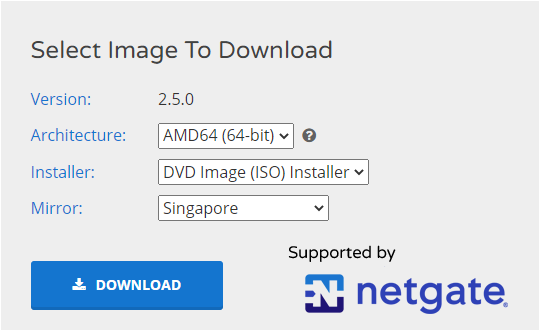
- PfSense ISO image.
You can download the Pfsense image from here, make sure you choose AMD64, DVD image(iso) installer.

Steps to install pfSense on VMware.
1. Configure VMware workstation network for pfSense
We require two interfaces for pfSense, one for the WAN and the other for the LAN, for the WAN interfaces you need to have internet access. And the LAN side will act as a gateway for the LAN users. We need to configure these two interfaces on the VMware workstation first.
We are going to configure as follows.
- WAN- We will be using the Bridge interface, which will bring the PfSense firewall WAN side to be part of the local network. Your local router will assign an IP address on the WAN side. There are times the bridge interface may not work well, and you can follow the guide here to troubleshoot the problem. As a workaround, you could use the NAT interface if the bridge interface doesn’t work.
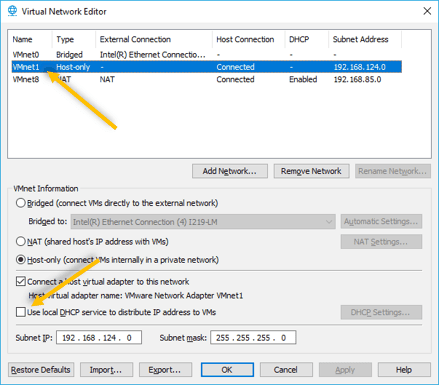
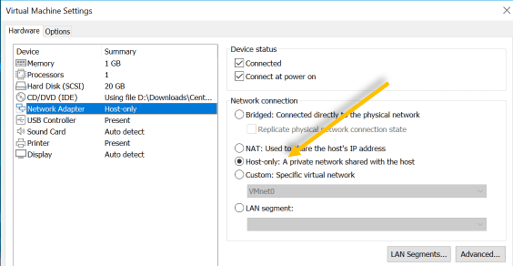
- LAN- For the LAN interface we will be using the host-only adapter and select VMnet1. By default, the VMnet1 will act as DHCP server for the Virtual machine. You need to disable the DHCP service on the VMnet1 first.
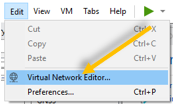
Open VMware Workstation and click on Edit > Virtual Network editor. In the Virtual Network Editor click on Change settings.
Note: You need to have admin rights, in order to change the settings.

Here is my virtual adapter configuration; we will configure VMnet1 for the LAN as the second adapter. As you can see, I have the DHCP configuration disabled on this adapter, and it is acting as the host-only adapter, meaning it will allow the VM to talk internally in a Private network.

Alright, we just configured the network for the PfSense firewall in the VMware workstation, let’s go ahead and install pfSense on the VMware workstation.
2. Create PfSense Virtual machine.
We are now going to create the pfSense firewall VM, so Click on File and new virtual machine.
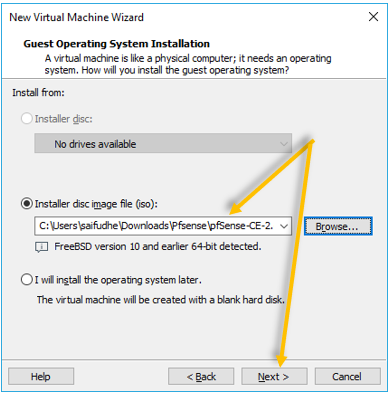
In the New virtual machine wizard choose Typical.
In the installer disk file image, choose the PfSense image that you have downloaded earlier and click on Next.

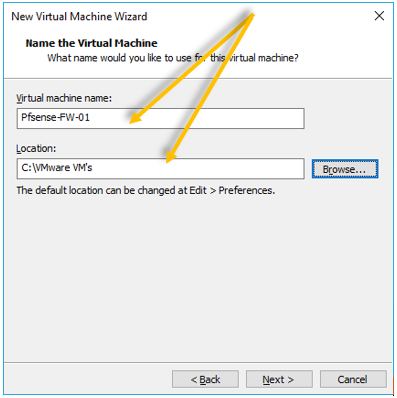
By default, the VMware workstation would pick up the location where you wanted to install the pfSense as well as the name. You may leave the default location or choose a different one. And you may name the VM of your choice.
Maybe you will have a dedicated drive just for the VM installation, so you need to make sure you choose that specific drive here, otherwise, it is okay to leave the default.

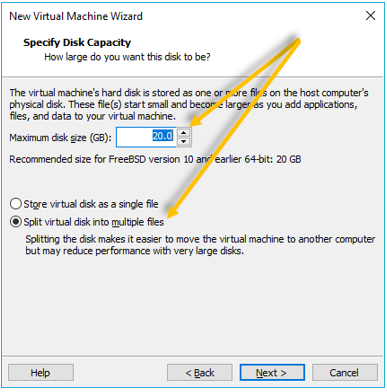
3. Setup the pfSense VM hard disk.
Since I would be using pfSense firewall VM for the LAB purpose, I will configure the Hard Disk as the default value 20GB and choose split virtual disk into multiple files and click on Next.

4. Assign the VM resources.
Before you click on next, you need to click on the customize hardware option here.


First change the default RAM size to 2048MB.
CPU – 2
Note: The PfSense VM will work just fine with 1024MB memory and 1CPU as well.
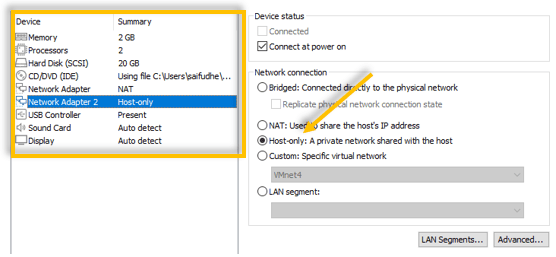
I configure the RAM and the CPU next lets go ahead and add the Network interfaces.
Connect two network interfaces that you configured earlier.
The first interface is already configured as NAT by default, we will change it to use it as a bridge interface that connects to the WAN, and I will add the second interface for the LAN.
Attach the WAN interface.
Select the network interface that is configured as NAT, and change it to Bridge interface.


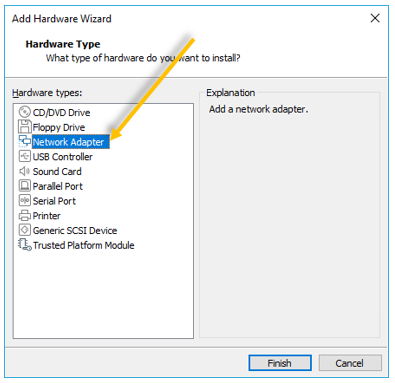
Attach the LAN interface.
Currently, the VM has only one network interface. We need to attach the LAN interface by clicking Add. The Add Hardware wizard now open.
Choose network adapter and Finish.

For Network adapter two (LAN), I can choose a Host-only adapter which is by default configured as VMnet1 adapter and we have validated that in step1.

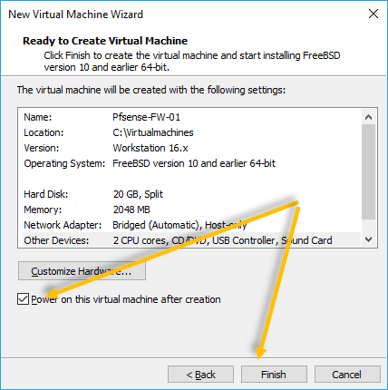
Make sure you check the option which says, Power on this Virtual machine after creation. Click on Finish on the New virtual machine wizard.

5. PfSense installation.
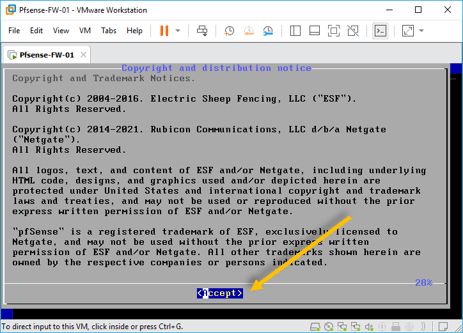
The pfsense installation now will begin. You can accept the copyright notice.

Click on Install on the pfSense installer welcome screen.


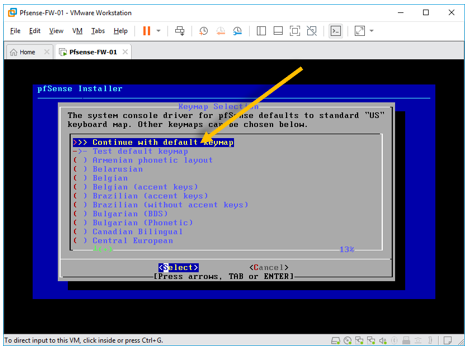
You may choose the keymap of your choice, I am leaving the default one.

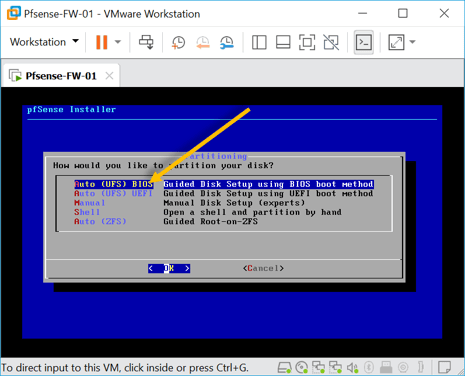
In the partitioning step, select Auto (UFS) BIOS and click on OK.

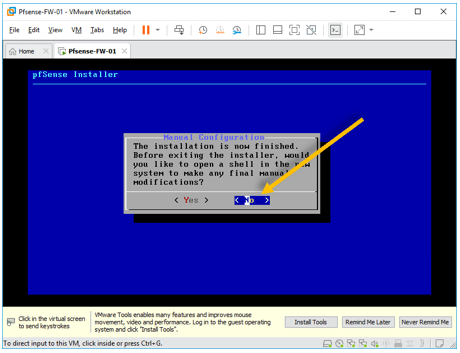
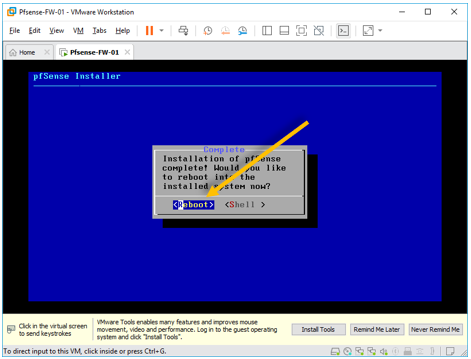
After few seconds the installation will now be completed, and you may now go there is nothing much here, you can click on No.

And go ahead and reboot the firewall.

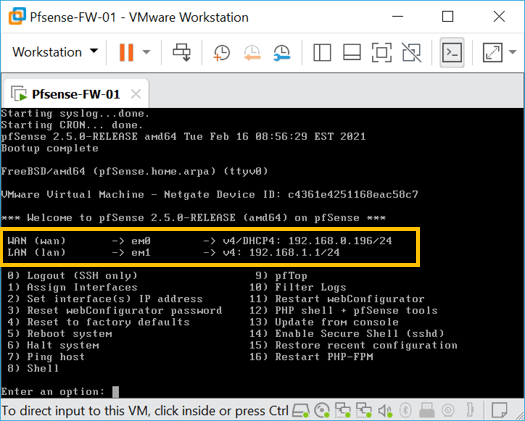
After the reboot, you will be presented with the below screen, as you can see below the WAN interface got the DHCP IP address from my local network 192.168.0.196/24 and the LAN is configured with the default IP 192.168.1.1.

Let me ping the internet to see, whether I can reach the internet or not, so type the key 7 and enter the IP address that wanted to ping.

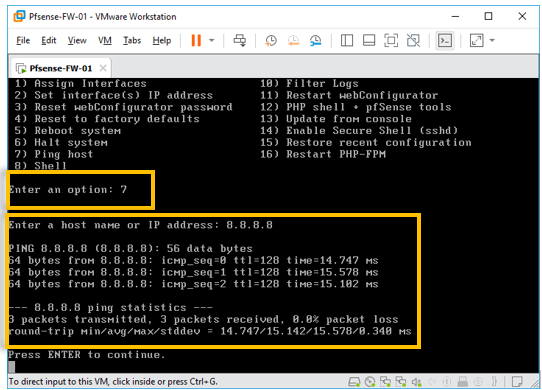
And we can reach the internet VIA the WAN interface.
6. Setup the client machine.
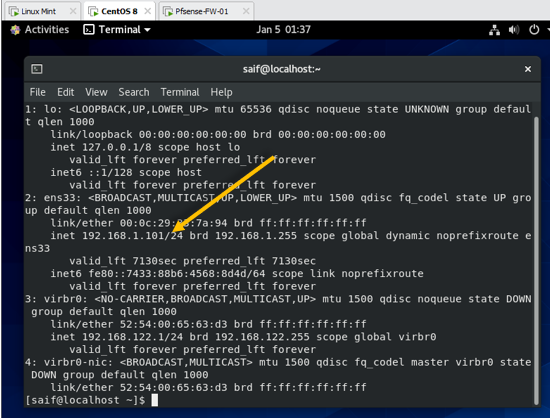
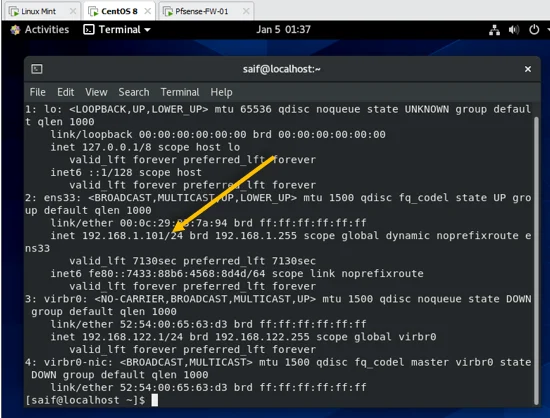
I have a Centos 8 and Linux mint configured in the VMware workstation; I will be using it as a client machine to test the end user connectivity on the PfSense LAN side.
Remember we have configured PfSense LAN side interface as Host-only network, go to the client operating system in VMware workstation and right-click on it and click on settings, add client VM to be part of Host-only network.

Once the LAN side of the PfSense connected to the client operating systems, it should start getting IP addresses from the PfSense DHCP server on the LAN.
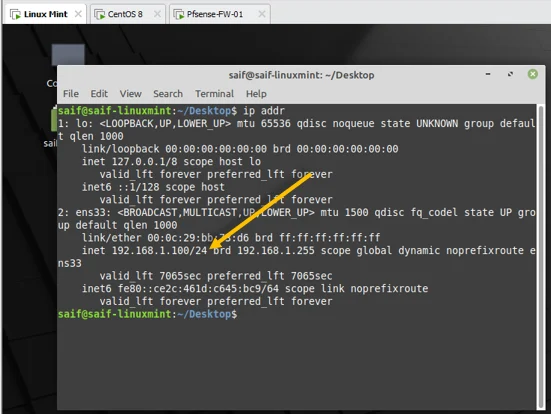
As you can see, the Centos machine got the IP address 192.168.1.101
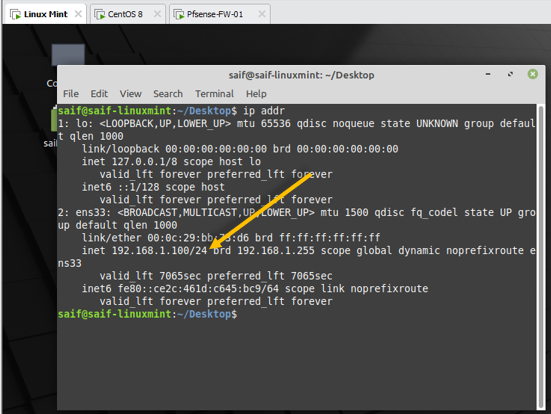
Live mint got the first IP from the range 192.168.1.100.
7. pfSense initial setup.
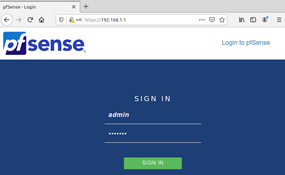
As we have the IP address on both the Centos and the Linux mint, you now should be able to access the pfSense web GUI from either of the machine by typing the URL https://192.168.1.1
You would get a security warning, ignore that and click on continue.
You will be prompted to enter the credentials; the username is admin and the password is pfsense and click on Sign in.

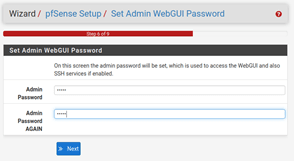
You will be taken to the initial setup wizard, since this is going to be the lab, I would choose the default options and eventually on the step 6 I would set the password for the web GUI.

Once reloaded you will be able to see the message Congratulations! pfSense is now configured. Click on Finish.
8. Install VMware tools in pfSense.
When you are using the any operating system on VMware workstation, it is recomeded that you install VMware tools to get best performance. It is no different for the pfsense.
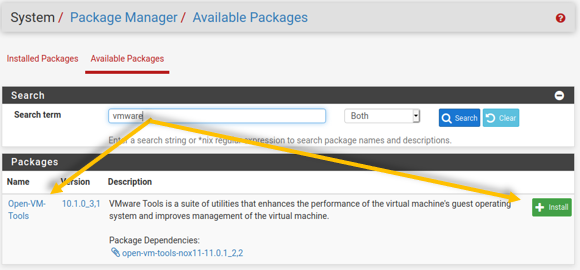
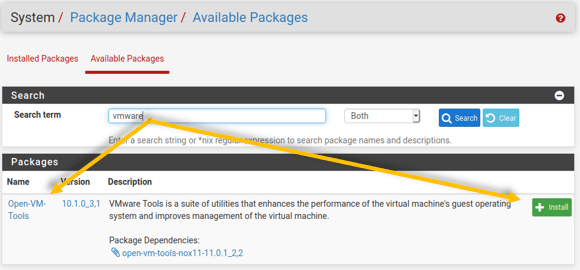
Click on system and package manager.
In the package manager, click on Available packages and search for VMware.
You should be able to see Open-VM-Tools appeared, click on Install.
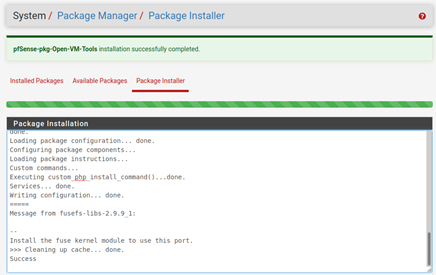
When you get a prompt click on confirm under package installer.
You will get a message that says, VMware tools package was successfully installed.
9. Access the internet on Pfsense LAN side.
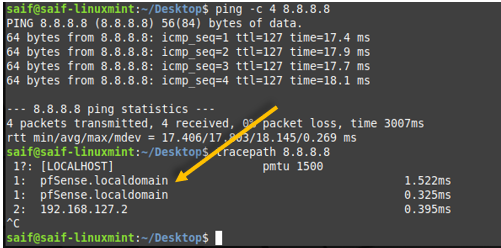
Let’s try to access the internet on the machine that is connected to the pfSense LAN side.
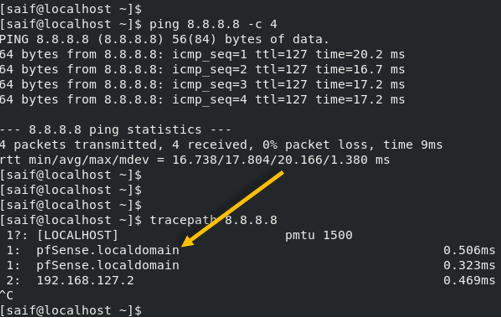
To test the internet connectivity, I am going to ping the google DNS IP 8.8.8.8.
As you can see, I can reach the internet, and when I try to do the traceroute it shows the internet is via the pfSense firewall.

The output is same on the Centos side as well.

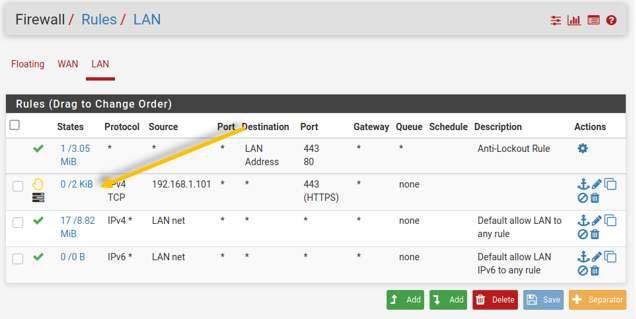
10. Block the internet traffic on the Centos Machine
Let’s do one test by blocking the internet on the Centos machine alone using pfSense. In a normal scenario, you block DNS, HTTP, and HTTPS access to block the internet. If you wanted to achieve the same on the pfSense, you could use a firewall alias.
But here I am going to block only the https traffic, so that end users will not be able to access any site with https traffic.
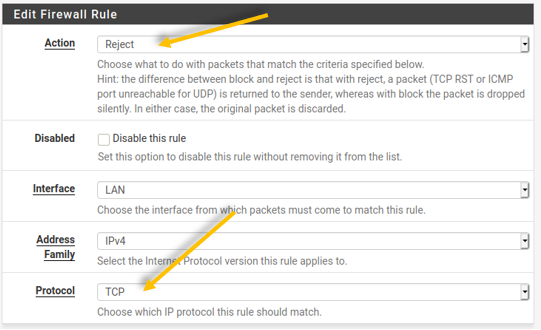
Open pfSense, on the firewall click on Rules.
Choose the option Reject.
Since the https is a TCP protocol, select that one.

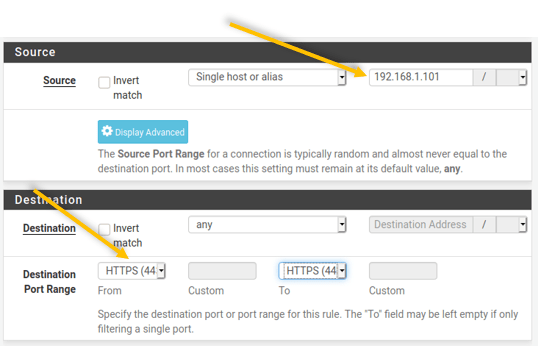
In the source IP, put the IP address of Centos VM which is 192.168.1.101.
And the destination port that we are going to block is https.

You can log the packet if you want.

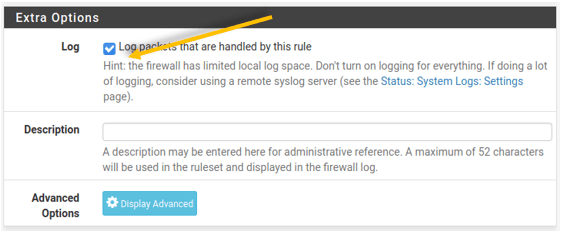
As you can see below, I have a rule in pfSense.
Now go back to Centos and Linux mint and try to browse the internet.
Note: you should be able to ping the public IP from both the machines.
As you can see, it is kept loading, but the page never comes up on the Centos.
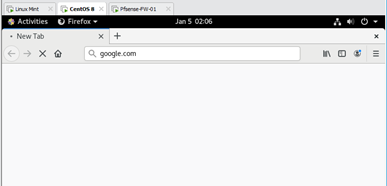
To verify the HTTPS traffic is blocked by the firewall, you can go to status logs, and click on firewall logs, and you should be able to see the Centos IP (192.168.1.101) is getting denied.


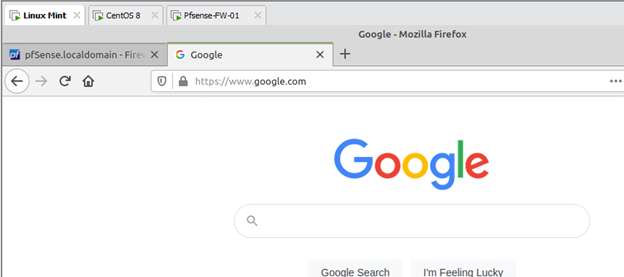
But when I tried the same from Linux mint, I can access the internet, which is the expected result.
mohamed
Sunday 21st of January 2024
does it work on VMware workstation player 17 Mr. Saifuldeen, because i wanna learn it but I can't afford the pro version :D
Saifudheen Sidheeq
Wednesday 13th of March 2024
I can understand :) Thats why I created another blog on pfsense on Virtualbox hope you will like it