
When you think about running a Virtual Machine for a lab or testing something out, the first option that will come to your mind would be the VirtualBox. The Oracle VirtualBox is a free open source virtualization platform developed and maintained by the oracle corporation. It is still my free go-to solution when I wanted to spin up some VMs for my labs.
Whenever you work with VirtualBox, you must have seen different types of network interfaces. And Each interface has other functions and features. Depending on your requirements, those interfaces can be connected to the Virtual machines that you have in your VirtualBox environment.
I have covered numerous blogs on how you can deploy virtual machines in VirtualBox hypervisor. In this blog, let’s look at important virtual network interfaces in VirtualBox Network settings and the scenarios in which you could use them.
Virtual network vs physical network
Before we dive in, you first need to understand the primary difference between the physical and virtual networks. If you don’t understand them, it would be difficult to grasp what’s happening on VirtualBox networking.
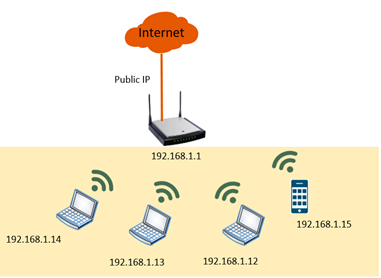
A physical network is connected using physical gears such as routers, switches, and other network hardware. The best example would be your home wifi network.
As shown below, you have a physical internet connection provided by the ISP and connected to your home router, and all the hosts are connected using either wired or wireless. That is the best example of a physical network.

The Virtual Network is getting widely popular now because of the adoption of virtualization in the data center and software-defined networking.
It is mainly used for the connection between virtual machines and extends its network to other locations. You can think of virtual networking as a virtualized version of physical networking. While the physical network is managed using hardware, the virtual network is controlled using the software.
Though virtual networking is a vast topic and every vendor has their way of managing it, let’s look at virtual networking in a VirtualBox networking environment.
The VirtualBox network can be used to build a different variety of labs for testing.
The below example shows how the physical network on the right is connected to the virtual networks in VirtualBox.

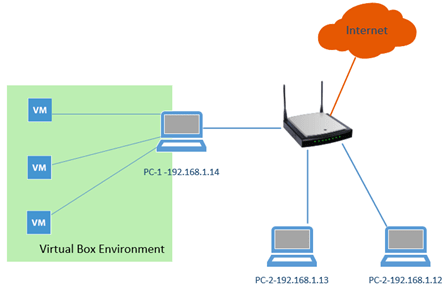
Note: In our following example configuration, we would call the physical network a local network.
What is the difference between NAT and NAT Network in VirtualBox?
The NAT and the NAT networks are two of the network settings in the VirtualBox. They both let the VM talk to the internet or outside the network using the host machine’s IP address. While in NAT, the VMs cannot speak to each other, however in NAT network, you create a network for the VMs with a subnet mask. Attach those VMs to the NAT network, and those VMs which are part of the NAT network can talk to each other, and that’s the main difference, and those VMs can talk to the outside world as well.
Let’s see how the VirtualBox VM behaves when the NAT and the NAT networks are connected. By the end of it, you will understand how each of them works.
VirtualBox NAT interface.

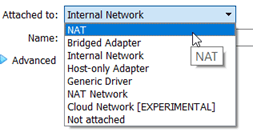
We just discussed the difference between the NAT and the NAT network; let’s look at the NAT interface first.
The NAT interface is a very common interface that you can use on a VirtualBox, and it is also the default interface on the VirtualBox hypervisor.
If you have ever installed an operating system on the VirtualBox, you would most likely have used the NAT interface. As most of the users wanted the VM to browse the internet, and it does that perfectly.
If you are from networking and heard about the term NAT (Network address translation), that’s the same concept.
For those who are not familiar with the network NAT concept, the home network is a great example.
You will have a wifi router connected to the internet, and that router would act as a DHCP server for your internal LAN network. And you have clients who are in private IP range 192.168.1.0/24 and if any of our local clients want to go out to the internet. The request goes to the wifi router, and the internet-facing interface on the router will have a public IP, and all the clients use that IP to go out to the internet.
So basically, here, it translates the private IP (192.168.1.0/24) with a public one. The public IP is a unique IP address on the internet. You can find out your public IP information here.
That’s the common NAT we know of at our home.
How does the NAT work on the VirtualBox?
The NAT interface on the VirtualBox works the same way as the above explanation. However, there is a slight difference. Instead of using the wifi public IP explained above, it uses a host IP address. NAT is performed on the host level where the VirtualBox is installed.
So, if the guest VM wanted to go to the internet or outside the network, it follows the below.
Guest VM (10.0.2.15) ((((NAT)))) Host machine (192.168.1.14) → internet or outside network.
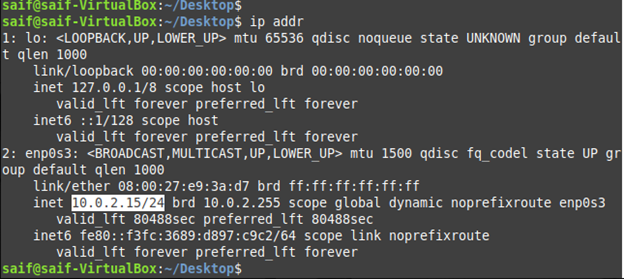
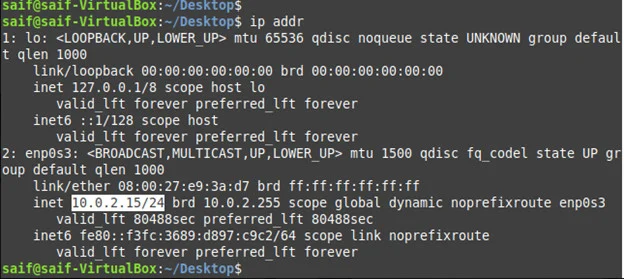
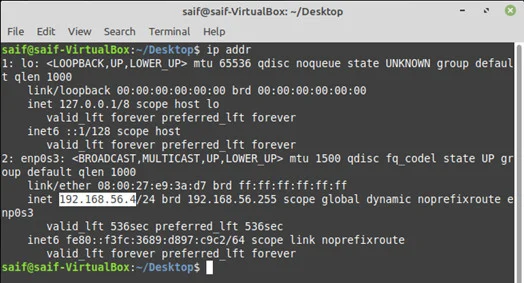
As you can see, I have a guest VM, which I have connected to a NAT interface.
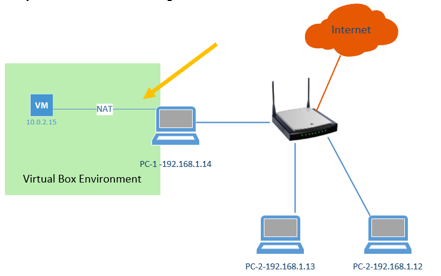

When the VM starts, it should get an IP address 10.0.2.15 from the VirtualBox NAT engine.
What does happen when the guest VM wanted to go to the internet?
The packet will initiate from the guest VM IP address 10.0.2.15, and when the VirtualBox receives the packet, it translates it to the host machine IP address which is 192.168.1.14. And from the host machine, it treats the packet just like any other packets.
If you were to look from the outside of the host machine, you should see the packet came from the same host machine itself than the VM. You will not be able to see the packet ever came from the IP address 10.0.2.15.
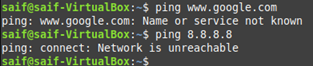
Let’s try to ping google public DNS IP 8.8.8.8 from the VM and do a packet capture on the host to see how the packet looks like.
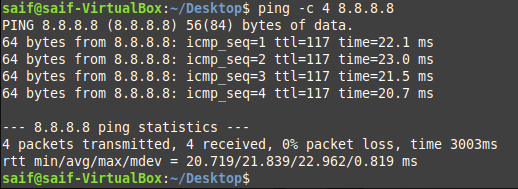

When we performed the ping test, you know that the packet was sourced from IP 10.0.2.15 and reached destination 8.8.8.8 as per above. Let’s see what the packet capture has to say.
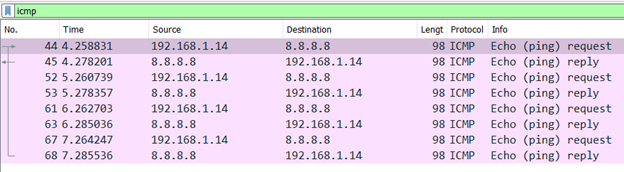
I ran the packet capture on my host machine, and as you can see, the packet was sourced from my host IP 192.168.1.14 (not from the guest VM IP 10.0.2.15, because NAT took place here.) And it is going to destination 8.8.8.8.
Even the return packet from 8.8.8.8 has been sent back to the same host IP 192.168.1.14, and as soon as VirtualBox receives this packet, it forwards this packet to the guest VM (10.0.2.15)

Let’s also try to ping other hosts on the local network from the VM, and you should be able to reach the other hosts to respond successfully.
As you can see below, I can reach the IP address from the host network.
However, you will not be able to initiate communication from other hosts on the local network (192.168.1.0/24) back to the VM. As shown below, it says destination unreachable. Moreover, I do not have a route for 10.0.2.15 in my host route table.
C:\Users\saifudhe>ping 10.0.2.15
Pinging 10.0.2.15 with 32 bytes of data:
Reply from 192.168.1.1: Destination net unreachable.
Request timed out.
Reply from 192.168.1.1: Destination net unreachable.
Reply from 192.168.1.1: Destination net unreachable.
Ping statistics for 10.0.2.15:
    Packets: Sent = 4, Received = 3, Lost = 1 (25% loss),
C:\Users\saifudhe>
How about VirtualBox VM to VM communication over the NAT?
You should not be able to communicate between VMs either while it is connected to the NAT. Because each VM will have a separate isolated NAT network, it gets the same IP address from the VirtualBox NAT engine.
You may spin up another VM with the NAT interface, and you should be able to see the same IP address 10.0.2.15 gets assigned by the VirtualBox to the guest VM.
So, if you are using the NAT interface, you can expect the below results.
- The VM’s can talk to the internet.
- And they cannot talk to each other.
- It can initiate the conversation with the HOST and other nodes on the local network.
- However, other hosts on the local network cannot talk to the VM directly.
VirtualBox NAT network.

There are times. You might want to use the same NAT functions mentioned above and still wanted the VMs to talk to each other. Is it possible?
Yes, it is possible. You can use the NAT network for this purpose.
With the NAT Network, the VMs that are connected to it should be able to talk to each other and go out to the internet. Though the VMs under the NAT network can talk to the local hosts, the local hosts cannot initiate the communication with the VM just like the NAT.
Let’s try to connect our three VMs to the NAT networks and see how it behaves.
How do I enable NAT network in VirtualBox?
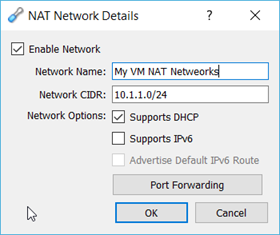
To connect the VMs to the NAT networks, you need to first create the NAT networks in the VirtualBox. To create the NAT networks, follow the steps below.
- On the VirtualBox, click on File>Preferences.
- Click on network and click on the plus icon to add the NAT networks. The NAT networks will be added automatically.
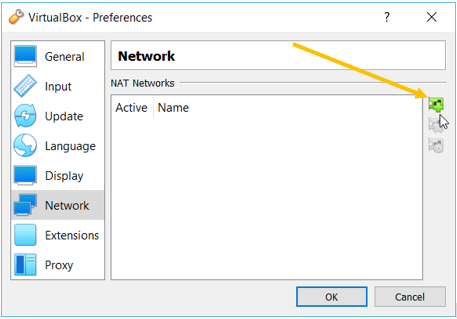

- Once you have the NAT networks added, you can double click or select and click on the gear icon the right on the added network to modify the default subnet. I have added the subnet mask as 10.1.1.0/24
Note: You can see an option called port forwarding, it will be useful to forward any port to the virtual machine. Which I covered here in detail with an example.

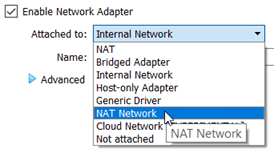
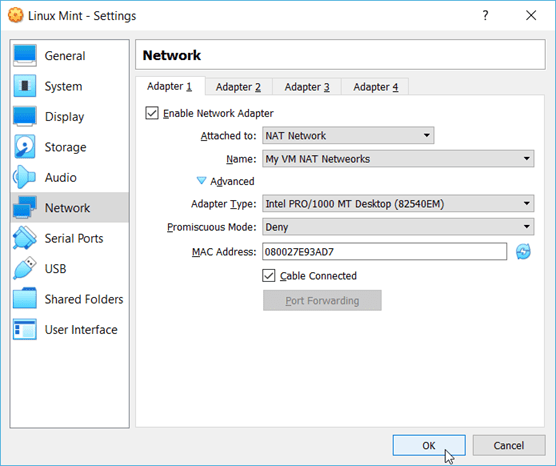
You may now right-click on the VM and attach the newly created NAT network.
Right click-> Settings-> Network
Choose the NAT networks, add the NAT network that we have just created and click on OK.

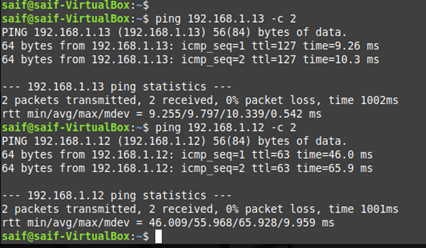
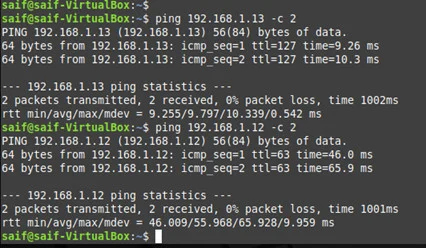
I performed the above steps on all three VMs that I have. And let’s take a look at the IP address that I received from my nat networks.
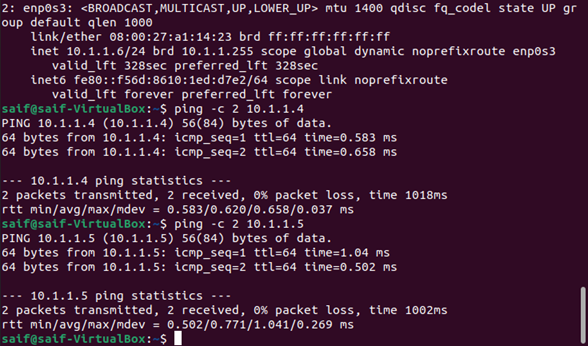
All my VM’s got an IP address as below from the exact subnet that we defined.
Ubuntu-VM-01 – 10.1.1.6/24
Ubuntu-VM-02 – 10.1.1.5/24
Linux Min-VM-01- 10.1.1.4
All my VMs can talk to each other.

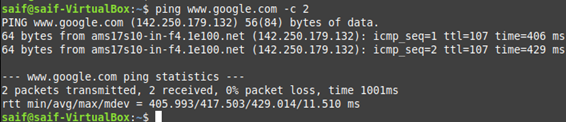
And it can also reach the internet as well.
In NAT Networks.
- The VM’s can talk to each other.
- And it can go out to the internet and also talk to other hosts in the local network.
- Local network devices cannot talk to the VM’s.
VirtualBox Bridged adapter.
The next important Network in Virtualbox is called the Virtualbox Bridged adapter.

In VirtualBox bridged adapter, it works like a switch connecting your VM to the local network. After the VMs are connected to the bridged network, the VMs will work just like other local host machines.
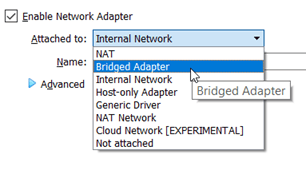
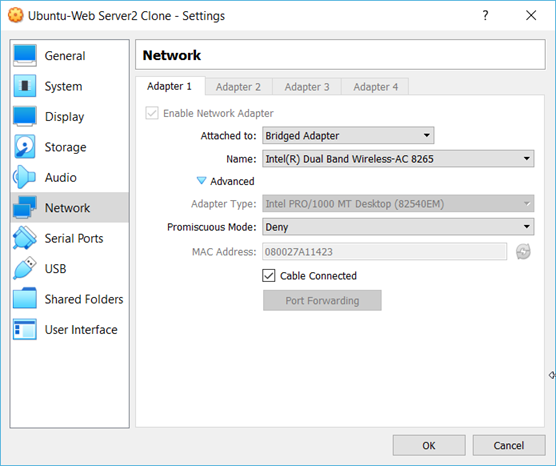
When you choose the bridged network, the VirtualBox will pick up your host’s interface connected to the local network. In my case, it is my wifi adapter.
If you choose the bridged adapter, make sure you choose the host interface that connects to the local network.

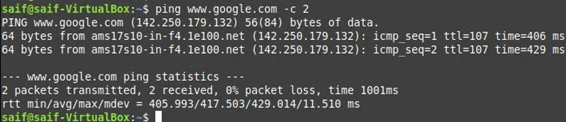
I have connected all three VMs to the bridged network, and I got IP addresses (192.168.1.25, 26, and 27) from my local router.
These three VM now act as another host on the local network, and let’s try to ping each other.
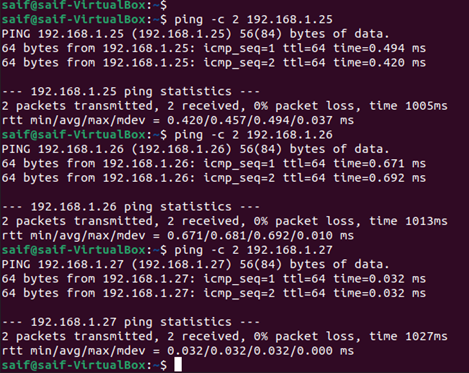
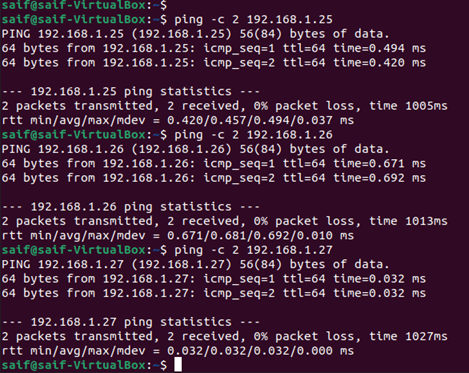
And we were able to ping each other successfully.
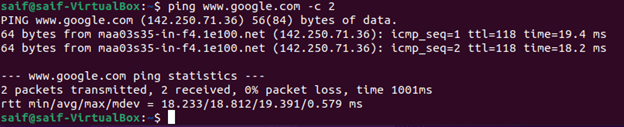
How about the internet?
The internet will work just fine, as long as your local network can reach the internet.
And you can see below that I can reach the internet.

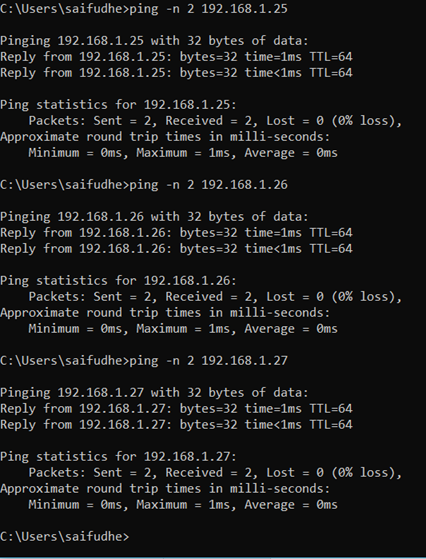
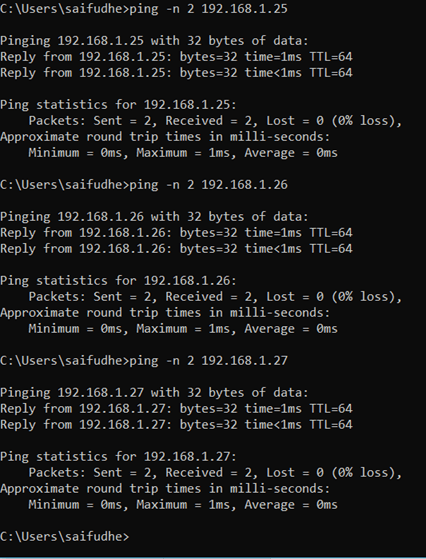
Can the VM talk to the host machine now?
The answer is YES because both the host machine and the VM are in the same network. Everyone can talk to each other. And even the devices which are in the local network can talk to the Guest VMs.
In bridged network;
- The VM’s will get the IP address from your local network router just like other local hosts.
- All the VM’s should be able to talk to each other.
- The VM can talk to the local network hosts, the devices on the local network can also initiate the communication with the VM’s.
- It can also go out to the internet using the local internet connection from the router.
VirtualBox internal network.
In the Virtualbox Internal network, you can create a separate private network isolated from all the other networks. It will be useful when you want to build some labs without worrying about leaking the network to your production or local network.

In this network, the VM’s Network will be completely isolated from the other network, including the host network.
When you configure the internal network, there will be no DHCP configured. You have to configure the IP address manually. There is an option in VirtualBox CLI to configure the DHCP. And another option is that If you build a VM that can act as a DHCP server in the VirtualBox, then that VM can act as a DCHP server for your internal network.
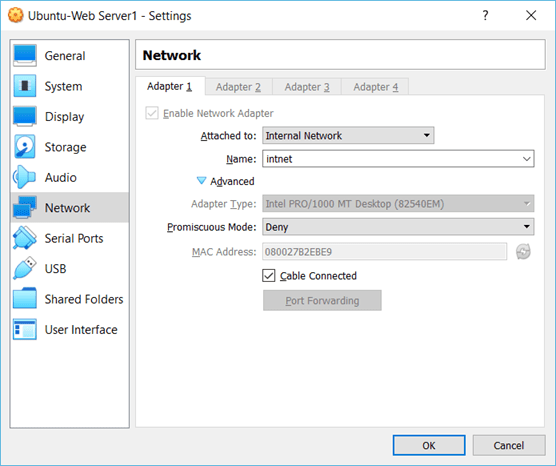
To configure the internal Network, Right-click on the VM and click on Settings.
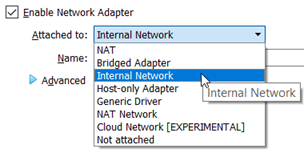
Click on the network, choose the internal network from the dropdown, and click OK.

After you configured the IP address on the VMs, it can talk to all the VMs in the internal network. But it cannot communicate with the host and the outside the internal network.
For example, if you try to communicate to the host machine from the VM, it will fail. The only way you can allow the VM to talk to the outside of the local network is by using a transit VM. It can be a router or a firewall. And its outside interface is connected to the Bridged interface, and the inside interface is connected to the VirtualBox internal network.
I have a lab where I have installed and demonstrated a pfSense firewall in VirtualBox using the same internal network.
In the pfsense Lab setup, when the VM’s that are connected to the internal network wanted to go to the internet, it has to talk to its gateway, which is in the internal network from the pfSense LAN and goes out to the bridged interface on the outside. You may check out the article here to understand that more.
In VirtualBox internal network
- The VM’s can talk to each other.
- It cannot talk to the host machine nor the local network.
- And the VM’s cannot reach the outside world/Internet.
Virtualbox Host-only adapter – VirtualBox network connection between host and guest

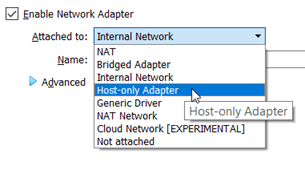
When you wanted the VMs to talk to the host but not to the outside network, you can use a VirtualBox host-only adapter. In this setup. The host machine would create a host-only virtual adapter on the host. You can think of it as a loopback interface that can be attached to the virtual machine.
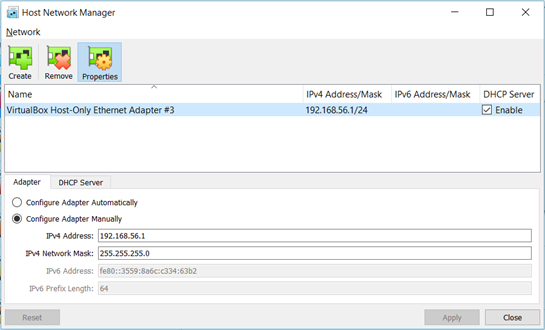
You can configure the host network adapter under the host network manager (File-> Host Network manager) in the VirtualBox. Where you can create or remove the adapter, configure the DHCP service, and so on.
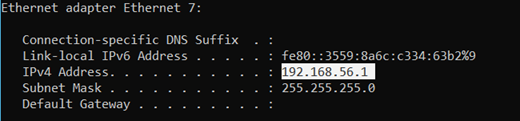
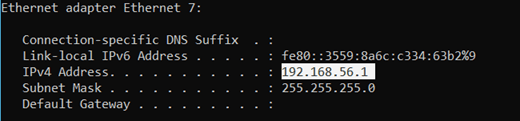
I already have one virtual host adapter in my VirtualBox with the IP 192.168.56.1
Using VirtualBox GUI, you can create up to 4 virtual adapters, if you wanted to create more, you can do so by using the VirtualBox CLI, however, you are limited to only eight adapters maximum.

The adapter that I have on the VirtualBox can be seen on the host machine as well, and it can be verified by going to the command prompt on the host machine.
Open the command prompt and run the command ipconfig and you will be able to see the virtual adapter settings.
Also, you can notice the host-only adapters in windows network adapter settings.


Let’s see how it behaves in VirtualBox host-only network setup.
I have attached one of my VM to be part of the VirtualBox host-only network. As soon as the VM is powered on, it has an IP address from the same Host Network Manager DHCP service.

Can I reach the internet with the host-only adapter?
No, you cannot. As you can see below, I cannot reach the internet.
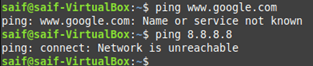
How about the host machine access?
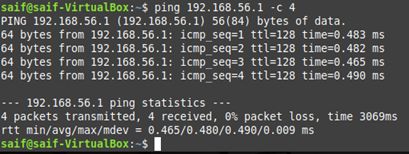
You can reach the host machine using the host-only adapter IP address, which is 192.168.56.1 in my case.
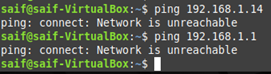
However, I cannot reach the physical adapter IP address 192.168.1.14, which is again part of our host local network.

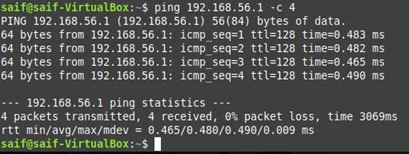
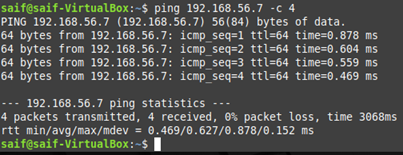
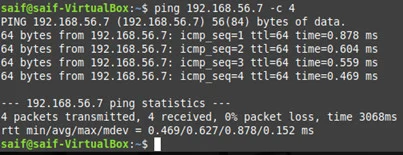
And I should be able to reach another VM that is part of the same virtual host adapter network.
I have another VM connected to the host-only adapter that has an IP address 192.168.56.7. As you can see, I can reach that VM just fine.
In a host-only network,
- You can talk to the host machine using the host-only adapter IP.
- You cannot talk to the host physical network from the VM’s. Hence no access to the host local network.
- The VM’s cannot go out to the internet either.
Mike
Sunday 6th of July 2025
Today is July 2025, I'm now using VirtualBox 7.1.10, I think NAT Network is by default, so I don't need to add NAT Network anymore for the latest version, am I correct? Many thanks.