

PfSense is great for small offices and even for some of the enterprise networks and most importantly it is a piece of budget-friendly network equipment. If you wanted dedicated hardware and support for your business, you have that option too. You could get Netgate hardware and their paid support or You can even go for a free option which is to install the PfSense firewall on an old PC and use it as a firewall.
In the end, it is a great choice for those who wanted to spin up the firewall on their network. There are multiple ways you can spin up the PfSense firewalls, you can even run them as a virtual machine on the network and it does support different hypervisors.
I have covered plenty of blogs related to pfSense in my previous articles you may check them out if you are interested.
Alright, you have set up your network with Pfsense for your branch offices or a small network, and the next question you might be asking how do I configure VPN in PfSense for remote workers?
If it is a remote branch you can connect them over IPsec VPN, but for a remote worker, you need to have another solution. And the PfSense firewall’s remote VPN solution is called OpenVPN.
In this lab, I am going to show you how you can set up an OpenVPN on your PfSense firewall. That way you can connect to your remote branch from anywhere on the internet. This is similar to the Global protect VPN that we have configured in our previous lab. If you are not familiar with global protect VPN, I would recommend you check out the article here.
I use PfSense as my home firewall and I do connect to the OpenVPN if I wanted to access some of files in my home network, which is kind of cool.
And how am I running the pfSense? I use my old laptop to run the PfSense.
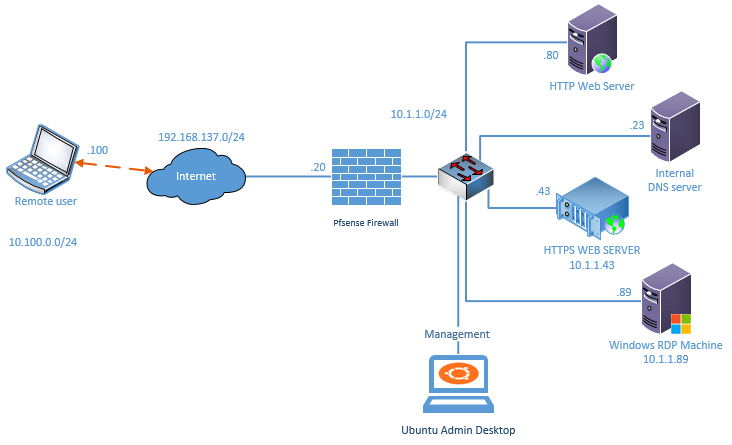
Below is the lab topology that we are going to work on for this OpenVPN PfSense lab.
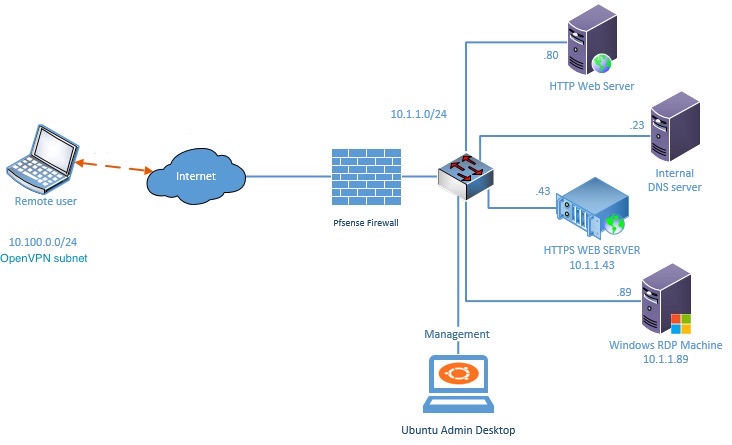
- I have a pfSense firewall configured on my small network and I have multiple internal hosts connected to the LAN side of the firewall. Which is on the right.
- pfSense also configured with the internet, The LAN users can communicate with the external network as well.
- I have a remote user who is connected to the internet on the left side.
So above is my network setup, you may setup the network as above if you wanted to test out the OpenVPN as a lab, otherwise you just focus on the PfSense OpenVPN configuration, which we are going to do next. You have to make sure you are using the correct subnets along the way.
Objective.
We will install and configure the OpenVPN on the pfSense firewall and then we will test by connecting to the VPN from the remote user. We would also disable the split tunnel as well and check the traffic behavior. If you are not sure about the split tunneling, read on, by the end of the lab, you will be comfortable with it.
Prerequisites
Before you proceed, ensure you have OpenVPN client installed on your client machine.
which can be installed on pretty much any operating systems, whether its windows, mac, linux, ios or android.
You can download the client based on the operating system by clicking here.
Steps to configure OpenVPN with pfSense Firewall
Now lets go step by step and configure the openvpn.
In case if you are interested, here is the step by step guide video.👇
1. Decide the authentication method.
You decided to use OpenVPN with pfSense firewall, so when the user tries to connect to the VPN what credentials should they use?
There are two ways you can integrate the user account with pfSense OpenVPN, the first option is the local users and the second is the radius and the final one is the LDAP.
Since this is a lab and I don’t have a radius or LDAP configured, I am going to use the local user method as the authentication method for the OpenVPN. So, let’s go ahead and create a local user account in the pfSense firewall.
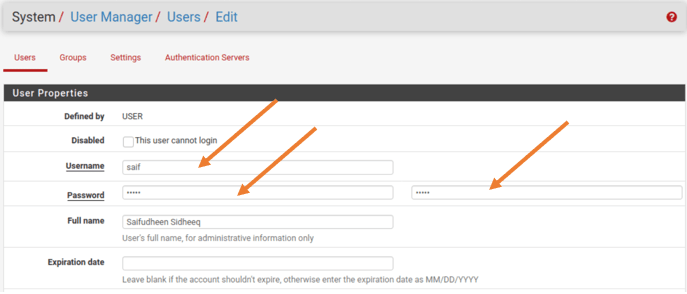
Go to System>User manager>Click on Add to add the user account.
By default, you will have default admin account.
Enter the username and password, also you can set the expiration date and the group membership, and all sort of configuration if you want to. However, we are just creating a user account with just a username and password hence after entering the username password also your full name you may click on SAVE.

2. Install OpenVPN pfSense Client Exporter.
Once we have the OpenVPN configured on the pfSense, you can send the pre-configured OpenVPN client to your remote host’s machine with which they should be able to log in.
Click on System>Package manager>Available Packages.
Type OpenVPN in the search field and click on Search. You will get a package called openvpn-client-export, click on Install.
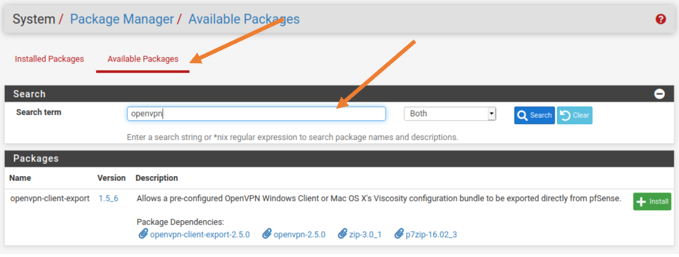

Depends on your internet speed it may take some time to install the packages. Once installed you will get a green status bar with a message down below saying success.
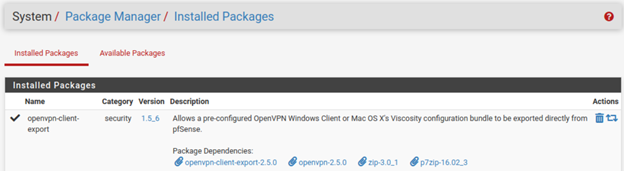
After the installation is completed the packet will be available under installed packages.

3. Add the OpenVPN Servers.
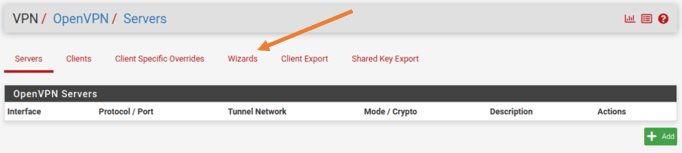
We have completed the prerequisite steps, now let’s go ahead and configure the OpenVPN service on the pfSense firewall.
Click on VPN > OpenVPN.
The best and easy method is to use the wizard, hence click on Wizard tab under OpenVPN Servers.

4. PfSense OpenVPN authentication Type.
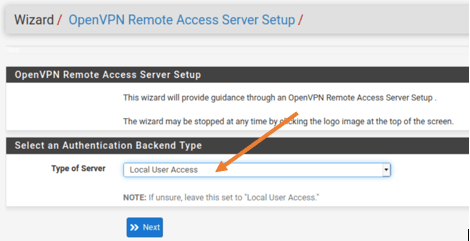
Remember we have created the local users in step1, we are going to use that as the authentication source in the pfSense OpenVPN configuration.
In the Select an Authentication Backend type, you can choose the type of server as Local user Access and click on Next.
Note: If you have LDAP or radius configured you may use any one of them.

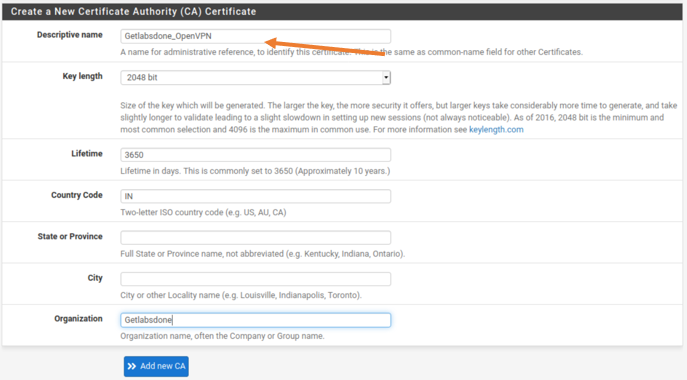
5. Add the Certificate authority.
You will be taken to Create a new Certificate authority Certificate next.
Enter the below details.
Descriptive name : Getlabsdone_OpenVPN.
There are other fields that are not mandatory, you could add them if needed. I have added the country code and the organization.
After you done, you may click on Add new CA.

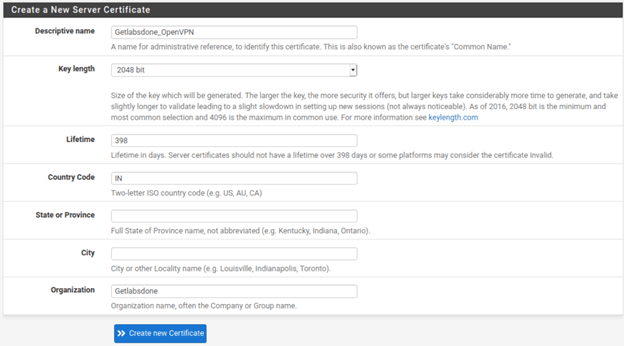
6. Create server certificate.
You now must configure the server certificate; this method is also similar to the previous one.
You may enter the user-friendly Descriptive name and add the other optional field if required.
Like before, I have chosen the country code and the Organization and left all other fields.
After everything you can click on Create new certificate.

7. OpenVPN server setup.
In the server setup options you will get multiple another options lets configure each one of them.
General OpenVPN server information.
In that, you will have to choose the outside interface of the pfSense firewall, if you have multiple ISP’s you will have to choose the one that you are going to use for the pfSense OpenVPN.
For me, I have a simple network with just a WAN and the LAN, and I just have to choose my outside interface which is WAN.
You don’t really need to make any other changes here, however, if you require to change the default OpenVPN port number you can do that here. I also added a Description here. After that scroll down.

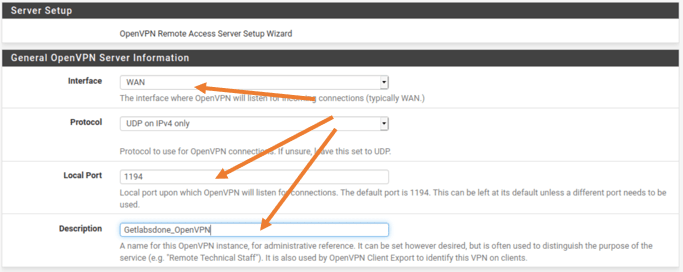
I am leaving everything else as default on the Cryptographic settings, it is recommended to leave the default.
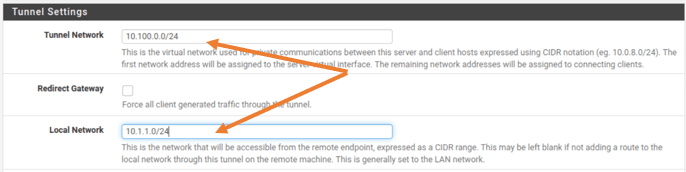
Tunnel configuration.
Scroll down to the Tunnel settings.
Tunnel Network:
As per our topology, we are going to configure 10.100.0.0/24 as our remote VPN subnet. Meaning after the user is connected to the VPN, they will be receiving the IP address from this subnet.
Redirect Gateway:
By default, the pfSense OpenVPN will enable split tunneling, which means the site to site traffic that you specify here will be over the OpenVPN tunnel and the rest of the traffic will be over internet.
Leave this option as unchecked for now, we will be testing this later. Let’s bring up the OpenVPN first 😊
Local Network:
If you look into the diagram you should be able to see that our office network has 10.1.1.0/24 network and we need to specify them here so that the remote user will be able to access the branch network.
Add the Local network as 10.1.1.0/24
You really don’t need to make any other changes here.

8. OpenVPN Client settings.
After the client connected to the VPN there are some configuration that we can push to the client, so the client can use those configurations.
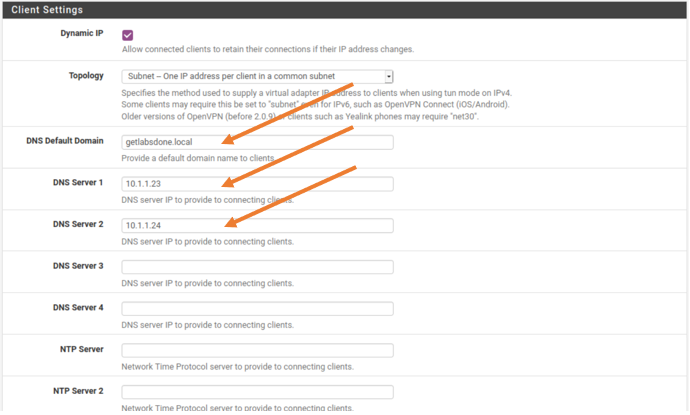
DNS Default Domain:
If you are managing an enterprise network, you most likely will have a DNS default domain. Since I have an internal DNS server, I am adding my internal DNS domain.
DNS Servers:
Also my primary and secondary DNS servers.
If you don’t have internal DNS servers you can leave this as blank or provide the public DNS servers here.
You can also point your NTP servers here so that the client can sync it’s time with it, since I don’t have an NTP server I just left it blank.
I am leaving everything else as default and clicked on Next.

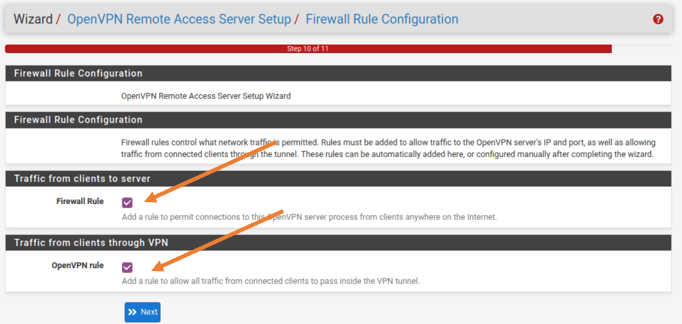
9. Firewall Rule configuration.
Finally, we are going to configure the firewall rules here.
Traffic from Client to the Server.
By default the pfSense firewall will block any connection from the outside world, so you need to enable the port number 1194 towards the internet so any clients on the internet can try to connect to the VPN on the OpenVPN port number.
All you must do is just check this option.
Traffic from Client through VPN.
The next rule is to allow the traffic from connected client to pass inside the VPN tunnel. Check this option as well and click on Next.

You will get a message that say configuration has been Finished! You may click on Finish.
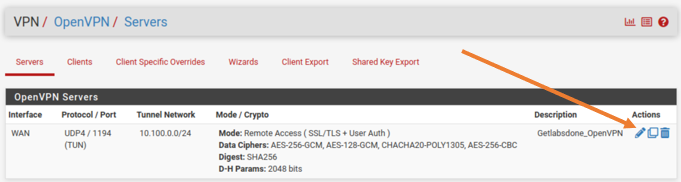
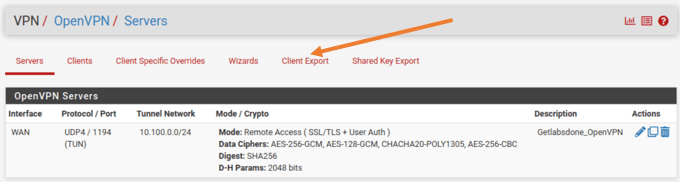
10. Change the server mode.
We have pretty much completed the OpenVPN configuration on the pfSense firewall, however there is one last step to do.
Click on VPN>OpenVPN.
Click on Edit on the OpenVPN servers.

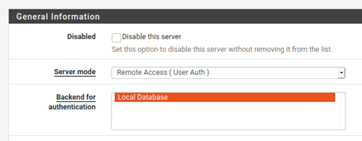
Choose server mode as Remote access (User Auth) and click on Save.

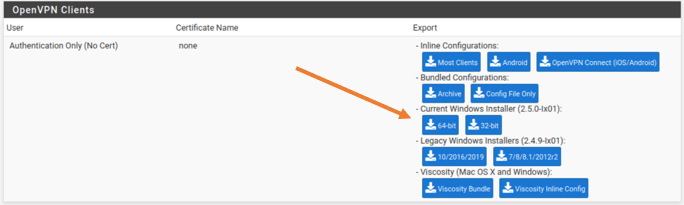
11. Download and send the OpenVPN client and configuration to the Client.
Remember on the second step, we have downloaded OpenVPN Client export package on the pfSense firewall?
We are going to use that package to download and send the OpenVPN client and its configuration to the end user machine.
Go to VPN>OpenVPN
In the OpenVPN server information on the screen. Click on Client Export.

Scroll all the way down to the OpenVPN clients.
And download the client of your choice. I have downloaded windows 10 client package and transferred to the machine.

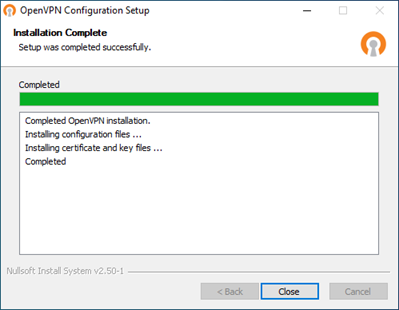
12. Install the OpenVPN package and connect to VPN.
After the file has been transferred you may double click to install the OpenVPN package on the machine.
At first the Setup will install the OpenVPN installer package on the machine, and it will install the OpenVPN configuration, You will get the below screen once completed. Click on Close.

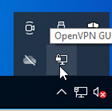
After the installation, you can find the OpenVPN app either from the start menu or from the system tray.
On the system tray click on the up arrow to show the hidden icon where you will be able to see the OpenVPN GUI icon. Just double click on it.
Note: The LAN Icon and the OpenVPN icon is kind of look identical, the difference is you can see a small lock on the OpenVPN icon.

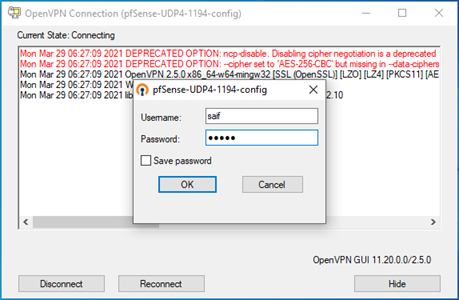
As soon as you open it, it will prompt you to enter the credentials to connect to the VPN.
Enter the local credentials that we have setup in step one and click on OK.

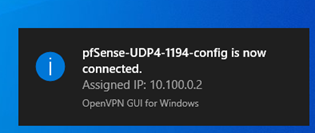
You will be notified on the bottom right of the screen once the VPN is connected.
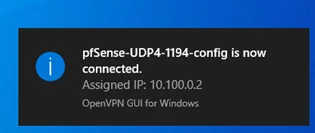
You can also verify the VPN connectivity by looking into the system tray, this time the OpenVPN icon will show green, that indicates it is connected to the VPN.


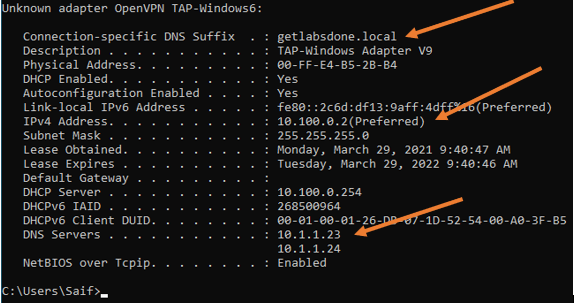
You may check the ipocnfiguration now and you should be able to see all the configurations that we have pushed from the firewall.
- The DNS suffix was added.
- Got the IP address that we reserved for OpenVPN.
- And the DNS servers as well.

14. Test the connectivity to the branch network.
Alright, we have now successfully configured the OpenVPN and were able to connect as well, lets now go ahead and check the connectivity by trying to reach the internal resources.
Before we start the connectivity test, lets go ahead and enable the logging for the rules that I have created for traffic that goes through the tunnel.
On Firewall>Rules>OpenVPN
You will be able to see the rules that we have created during the OpenVPN configuration.
Click on the pencil icon to edit the logs.

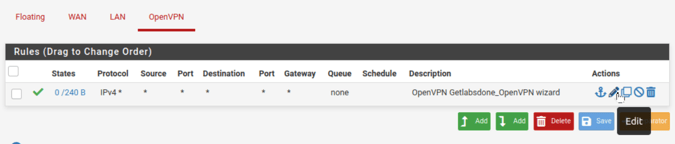
And on the extra options check the option that says Log packet that are handled by this rule.
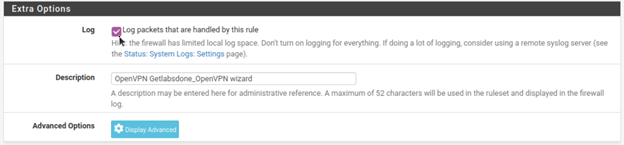

Click on Save and apply the changes.
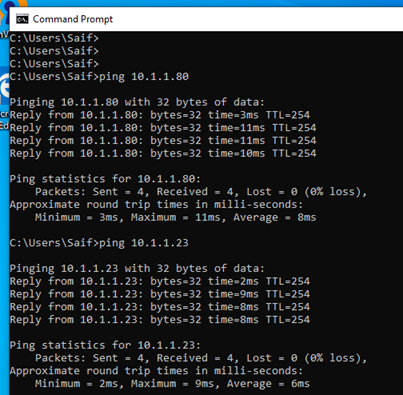
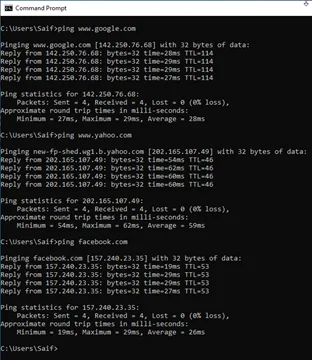
Let’s initiate some pings now.
As you can see, I am able to reach my internal resources over the VPN tunnel. Which is awesome!

Let’s check the logs and make sure it is going via the firewall.
Click on Status>System Logs>Firewall
You should be able to see the logs for the ping that we have just made. As you can see the ICMP traffic are hitting the OpenVPN rule and it is allowed.


How about the internet traffic?
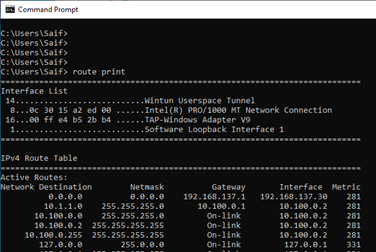
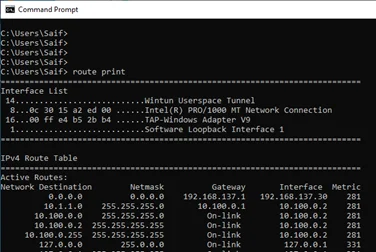
PfSense OpenVPN will send the internet traffic to your local internet and the site to site traffic through the tunnel, so it has split tunnel enabled by default. To check how the traffic is routed on your windows machine is by entering the command route print.
As you can see the default route is through my local ISP. And there are no other default routes.
However, some users prefer to send both internet as well as tunnel traffic through the tunnel.
how do we disable the split tunnel and send all the traffic through the OpenVPN tunnel in pfSense?
It is very simple, lets see how we can do that.
Click on VPN > OpenVPN
Edit the VPN configuration.
Scroll all the way down to the tunnel settings. Check the option that says Redirect IPv4 Gateway, it will send all the traffic through the tunnel.
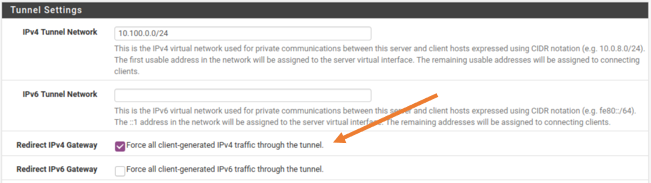

Since I don’t have IPv6 configured I left the IPv6 option as default. You may go ahead and save the configuration and check out the behavior.
Either you can wait for few mins or disconnect and connect again to affect the changes.
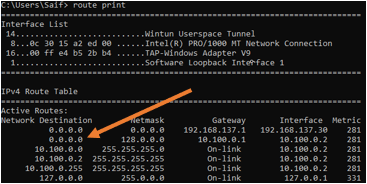
Let’s check the routing table now.
As you can see there is another default route.

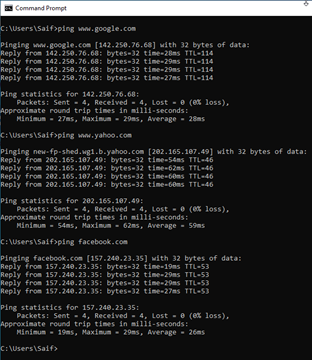
let me ping some external sites and check the logs to verify whether it is taking which path.
You can also try the traceroute to identify which path it is taking.
As you can see, I am able to reach the internet.
Go to Status>System Logs>Firewall
If you scroll all the way down, you can see multiple logs.


Every time when we tried to ping an external URL, the remote PC send the DNS request out to our internal DNS server and following to that ICMP communication started.
It happened three times, when we performed the ping.
If you wanted to see how you can connect your ios device to openvpn which is covered here.
Conclusion.
Everyone knows pfSense firewall is great and I personally use OpenVPN and it works great. If you have a small budget and wanted to spin up a firewall with VPN capability. The PfSense is a great choice. And it provides most of the security functionally which commercial high end routers provides. Moreover, it is opensource and Free too 😊
Jan
Thursday 9th of January 2025
Very cool guide! Thanks :)