


Pfsense is a free, open-source firewall that you could deploy at your home or enterprise network. I have been using pfSense on my home network, and it works great. The main reason I use pfSense is to utilize the OpenVPN functionality. With VPN access, I can access my internal server storage anywhere worldwide. Not only that, I could access my windows 11 machine via RDP over the VPN.
I have covered how I turned my old computer into a pfSense firewall here. Also plenty of articles related to the pfSense firewall in my previous blogs. We have also taken a look at how you could virtualize pfSense in VMware workstation and VirtualBox hypervisors, but what if you don’t want to install any other virtualization software and install it on windows built-in hypervisor called hyper-v?
Yes, that is possible in this blog. We are going to do just that.
Read also,
How to Install PfSense on AWS EC2 Cloud?
PfSense Dual WAN Failover & Load Balance | How to Set It Up?
How to Configure PfSense Load Balancer Using HAProxy?
pfSense IPsec Site to Site VPN Setup – Step by Step.
How to Setup IPsec Tunnel between Paloalto and PFsense?
Can I virtualize pfSense in Hyper-v?
The problem with hyper-v is that you cannot use it with the other virtualization software such as VMware workstation and Virtualbox. The last I heard from VMware is that they are working for a solution to use both the VMware workstation and the hyper-v on the same machine without losing the ability to use either of the platforms. Due to this issue, it is pretty common for anyone to think, is it possible to virtualize pfSense in hyper-v if yes, then I could go ahead and enable the hyper-v on my machine. If that’s in your mind, I have good news, the pfSense on hyper-v can be installed, and it works just like any other hypervisor. Moreover, hyper-v has different types of networks that you could utilize to install the pfSense.
So let’s go ahead and get started.
Prerequisite.
- Pfsense ISO image.
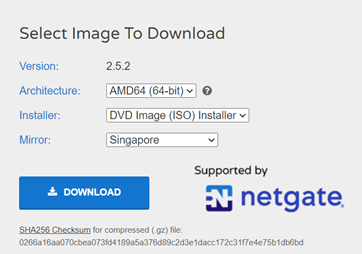
You need to have the latest Pfsense image downloaded, by going here.
While downloading, make sure you choose AMD64 and DVD image installer.

- Turn the hyper-v feature on.
You can follow the article here to see how you can enable hyper-v on a windows machine.
Below is the topology that we are going to build.

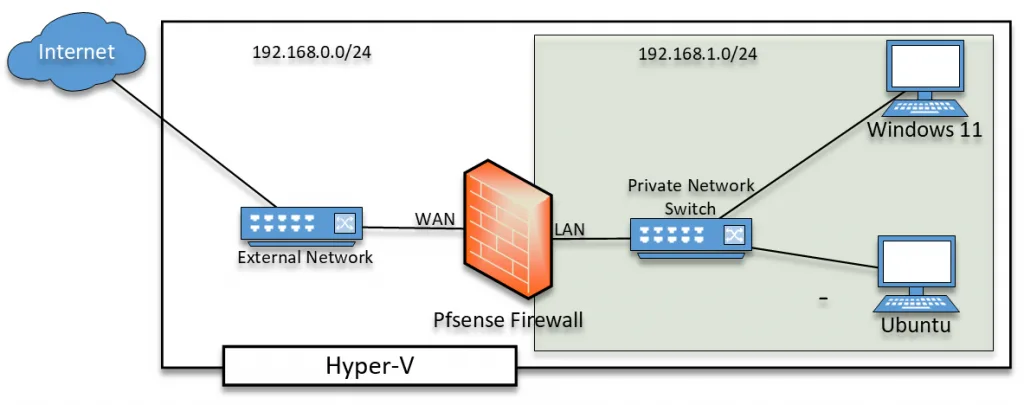
Pfsense has two interfaces, the first one is the WAN interface, and the second is the LAN interface.
We will finally have to connect the WAN interface to the internet and the LAN interface to a private network. We will test out the connection by connecting a client to the LAN side of the network and see how the network behaves.
To simulate internet access, we can use the External network switch on the hyper-v and for the LAN – Private Network switch. You can learn more about the hyper-v network types here.
For the client connectivity, I am using Ubuntu desktop and windows 11 virtual machines, you can follow the article here to know how you can install ubuntu-desktop and windows 11 on a Hyper-v.
Steps to install pfSense firewall on hyper-v on windows.
- Pfsense VM creation.
- Configure the Memory.
- Pfsense network configuration.
- Configure the virtual hard disk for the firewall.
- Choose the installation media.
- Add the LAN interface.
- Install the Pfsense firewall.
- Remove the installation media.
- Configure the WAN and the LAN interface.
- Verify the client connectivity.
- Finish the initial setup wizard.
- Verify internet connectivity through firewall.
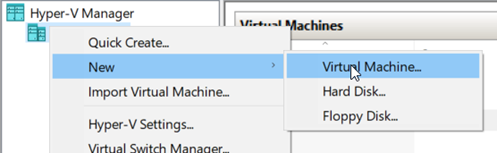
1. Pfsense VM creation.
Open your hyper-v hypervisor, right-click on your machine name and click on NewàVirtual machine.
You will get a virtual machine installation wizard.
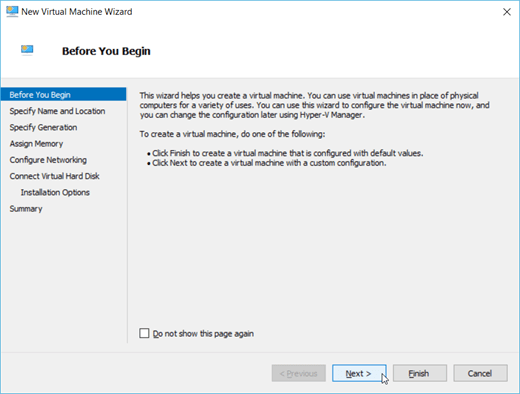
In the ‘Before you begin’ windows, click on Next.

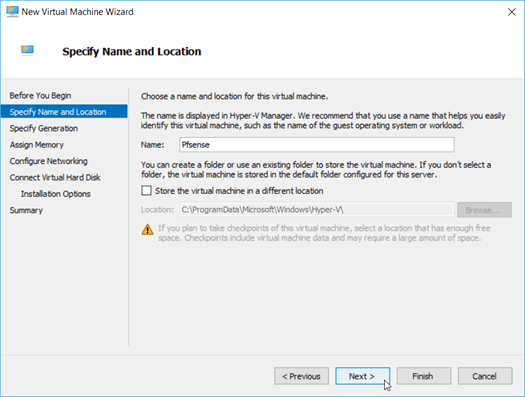
- You may enter the name of your firewall. In my case, I have named it as pfSense.
And click on Next.
Note: If you would like to change the storage location for the pfsense, you can do that here by clicking the checkbox that says Store the virtue machine in a different location. I am happy with the current location.

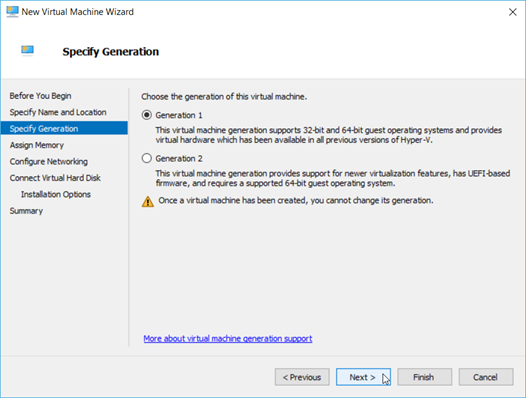
- Specify the generation.
You would need to specify the generation here, you need to choose generation 1 and click on Next.
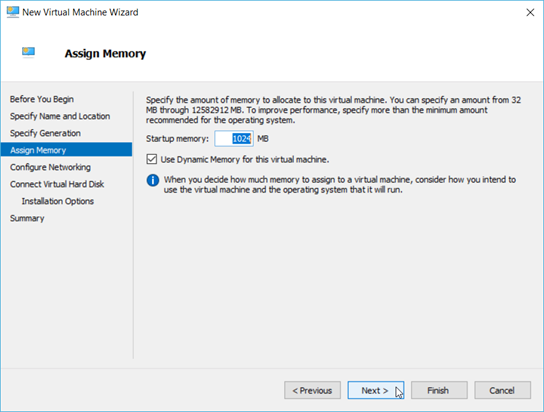
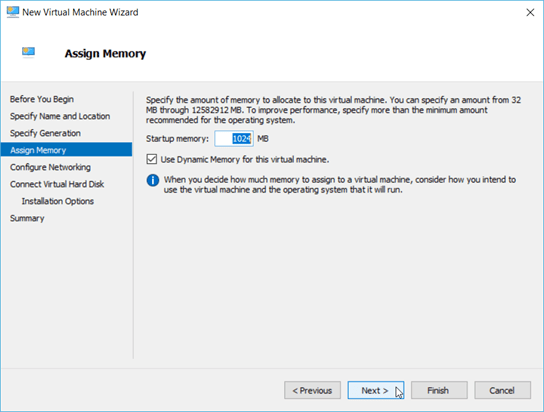
2. Configure the Memory.
We don’t require much resource for the pfSene firewall to run. Hence I am assigning only 1GB of ram. If you don’t have enough resources, you could give less than 1GB of memory as well.
Also, check the option – Use Dynamic Memory for this virtual machine.
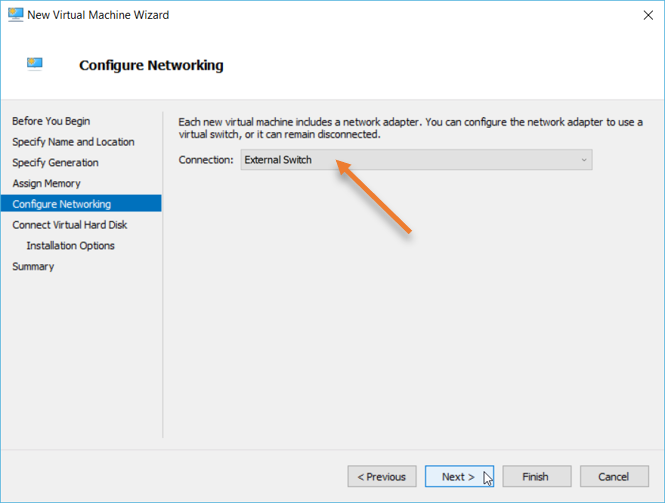
3. Pfsense network configuration.
As I mentioned earlier, pfSense has a WAN interface and LAN, as we have to connect the WAN interface to the internet. We are going to use an External switch for the same.
I have already covered how you can create a hyper-v virtual switch in this article.
Click on Next.

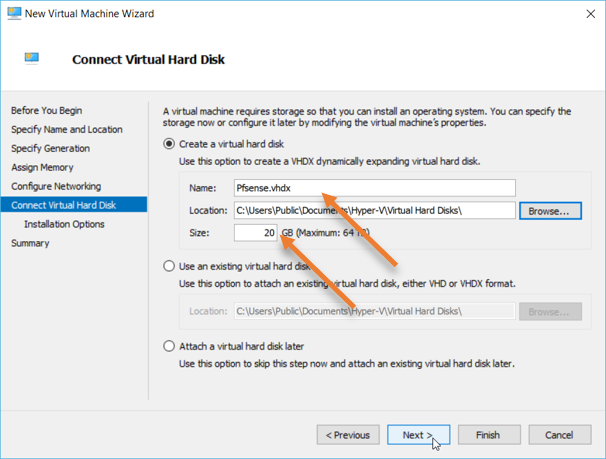
4. Configure the virtual hard disk for the firewall.
We need to configure the virtual hard disk for the VM. By default, hyper-v would try to assign 127GB of storage. However, it doesn’t require that much storage, so I am choosing 20GB.
If you plan to keep this VM as permanent and keep all the logs on the same VM, you will have to increase the storage.

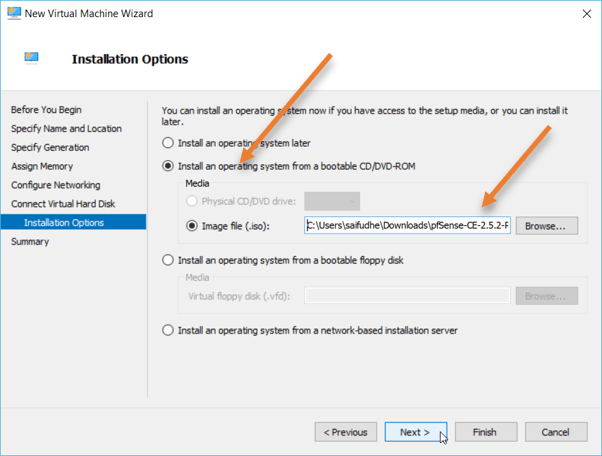
5. Choose the installation media.
We will choose the installation media, so choose to install an operating system from a bootable CD/DVD-ROM.
Attach the ISO in image file(.iso) by clicking on browse.
Click on Next.

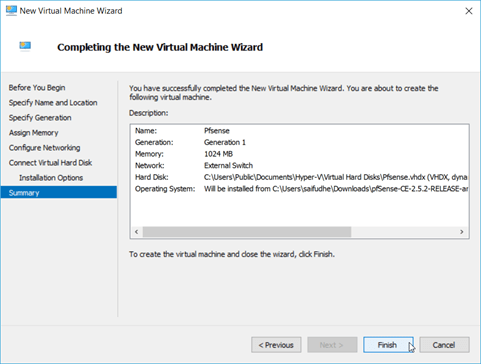
You would get a summary of the pfSense firewall that you will install. You may click on Finish here.

6. Add the LAN interface.
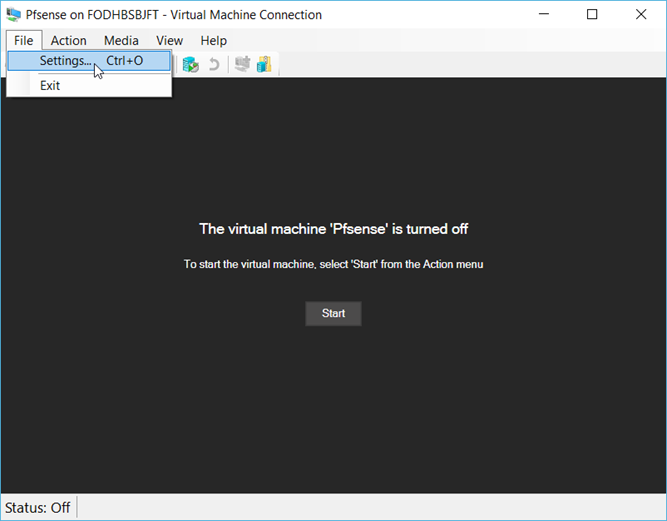
Double click on the pfSense firewall VM that you have installed on the hyper-v.
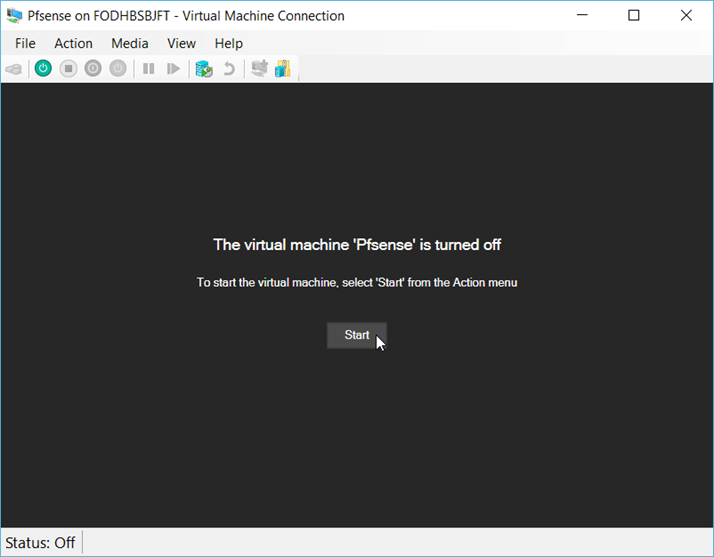
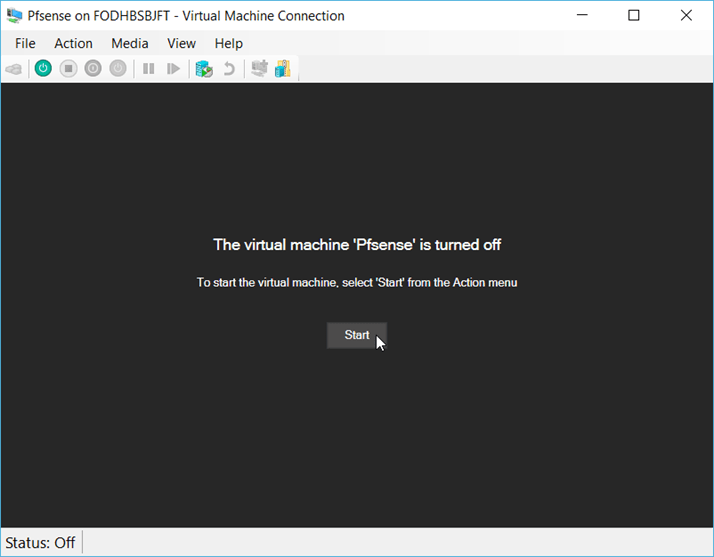
You will see an option that says the virtual machine ‘pfsense’ is turned off, do not turn it on at this time.
We had only added the WAN interface to the firewall during the installation wizard. We will now have to add the second interface, which is the LAN.
Click on FileàSettings.

In the settings window, click on Add hardware.
Choose Network adapter, and click on OK.
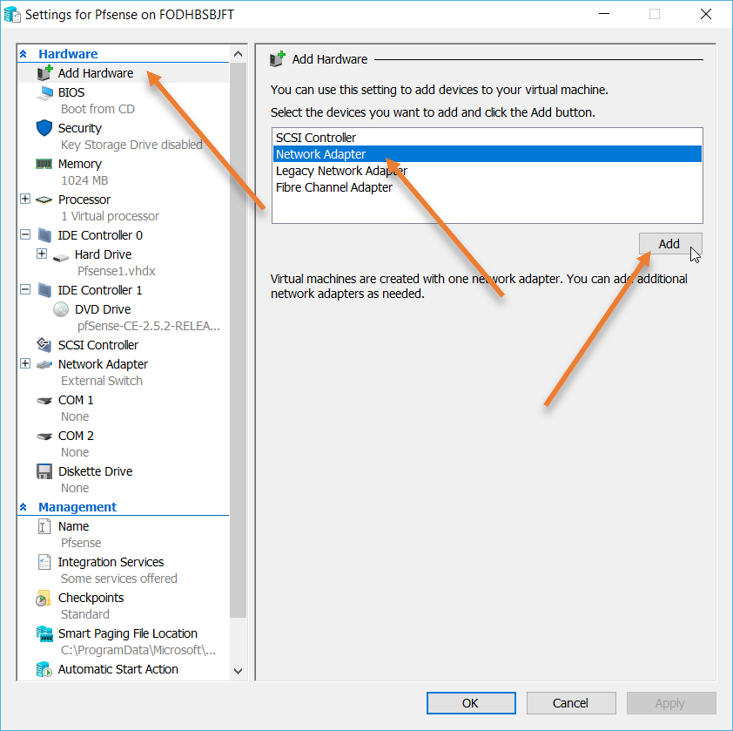
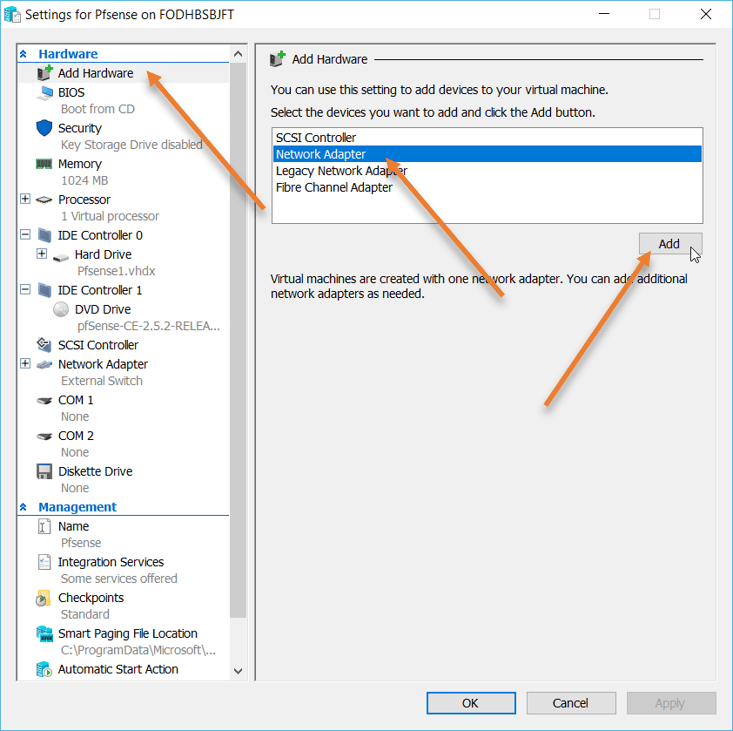
A new network adapter has been added as the second network adapter. Click on that.
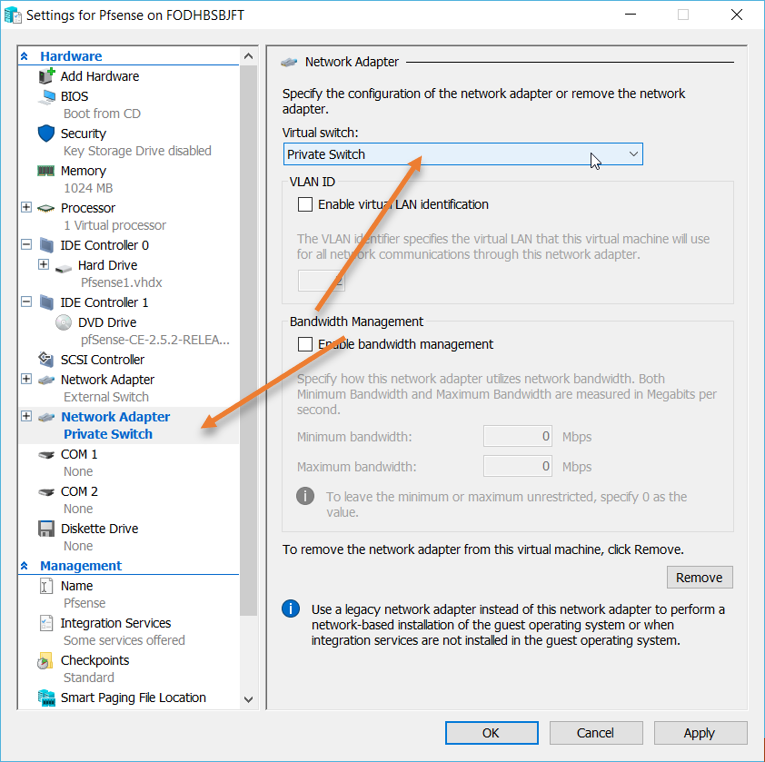
Change virtual switch to private switch and click on OK.
7. Install the Pfsense firewall.
We have all the prerequisites ready; let’s go ahead and proceed with the VM installation.
Come back to the pfSense firewall window and click on Start. This will initiate the pfSense firewall installation.
- Accept the copyright and distribution notice.
- Hit enter on Install.
- On the Keymap selection, choose the default keymap. By any chance, if you would like to change the keymap, you can do it here.
- On the partitioning, choose Auto (ZFS)
- Hit install on the ZFZ configuration.
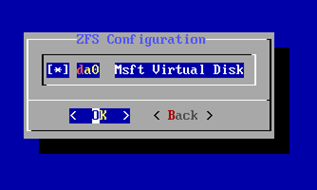
- Choose stripe and hit ok.
- You will be asked to choose the virtual hard disk. To make the selection, press the space bar, and once the choice has been made, hit OK.

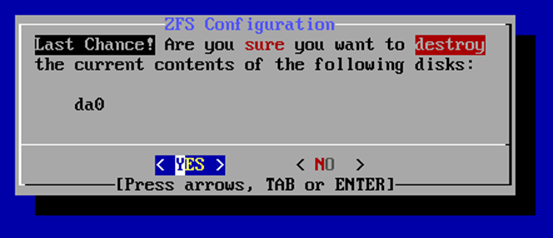
- You will get a warning for the hard disk format. Choose Yes by using the arrow key and hit enter.

The installation will now begin, and it may take a few seconds to finish the installation.
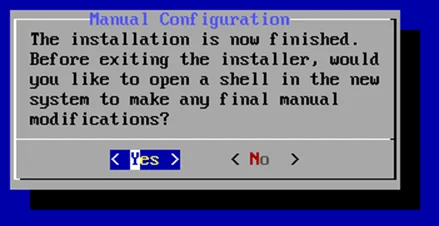
You will get a message that says the installation is now finished.
On the same prompt, click on Yes.

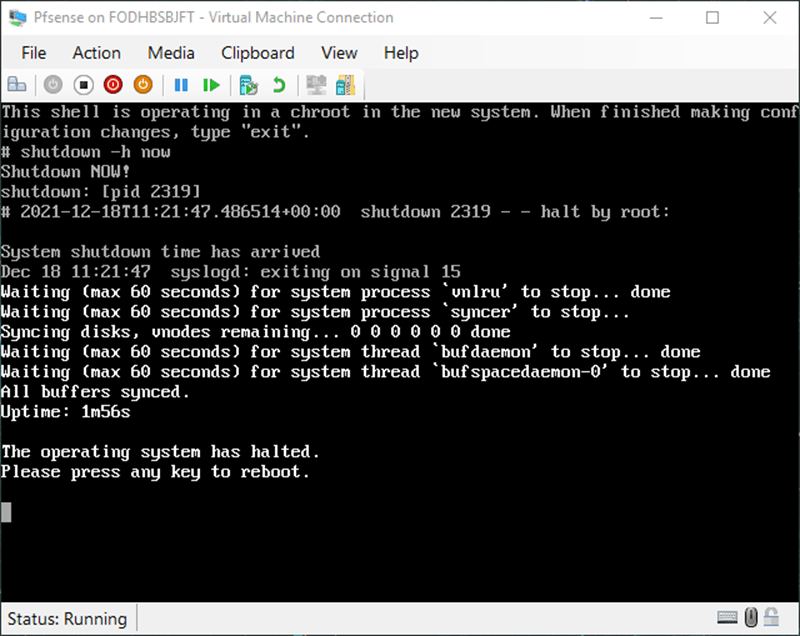
8. Remove the installation media.
You will get CLI access to the pfSense. Here we are going to shut down the VM now.
If you don’t shut down and go ahead with the reboot, the installation will continue again like a loop because we have the CD drive attached to the VM.
So the only way we can take out the virtual CD-Drive without causing an error is by shutting down the VM and disconnecting the CD drive from the VM.
On the CLI, type shutdown -h now
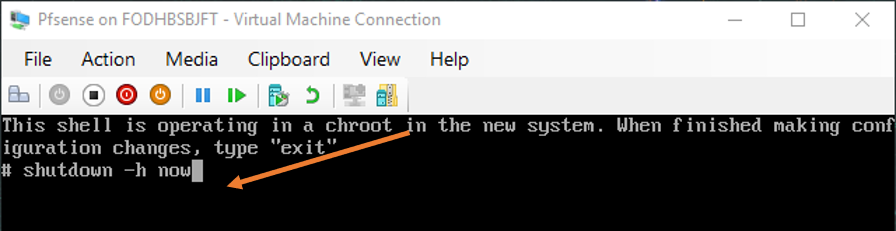

After a few seconds, you will get a message that says below.
The operating system has halted
Press any key to reboot.
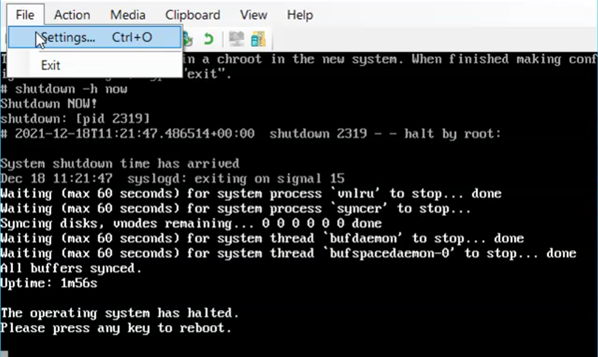
Do not press any key. Click on File–>Settings

On the settings windows, Under IDE Controller 1, select DVD Drive, and under media on the right choose None.

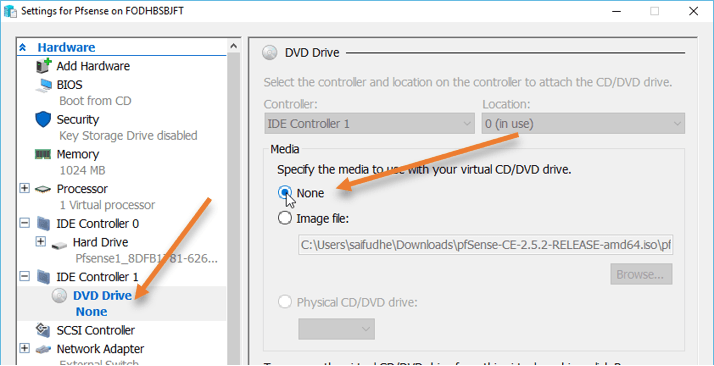
You can now press any key to proceed for the VM to reboot.
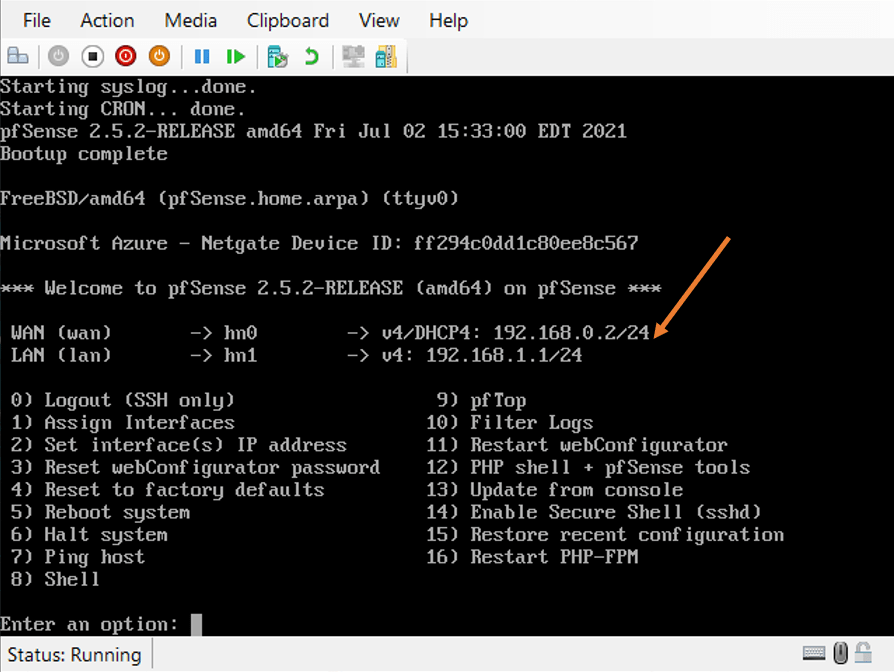
9. Configure the WAN and the LAN interface.
Once the VM has been rebooted, it should automatically pick up the interface that we assigned.
Answer the configuration wizard prompt to complete the vm interface configuration.
- Should VLAN be setup now = type no to that.
- Enter the WAN interface name = We need to choose the first interface, which is hn0
- Enter the LAN interface name = Choose hn1
- You will now get a message that shows the WAN and the LAN assignments.
- Do you want to proceed = Say Yes.
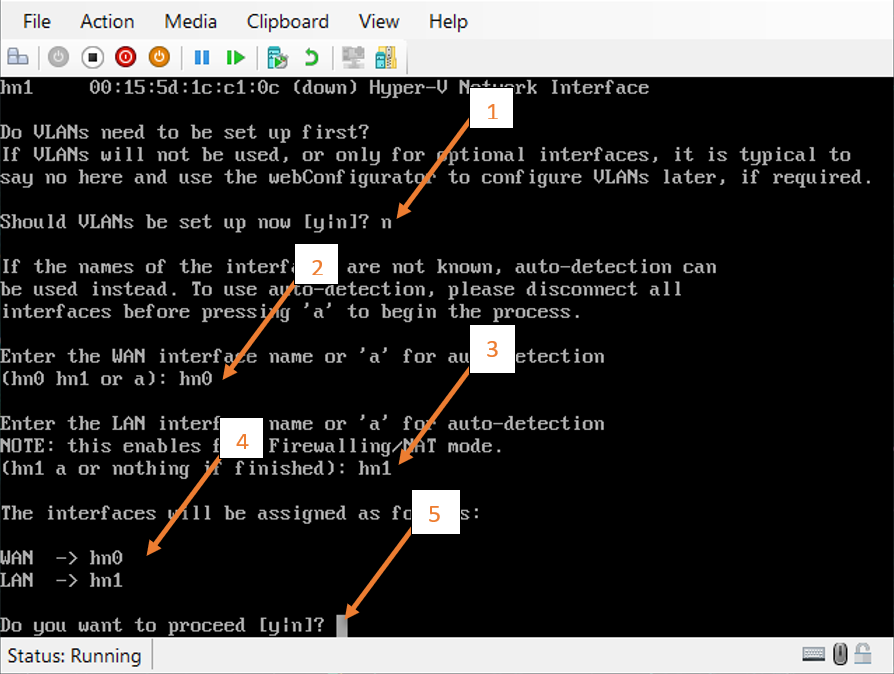
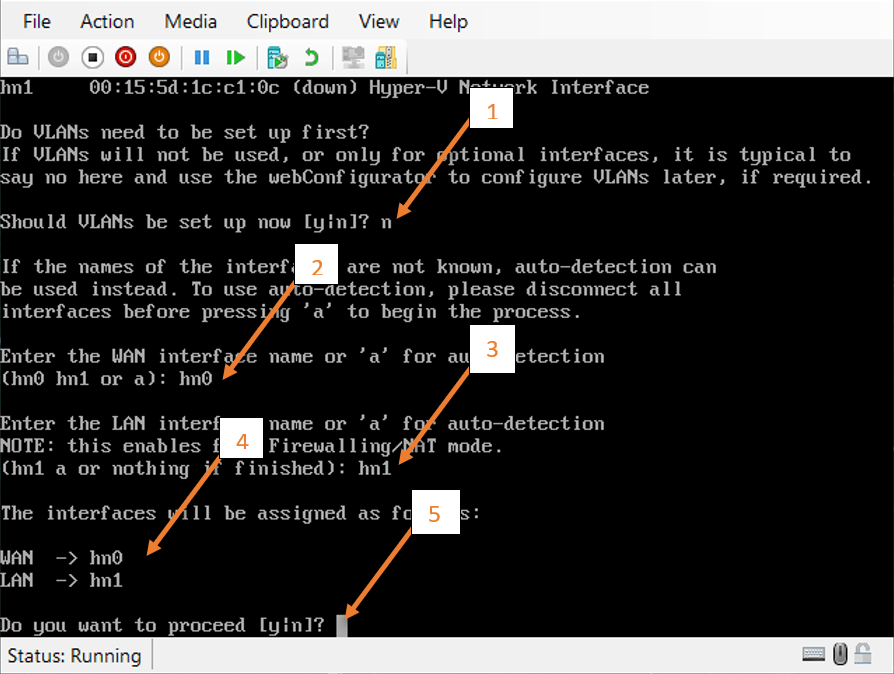
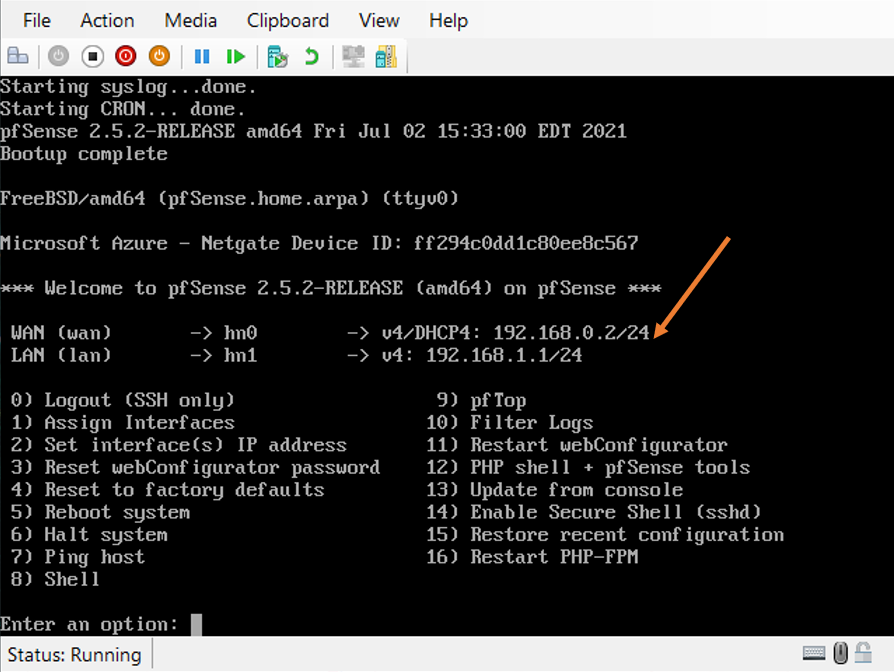
That’s it, we have successfully installed the pfSense on our windows machine with the WAN interface connected to the external network that has an Ip address of 192.168.0.2/24 and the LAN interface connected to the private network, and got an Ip address of 192.168.1.1/24.
That’s great.
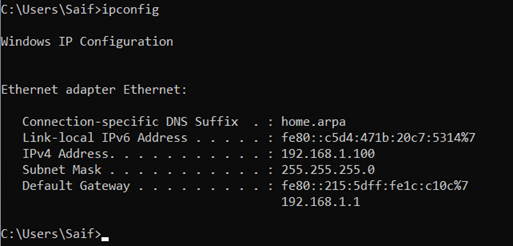
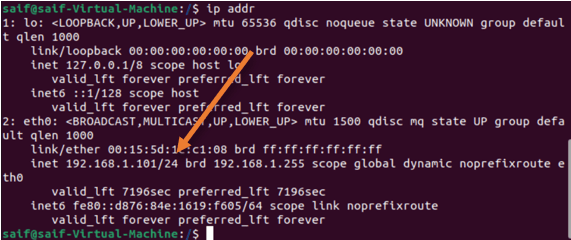
10. Verify the client connectivity.
I have spun up two VM in the hypervisors and connected them to the private network where the pfSense LAN is connected.
As you can see both of them got an IP address from the pfSense DHCP service.

11. Finish the initial setup wizard.
The only network from where we can access the pfSense LAN network is from the virtual machine that is attached on the LAN side.
Goto either of the virtual machine and access the web gui, by typing in the browser https://192.168.1.1
- Ignore the security warning and proceed.
- Enter the credential as below.
Username : admin
Password : pfsense
- You will get the initial setup wizard. Click on Next and next again.
- Enter the name as Pfsense-fw.
- You may enter the DNS Server of your choice and click on Next.
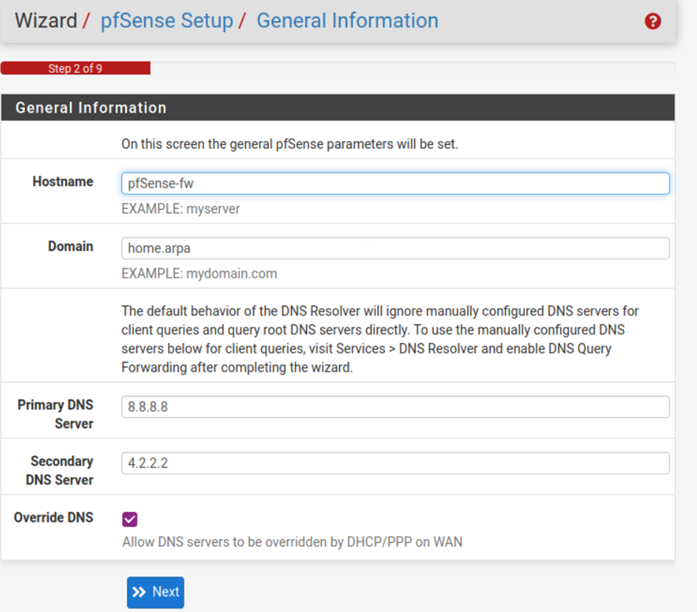

- Set the timezone.
- Configure the WAN interface à Leave the default unless you want to change it to static.
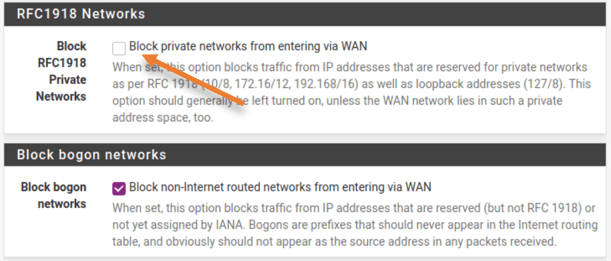
- Uncheck the option, Block private networks from entering the WAN.
As you know, we are already using the private IP address on the WAN side, and it doesn’t make any sense to have this enabled.

- You may change the LAN address if you want to. I am leaving the default.
- Finally, Reset the password.
12. Verify internet connectivity through firewall.
As you can see, I can reach the internet from the VM just fine. And the traceroute says, to get the internet, I am going through the firewall LAN IP. After that, click on Next.

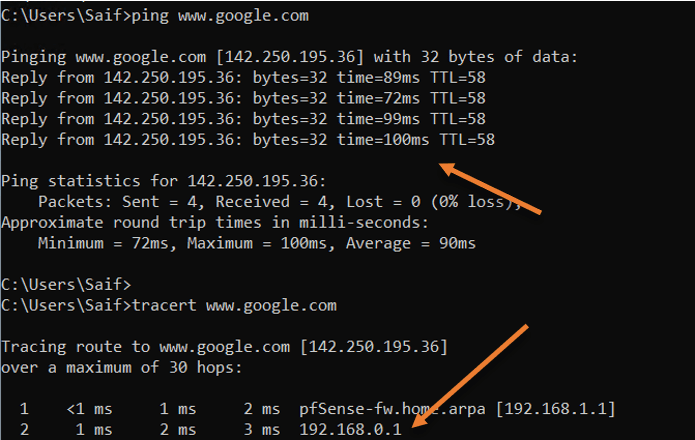
So by default, the private network cannot reach the internet, so what’s happening is here?.
- On the VM, when the traffic is destined for the internet, it will be sent to its default gateway, which is the pfSense LAN interface.
- PFsense has a default policy that will allow the traffic from the LAN to WAN.
- It also has the default NAT policy to convert the 192.168.1.0/24 network to pfSene WAN interface IP 192.168.0.2/24 and go out to the internet. Of course, my local router will take care of the traffic from there.