
The installation is pretty straightforward when you deploy the pfsense firewall at your home or office network. When the pfsense has more than a single interface, it would automatically pick up the WAN and LAN interface. You connect the ISP to the WAN interface of the Firewall, configure the WAN side on the pfsense. The LAN side is auto-configured with a private IP address, DHCP, Policies, and the NAT to go out to the internet. That’s the reason many people think the pfsense installation is very easy.
However, they get so frustrated and confused when setting up the DMZ. As the creation of DMZ is not easy as the LAN side. While the LAN side of the pfsense is pretty much auto-configured out of the box, it’s not the case with the DMZ.
First, you need to configure the interface for the DMZ and configure all the required services for it, including security policies, NAT policies, if you are using DHCP, DHCP services, and so on.
So it is a complicated process, isn’t it? It’s not, it is pretty straightforward, and in this blog, we are going to deploy a DMZ network in pfsense.
What is DMZ network in pFSense?
The term DMZ known as Demilitarized zone, is a type of network where you deploy all your public internet-facing servers. It could be a web server, mail server, FTP server, etc. It is similar to the LAN network, but there are some differences. While in the LAN network, most of the traffic will be outbound, meaning the users will initiate the traffic out to the internet and come back. In DMZ, however, most of the traffic will be inbound. You open a certain port, for example, http/HTTPS, for your web server, and anybody on the internet will be able to reach your web server inside the DMZ. We can also deploy a web server on the LAN side and allow external users to access the webserver from the internet, But that’s not a good security practice. If your web server on the LAN got compromised, your entire LAN side of the network would be affected. For any public-facing traffic, it is recommended to keep them on an isolated network such as DMZ instead on the LAN.
In this blog, let’s look at how you can set up a DMZ network in the pfsense firewall.
Below is the current network.
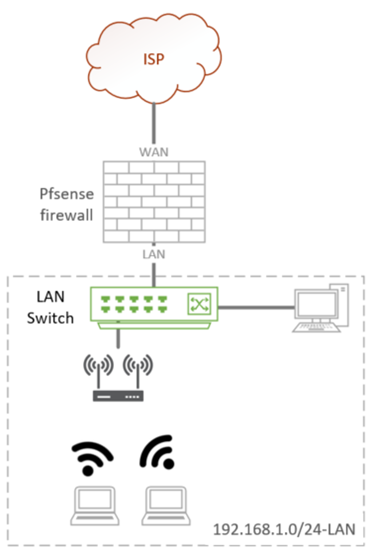

A basic pfsense network, where the pfsense WAN is connected to the internet and LAN side is configured with the default subnet 192.168.1.0/24 connected to a switch. The switch provides connectivity to the wireless access point and the wired client.
Everybody is happy. The users can access the internet, and the DHCP service is running for the client.
Now, you want to introduce a web server facing the internet, so what would you do?
If you don’t have any experience with network security, you would tell, let’s connect them to the LAN port and configure the firewall rules. But you should never do that. We need to introduce a DMZ network here.
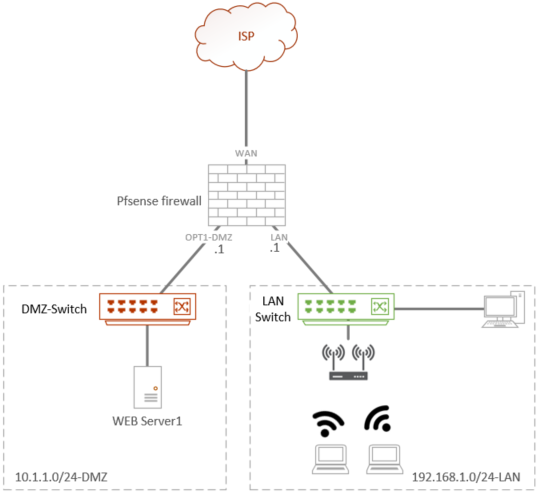
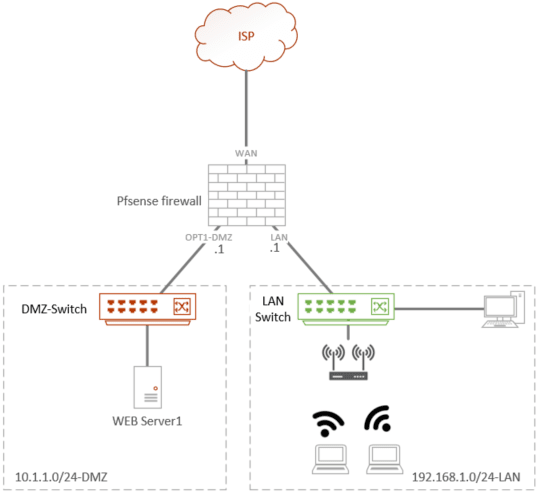
So your new network will be like below.
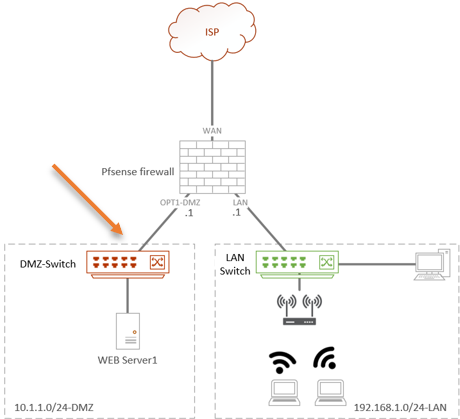
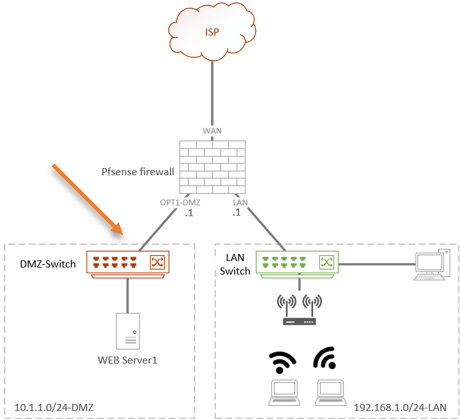
As you can see, I added a new interface with the 10.1.1.0/24 network, as DMZ.
- If you have the budget, it is recommended to have a separate switch for the DMZ, so in the future, when you add more servers to DMZ, you have to just plugin to the DMZ switch. If you are using pfsense at home and planning to use a single server, you might as well plugin the server directly to the OPT1 (3rd interface) interface.
- Another benefit of having a separate switch is that the DMZ traffic is physically separated from the LAN network.
- If you don’t want to use a separate switch, You can use the same interface that is connected to the LAN side as the DMZ, the way you would do that is by using VLANs. With VLAN, you are logically separating the network. You could keep the LAN network interface as it is, create a new VLAN for the DMZ network and assign the DMZ port accordingly on the LAN switch. You can check out the article here to see how you can set up a VLAN on a pfsense firewall.
- Once you have the VLAN part is taken care, rest of the configurations are identical.
Setup a Pfsense DMZ network.
When you connect a brand new physical server to the DMZ, it will have a data port and the management port in most of the deployments. In the case of the HPE server, the management port is called ILO. So, the server administrator will plugin the Data port into the DMZ port and the ILO port to the management VLAN. So the Management and the DMZ will be in a separate VLAN. So we are not covering the management part deployment here, just a plain DMZ network. So let’s go ahead and configure the DMZ interface first.
1. Configure the DMZ interface.
In Pfsense, the interface that connects to the internet is called WAN, and the inside interface is called LAN. Further, if you add more interfaces, those are called optional interfaces, that start as opt1, opt2, and so on.
We already have a LAN network created. We will now create a DMZ interface.
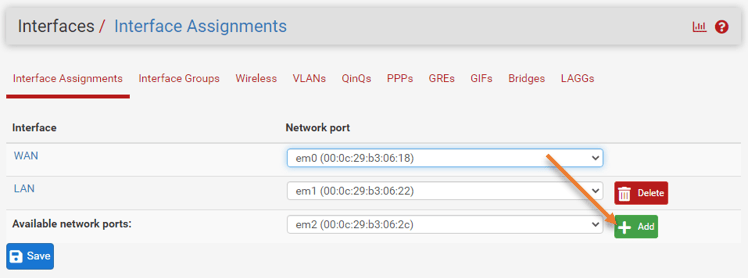
Goto Interfaces->Assignments
You can see the list of interfaces that are available on the pfsense, if you have only two interfaces configured, it will just show you WAN and the LAN, and if you don’t see any available ports. That’s because you have only two ports on the pfsense. In that case, you need to rely on a VLAN, so to add a virtual interface, you need to click on VLAN and configure the virtual interface from there. You can read about pfsense VLAN here.
Choose the available ports from the list and click on Add and Save.

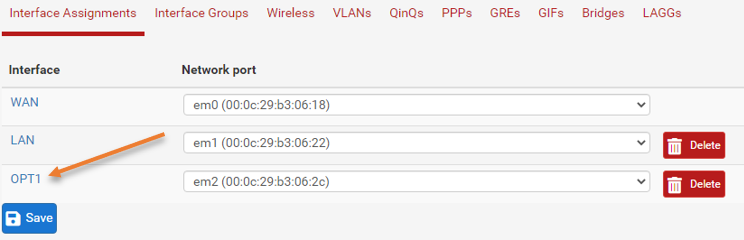
You will get a message interface that has been added, and the new interface will show as OPT1.
2. Configure the Pfsense DMZ IP address.
By default any new interface you add to the pfsense will be in a disabled state. We need to enable the interface first before you proceed with the IP address configuration.
Click on the OPT1 interface in Interface assignments.

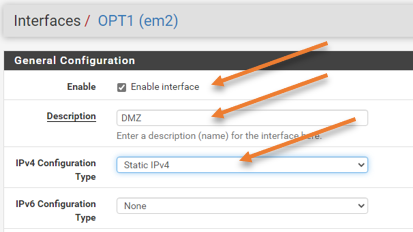
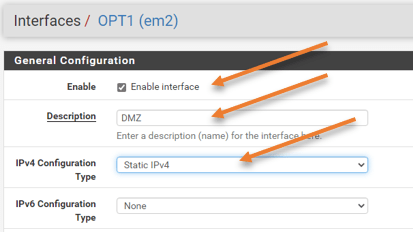
General configuration.
- Check the box that says, Enable interface.
- Description: DMZ.
- IPv4 configuration type: Static IPv4.
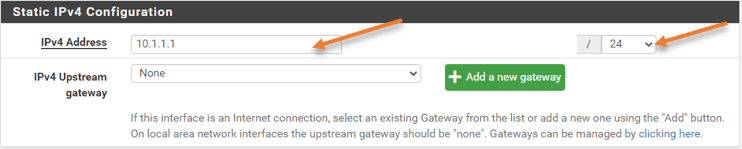
Static IPv4 Configuration.
Depending on your network size, you need to choose the subnet. Here I am configuring /24.
IPv4 Address: 10.1.1.1/24
Click on Save.

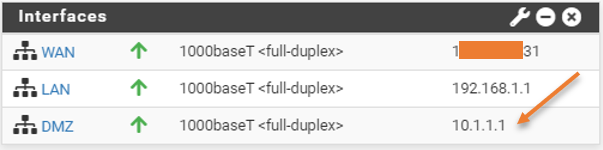
Go back to the dashboard and you can see a third interface is added as DMZ in the pfsense dashboard.

3. Configure the DHCP service.
In most DMZ deployments, you would assign the IP address statically to the DMZ server, but sometimes you may not have physical access to the remote office, and you ask the onsite guy to plugin the server and turn it on. If you don’t have DHCP configured, you will have to ask the onsite guy to configure the IP address statically. So I always create a DHCP service for the DMZ servers and reserve a few addresses in there, it makes the remote access a whole lot easier. You may skip this step if you don’t want to configure the DHCP service.
- Goto Services->DHCP Server
You will see LAN and DMZ listed there.
- Click on the DMZ.
The DHCP services are disabled by default. To enable the service check the box that says Enable DHCP server on DMZ interface.
- Under Range, I will create a scope with just the last 20 addresses. Between 10.1.1.234-10.1.1.254
- Under gateway, add 10.1.1.1 and click on Save.
Plugin the server into DMZ.
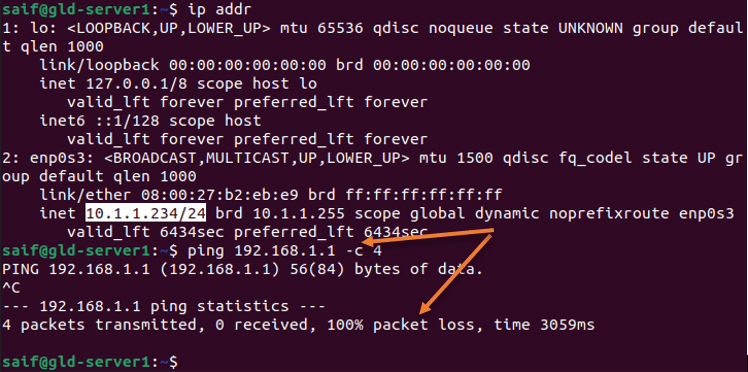
You may plug in the machine to the DMZ, and you will get an IP address from the Range that we configured on the pfsense DMZ DHCP service.
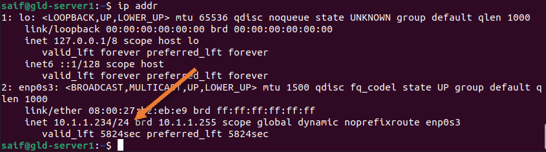

As you can see, I got the IP address 10.1.1.234. If you want to set the IP address to static, you may do that now.
4. Block traffic from DMZ to the LAN.
The first thing that you want to do is restrict the DMZ network from reaching the LAN side of the network. There is a reason why we separated the DMZ from the LAN side, so it doesn’t make sense to allow the traffic from the DMZ to the LAN.
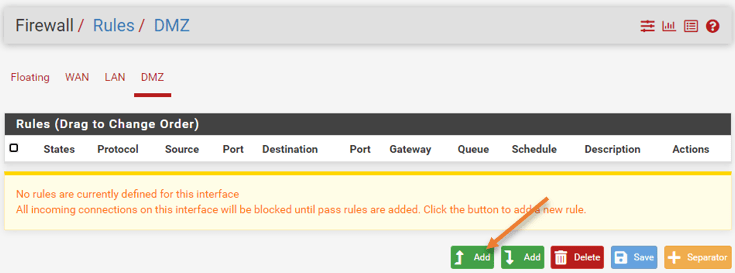
- Goto->Firewall->Rules->DMZ.
- The rules are currently empty. Click on add to add new rules.

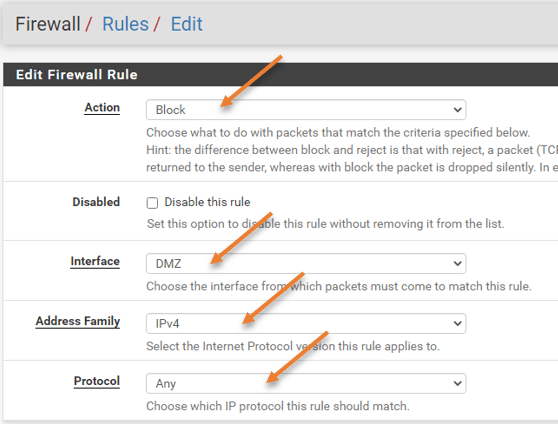
- Action: Block
- Interface: DMZ.
- Address Family: IPv4
- Protocol: Any.

- Source : DMZ Net.
- Destiantion : LAN net.


Test the connectivity.
Try to ping from DMZ host to LAN IP address, and this rule should reject it.

5. Allow the LAN users to access DMZ.
With the default LAN rule, you should be able to access the DMZ from the LAN, if not defined you may enable them.
The default LAN rule says, anybody from LAN network should be able to reach anywhere (Outisde/DMZ.)


6. Allow Internet access from DMZ.
The DMZ may be configured in different ways, it all depends on what you want to achieve.
Some companies will allow internet access to the entire DMZ. Some restrict internet access to specific VM’s or servers. Allow ports based on requests and approval from the security team.
We are going to allow internet access only to the webserver.
As you can see below, I can’t ping google’s URL from the webserver.


Create Alias for the Rule.
To save some time and make your rule management easier in the future, you can create an alias for the ports and the servers.
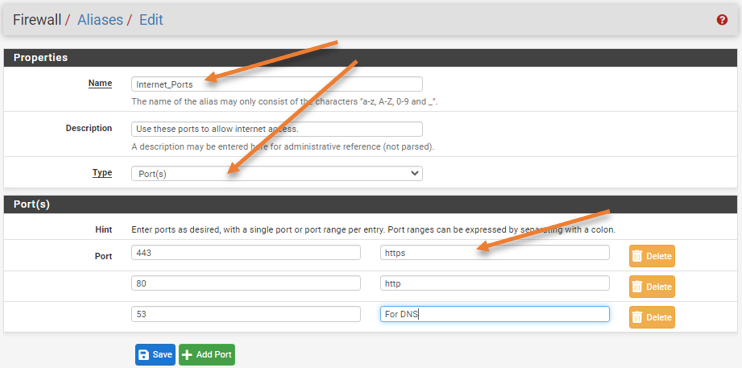
Firewall -> Alias->Ports.
For internet traffic, I will allow ports HTTPS, HTTP, and DNS.
- Name: Internet_Ports.
- Description : Provide some description.
- Click Add to add ports.

Add the Alias for the internet-enabled DMZ hosts.
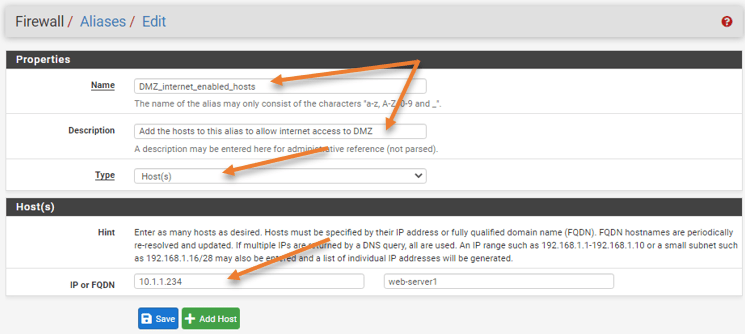
Firewall -> Alias->IP.
Click on Add to Add new Alias under IP.
- Name: DMZ_internet_enabled_hosts.
- Under hosts, you may click on Add to add new IP address and click on Save.

Create firewall rules to allow internet access.
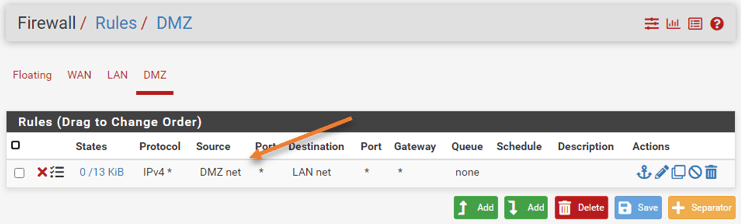
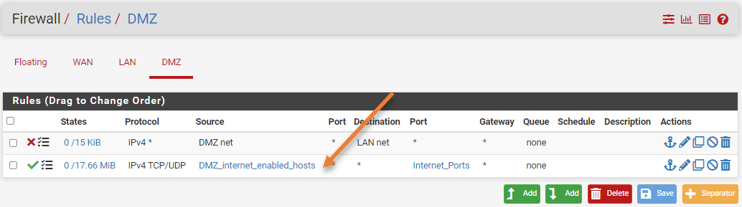
Click on Firewall->Rules.
Click on DMZ. We don’t see any rules in DMZ allowing internet, so by default, everything will be denied. Click on Add rules below to add a new rule in DMZ.

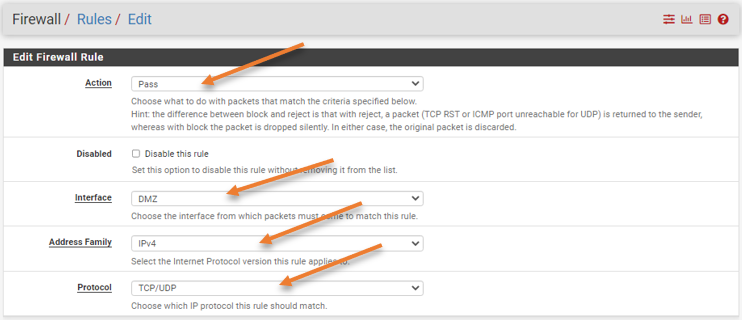
In the new rule,
- Action : Pass.
- Interface : DMZ
- Address Family : IPv4
- Protocol : TCP/UDP.

- In the source : Choose Single host or alias form the drop down.
- Choose the alias we added under IP.


- Destination : Any.
- Destination Port range : Choose other and select the port alias we defined.


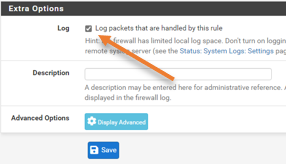
If you want to monitor the traffic, you may check the option Log packets that are handled by this rule and click on Save.

You have to ensure that the newly added internet rule is below the deny LAN traffic rule that we added before. Because the rules are processed from top to bottom.

Allow ICMP to the internet.
Since we cannot add the ICMP in the ports alias, you can create another rule to allow ICMP. It again depends on whether you want to allow internet access to outside.
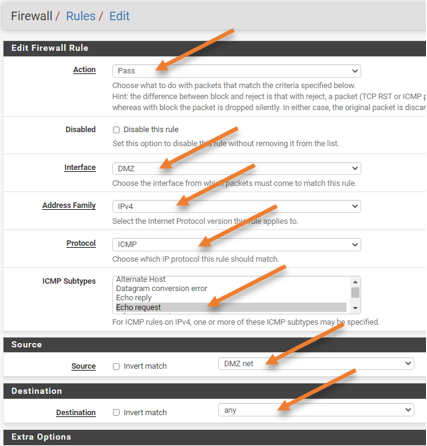
Click on Add below rule.
- Action : Pass.
- Interface : DMZ.
- Address Family : IPv4.
- Protocol : ICMP.
- ICMP Subtypes : Echo Request.
- Source : DMZ Net.
- Destination : Any.

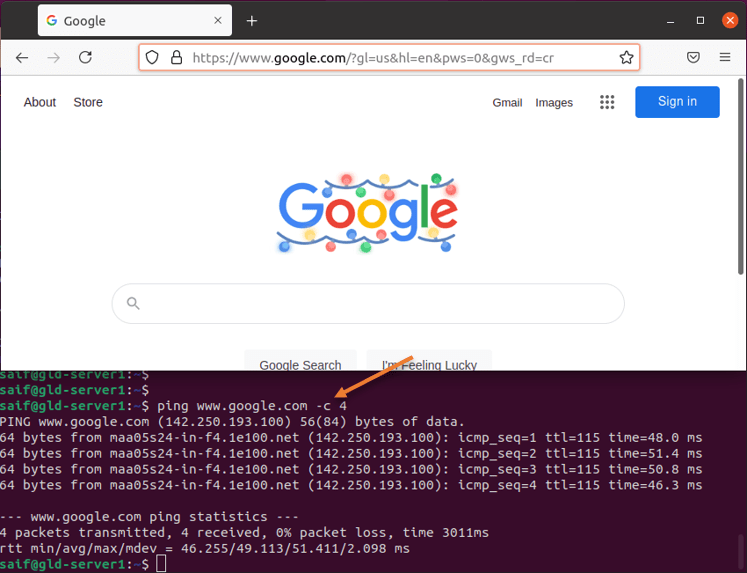
Test the internet access.
As you can see, I can browse the internet from the server and also ping is working fine.

7. Allow inbound access.
When you deploy a web server in DMZ, you want everyone on the internet to reach your webserver on Specific ports, in our case, it is either on port 80 or 443 to your DMZ. You must have a public subnet configured at the DMZ side. It is common to have a handful of Static public IPs available for the companies to use for DMZ. Some companies use the public IP directly on the server, whereas others use private IP addresses on the DMZ and do one to one NAT to the public IP. In the second scenario, the LAN users can access the DMZ network using the private IP, and when the internet users want to connect, they can use the public IP.
In our setup, we are going to use the private IP address on the servers from 10.1.1.0/24, as I have shown before. So to allow communication from the internet, either we need to configure port-forwarding on ports 80 and 443 if you have a single public IP, check out the article here to learn more. Or create one to one NAT, also known as static NAT.
So if you don’t have an available public subnet, the only options are port forwarding or the 1:1 using the external single public IP.
We will look at the DMZ port forwarding with a single IP address and static one-to-one nat using another public IP from the same subnet.
Pfsense DMZ port forwarding.
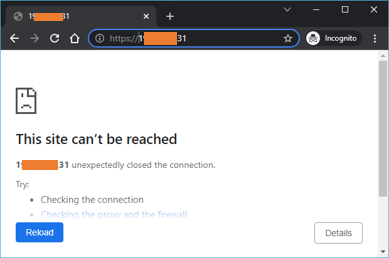
Let’s suppose my public IP address is 1.1.1.1, and if anyone tries to reach the IP with ports 80 and 443, it will not respond because any communication from outside is blocked.
Note: The configuration we will set up is on pfsense located in a lab environment. Not all firewalls are configured the same way in production, so you need to check your Firewall to confirm port 80, and 443 is not allowed on the WAN side. Also, port forwarding will not work if you have carrier-grade NAT applied by the service provider. Check the article here to know why the pfsense port forwarding is not working. In the end, you need to make sure the rule that we apply doesn’t conflict with the production network.
In the port forwarding, we will tell the Firewall.
When anyone on the internet is tries to reach 1.1.1.1 on 443, redirect the request to the DMZ server on 10.1.1.234 on port 443.


As you can see, I am trying to reach my pfsense firewall outside IP, and it is not working because we have not configured port forwarding yet.
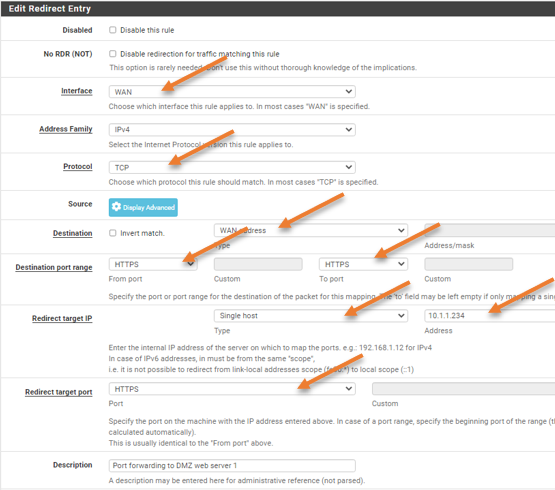
To configure the DMZ port forwarding,
click on Firewall->NAT->Port Forward->Add.
- Interface: WAN
- Address Family: IPv4
- Protocol: TCP
- I am not editing the source address (Display Advanced in the source), as it is set to any by default.
- Destination: WAN address.
- Destination Port Range: HTTPS.
- Redirect target IP: Single host->10.1.1.234
- Redirect Target Port: HTTPS
- Add the description if you want to, click on Save and apply the configuration.
- Save the configuration.

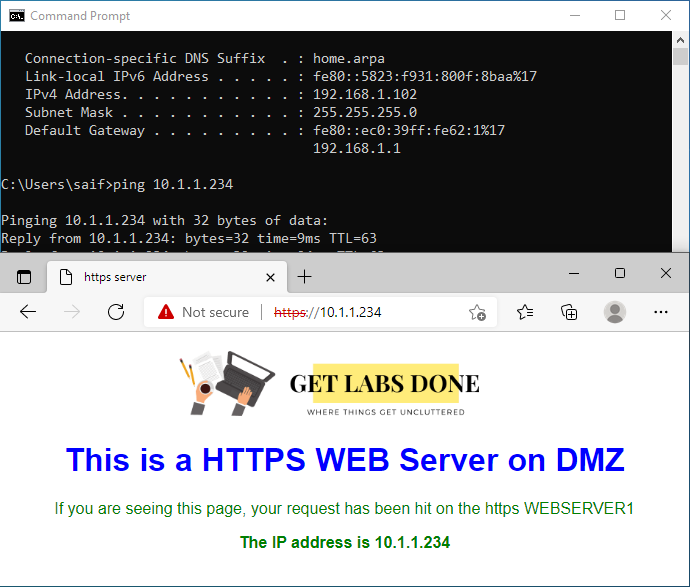
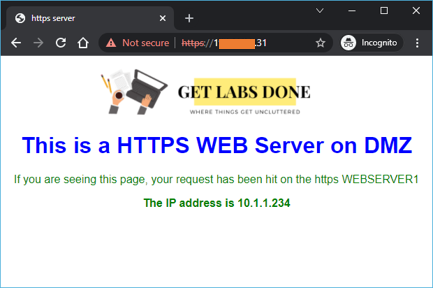
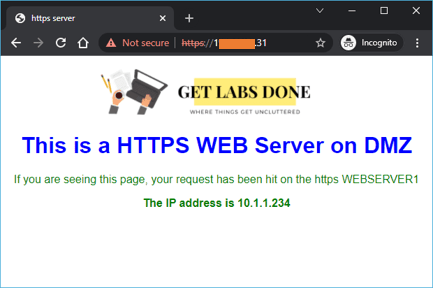
After I have made the changes, I can access the web server from the internet. Though I access the public IP of my Firewall, I am accessing the private host in DMZ.
Note: If you plan to add another web server and configure port forwarding again with the same interface with the same port, it will not work as the outside IP is already mapped to port 443. You need to have alternate public IP in that case.
DMZ Static NAT.
Let’s go ahead and do static NAT and see how that will work. We can assume that we have /24 static public IP from the service provider.
We are going to use one of the IP ends with x.x.x.250 to map it to 10.1.1.234
Note: The reason I am using x.x.x.250 instead of actual IP, because I don’t want to expose my public IP, so it is actually a public IP.
First assign x.x.x.250 as the virtual IP in pfsense.
When you add virtual IP in pfsense to a particular interface, it acts kind of like another physical IP, which you can use for Static NAT or 1:1 NAT.
Goto Firewall ->Virtual IP’s ->Click on Add to add new virtual IP’s.
- Type : IP Alias.
- Interface : WAN
- Address Type : Single address.
- Addresses : x.x.x.250/32
- Click on Save.


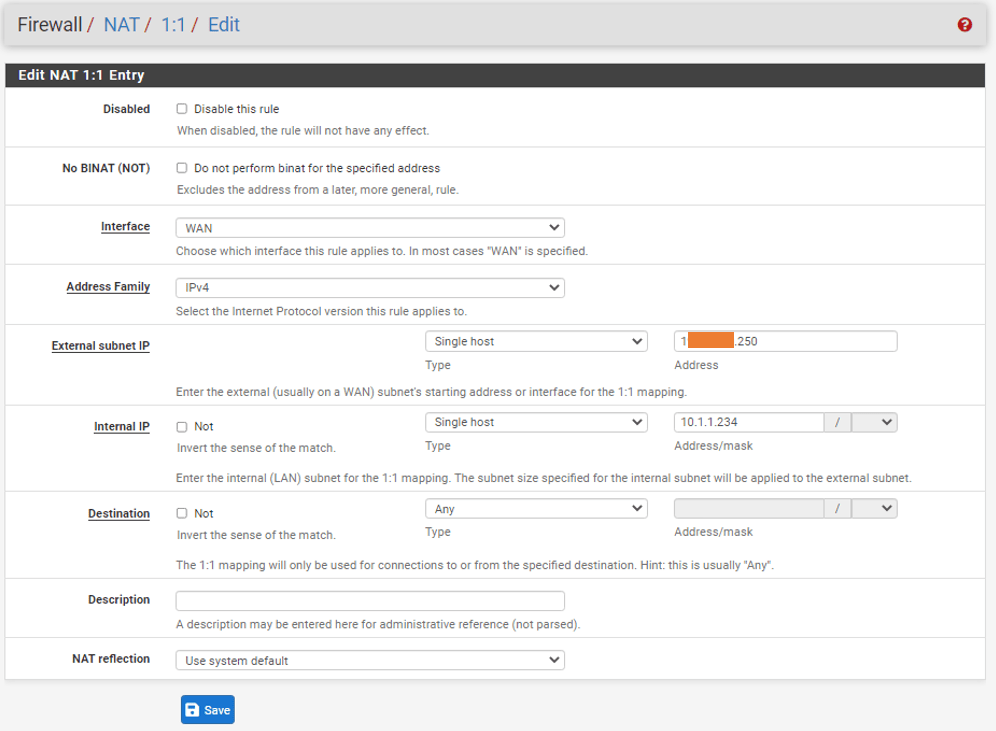
Configure the 1:1 NAT.
- Goto Firewall -> NAT->1:1->Add.
We will assign the virtual public IP to our internal private subnet.
- Interface: WAN
- Address Family: IPv4
- External Subnet : x.x.x.250, your virtual IP.
- Internal IP: Single host ->10.1.1.234
- Destination: Any
- Click on Save.

8. Allow HTTPS port from outside to web server.
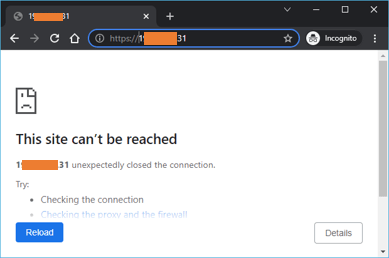
We have created the one-to-one mapping. But it will be denied when anyone tries to access your public IP.
As you can see below, it is rejected!
but wait, why is it showing the destination as 10.1.1.234 instead of x.x.x.250?
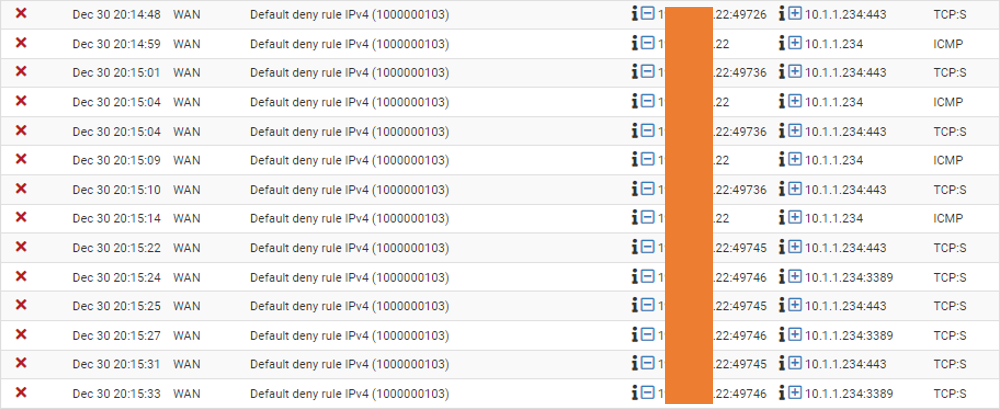
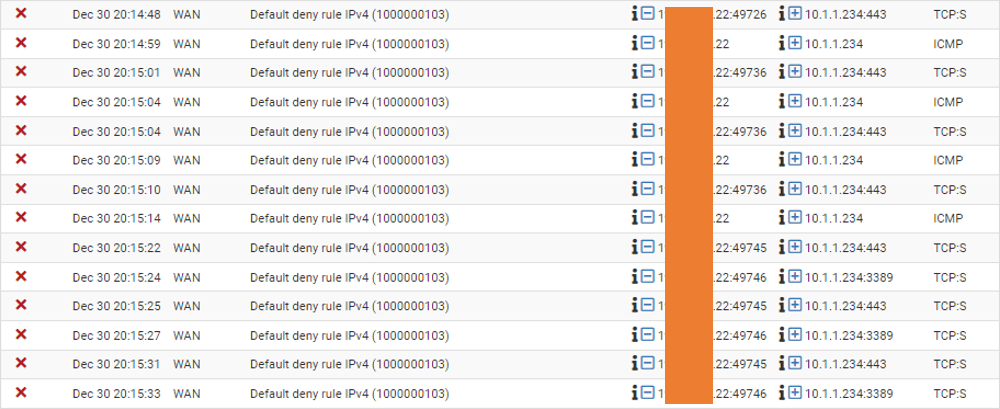
That’s because the NAT will perform first before the policy.
So we need to configure a policy to allow the traffic to 10.1.1.234 on port 443 from the internet.
DO NOT ALLOW ‘ANY’ TO THE SERVER. THAT WILL PUT YOUR SERVER AT RISK. Only ALLOW ports that needs to be exposed to the public internet.
To allow any traffic coming from the internet to 10.1.1.234 on HTTPS port.
Firewall->Rules->WAN->Click on Add rules below.
- Action: Pass.
- Interface: WAN
- Address Family: IPv4
- Protocol: TCP.

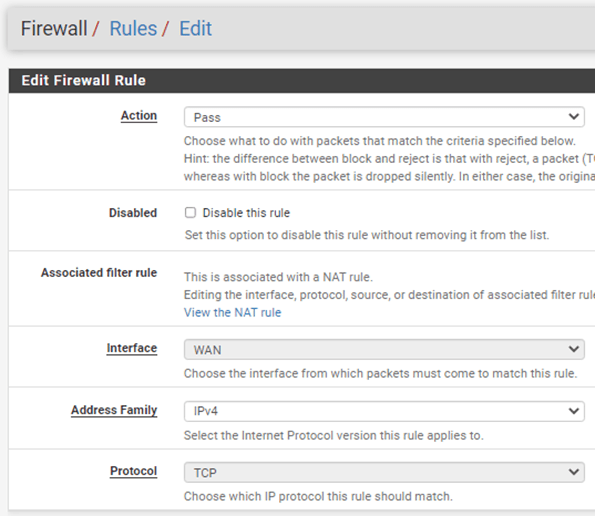
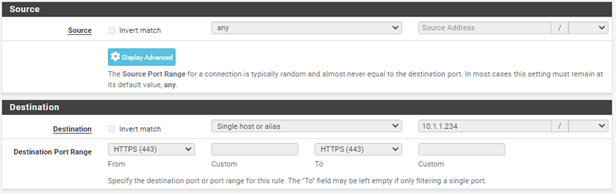
- Source : Any
- Destination : Single host or alias -> 10.1.1.234

Test the connectivity.
After we configured the policy, I can access the webserver directly.
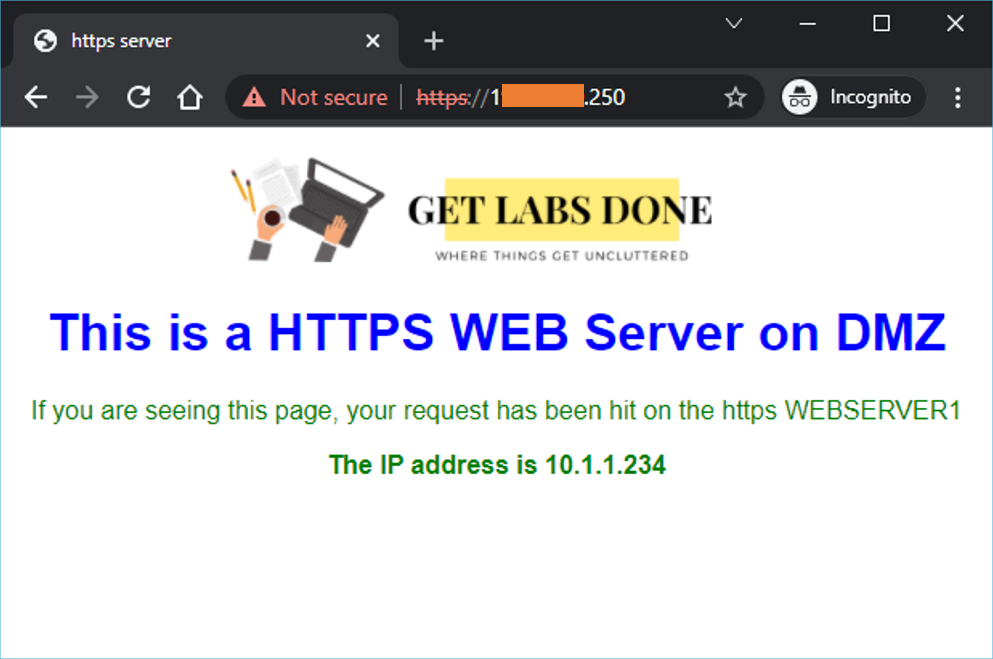

That’s it, we have successfully deployed the DMZ network in PFsense. When you want to add a new web server, you connect to the DMZ switch and modify the rule accordingly. You also keep in mind that if you have port forwarding and the STATIC NAT configured for the same public IP, the port forwarding will take precedence over the static NAT. So to make the static NAT active, you need to disable port-forwarding.