Pfsense is an open-source firewall that you can spin up in your home, as well as in the enterprise network. I have been using the pfSense community edition on my network for quite some time now, and it performs well. Apart from the security, I could use its features, mainly the OpenVPN, IPsec tunnels, and even load balancing.
We have discussed how you can deploy a pfSense firewall on different hypervisors, even turning your old computer into a firewall. We will install pfSense on an AWS cloud ec2 Instance in this lab. You have to remember that the pfSense community edition is not available for AWS; instead, we have to use pfSense plus, which is almost identical.
How to deploy Pfsense in AWS cloud?
Pfsense has two interfaces that connect to the LAN side and the WAN. So we need to make sure each of these networks is not in the same Subnet. So how do we do achieve that?
We need to create a separate network called a Private network for the LAN and a public Network for the WAN. The instances connected on the private Subnet will forward the traffic to the pfSense LAN side and go off to the internet instead of directly offloading from the internet gateway.
It may seem so much to you when you think about it, but Don’t worry, let us break it down, and at last, you will be able to connect all the pieces.
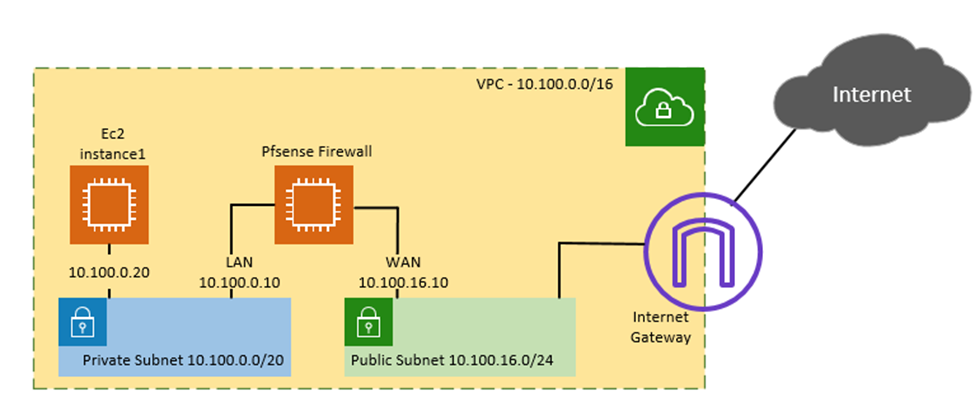
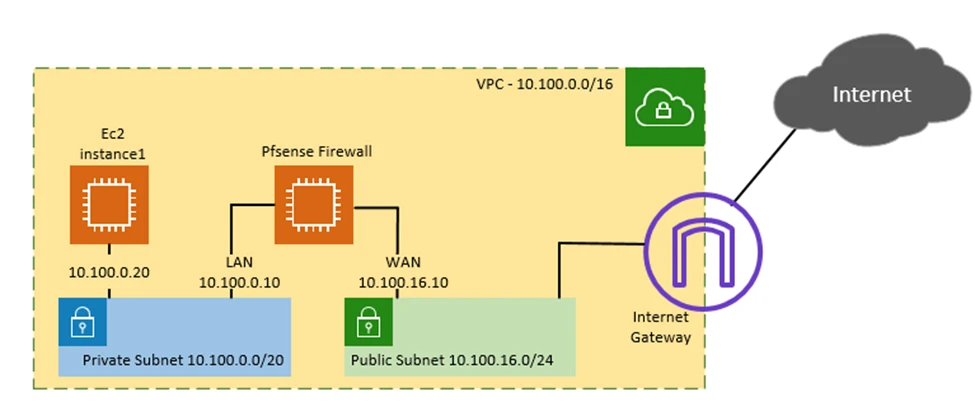
Below is the topology that we are going to work
We will create a private and public network to spin up the pfSense LAN side in the private Subnet and WAN side on the Public Subnet. Eventually, test the connection by spinning up another VM on the Private Subnet. And access the Private VM from the internet, and the traffic will go via the pfSense firewall.
- Create a VPC with Public and Private Subnet.
- Create a Keypair.
- Instantiate the Pfsense firewall.
- Create the security group.
- SSH into the firewall.
- Reset the Web password.
- Attach the LAN interface.
- Point private routing table to pfSense LAN interface.
- Spin up a VM in the Private Subnet.
- Enable pfSense port forwarding.
- SSH into the Host using through pfSense.
- Test the internet connectivity of the Host.
1. Create a VPC with Public and private subnets.
In our last blog, I showed you how we could create a public and private subnet in AWS VPC from scratch, and we are going to use the same topology to start this blog post. So make sure you have the following before you proceed. Go back to the previous article and complete the following.
- VPC with the private and public Subnet.
- On the public Subnet, enable auto-assign of public IPv4.
- Internet gateway has connected to the VPC.
- Public and Private route table.
- Associate Private subnet into Private route table and Public Subnet into the Public route table.
- Default route pointed to the internet gateway on the Public route table.
2. Create a Keypair.
As you know, in AWS, the only way you can ssh into a host is by using the ssh key pair instead of the username and password. Though you can still use credentials to log in, but recommended to use keypair for security reasons instead of Credentials.
You might already have a Keypair configured with your account, and if you do not have one, you may create one now.
Log in to the AWS dashboard àServicesàClick on EC2.
It will be directed to the EC2 dashboard now.
On the left side, under Network & Security, you will find Key Pairs. Click on that.
- Click on Create Keypair option on the top right corner.
- Provide a friendly name, choose the private key format as .pem and click on Create Key Pair.
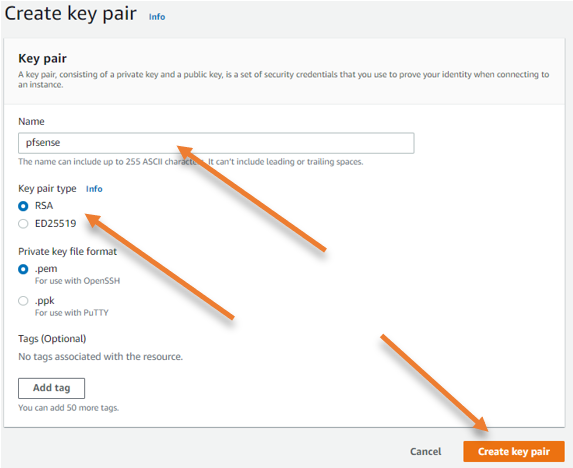

- You have to download and save the keypair. Save the private key in a safe location.
3. Instantiate the Pfsense firewall.
We have all the pre-requisite ready; now, let us go ahead and start the pfSense instances. You need to remember one thing, In AWS, pfSense is not entirely free; however, if you want to spin up and learn about PfSense, it is an excellent place because AWS provides a 30 day free trial for your Instance. The free trial is given only for a single Instance; it will be charged if you spin it up for two Instances.
In the EC2 Dashboard, under Instances–> click on Instances.
- Click on Launch instances.
- Choose an Amazon Machine Image (AMI), click on Aws marketplace.
- In the search field, search for pfSense and hit enter.
- You will see pfSense+ AMI here. To choose that, click on Select.
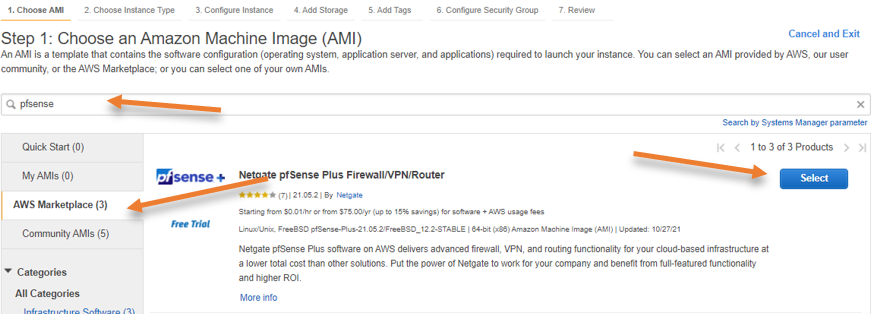

- It will get directed to a page, showing you the details about the pfSense + instances and charges based on each supported EC2 Instance. We will run t2.micro here, though; in AWS free tier, t2.micro is free tier eligible; you will be charged for the pfSense instances after your trial expires.
Click on Continue here.
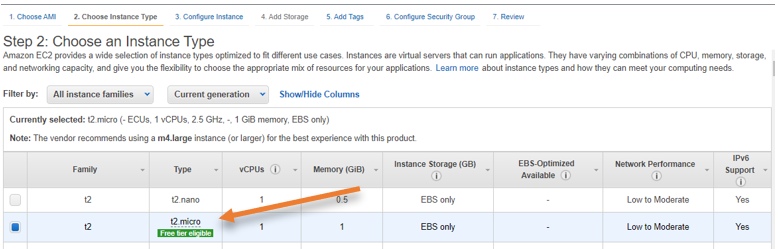
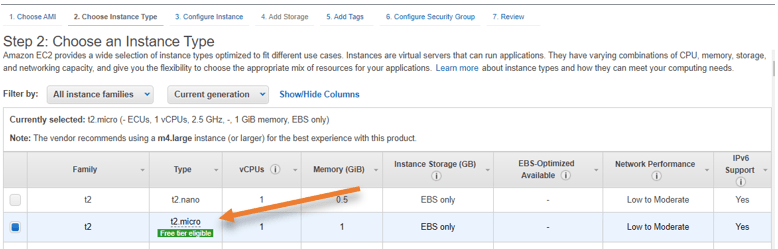
- From the instance type, choose the t2.micro Instance and click on Next: Configure Instance Details.
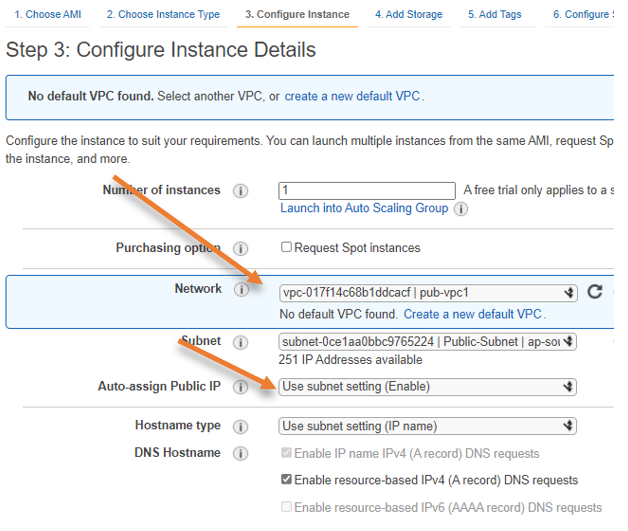
Configure instance details.
The pfSense has two interfaces; one is for the WAN, and the other is for LAN. You need to keep the WAN interfaces on the public interface and configure the LAN Interface later.
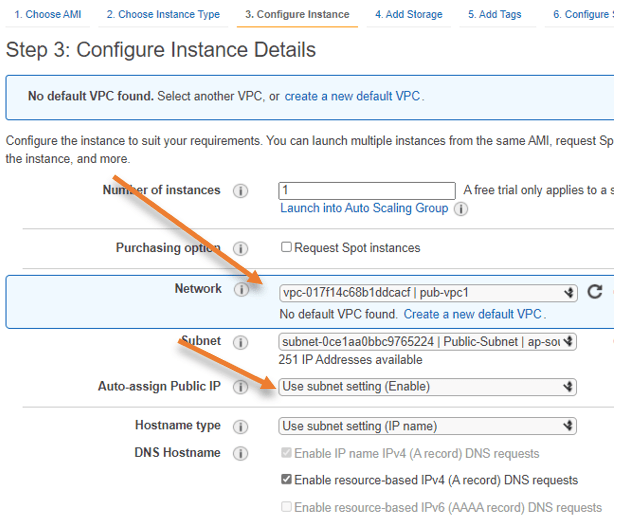
- Under network, ensure you have chosen the correct VPC from the list.
- In Subnet, choose the public Subnet.
- We also need to ensure that the auto-assign public IP is in the enable state.
Note: In the production environment, you will have to use an elastic IP when you configure the WAN side of the pfSense firewall, so the public IP will never change. However, I will go ahead with the auto-assign of public IP for this setup.
The interesting part is, I have rebooted my pfSense instance multiple times but it never revoked the IP.
You can also set the password by adding the values in user-data; we will not do that here so that the pfSense will create a random password instead of the default one, ‘pfsense’. Later we will reset the password by SSH into the Instance.
- Configure the IP address for the WAN side.
Scroll down to the network interfaces.
In the Primary IP, it is Auto-assign. Click on it to configure the Static IP address from the public Subnet.
I am going to use 10.100.16.10 as the WAN side IP.


- Click on Next: Add Storage.
I am leaving the default values except for one in storage.
If you look at Delete on Termination under storage, it is unchecked, unlike other instances in AWS.
If you terminate the Instance, EBS volume will still not get deleted if you uncheck the ‘Delete on Termination’ option. If you like to keep the storage, you may leave the default, so even after deleting the Instance, you can attach the same storage later on to the other pfSense instances.


Since this is primarily a lab setup, I recommend checking the option before proceeding.


Note: In production, the default storage of 8GB will not be enough for the long run, so you will need to be mindful of that.
- Click on Next: Add Tags.
Under tags, I have added the name Pfsense-fw, so it will be easier for me to recognize the VM on the EC2 dashboard.
Click on Next: Configure Security group.
4. Configure the Security Group.
By default, it will create a security group, where http, HTTPS, and ssh traffic is allowed from anywhere on the internet.
I don’t like the default rule because the firewall management IP is on the public internet, and I don’t want everyone on the internet to be able to reach my firewall management interface. Though I can control all the traffic coming to the firewall, if I could filter out some traffic from the AWS side; I would do so.
To secure the environment, instead of allowing all the IP’s (0.0.0.0/0) from the internet, I will permit my static IP instead.
Many of you out there may not have the static IP; in that case, you can get your dynamic public IP address here and add them to this list. However, the dynamic IPs will keep changing, so if you lose access to the firewall management side, it is most likely that your internet IP is changed. So you will have to allow access to your new IP on the AWS security group again.
If it is purely for testing, you might leave the default value.
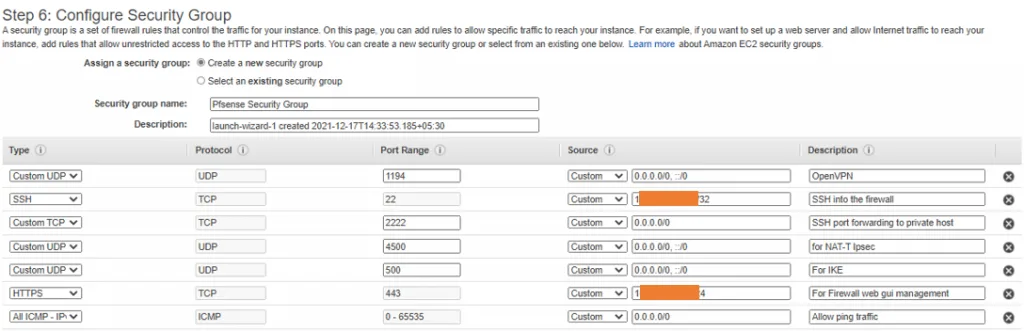
- I would also want to allow the ports 500 and 4500 from anywhere for IPsec tunnel; this will allow me to create IPsec tunnels from other compatible hardware to my pfSense Instance.
- Also, open port for OpenVPN, 1194, so I can connect to the Pfsense OpenVPN anytime from my local machine and my handheld devices.
If you are not planning to use pfSene for IPsec and OpenVPN, you may not add them to the rule; after you are happy with the rule, Click on Review and Launch.
- I would also allow ICMP from anywhere.
- Since I will perform port forwarding for ssh over port 2222, I will allow that on the AWS side as well.
In case if you are wondering, why allow port 2222 because I would be testing the firewall network by keeping another host in the private Subnet, so the only way I can get to the Private Host is through my firewall. So I would configure port forwarding on the pfSense, but for that to work, I will have to allow a specific port that I am forwarding on the AWS security group first.
So with the above in my I am creating a new security group, Name the group and add the required ports.

You will get a summary of your configuration, make sure everything is correct, and click on Launch. If you want to make any changes, you may click the previous button.
Choose the SSH keypair and Acknlodge and click on Launch Instances.
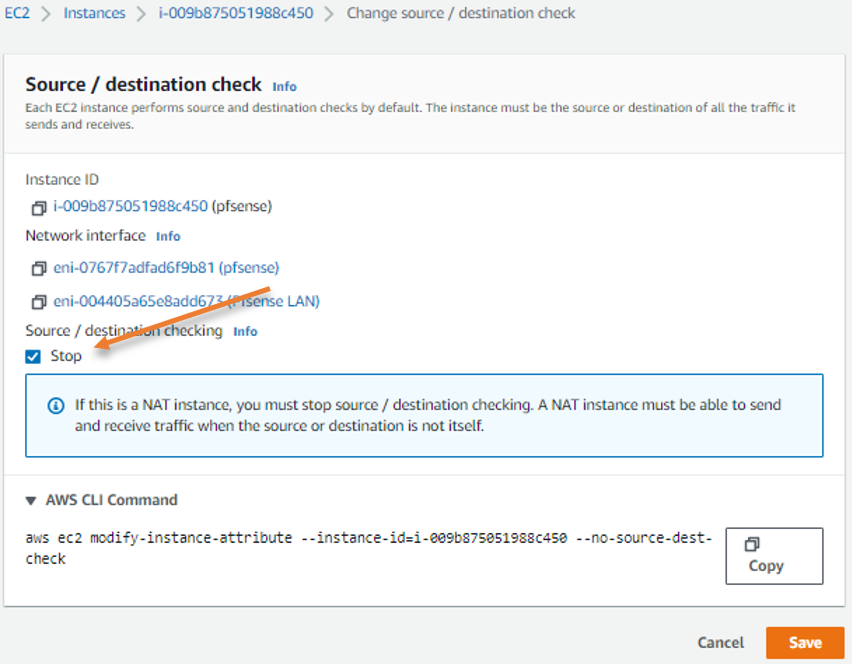
5. Disable Source and Destination Check.
While it’s loading, let’s disable source and destination checks on the firewall instance.
- Select the firewall and click on Actionà NetworkingàChange Source/Destination Check
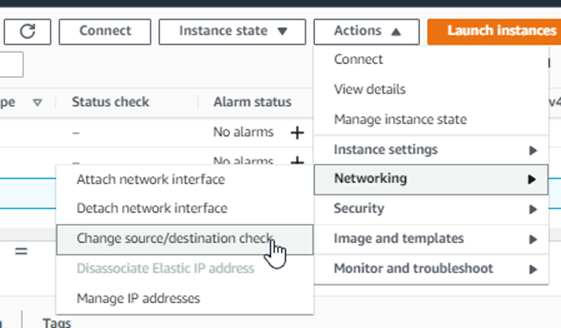
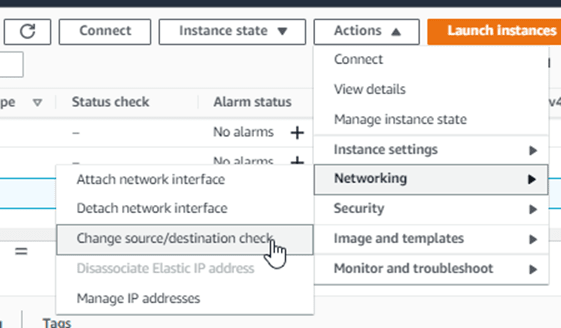
- Check Stop and click on Save.

6. SSH into the Pfsense firewall.
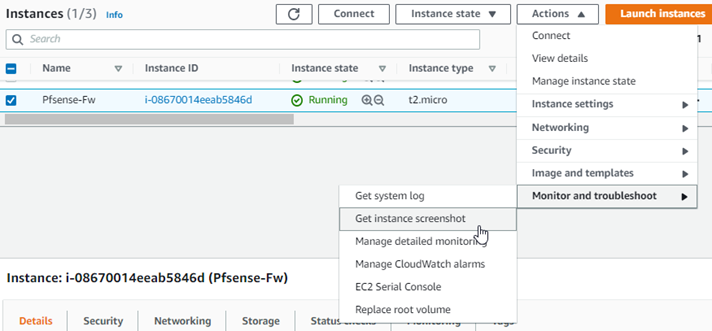
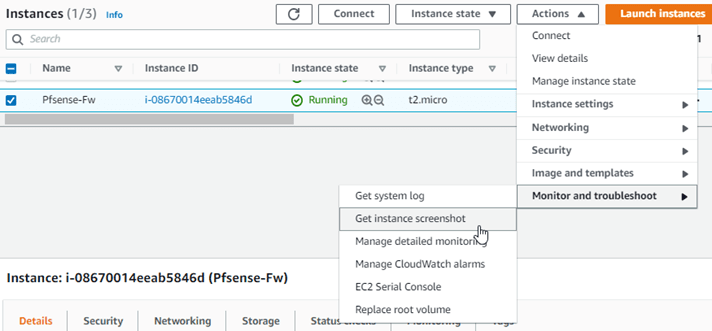
It will take some time for the pfSense firewall to load, and you won’t be able to ssh into the firewall right away. You can check the Instance status by selecting the Instance and clicking on Actions–>Monitor and troubleshooting–>Get Instance Screenshot.
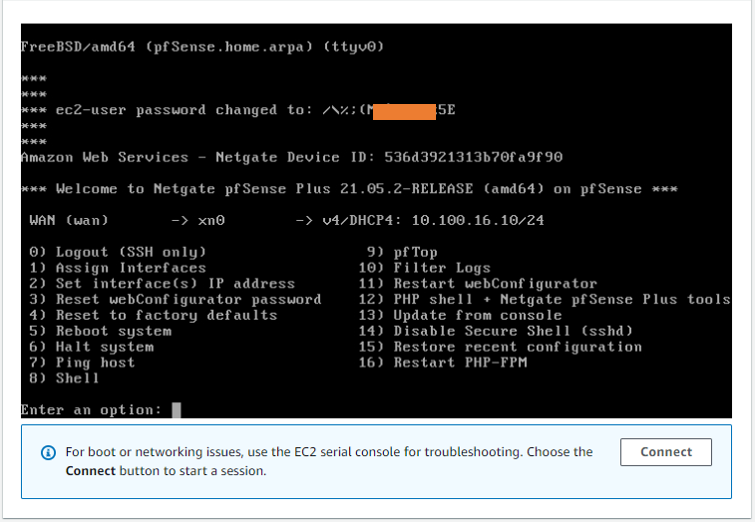
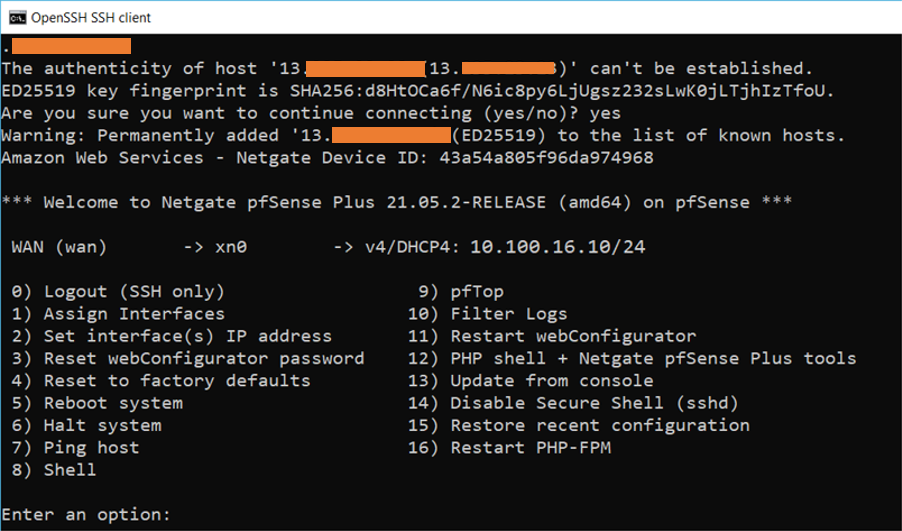
After the pfSense is fully loaded, you will get the below screen. With the WAN side configured with the IP address from the public subnet 10.100.0.10, and the password for the pfsense instance.
Note: Make a note of the password.

- Go back to the Instance and get the public IP of the Instance.
If you have followed everything correctly up to this point, you will be able to ping the public IP of the Instance.
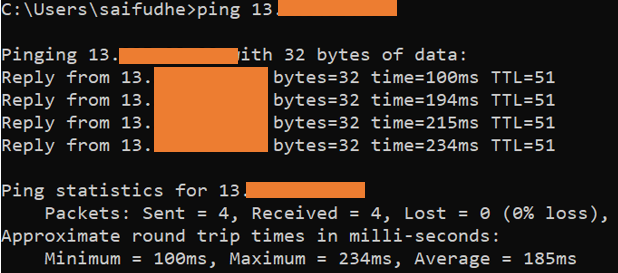

You can now ssh into the Instance with your private key that we have downloaded earlier.
You can ssh using the following command on your windows machine.
ssh -i pfsense.pem admin@<publicIP>
As you can see, I have logged into the Pfsense CLI.

7. Add the Network interface on the AWS For Pfsense LAN.
Before making further changes, we need to attach a LAN interface for the firewall, as the firewall is currently running with only a single WAN interface.
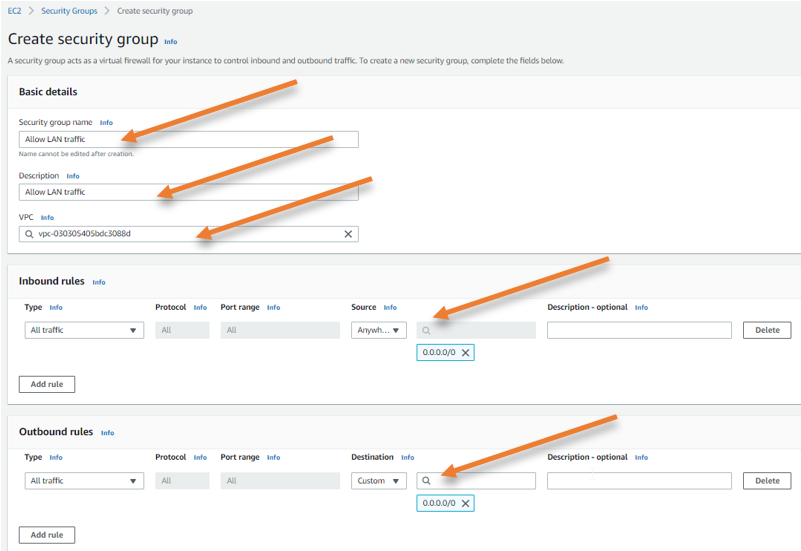
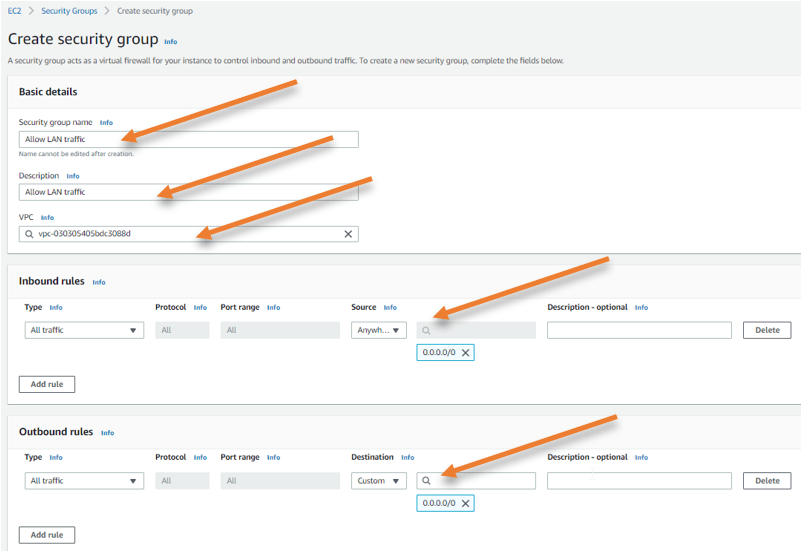
Create a Security group for the LAN interface.
On the EC2 dashboard, under Network &Security, choose Security groups.
Click on Create a new security group.
We want to allow all traffic on the LAN side of the firewall.
- Provide the name of the Security group and Description.
- Attach the VPC.
- Allow all traffic from anywhere 0.0.0.0/0
- Click on Create security group.
On the EC2 Dashboard, under Network &Security on the left, choose Network Interfaces.
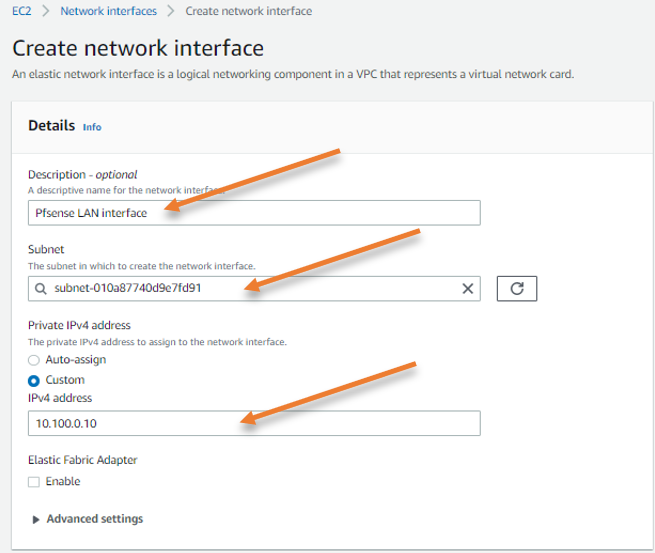
Click on Create network interface.
- Enter the name.
- Choose the Private Subnet.
- And configure the LAN side IP address to 10.100.0.10

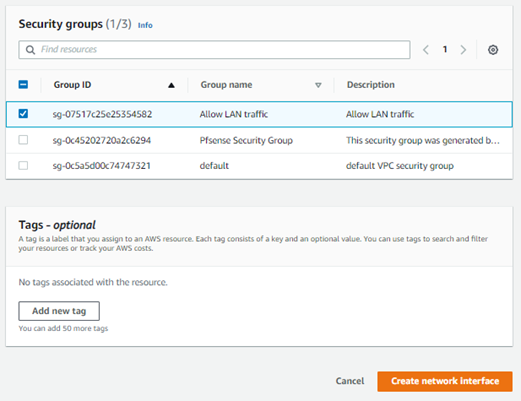
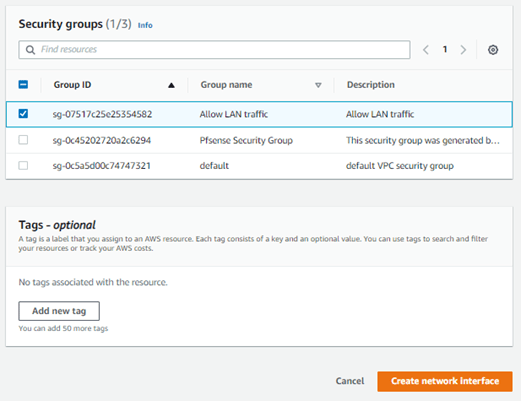
Choose the security group we created just before and click on Create network interface.
Attach the LAN interface to the pfSense firewall.
Go back to the pfSense firewall in EC2.
Select the pfSense firewall, and click on Actions under Networking à Attach Network interface.
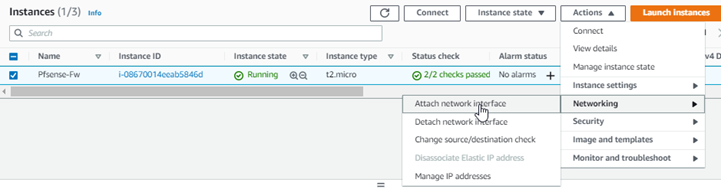
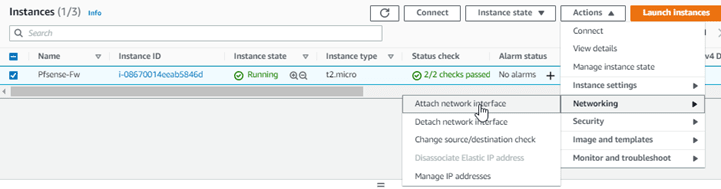
Choose the LAN interface we created, and click on Attach.

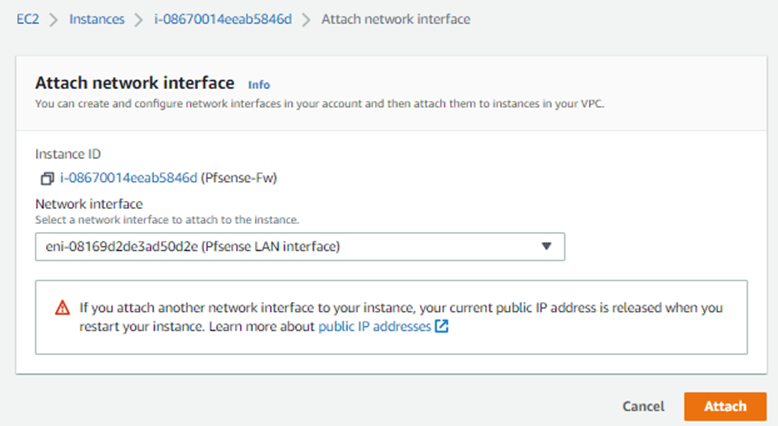
The added interface will not be attached automatically; we will have to add them manually, which we will do next.
8. Access the pfSense Web GUI.
SSH back into the firewall.
We will now access the web GUI of the firewall using our browser.
For that, you may type. https://publicIP.
You will get a security warning, ignore that and continue.
After authenticated, you will be presented with the initial configuration wizard.
- Provide a name and DNS of your choice. If you have aws DNS server you may add them here, so it doesnt have to go out and do a DNS query.
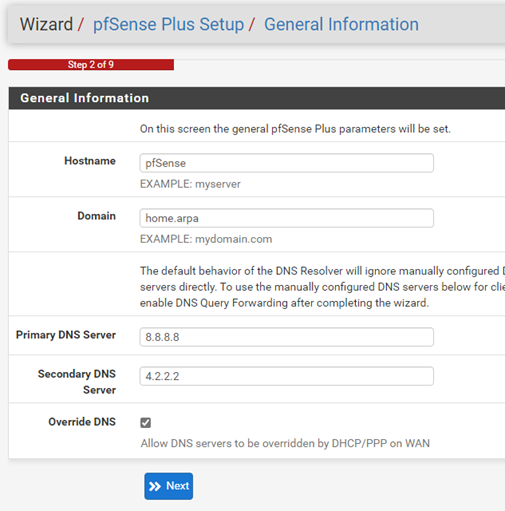
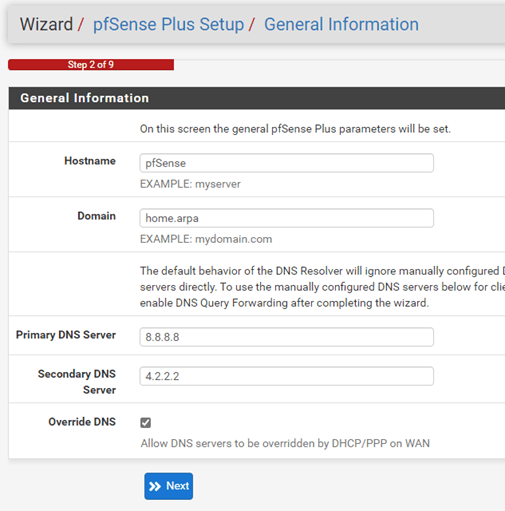
- Choose the timezone.
- If you would like to reset the password, Enter the new password for your firewall, click on reload.
- And your firewall is ready to use, however, we still need to do one more thing, which is to configure the LAN interface that we added in the EC2 to the pfSense.
9. Configure the Pfsense LAN interface.
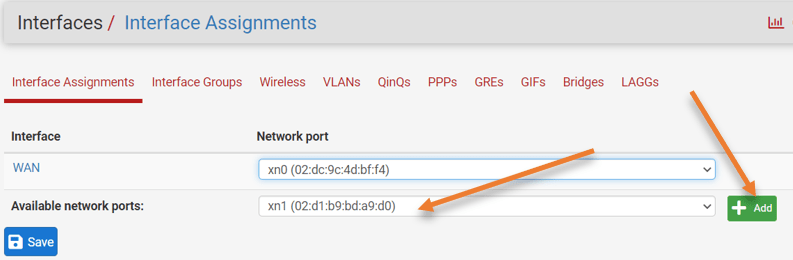
On Pfsense web GUI Click on interface–> Assignment.
You see only WAN interface in the available network ports; however, you can see the LAN interface attached to the pfSense instance here but not active.
Choose the interface xn1 in the drop-down and click on Add.

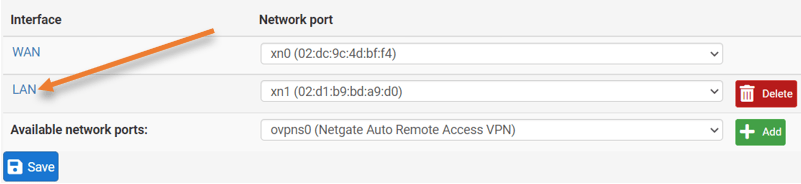
You can now see the LAN interface is added; click save to save the configuration.
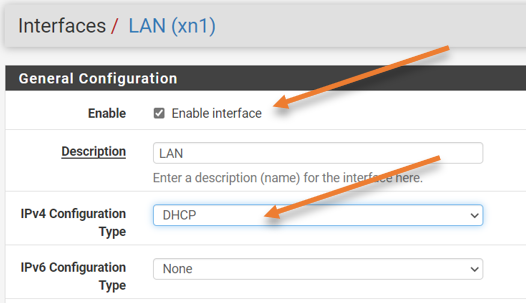
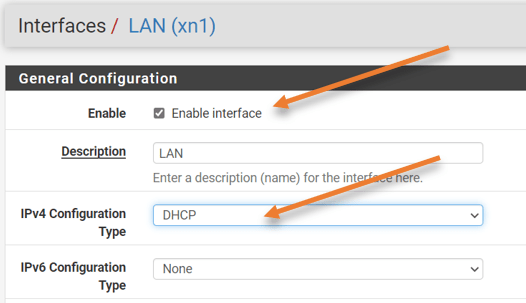
Configure the IP address fo the LAN.
You may now click on the LAN interface.

- Check the option that says enable the interface.
- And Choose the ipv4 configuration type to DHCP from the drop-down.
- Save the changes you just made and apply the changes.
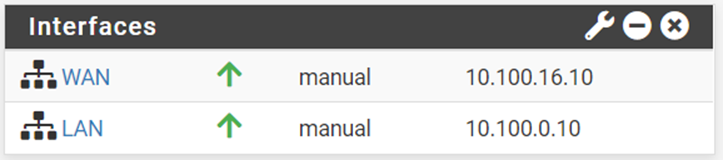
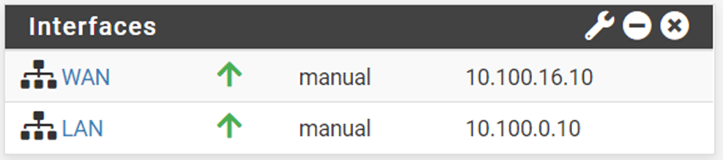
Go back to the pfSense dashboard, you will see both the WAN and the LAN configured with the IP address from public and private Subnet accordingly.
You can also confirm that the LAN IP address matches with the IP that we configured on the network interface in AWS.
10. Point private routing table to pfSense LAN interface.
How do we point the private hosts to go and talk to the LAN interface of the firewall if it has to go outside the private Subnet of 10.100.0.0/16?
We will have to update the private routing table with a default route pointing to the LAN interface of the firewall.
Go back to your VPC.
- Under Virtual Private Cloud.
- Click on the Route table.
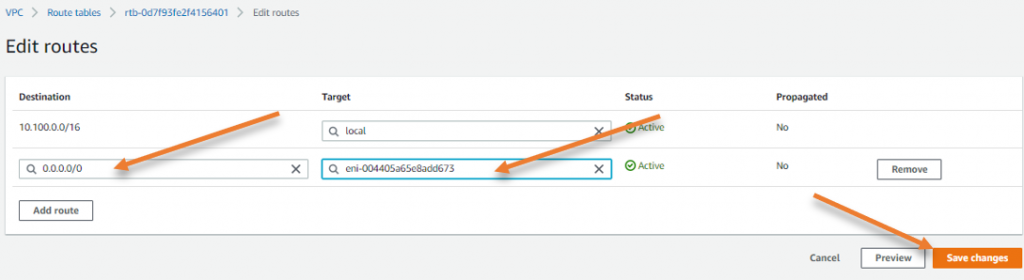
- Under routes, click on Edit routes.
- Add a default route pointing to the pfSense LAN interface, and click on Save changes.
Note: On the target, you can type network interface and your pfsense LAN interface will show up here, you may compare the interface ID with the pfsense LAN interface.

11. Configure the NAT on pfSense.
We pointed the routes to the LAN interface, and all the private hosts will start sending the packets outside the 10.100.0.0/20 network out to the pfSense LAN interface. However, private IP cannot be routed across the internet, so the solution to that problem is we need to configure the NAT on pfSense.
In a normal on-prem network, pfSense will have the default NAT configured, and it will take care of the natting from LAN to the WAN interface IP, however in pfSense on AWS, you will have to configure the NAT manually.
Go back to pfSense web gui.
- Click on Firewall–>NAT.
- Choose Outbound.
- Choose Manual Outbound NAT rule generation-> Click on Save and apply the changes.
Under mapping, click on Add to add new NAT rule.
- Choose the interface as WAN.
- Address family to – Ipv4
- Source – Network – 10.100.0.0/20
- Destination – Any.


In Translation.
Address – Interface Address.
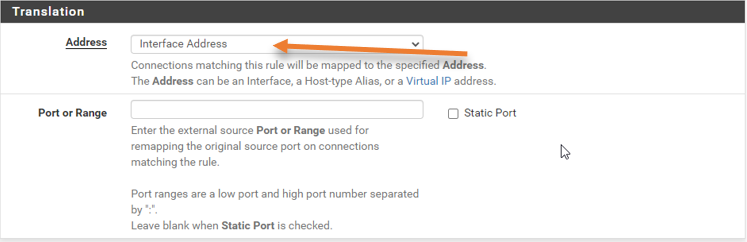

And click on Save and apply the changes.
12. Spin up a VM in Private Subnet and test the connection.
I have spun up another instance in the private Subnet, but there is no way we can get into the Host in the private subnet cos it is not connected to the internet directly.
I will configure port forwarding, with which I should be able to ssh into the private Host using the pfSense public IP address.
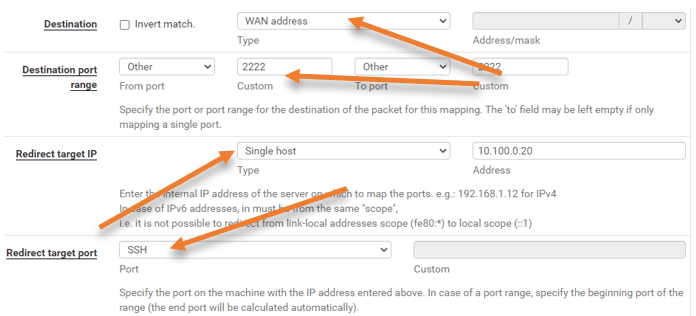
As per our diagram, the private host IP address is 10.100.0.20, I have configured the port forwarding so that if anyone on the internet is trying to reach my public IP address of the pfSense firewall on port 2222, it should forward the request to the private Instance.
See the snippet from the pfSense.
- Destination = WAN address.
- Destination port = 2222.
- Redirect target IP = 10.100.0.20 (Private host IP)
- Redirect Target port = SSH.

To learn how to configure the pfSense port forwarding, check out the article I created here.
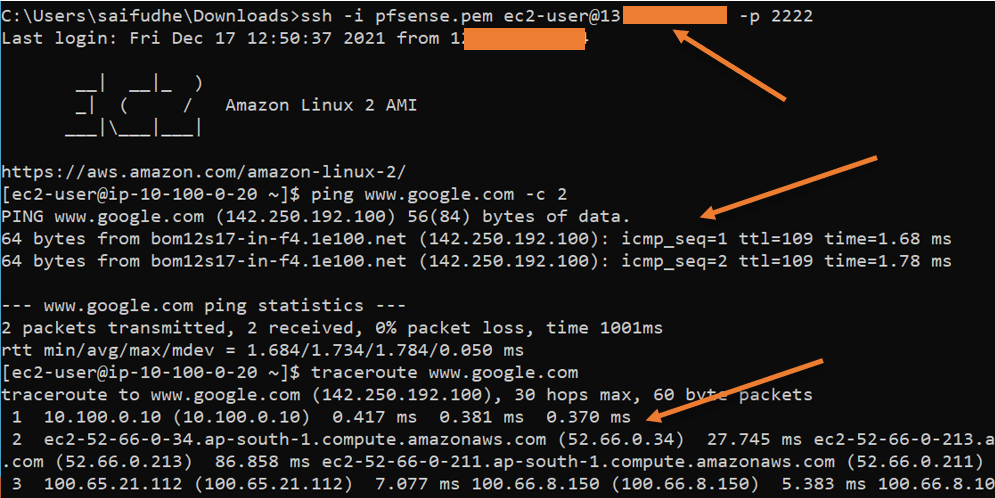
So to SSH into my private Host, enter the command below. You can see from the command that I am trying to connect to pfSense public IP.
ssh -i pfsense.pem ec2-user@<publicIP> -p 2222
Did you notice the hostname of the Host, it says ip-10.100.0.10, which proves that we logged into the private host.
- As you can see, I can reach the internet.
- When I try to do the traceroute, it is going via its default gateway: pfSense LAN interfaces IP 10.100.0.10.