
The pfSense is an open-source and free firewall that you can spin up on your home network. I have been using it for a while, and it works great. Also, it is a very stable firewall that you could use. Some enterprise users use pfSense as their primary firewall. However, for enterprise networks, it is better to use official pfSense firewall hardware and netgate support.
I have virtualized the pfSense firewall on different hypervisors and even converted my old laptop to a pfSense firewall. In this blog, we will talk about the webserver load balancing feature available on the pfSense firewall. And we will test load balancing by using three http web servers on the pfSense LAN side.
Can’t find a load balancer in pfSense?
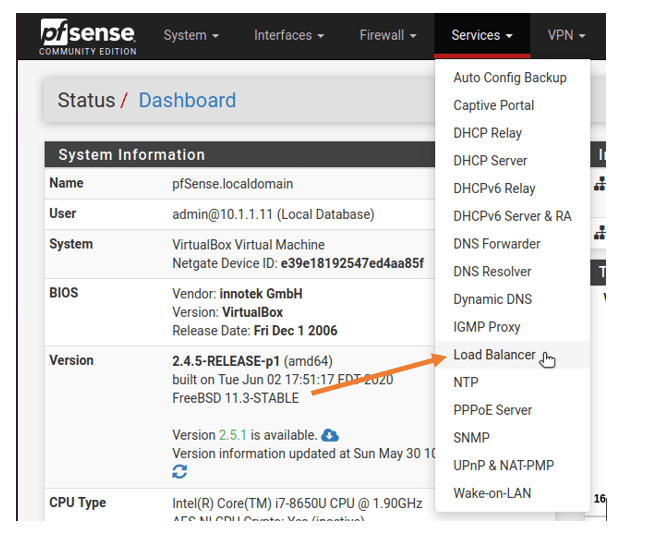
The pfSense load balancer was available under services and in the load balancer section; however, after version 2.5, the default load balancer is not available anymore. You can stop looking at the services tab, and it’s not there in version 2.5 and above.
Here is the screenshot from version 2.4.5; as you can see, the load balancer is available under the services tab.

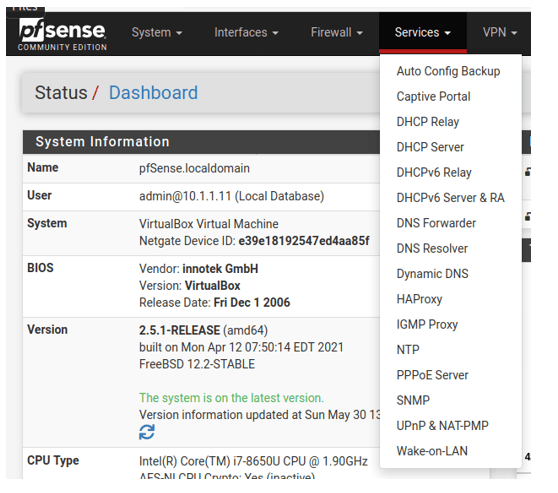
But if you see from the 2.5.1 screenshot below, I no longer have a load balancer in my pfSense, so what should I do?

The recommendation from pfSense is to use HAProxy as an alternate load balancer.
Suppose you are already using the load balancer in pfSense, and you are planning to upgrade it to version 2.5. In that case, I recommend you to hold on until you get familiar with the HAProxy, which is the future-forward for a pfSense load balancer.
If you don’t know how to start with the HAProxy feature in pfSense, don’t worry. This blog will look at how you can use pfSense HAProxy for the webserver load balancing.
What is HAProxy in pfSense?
HAProxy is open-source software that provides high availability and load balancing for TCP/HTTP services. And it is known for its speed and efficient performance. You do not require pfSense to run the HAProxy service. You can spin up a Linux host and deploy the HAProxy services in it and start using them. However, in this blog, we are discussing HAProxy from the pfSense perspective.
There are two parts for the HAProxy, the first one being the front-end, and the second is the back-end.
The front-end listens to the port that is open to the users, mostly external facing. And the back-end is your local servers. You create a front-end and point to the back-end, which has multiple servers attached to it.
Below is the topology that we are going to use.
I have three web servers connected to the LAN side of Pfsense, and it is running an apache service on port 80. We are going to perform load balancing on all three web servers as a round-robin method.

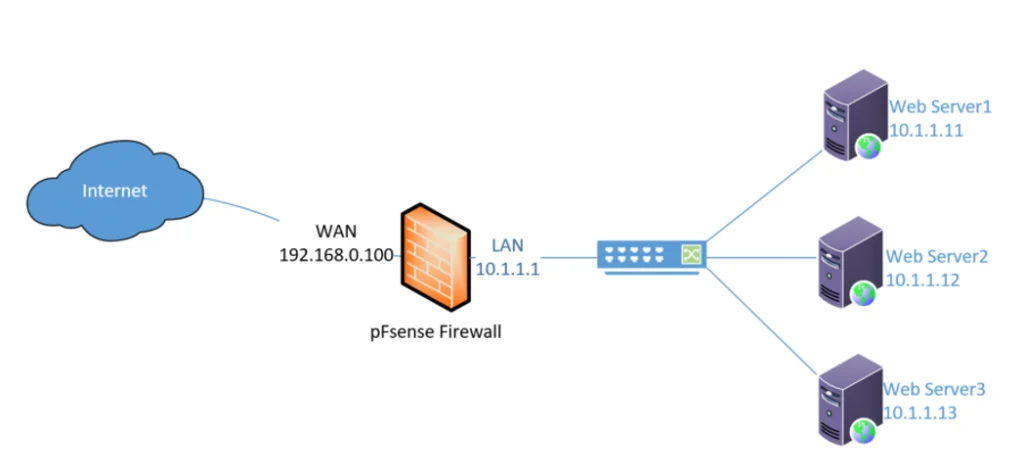
From the LAN side, I can access the web services just fine. With the help of pfSense HAProxy load balancing, we will configure the webserver so that the outside users can access the webserver with load balancing enabled on the pfSense firewall.
Install the HAProxy on the pfSense.
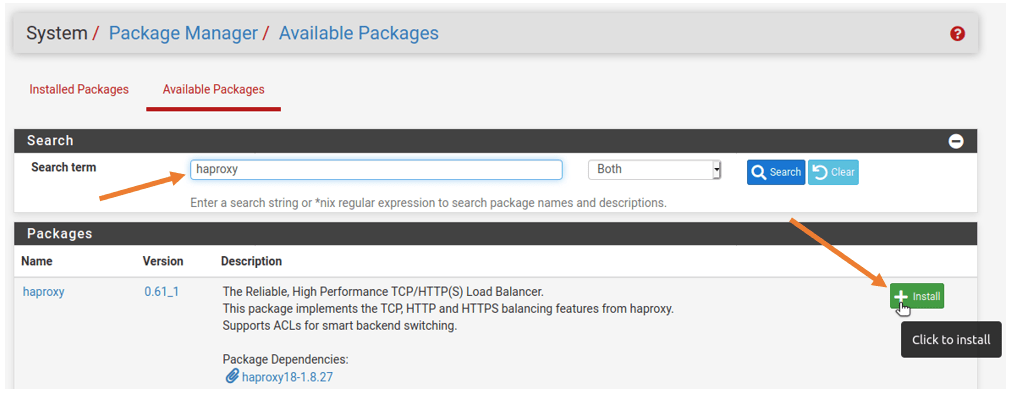
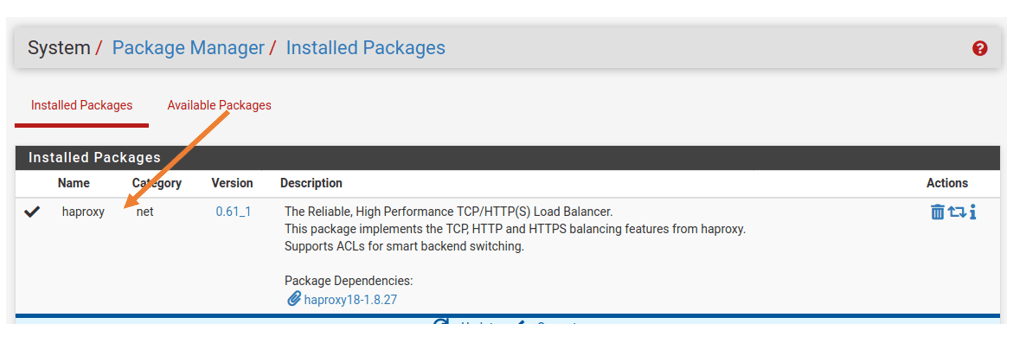
Unlike load balancing, the HAProxy service is not available as default on the pfSense firewall; you will have to download it as a separate package. To download the HAProxypackage, Go to System –>Package manager.
If you have the HAProxy installed, it should show up in the installed packages tab. Since I don’t have the package installed, I have to click on the available packages; this will list down all the packages available for the pfSense. You can search for the package HAProxy; once you find the package, you may click on install and confirm.

After few seconds, the package will get installed, and it will now show up in the installed packages tab.

Configure the load balancing for the http service.
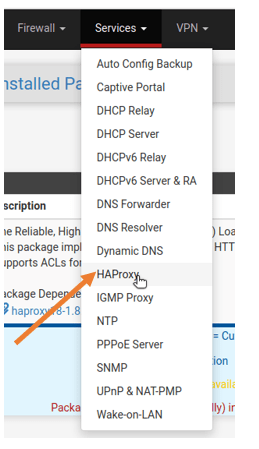
We will now configure HAProxy load balancing for our three web servers running on an http port number. In the services drop-down –>HAProxy

For beginners, when you look at it, it may look so confusing but don’t worry, we are going to take a look at how we can configure load balancing step by step.
Configure the back-end server.
First, we will configure the back-end servers; the back-end servers are the virtual servers on my LAN side, the web server 1, 2, and 3.
Click on the back-end tab.
It will be empty; Click on add to configure the back-end servers.


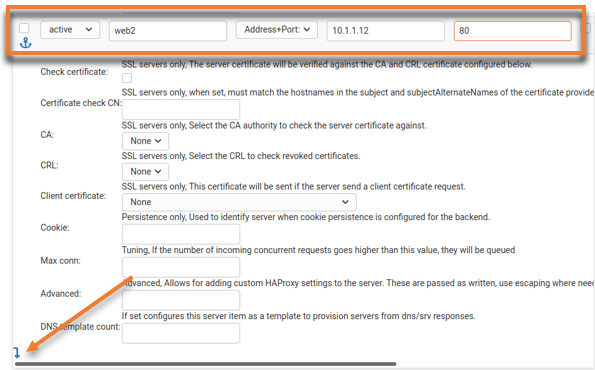
Fill in the necessary field required below.
Name: provide a user-friendly name; I have given http_web_server_pool1
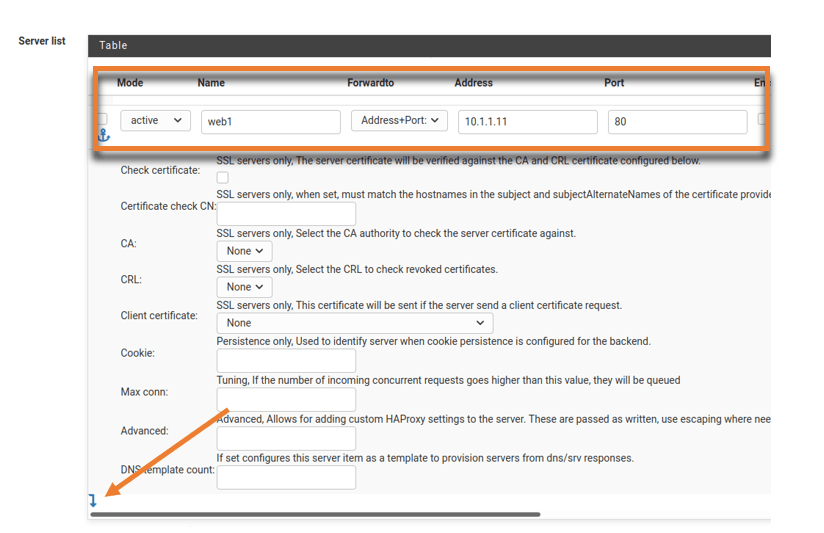
Under the server list, you can click on add server field to add the servers one by one.

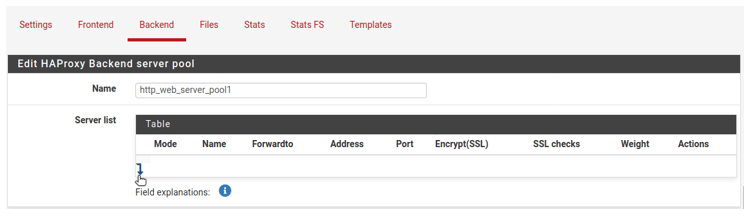
The required fields to be filled are as follows.
Mode: Active
Name: web1
Address:10.1.1.11
Port:80
After that, click on the add button on the bottom left to add the next server.

In the following field, add the second server as below.
Mode : Active
Name: web2
Address: 10.1.1.12
Port:80
To add the final server, click on the add button on the bottom again.

Following the above procedure have added the third server filed as below.
Mode: Active
Name: web3
IP: 10.1.1.13
Port: 80
Configure the load balancing option.
We now have to configure the load balancing option, which is right below the server list.
There are multiple options available, but we will use the round-robin method, a standard method for load balancing, and will equally load the back-end server.
You may choose different options based on your requirement.

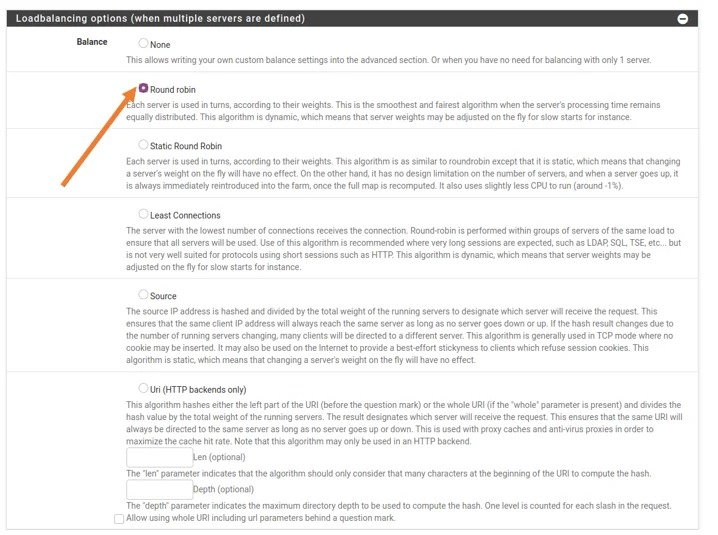
You can further configure the ACL – access control lists and actions and Timeout/retry settings, but we will follow a basic configuration.
Server Health Checking.
We need to use Health checking options to monitor the health status of the backend servers. We will further look into the stats table later on.
Choose HTTP as the health check method as it will check the health status of the web servers using the HTTP protocol.
You can also enable Log checks, so when any of the web server goes down, a log will get generated.
Select the HTTP check method as GET.

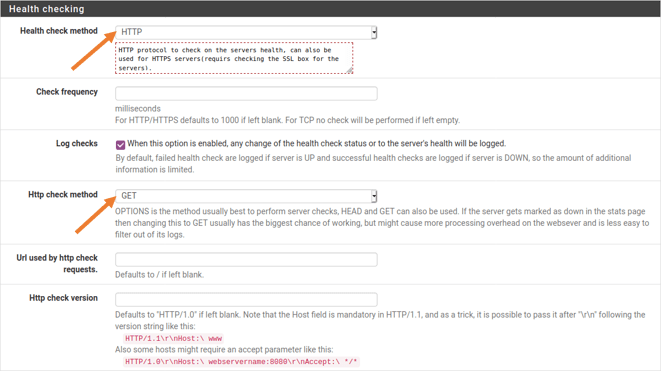
Leave everything else as default and Click on Save now to apply the changes.
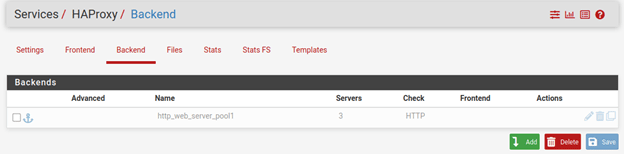
You can see the back-end servers are added now in the pfSense.
Why the back-end server showing a grey color?
Because we have not attached the back-end serve to the front-end, which we will do next.

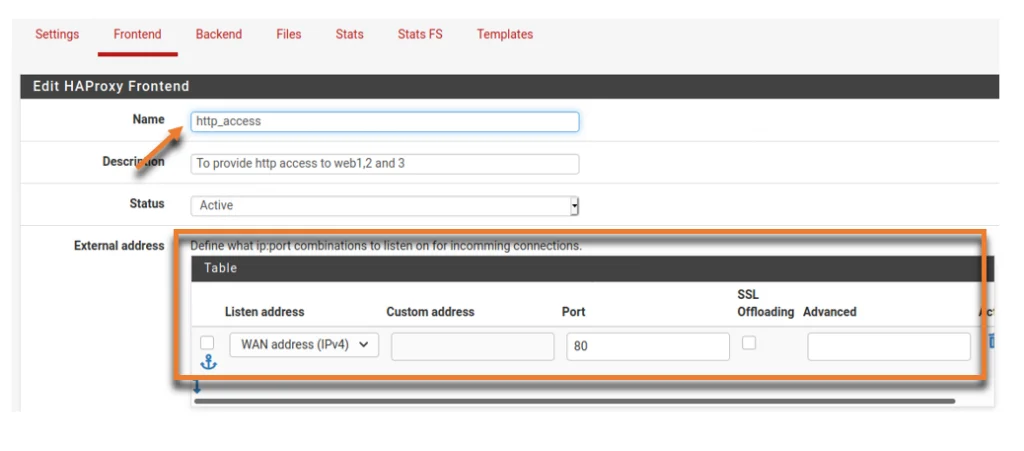
Configure the Front end.
Click on the Front-end tab and Click on Add button to configure the Front-end.


Edit HAProxy front-end.
Name: http_access
Description: To provide http access to web1,2 and 3
Status: Active
On the External address, I left the default settings.
Listen address: WAN address (ipv4)
Port: 80
This settings will make the front end IP address to start listening in on port 80

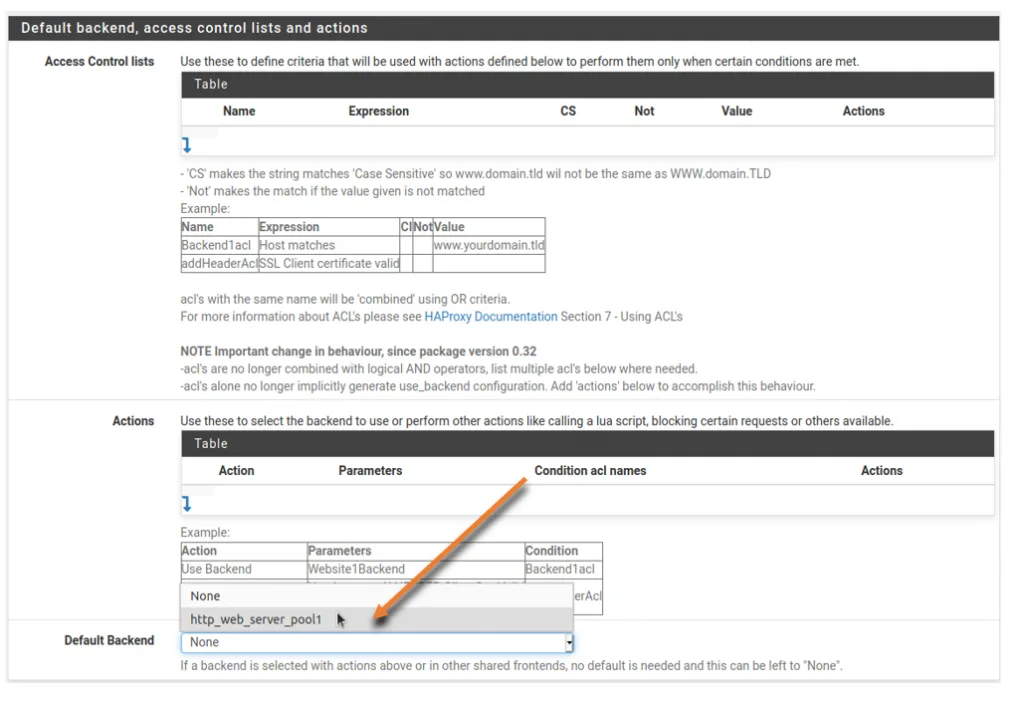
Attach the back-end to the front-end.
Scroll down and under Default back-end, access control lists, and actions.
Choose the newly created back-end servers from the dropdown and click on Save to apply the changes.

Configure the pfSense HAProxy settings.
After the frontend is configured, you can now click on the settings tab on the HAProxy configuration. It is where you enable the HAProxy process; check the option that says enable HAProxy.
Mention as 1000 on the maximum connection per process.

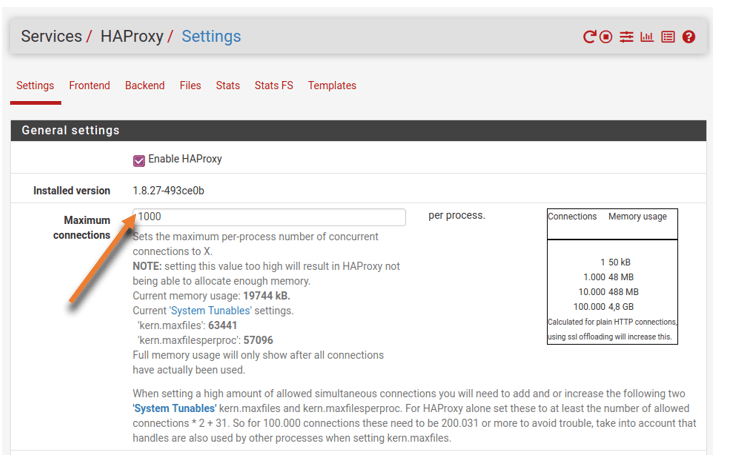
Leave everything else to default and scroll down to the next section Stats tab, internal stats port.
You can add any port available if you want to, but here I’m choosing 2000, and it is up to you which port number you wish to use.

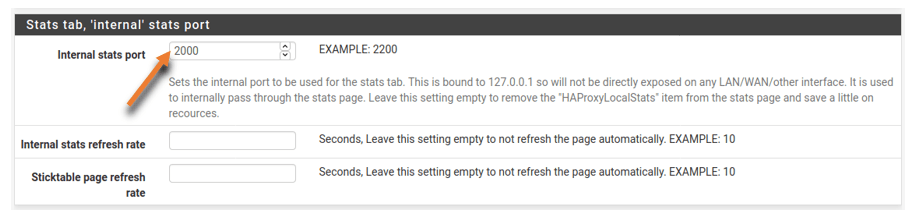
You can make many other changes here, but let us keep the simple configuration, not make any other changes, and then click on Save.
Great. We have just configured the load balancing for the http traffic.
Will you be able to access the services from outside?
Not yet, because we have not allowed any external users to access our web servers, now let’s do that.
Configure the security policies to Allow outside access.
To simulate the internet, instead of using the public IP addresses, we use a private IP address range, and all the machines are in 192.168.0.0/24.
I can allow http access to all the external users, specific to a subnet or a single host.
Since this is a lab and my test machine is on 192.168.0.13 IP, I will allow http access from outside to inside for that specific IP.
Note: You should be fine to allow single trusted public IP to the webserver. However, whenever you allow something outside to inside, you should be extra careful. You need to check with your network security team to enable certain services to inside, especially a big subnet, or allow any. Usually, the web servers sit on the DMZ; hence you point your policy to the DMZ, separate from your LAN network.
Click on firewall–> Rules –>WAN.
Click on add to add a new policy.

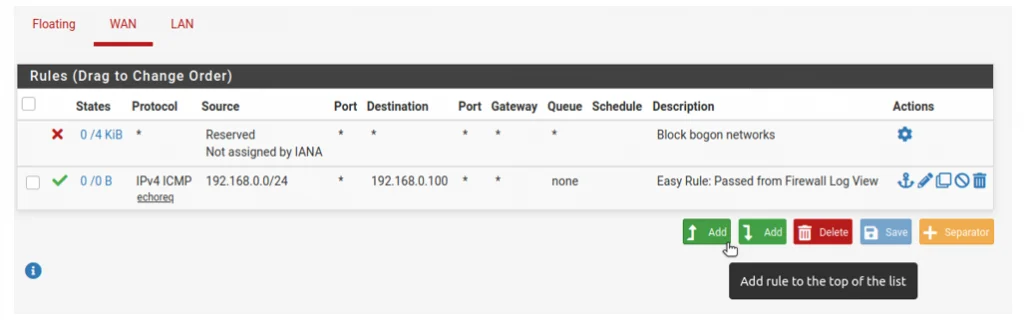
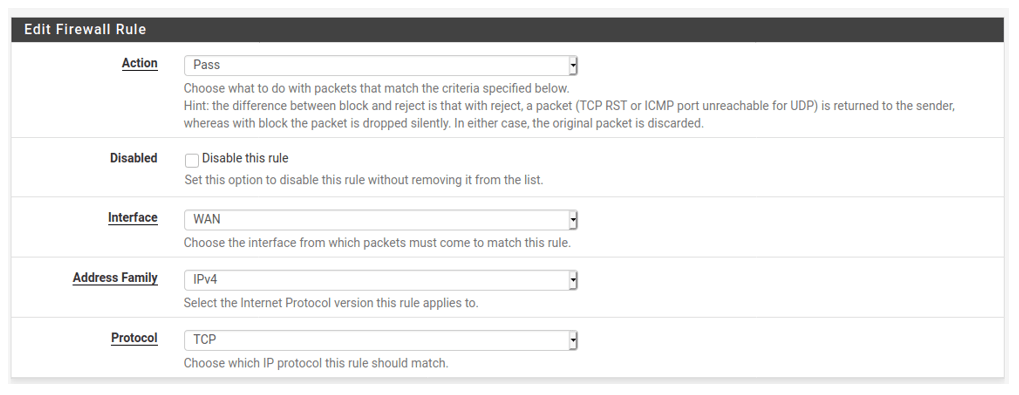
Edit firewall Rule.
Action: Pass
Interface: WAN.
Address Family: IPv4
Protocol: TCP

Source.
We need to add the windows machine 192.168.0.13, you may add your test PC IP address here.
Note: If the source is in a different location than where you are, you most likely have to get the public IP address of the remote and add it here.


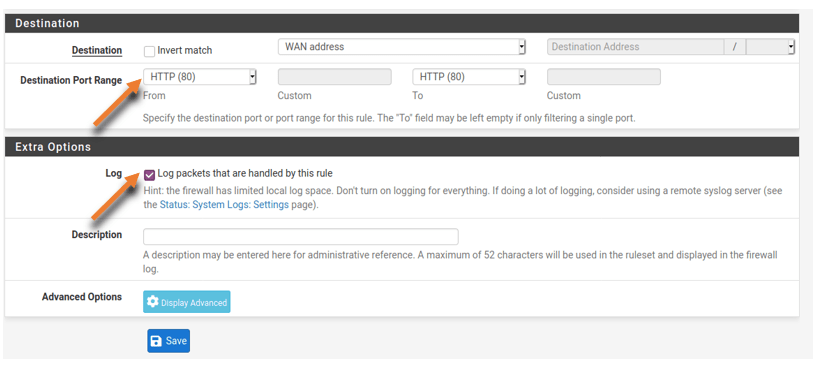
Destination.
Destination: Wan address.
Destination port range: HTTP(80)
You may log the session if you want to and click on Save.

Test the HAProxy configuration.
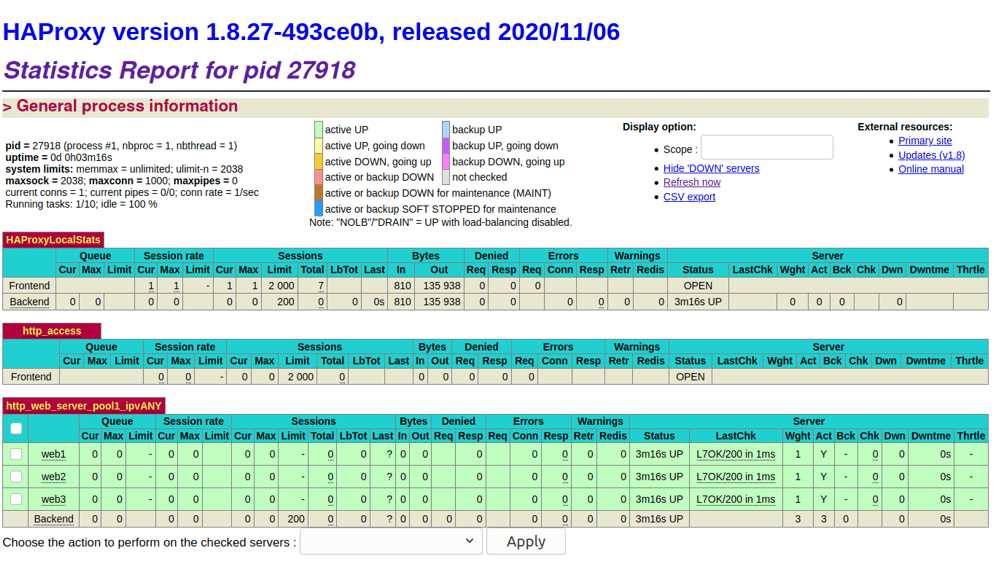
We are now ready to test the load balancing service on the pfSense; before we do that, let’s check the stats table, and you should see all the web servers showing green.
On the same HAProxy configuration window, you can see the stats on the same screen or a full screen. Right-click on the Stats FS and click on the open link in the new tab.

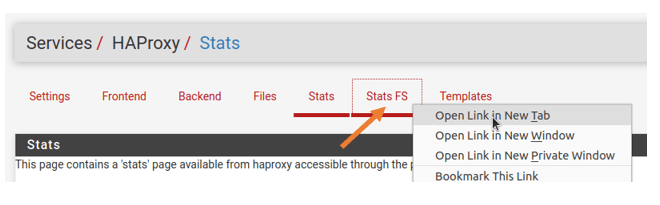
This will open up the stats table in a new tab as shown below.

Access the web page.
Access the web page using the firewall outside IP. The first request will hit the web1, and the second will go to the web2, and so on. As you can see below, each time when I tried to access the web page, it went to different virtual servers on my LAN side.


Check the stats on the pfSense
You can validate the same from the HAProxy stats screen as well.


When I refresh web server tab two times, you should see the request goes to web1 and web2 in the stats as well.

