
You have been running pfSense on your network. Since there is no high availability on your WAN side, you now have decided to add another ISP for redundancy. When the primary goes down, the secondary ISP should take over or use both the primary and secondary link simultaneously like a load balancing method. Is it possible in pfSense?
The multi wan or the dual wan configuration is possible with the pfSense. In this blog, let’s look at how you can configure pfSense Dual WAN/multi-wan configuration with two different ISP’s.
The network I will use has a single uplink over PPPOE, which provides me with 100Mbps download and upload speed. And the second ISP that I am going to add is 4G LTE. Fortunately, my 4G LTE connection provides me a speed of 15Mbps, which is good.
For my ISP1, I have got a static IP address configured from them. Does it matter for this configuration?
No, the dual ISP configuration should work fine on PPPoE with a dynamic IP configuration as well. More importantly, If you have a second PPPOE connection from the same ISP, you can bundle them as one using MLPPP (Multi-Link PPPoE) and get the aggregated bandwidth. Of course, you need some help from the ISP side as well to get everything configured, which will get you aggregate bandwidth. For example, you have to WAN1=100Mbps and WAN2=100Mbps when you combine both, you should get 200Mbps. As I don’t have a second PPPOE link from the same ISP and, even if I have, it would be tricky to work with my local ISP to get the MLPPP configuration done.
So configuring the MLPPP is not covered here.
Configure dual wan with primary and backup – pfSense LTE backup
Below is my home network topology, which we are going to work on. I currently have only the primary ISP connected to the WAN interface, though I have shown the ISP2 LTE link on the diagram as connected, which has not been attached right now.

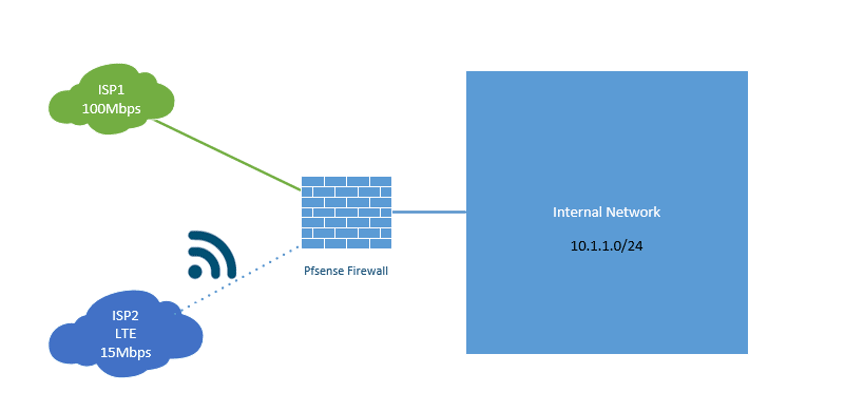
I want to configure my network in such a way that when the primary link is entirely down, the second one should take over, and when ISP1 comes back again, it will take over the primary role. And everything should work automatically.
Validate the secondary ISP connectivity.
After you add the new secondary ISP link to the pfSense firewall, you need to make sure that the new internet circuit is working or not. You may have got the dynamic IP configuration on the interface link that doesn’t mean the internet should work fine for the downstream devices. And you also need to make sure the new internet link should not take over the traffic as soon as it becomes available, especially on the 4g LTE link.
You can imagine how the performance of the link would be when you switch the network bandwidth from 100Mbps to 15Mbps over LTE, especially when you have multiple users at the site.
So that reason, it is recommended to do manual failover first and test everything is working fine the way it should, and configure the automatic failover.
We are going to look at both the manual failover and automatic failover.
If you don’t want to test the manual failover, it’s okay, and you can jump right into the configuration of ISP automatic failover.
How do I manually failover the connection?
You may have got the new LTE backup link configured with the ISP, and you plan to move the automatic failover mechanism. However, you decided to test the LTE network bandwidth and latency while on the call with the LTE provider. So you can use the manual failover for that.
Let’s see how the manual failover works.
It would be best to have the following settings enabled before adding the new ISP configuration.
The decision to prefer the primary ISP happens on the pfSense routing configuration.
Change the automatic gateway configuration.
By default, In the default gateway selection, the automatic gateway selection is enabled. Before adding the new LTE connection, you must choose the primary ISP, the ISP1, as the gateway. That will make sure the new ISP you will add will not take over the traffic.
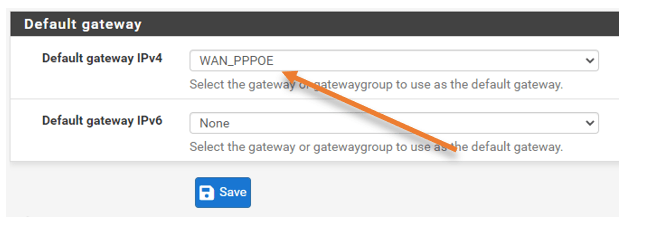
Click on–> System–> Routing–> Under default gateway, change the gateway to the primary ISP and click on Save.
In my case, my primary ISP is WAN_PPPOE.


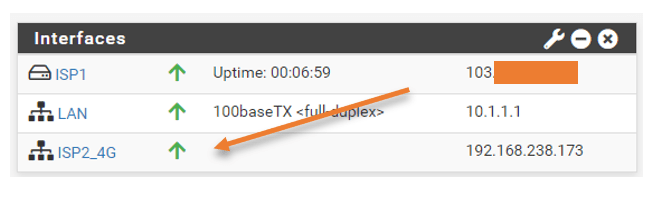
We have now added the 4G LTE backup configuration on the pfSense as ISP2_4G.
You will have a corresponding gateway that has been added automatically under the gateway.

Test the manual failover.
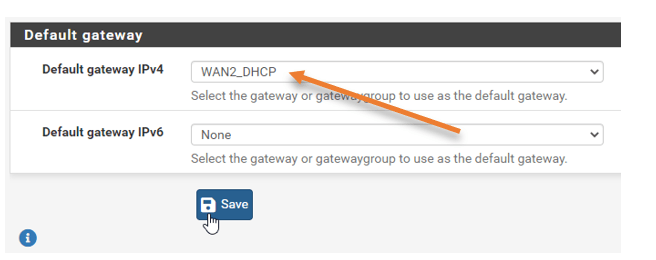
To force my LTE link to become the primary manually, I must move the gateway to the New gateway, WAN2_DHCP.
Before making the changes, let me send a continuous ping from my LAN host to the google DNS IP 8.8.8.8.
And I can select the new gateway that I have added, which is WAN2_DHCP, select that and click on Save and apply changes.

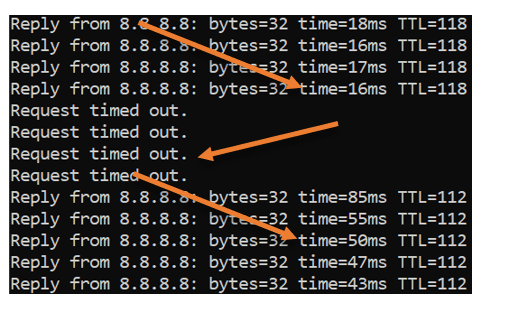
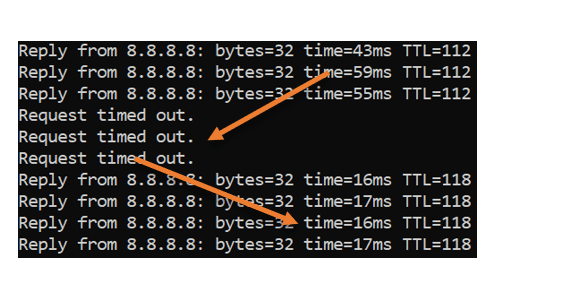
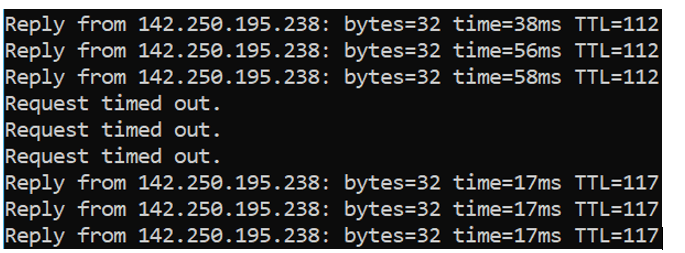
Here are the test results
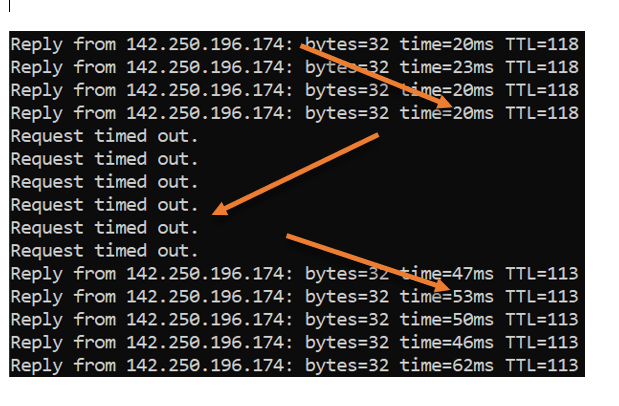
- The first ping output is via the primary circuit, and you can see the latency is around 17ms.
- As soon as I forced the failover manually, I see the packet loss. 4 requests times out.
- Finally, it recovered on the secondary LTE link, and since it is the 4G connection, you can notice the sudden spike in latency from 17ms to averaging around 50ms. This means our LTE connection is working fine, and we are ready to make the automatic configuration anytime.
If this test didn’t not work for you, then you will have to configure the ISP2 properly.

Fail it back over the primary.
We now know that our LTE backup link is working fine, and we can directly point the gateway back to our primary ISP, and you will observe the opposite behavior this time.

The latency was about 50ms, and when I made the switch, there was packet loss, and it picked up.
As soon it picked up, the network latency went back to 17ms.

Configure the automatic failover of ISP’s – Primary and LTE backup.
Currently, the ISP1 is the primary. When the ISP1 goes down, we manually point the ISP1 gateway to ISP2, which is difficult, especially on the enterprise network. You never know when the outage occurs on the primary ISP. Sometimes you might have to wake up in the middle of the night to make the manual failover. So we will set up the dual ISP automatic failover mechanism, and during an outage on the primary link, the second one will take over the traffic.
1. Change the gateway monitoring configuration.
When you have the WAN link configured, you should see a gateway added to the pfSense by default. You can check by going into Status>Gateways.
Both the gateway should say online.
If you see either of the gateway’s Status shown as offline, you will have to fix that first.
Here on the gateway, you should see each link’s latency, and you might be wondering, hold on, you said you have secondary ISP as 4G LTE, and how come its latency is almost the same?

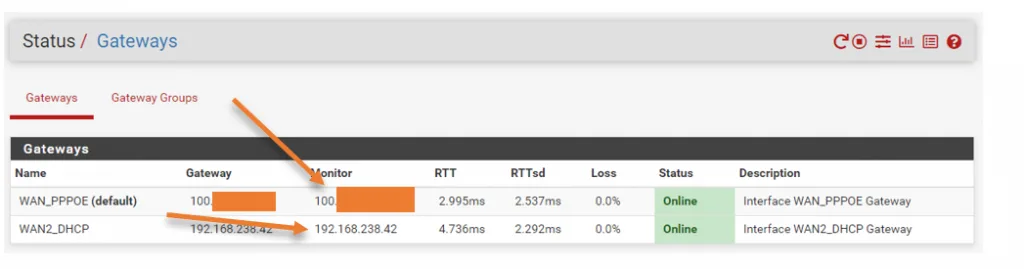
By default, when you add the gateway to the pfSense, it adds its default gateway as the monitoring IP. And of course, when you ping the default gateway from your public IP, which is the next hop from your public IP, it is expected to have less latency.
Most of the time, the link between your public IP and the default gateway should be okay. However, the outage may occur behind the gateway, and you may not be aware of it. Hence it better to monitor some remote public IP that you believe will be up all the time.
When you add the monitor IP, the pfSense will start sending the ICMP probe every 500ms from the respective ISP interfaces, which is the default value.
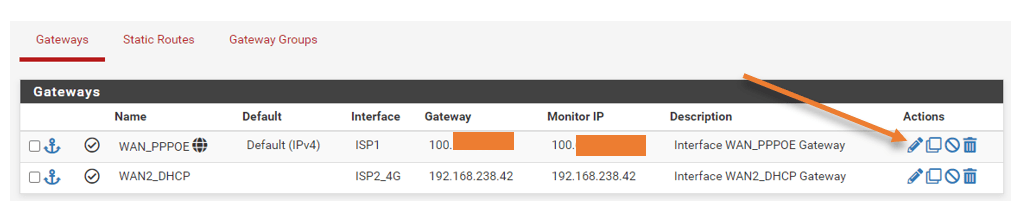
Goto–>system–>Routing–>Gatways.
In the list of gateways, you can see the monitor IP is configured as it’d default gateway. Let’s go ahead and change that.
Click on Edit on the Primary gateway.

Change the monitor IP to a public IP. For example, I am adding the google DNS IP 8.8.8.8 here.
I wish I could add more than a single IP for monitoring. That way, I will have the ability to take action only when both the IPs are down. Unfortunately, that option is not available in pfsense at the moment.

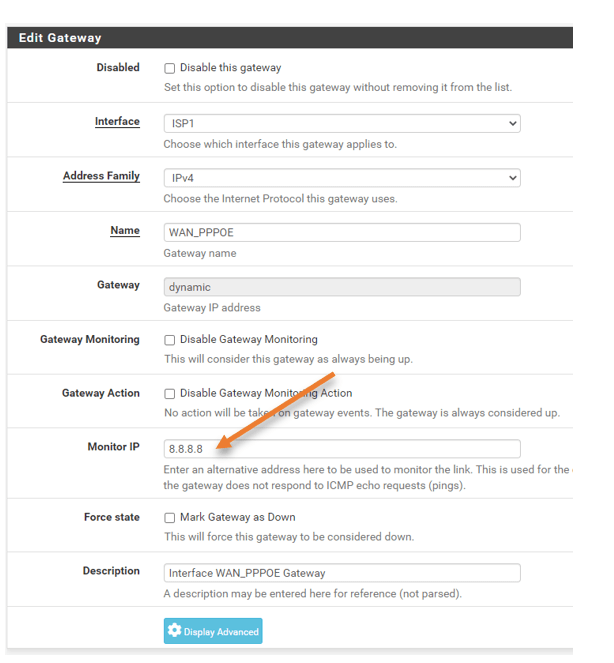
Click on Save –> Apply the changes.
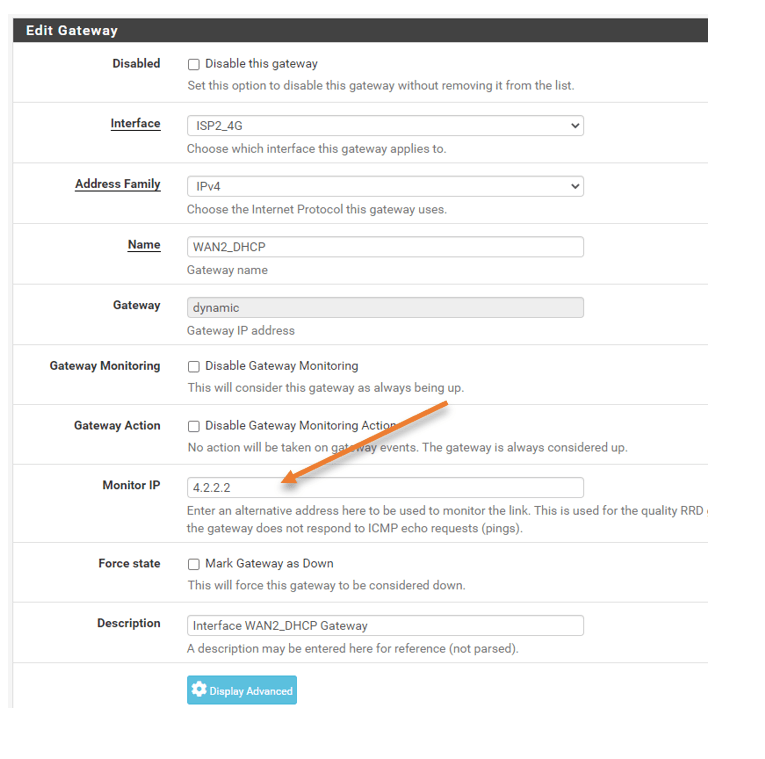
Edit the second gateway as well.
You should not use the same public Ip that you have used on the ISP1 configuration. Hence I am using 4.2.2.2 for the second ISP monitoring.
Click on Save and apply the configuration.

2. Create a gateway group.
We are now going to create a group of the gateway with both the ISP’s. It is where you define how the ISP should react in each situation.
Click on the Gateway group tab under routing and click on Add.
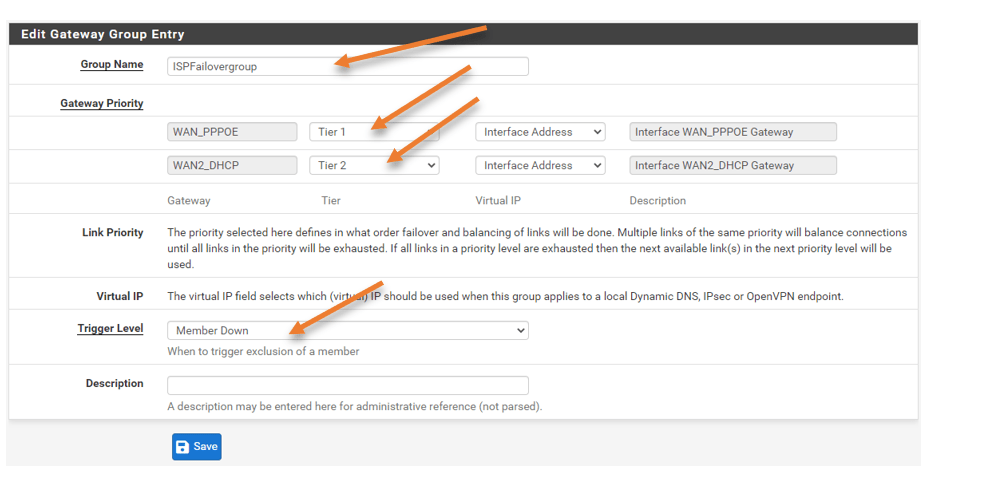
Name the group: Give a user-friendly name.
Set the gateway priority.
I have ISP1 with 100Mbps and the 4G LTE with 15Mbps, and I want to choose ISP1 as the primary hence choose Tier1.
And choose Tier2 for ISP2.
If you choose Tier1 for both the gateways, it will start doing the load-balancing, so when you have the same bandwidth link, that is the recommended option. However, we don’t want to do the load balancing for the current setup.
Trigger Level: Member down.
It will make sure only when the member is down, The action will be triggered.
Note: If you are using the same bandwidth ISP’s and configured the priority as Tier1 on both, you should not keep the trigger level as member down. It would be best if you chose packet loss and latency. This will ensure that when there is a latency on either of the links, pfSense will choose the connection with less latency. You can see the latency status in the Status>Gateway option.
Click on Save and apply changes.

3. Choose the gateway group
Remember, during the manual failover, we forced the ISP1 as the primary. We will have to change the settings to choose the gateway group that we defined in the previous step.
Click on the Gateways tab.
Under the default gateway for IPv4, choose the ISPFailovergroup that we just created and click on Save.

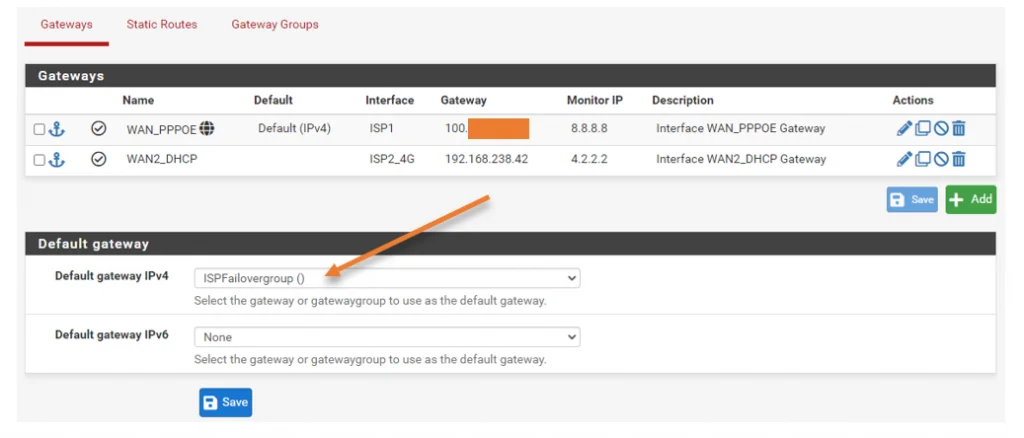
That’s it. We just configured the failover group in the pfSense, and everything should start working now.
What about the firewall rules?
By default, Everything from the LAN to the outside is allowed, And the NAT rule also in place. So with the default setup, everything should work just fine when the failover happens. However, some services pointed to primary ISP, such as IPSec and the OpenVPN, will not function during the primary ISP outage.
Neither would I recommend you choose the LTE backup for those services. If you have multiple users on the LAN side. You cannot treat the 4G LTE as the primary link because it has less bandwidth and more latency, and performance will be degraded when more users start to use the link. So the recommendation is to use it as a backup.
4. Test the primary ISP connectivity
When you test the connectivity, it is expected that some of the TCP sessions will be interrupted, and the user has to initiate the traffic again. For this test, ICMP is an excellent choice, however, we will test with both ICMP and TCP traffic.
Before the test.
My NAT IP address.
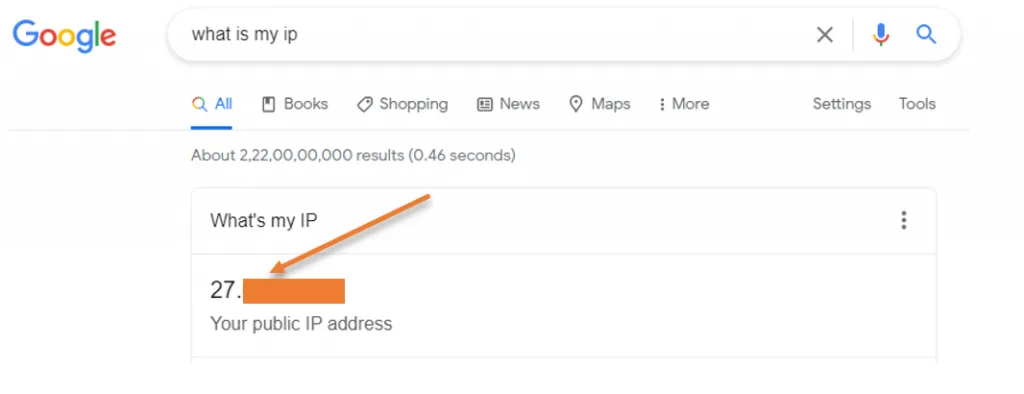
As you can see my public IP starts with 103, as you can see below.


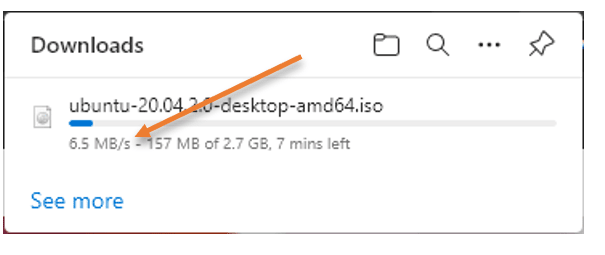
To test the TCP connection, I will start downloading ubuntu software from the Ubuntu website, which uses an SSL connection. As you can see, I am getting decent speed.

I will also initiate a ping to google public IP. As you can infer, my latency is about 21ms on average.
Reply from 142.250.196.174: bytes=32 time=21ms TTL=118
Reply from 142.250.196.174: bytes=32 time=21ms TTL=118
Reply from 142.250.196.174: bytes=32 time=22ms TTL=118
Reply from 142.250.196.174: bytes=32 time=22ms TTL=118
Reply from 142.250.196.174: bytes=32 time=21ms TTL=118
5. Disconnect the Primary ISP.
I am now going to unplug my primary ISP modem and see what happens.
As you can see, as soon as I disconnected the primary ISP, the request starts timing out. However, after few request timeouts, I began to get the response back, and this time you can notice the latency changed to 50ms, as we have observed on the manual failover. That means my backup link took over the traffic.

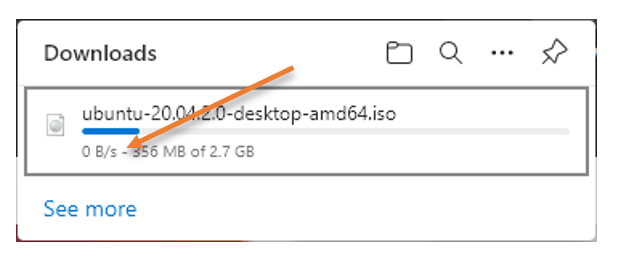
What happened to my download? It started to reduce its speed and stuck at 0 B/s. Even if I pause the download and start again, it will not resume because its connection was originated from my primary ISP public/Natted IP.

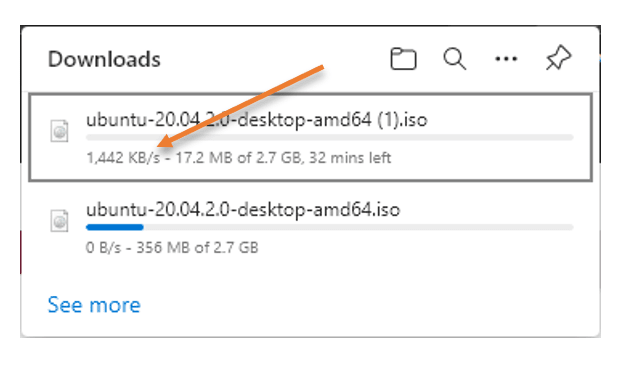
To resume the download, I will have to start downloading again from the ubuntu page; however, it will not continue from where I left off. Instead, it will begin to download with the new session, as you can see below.
You may also notice the download speed went down.

What about my NATed IP.
Previously I had Ip start with 103 range, now that start with 27.x.x.x

6. Connect the primary ISP back.
I will connect the primary ISP back, and let’s see how the ping response looks like.

Some requests time out, and when the primary ISP took over the traffic, the latency went back to the usual 17ms.
Conclusion.
We were able to test the WAN failover when the primary link is fiber, and the backup is lte, and it failed over as we expected. This solution will make sure your internet connection is up at all times. And this is the best option when you have the ISP1 with more bandwidth and ISP2 with lesser bandwidth. If both ISP’s have the same bandwidth, then you will have to use load balancing