The majority of enterprise networks in use today are exactly like the AWS cloud network.
All end users in a corporate network will have private IP addresses; if any users wanted to leave the network, they would need to utilize a router or firewall that was installed at the network’s edge and had its public IP address pointing towards the internet. The firewall or router will function as a NAT device.
Similar to this, there will be some hosts with a public network, such as a web server, email server, FTP and so on. We either configure a public IP directly on those public-facing servers or perform one-to-one NAT.
The same logic remains true here; at AWS, there are private and public subnets. And these subnets are used in the following ways.
We would place any hosts in the private subnet that don’t need inbound connectivity from the internet and just need access to the AWS internal network (or, in certain circumstances, on-premise network connection).
Private hosts can be compared to Database servers hidden behind a public-facing web server. In this scenario, users would communicate with the web server using its public IP address, and the web server would communicate with the database server over its private IP address.
Another example would be a web server in the private network and a load balancer on the public subnet. The users will hit the load balancer public IP to access the resources that are spread across on the web servers
The web server and load balancer can speak to one another over a private network.
In certain cases, we might provide such private hosts access to the internet by using a NAT gateway that is deployed in a public subnet. as in the case of downloading system updates.
With Nat gateway, only outbound access is allowed; incoming access is forbidden.
Moreover, the aws is responsible for managing nat gateways. A firewall appliance can be utilized if you want complete control over NATing.
We would set up the public-facing servers, such as web servers, email, ftp, and so on, in a public subnet. comparable to the DMZ network used in a corporate network.
The internet gateway is required to enable communication between the hosts in the public subnets and the internet.
You must authorize inbound access through the security group in order for a outside host in the internet to talk to the public subnet host. Using NACL, you may even manage traffic at the subnet level. Of course, each device in the public subnet has to be given a public IP address. More like a one to one NAT.
Note: I have removed the default VPC, and all the configuration is from the scratch including the VPC.
Plan the VPC IP network.
It is important to plan your network while setting up an AWS cloud.
It is important to plan your network while setting up an AWS cloud. Additionally, you should ensure neither the on-premises network nor the other VPCs are in conflict with the subnets that we are going to use.
The /16 subnet is the maximum subnet size supported by AWS, and provides us the 65536 IPs. Even the default VPC has the /16 subnet range.
Also, I’m going to stick with the same CIDR, which is 10.100.0.0/16.
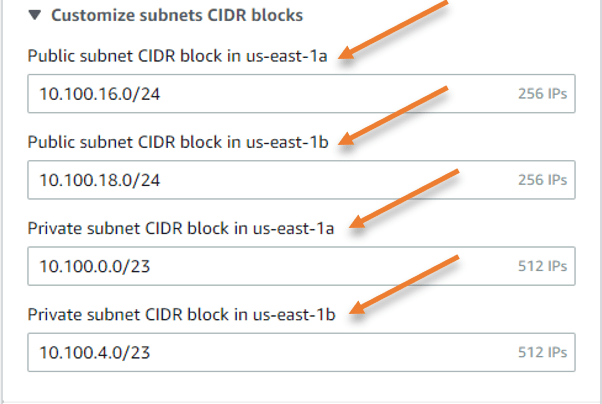
I would only need 500 IP addresses in the private subnet, therefore I may select the subnet /23, which offers 512 IP addresses, so I picked the first subnet, 10.100.0.0/23.
Reserving 10.100.2.0/23 for potential usage in the future.
To achieve high availability, I can create a second private subnet 10.100.4.0/23 in a different AZ that is in az-b.
I won’t be deploying many public servers at the public subnet in my configuration.
So, since I’m using /24 subnets in my configuration, the subnet for az-a will be 10.100.16.0/24.
I’m going to select 10.100.18.0/24 for the az-b in order to ensure high availability while preserving 10.100.17.0/24 as a reserved network address.
In your setup, the subnet requirement will be different, so based on the host and network requirement you will have to choose subnets.
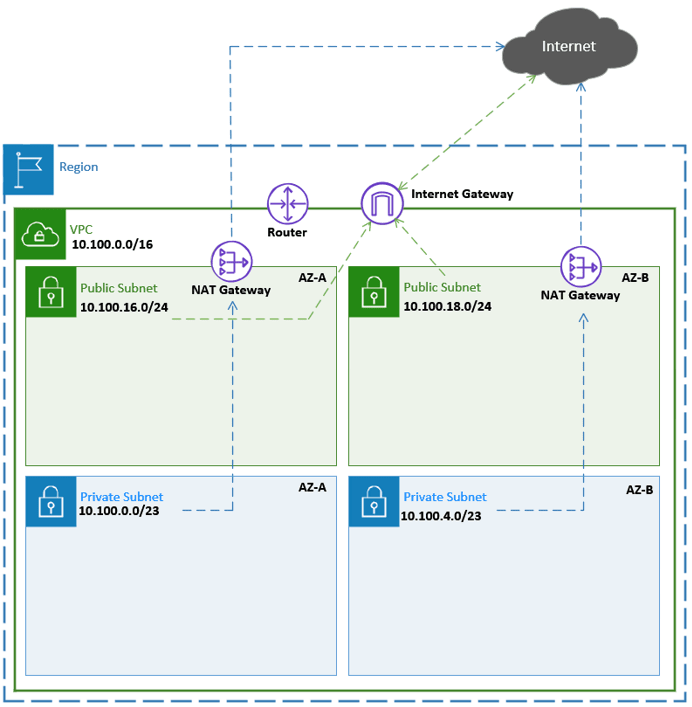
After removing the reserved subnets, Below are the subnet assignments.
| Subnet Name | CIDR | Availability zone. |
| Private Subnet 1 | 10.100.0.0/23 | AZ-a |
| Private Subnet 2 | 10.100.4.0/23 | AZ-b |
| Public Subnet 1 | 10.100.16.0/24 | AZ-a |
| Public Subnet 2 | 10.100.18.0/24 | AZ-b |
Note: Five IP addresses in each subnet will be reserved by the AWS as below.
In the case of 10.100.0.0/23 it will be as follows
10.100.0.0 – Network address.
10.100.0.1 – VPC gateway.
10.100.0.2 – DNS Server.
10.100.0.3 – Reserved for future use.
10.100.1.255 – Broadcast Address. Aws doesn’t support broadcast though.
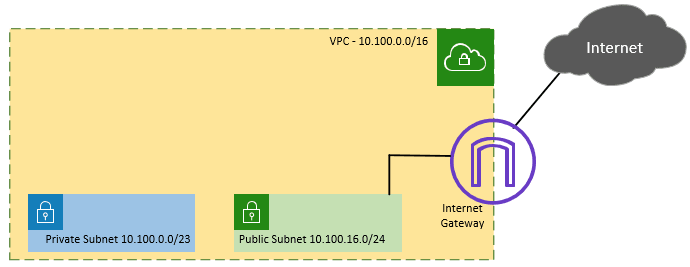
Below is what we are going to deploy.

The Public subnet users will be able to initiate inbound and outbound access to the internet after the subnet deployment thanks to the internet gateway. Provided the EC2 host in the public subnet has;
- Public IP address.
- Security Group allowing the traffic inside. By default, outbound access is allowed.
How to access private hosts in AWS remotely?
The NAT gateway connected to the public subnet will allow hosts in the private subnet to communicate with the internet.
Only the outgoing connection from the VPC to the internet is authorized with Nat gateway; the inbound connection is not.
To control the outbound NAT as well as to check the traffic, a firewall network appliance may occasionally be used in place of a NAT gateway.
Read also,
How to Install PfSense on AWS EC2 Cloud?
How to Deploy FortiGate Firewall on AWS EC2?
How to Deploy the PaloAlto Firewall in AWS?
How to Configure OpenVPN on PfSense in AWS Cloud?
Therefore, it may not be good to include a NAT gateway while building the network if you want to utilize a firewall appliance.
We install a bastion host in the public subnet and the majority of the services in the private subnets.
You can connect to the public subnet using the bastion host via the internet and then access the private host from there since any host in the public subnet will be able to communicate with those hosts in the private subnet.
In a production network, the on-premises network is typically connected to the AWS VPC using either a site-to-site VPN or a direct connect link. At that time, you can communicate with both the private and public subnets directly over the same medium, which is more secure and eliminates the need for a bastion host.
You may also set up an AWS client VPN to access the private and public subnets by connecting to the VPN from a client PC to AWS.
Use the vendor’s proprietary VPN solution, such as OpenVPN from pfSense, Global Protect VPN from Paloalto, and so on, if you are deploying a firewall appliance as an EC2 instance.
A client VPN may also be created using an OpenVPN access server setup as an EC2 instance.
Create the VPC in AWS.
You may think of an AWS VPC (virtual public cloud ) as a virtual data center. You basically going to deploy services in a data center owned by someone in this case AWS, and you pay for what you use.
Let’s go ahead and create the VPC first.
Log in to the AWS with an IAM user, Make sure you have the admin rights to manage the VPC and the EC2.
- In Services click on VPC.
- On the top right corner choose your desired region.
- On the left side menu pan, Under Virtual private cloud -> Your VPC’s.
- Click on Create a VPC.
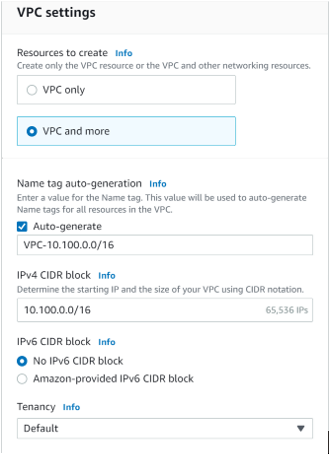
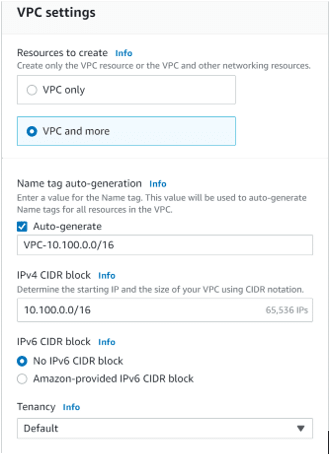
AWS recently introduced a new VPC experience with the new GUI, where you can create everything simultaneously. Hence, Choose VPC and more.
Name Tag auto-generation: enter the name of the VPC
IPv4 CIDR block: 10.100.0.0/16
IPv6 CIDR block: If you are not using IPv6, you may uncheck No IPv6 CIDR block, Else Amazon-provided IPv6 CIDR block.
Tenancy: Default.
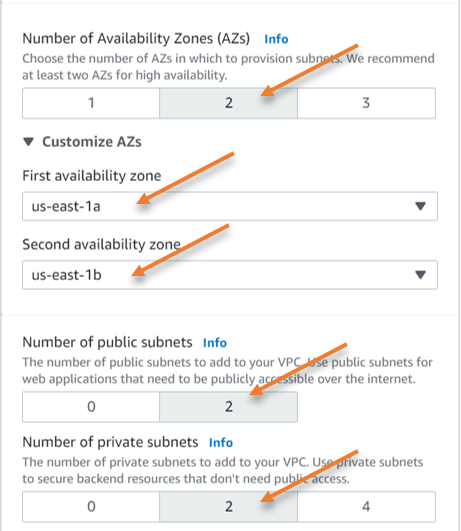
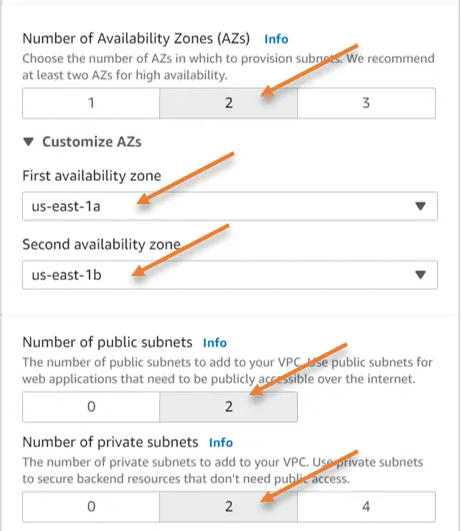
Number of Availability Zone: 2 – If you require more availability zone, you may choose 3.
Expand Customize AZs to choose the Primary and secondary AZs.
Number of Public subnets: 2
Number of Private subnets: 2
The reason the subnet was selected as 2 is cos we already selected the AZ as 2.
Just below the AZ assignment, you will see customize subnets CIDR blocks, expand that.
This is where you need to configure the subnet for each AZ’s.
Configure the Subnet as per the diagram.

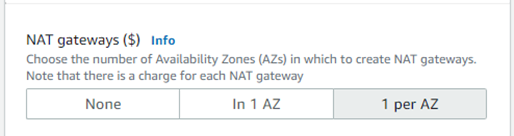
Configure the NAT gateway.
Before using the NAT gateway, you should be aware that there are fixed costs and traffic use fees; it is not free to use like the internet gateway.
NAT gateway setup can be done at the AZ level, just like the subnet configuration.
You can decide If you need high availability in 1 AZ, so you can select 1 per AZ. There is no cross-AZ availability with the NAT gateway.
Additionally, since all of the hosts in the AZs are down when AZ-a is down, there is no need for a NAT gateway anyways.
So According to our diagram, I’m picking 1 for each AZ.

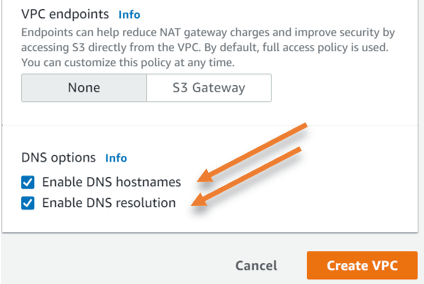
VPC endpoints.
At the moment I don’t require a VPC endpoint to access s3 over the internet, which I can do it later if I want to, hence selected none.
DNS options.
Selected both DNS options.
Enable DNS hostnames.
Enable DNS resolutions.
Click on Create VPC.

The VPC creation will begin now and it may take few seconds to finish.
Once done you will get a success message.
Deploy Bastion host.
We are now going to deploy bastion on the public subnet. Once deployed we should be able to ssh into the bastion host. From there we can access the private hosts.
Goto EC2-> Launch Instance
Name and Tag: Enter the name of the host.
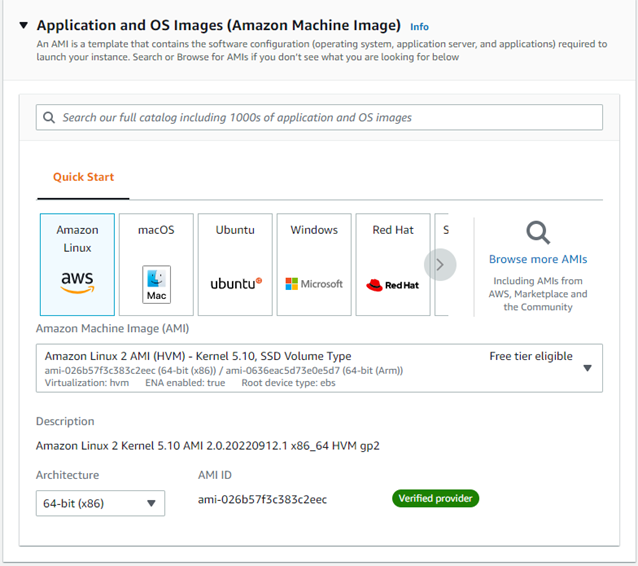
Choose Amazon Linux as the AMI.

Instance type: T2.micro.
Keypair: Either create new keypair or choose the existing one.
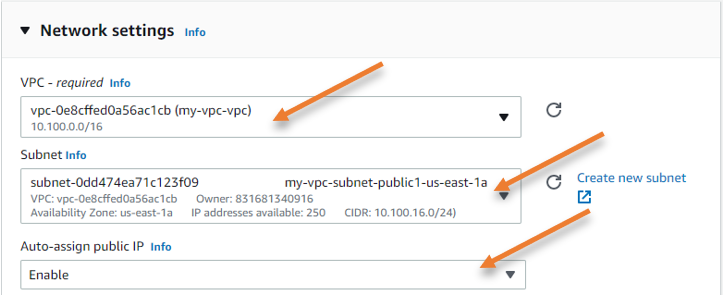
Network settings.
Click on Edit on the network settings.
Choose the VPC that we just created.
Subnet: As we require ssh to the bastion host from the internet, we would have to choose the public subnet here. So from the available public subnet of two, I choose the subnet in Az-a.
Auto Assign Public IP: The only way we can reach the bastion host via the internet is by using the public IP address, hence we need to keep this option enabled so the ec2 host will get the public IP address.

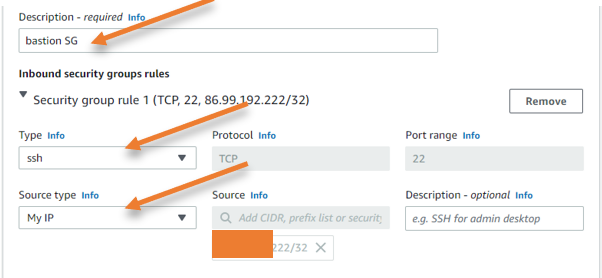
Firewall (security group) :
In order for us to access the host, SSH inbound traffic would need to be allowed. Additionally, keep in mind that it is advisable to just let ssh traffic come from your own IP address rather than from anywhere else. Therefore, I’ll select My IP as the source.
Choosing my IP should be a fine option if you have a static public IP address, however, the majority of consumer internet connections use dynamic IP addresses, which means that when the ISP lease time expires, your current IP address will change.
Therefore, if your ISP has provided you with a dynamic IP address, you will lose SSH connection to the bastion server whenever the IP address changes. As a result, it’s critical that you continuously upgrading the security group whenever your IP changes.

Leave everything else to default and click on Launch instance.
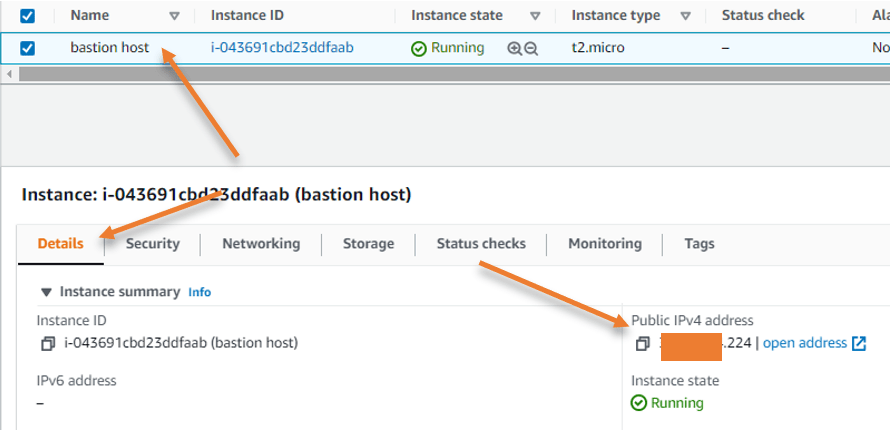
Get the Public IP.
Now that we have the host up and running let’s go ahead and get the IP address assigned to the host.
Under instances, choose the instance that we just launched, and click on details. You will see the public IP address, make a note of that.

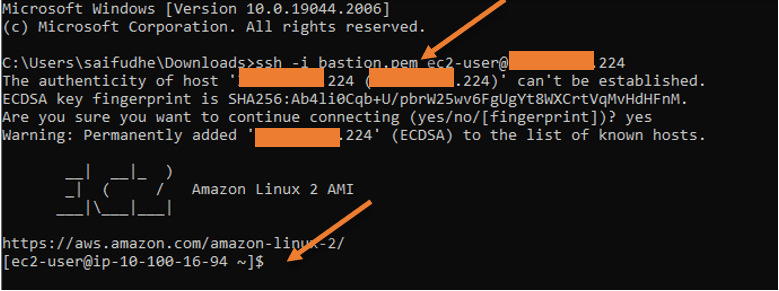
Login to the bastion host.
Go to the location where you have downloaded the key pair for the host.
I am using the windows host, so I opened the command prompt from there.
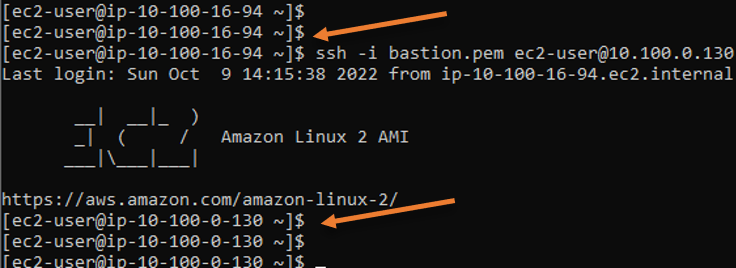
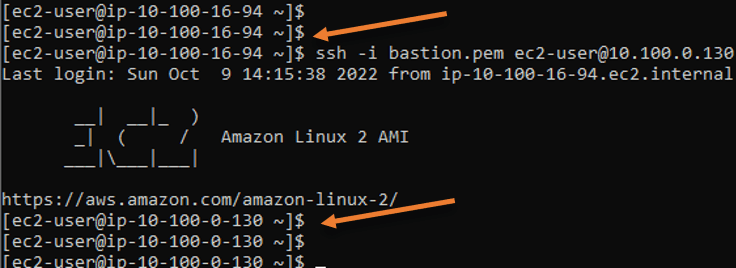
And type the command as below.
ssh -i bastion.pem [email protected]
as you can see, I have logged into the bastion host from my local machine.
And it got the IP address 10.100.16.94 from the public subnet.
In case if you are wondering where the public IP is configured on the host, AWS basically does the static one-to-one NAT between the private IP 10.100.16.94 and the public IP that we used to SSH with.

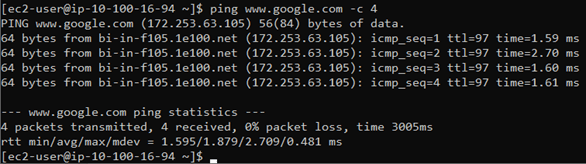
Check the internet access.
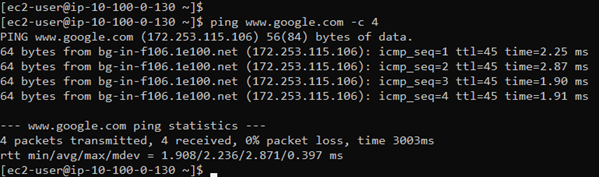
When we ssh into the host, we can verify the incoming internet access is functioning. To verify the outbound internet connection is functioning, you may ping any publicly available IP address.
As you can see the internet access is working and it is via the internet gateway.

Deploy private host.
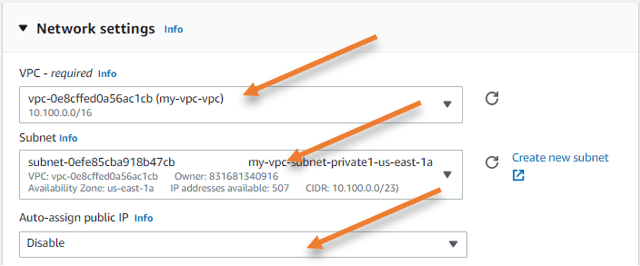
As we deployed the host in the public subnet, we are going to deploy the host in the private subnet, the only settings that you need to change as below.
Subnet – Private subnet in Az-a.
Auto public assignment: Disable.

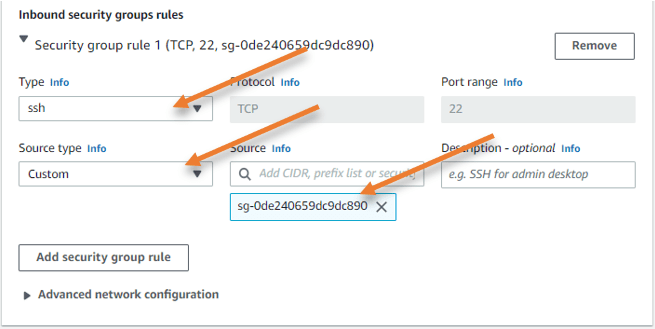
And in the firewall (security group) under the inbound security group, it should be as follows.
Type: SSH.
Source type: Custom.
Source: Choose the bastion host security group that we created.

You will see a new instance created with no public IP assigned to it.
Copy the private key to the bastion host.
Open the keypair that we downloaded when we deployed the private host in a notepad.
Copy the entire content from the file.
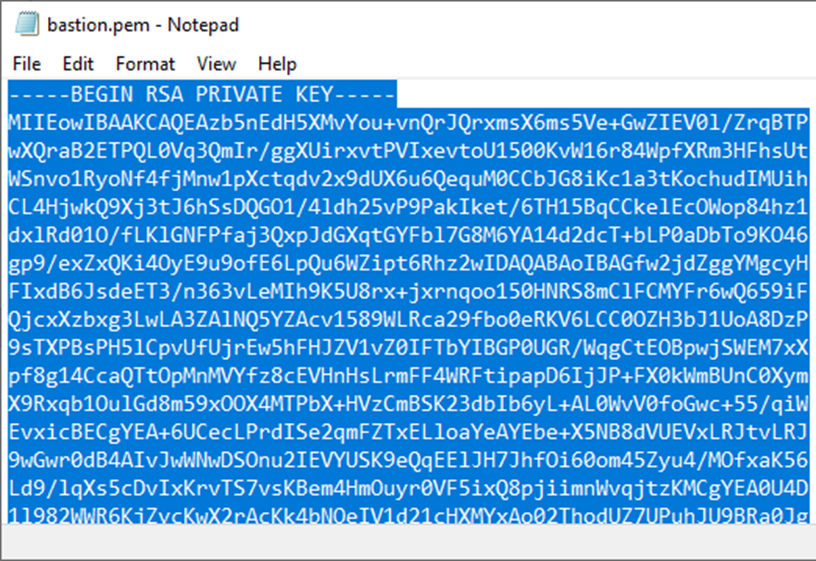
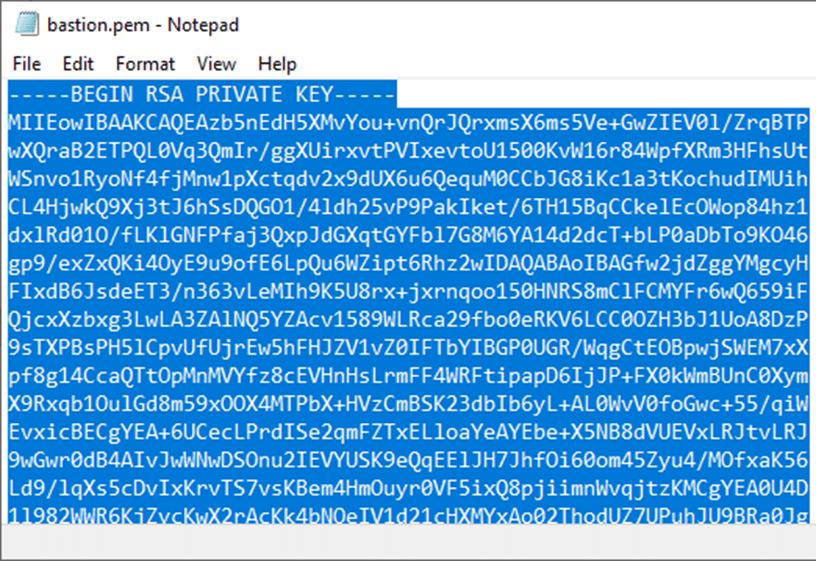
Go back to the Bastion host and create the file with the command vi bastion.pem
Add the content you copied into the file that you just created and save it.
Change the file permission.
Change the file permission with the command chmod 400 bastion.pem
That’s it you can now connect to the private host from the bastion host now.
You can also confirm that the private host can access the internet. So the traffic is basically going through the nat gateway.