The FortiGate Firewall is one of the popular next-generation firewalls used by many worldwide on-premise and cloud data centers. With the FortiGate Firewall, you can not only secure your branch or cloud network, but you can also connect your branches using site-to-site VPN and SSL VPN.
In this blog, we are trying to see how we can install the FortiGate Firewall on the AWS cloud.
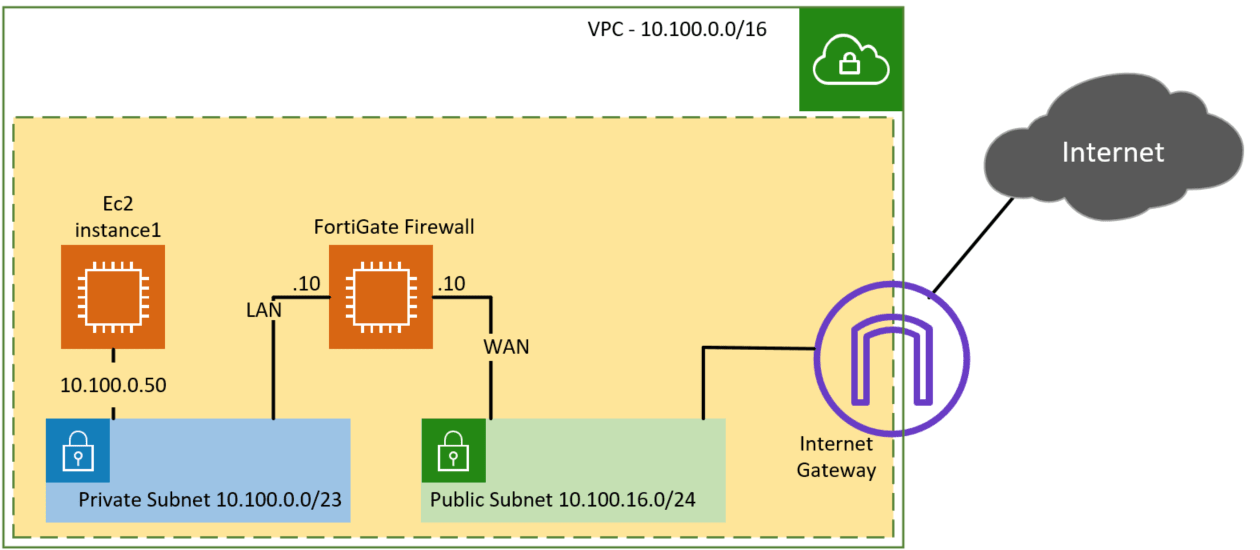
Below is the topology that we are going to build. We have a public and private subnet, and there is an EC2 instance spun up on the private subnet (10.100.0.50). We will deploy the FortiGate firewall WAN interface connected to the public subnet and the LAN interface connected to the private subnet.
After which, we will configure port forwarding on the FortiGate Firewall to get into the host in a private subnet and verify the private subnet machine can talk to the Internet through the FortiGate Firewall.


Read also,
How to Deploy the PaloAlto Firewall in AWS?
How to set up AWS site-to-site VPN?
How to Install PfSense on AWS EC2 Cloud?
How to configure AWS site to site VPN to Paloalto?
Steps to deploy FortiGate firewall on AWS.
1. Create AWS private and public Subnet.
We have already created the AWS private and public subnet following the article here, so you may go ahead and create the subnets and come back here to deploy the FortiGate Firewall on the cloud. The LAN side of the FortiGate Firewall will be on the private subnet, and the WAN side of the FortiGate Firewall will be for the public subnets of AWS.
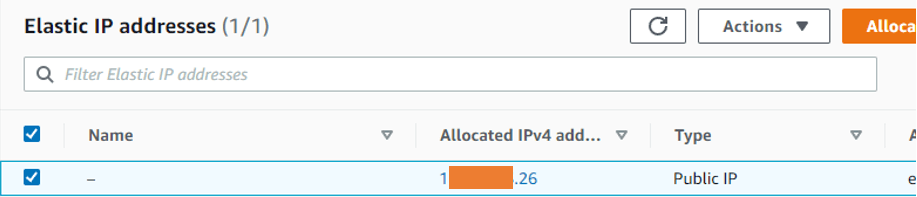
2. Create an Elastic IP.
In AWS, whenever you reboot the system or Terminator an instance. You will lose its public IP, so it is always recommended to have an elastic IP associated with an instance. You can think of the elastic IP as a static IP that you normally get from an ISP. And that will never change. And once you have the elastic IP, you can attach it later to the instance you’re going to run.
Goto EC2-> Network& Security-> Elastic IPs-> Allocate Elastic IP address.
Under Elastic IP address settings, Choose Amazon’s pool of IPV 4 addresses. And click on allocate.
You will see a new elastic IP address assigned to your account.

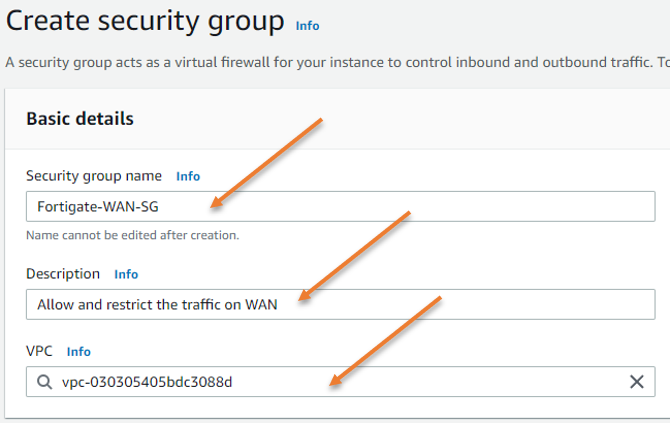
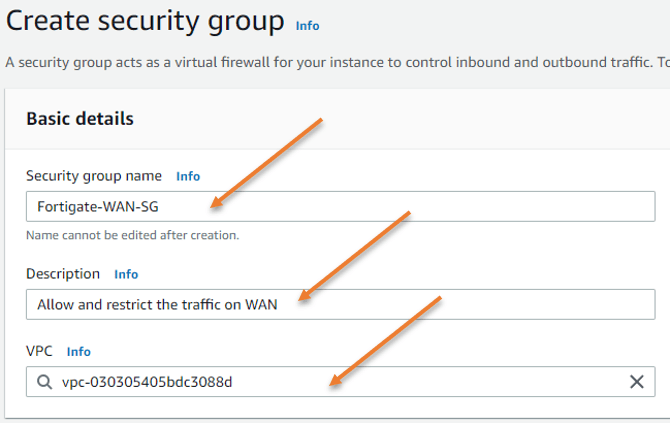
3. Create a security group for the FortiGate Firewall.
You need to create a security group for the WAN interface and the LAN interface.
Security Group for WAN.
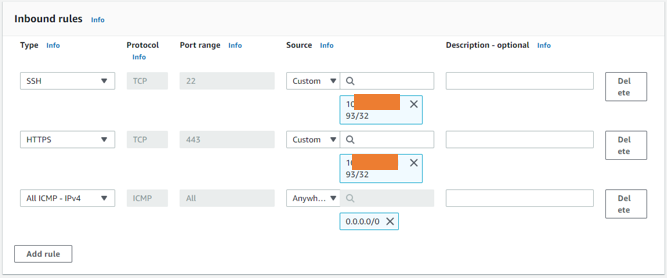
In the WAN security group, you will have to configure HTTPS and SSH access from outside but only to known IP, If you allow SSH and HTTP access everywhere, everybody on the Internet will be able to reach the Firewall using HTTPs and SSH protocol, so it is always better to Restrict those protocols to known IP or trusted IP that you own. That way you can restrict the firewall access from outside. I’m also allowing ICMP from anywhere so I can make sure the firewall interface is reachable.
Goto EC2-> Network& Security -> Security Groups->Create Security group.
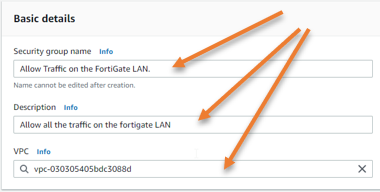
Security Group Name: Fortigate-WAN-SG.
Provide a description.
VPC: Choose your VPC.
Under inbound rules
SSH and HTTPS access to my static IP, and ICMP access from everywhere.
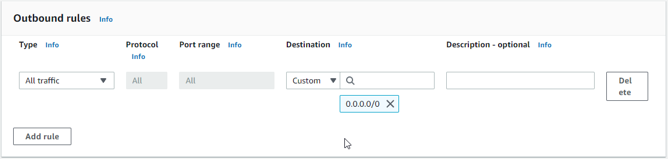
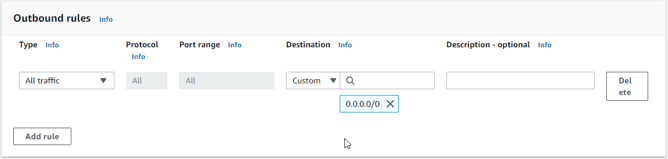
Outbound rules.
You can leave the outbound rules as it is, which will allow outbound traffic to all.
The reason we are allowing all the traffic is that if anybody inside the Firewall wanted to go out to the Internet, the outbound rules should be allowed.
Click on Create security group.
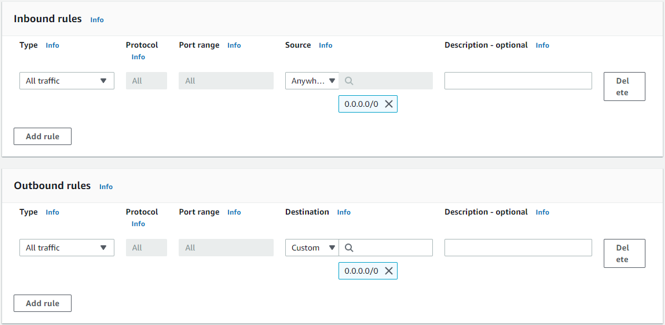
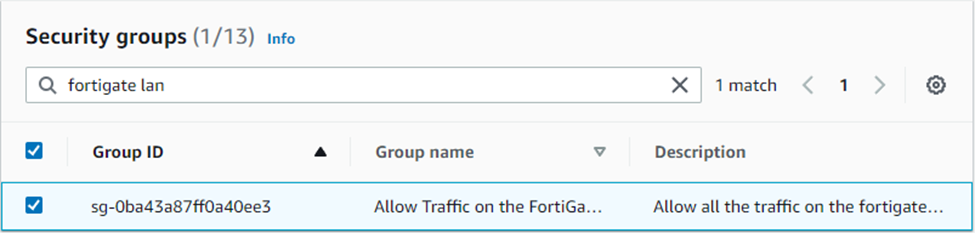
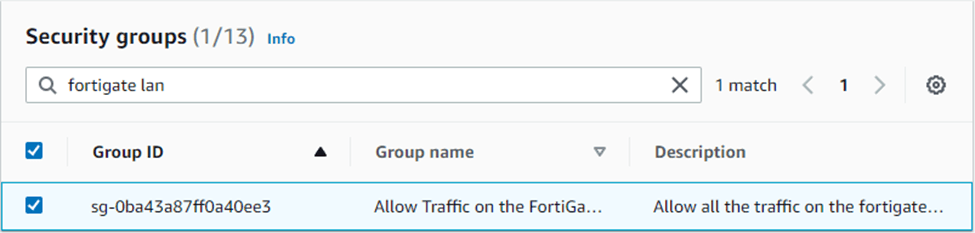
Security group for LAN.
You can allow pretty much all the traffic on the land side.
EC2-> Network& Security -> Security Groups->Create Security group.

Both the inbound and outbound will allow all traffic.
Click on Create security group.
4. Setup an elastic interface.
When you spin up a Fortigate firewall, it requires you to have WAN interface and the LAN interface.
When you start the intance, it will have WAN interface by default. And the LAN interface you will have to create here, and you can attach it during the VM Deployment.
In EC2-> Network & Security-> Network Interfaces -> Create Network interface
Add a Description of your choice.
Subnet: Choose the private subnet.
Private IPv4 Address- Choose custom and type the Address 10.100.0.10
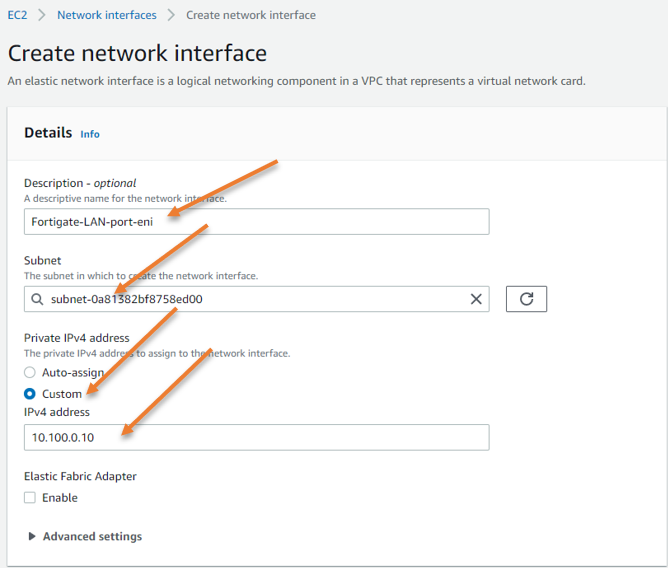

Choose the FortiGate LAN security group that we created before.
Click on Create network interface.
5. Launch FortiGate firewall in AWS EC2.
We have created the security groups, interfaces that we could use with the Fortigate Firewall. Now let’s go ahead and spin up the FortiGate instance in the AWS.
Go to EC2-> Instances->Launch instances.
Choose an Amazon Machine Image.
Click on AWS marketplace. In the search field, type FortiGate and hit enter.
You will have to choose FortiGate next-generation firewall and click on select.

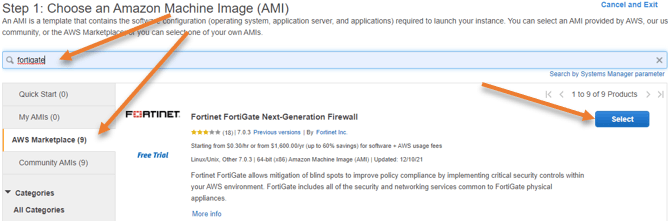
You will get the summary and the product’s pricing on the next screen. You may click on Continue here.
Choose an instance type.
Since this is a lab, I’m going to provide the least resources for the VM, so the smallest I could go for is the T2.small.
You might choose the instance type based on your requirement.
After the selection, click on Next : Configure instance.


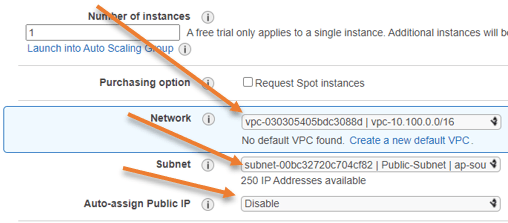
Configure instance details.
In the subnet, we have to choose the public subnet that we have created; since we are going to assign Elastic public IP, we can disable the auto-assignment of public IP.

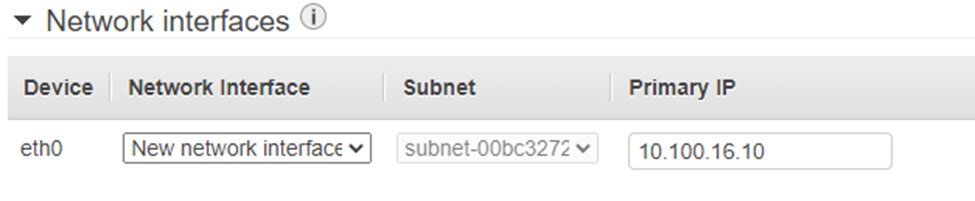
Configure the network.
We have to configure the IP address for the eth0 that will be the WAN interface, and the IP address would be 10.100.16.10.
Attach the LAN interface.
The default interface Eth0 picked up by the Fortigate will be the WAN interface. We’ll now have to add the LAN interface that we have created under the Elastic Network Interface.
Click on Add Device
Choose the ENI that we created in the beginning.


Note: you need to make sure the interface ID is the same that we created, so go back to the elastic interfaces and make sure the interface ID is correct.
Click on Next: Add storage.
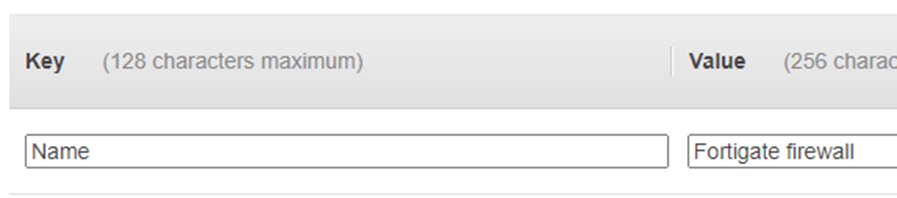
You may leave the default storage options click on next: add tags.


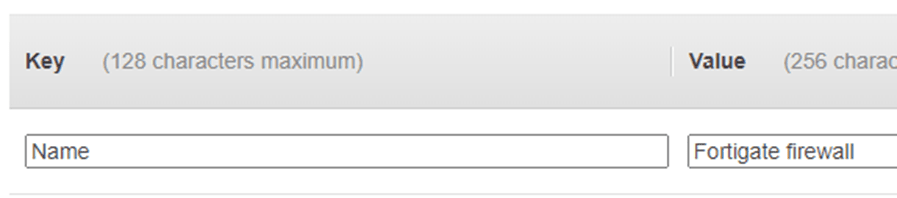
The tag is not so important, but it would be easy to identify the VM when you add the tags, so I’ve given the tag as Name – Fortigate Firewall.
Next: Configure security group.
Configure the security group.
We have already defined the security you May choose a security group that we have defined for the FortiGate WAN interface.


Click on Review and Launch.
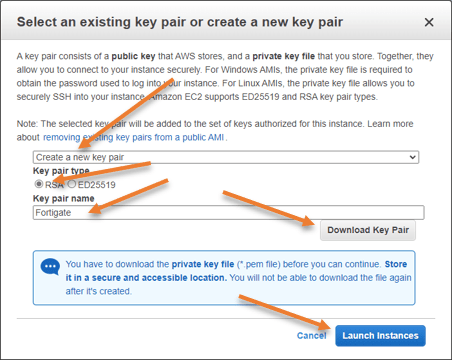
Chose the keypair.
In the Keypair pop-up, click on Create a new key pair, choose RSA, define the key pair name and click on Download Keypair.
Once you have downloaded you may click on Launch instance.
If you already have another keypair, you may choose that as well.

You may click on View instance to go back to the instance page.
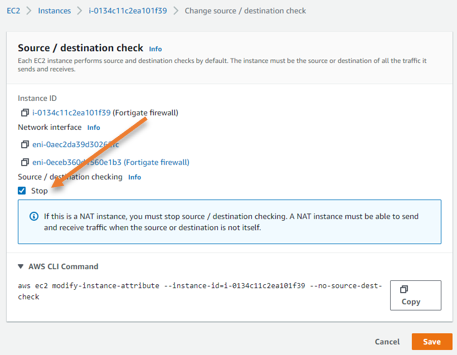
6. Change source /Destination Check.
Whenever you deploy a firewall in AWS, you must disable the change source destination check option.
Select the fortigate firewall instance->Actions->Networking->Change source/destination check.
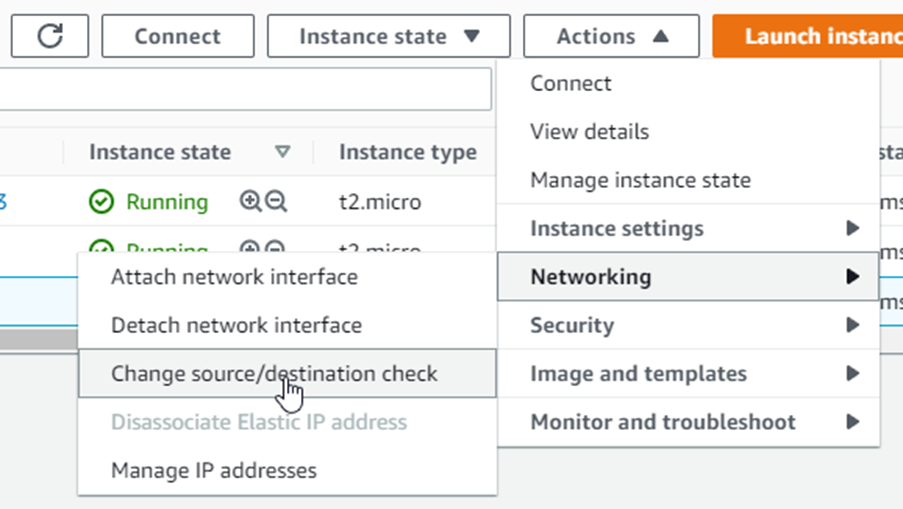
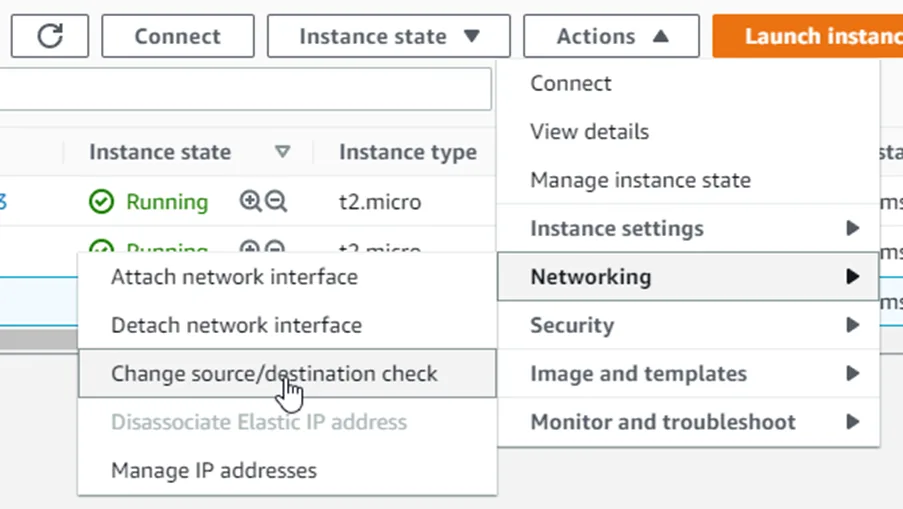
Check the stop option and click on Save.

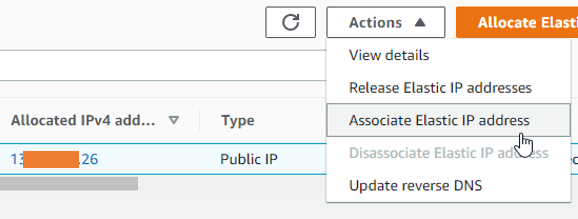
7. Assing the Public IP to the FortiGate Firewall.
The FortiGate firewall rig doesn’t have any public IP assigned to it. And if you don’t have any public IP, there is no way you can reach the firewall management GUI. Neither the Firewall can go out to the Internet.
EC2 -> Network & Security -> Elastic Ips
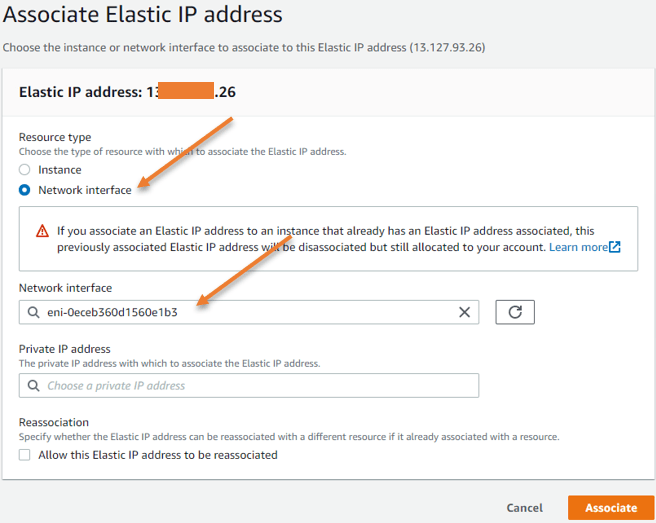
Select the elastic IP -> Actions-> Associate Elastic IP address.

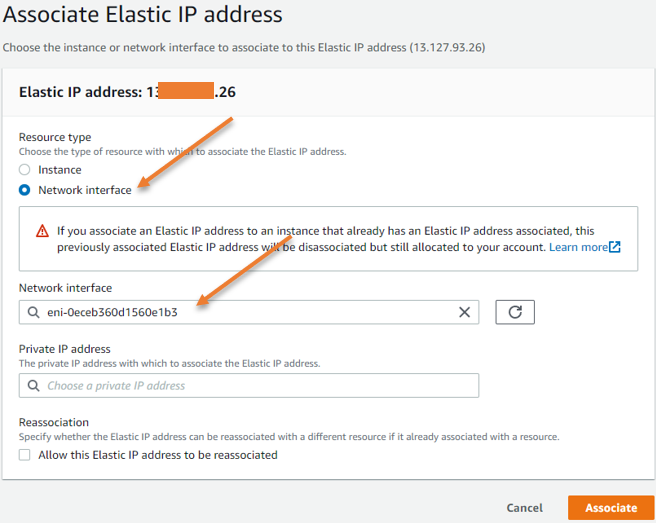
Choose the resource type as the network interface.
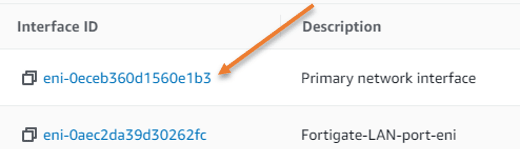
Under the network interface choose the WAN interface of the Firewall, you need to go back to the fortigate instance and get the primary interface ID, and you need to choose it here.
Below is the network ID’s of my Firewall.

8. Access the WEB GUI of the Firewall.
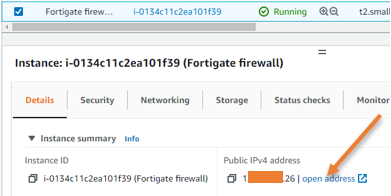
You can now access the web GUI of the Firewall using its elastic public IP.
Go back to the instances, select the Firewall, and under details, you will see the public IP address that we just associated, you may click on Open Address.

9. Set the FortiGate password.
When you open the page, you may get a security warning. You may ignore that and you will end up getting a login disclaimer that basically says in order to log into the Fortigate Firewall you’ll have to enter the username as admin and the password as instance ID.
So you’ll have to go back to the instances and find out the instance ID for the FortiGate and you may click on accept here and on the login prompt. You will have to enter the username as admin and the password as instance ID.
After you entered the creds, you will be required to reset the password.
Enter the instance ID as the Old Password, and you may enter the new password and confirm the same. And click ok.

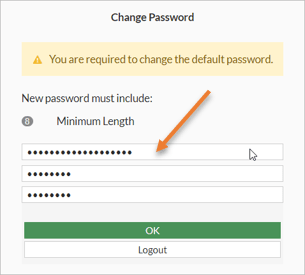
The password will reset and you will get the login prompt again. Enter the username as admin the password that you just reset and click on Login. And you should be good to go.
In the FortiGate Setup window, click on Begin and set up your FortiGate firewall hostname.

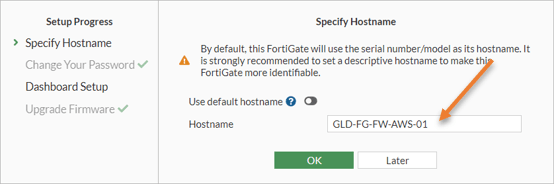
Choose the dashboard as Optimal and click on Ok. And you will be taken into the FortiGate dashboard.
10. Configure the interfaces of the Firewall.
To see the network interfaces on FortiGate firewall, goto Network -> Interfaces.
You will see the Fortigate firewall interfaces are now configured using their DHCP and the IP address that you got will be the same on the AWS side as well. You can leave the DHCP on port 1 and that would provide a default gateway for port 1 outside interface, which will take care of the default route towards the Internet.
However, on port 2, though it is configured as a DHCP, you will have to change it back to manual.
Double click on Port2.
The port2 configuration window will now open up, you may change the role to LAN.
Under Address, choose manual, this will automatically pick up the previous Address in the IP/Netmask field, you may click on OK here.
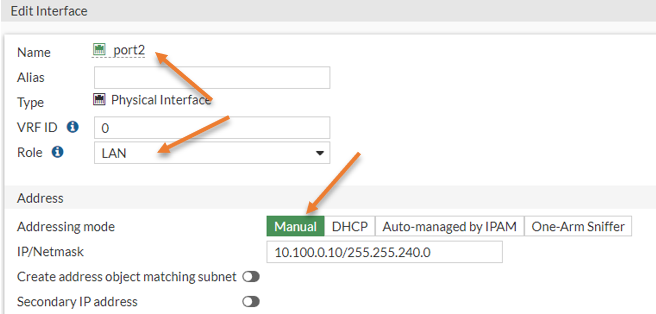

You may change the role for port 1 as WAN.
Double click on port1, and change the role as WAN and click on Ok.
11. Setup a security and NAT policy for the inside host for the Internet.
If the devices on the LAN wanted to go out to the Internet using the Fortigate Firewall, you will have to configure a security policy and the Nat policy, so let’s go ahead and do that now.
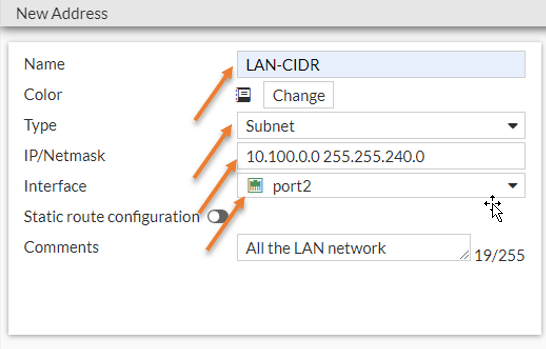
Create address object.
Before you proceed with the security policy, let’s create and create an address object for the LAN network.
Policy&Objects-> Addresses-> Create New-> Address.
Name : LAN-CIDR
Type : Subnet
IP/Netmask: 10.100.0.0 255.255.240.0 (Our Private subnet in AWS)
Enter some comments and click on Ok.

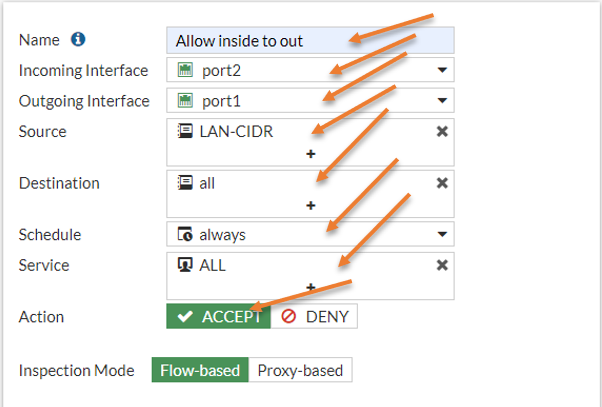
Configure the Policy.
By default, everything will be denied on the FortiGate of the Firewall. We are going to create a policy that says, if LAN-CIDR wanted to go out to the Internet it should be allowed.
Policy&Objects-> Firewall Policy-> Create New.
Name : Allow inside to Out.
Incoming interface: The traffic is coming from the LAN interface which is port2.
Outgoing interface: Our outside interface is port1, hence choose that.
The traffic source is LAN CIDR – The address group that we created before.
Destination – All, we are allowing all the internet access.
Action: Accept.

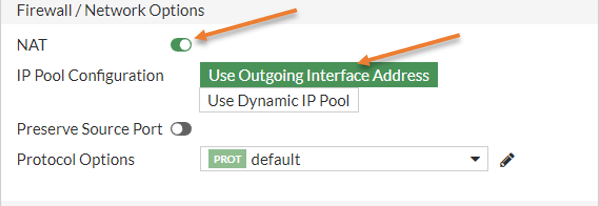
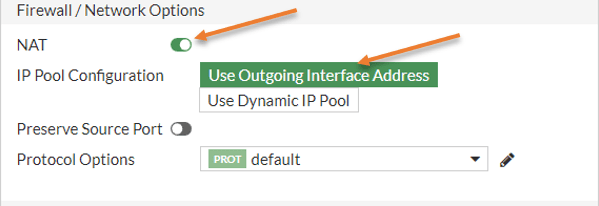
Configure the NAT policy.
You need to ensure that the NAT option is checked and that the outgoing interface is selected.
So the LAN-CIDR block gets translated ot the outgoing interface of the Firewall.
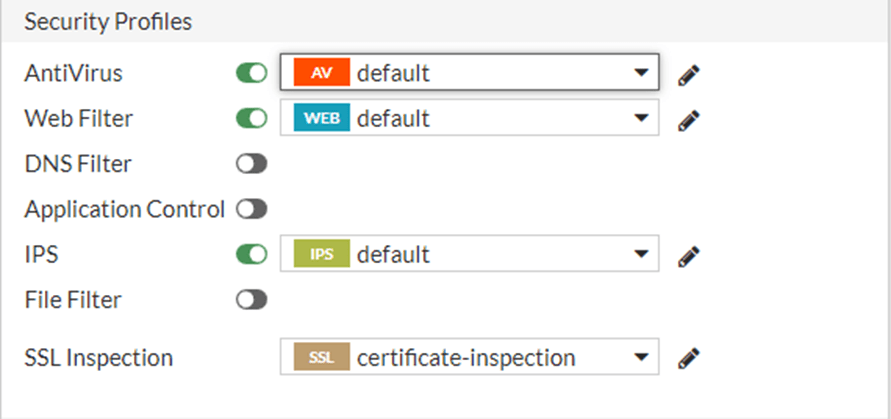
Security Profiles.
Based on your setup, you may choose your security profile.

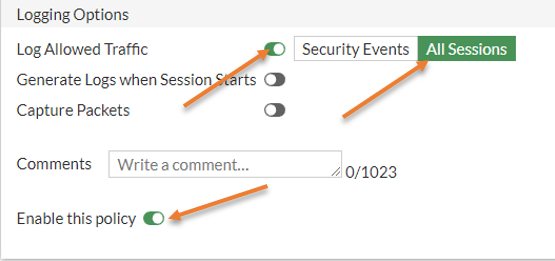
Log the traffic.
You need to make sure all the sessions are logged, so it will be easy for you during the troubleshooting.
And make sure the enable this policy is checked and you may click on Ok.

12. Update private subnet route table.
We have enabled the security policy and the Nat policy on the Firewall, but. When the host in the private subnet wanted to go out to the Internet, it didn’t know how to get to the firewall LAN interface. So you need to update the private routing table that says if you want to go out to the Internet, you’ll have to go and talk to the LAN side of the Fortigate Firewall.
Go back to AWS Dashboard, and click on VPC-> Route Tables-> Select Private Route table -> Click on Routes, you may click on Edit routes.
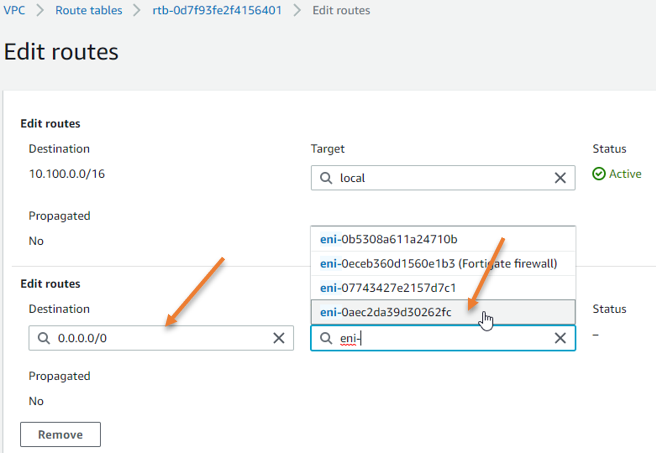
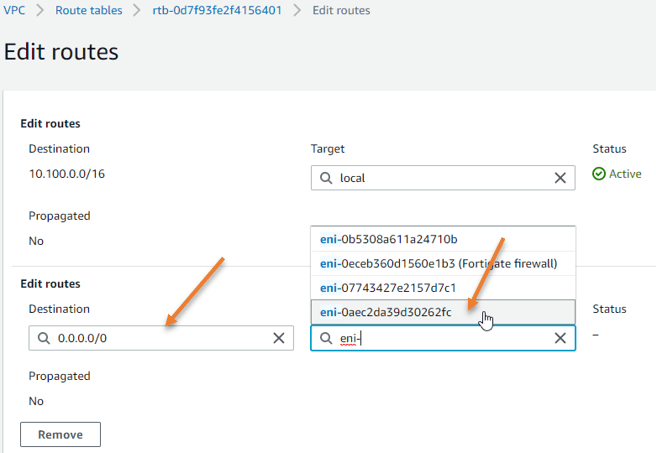
Save changes.
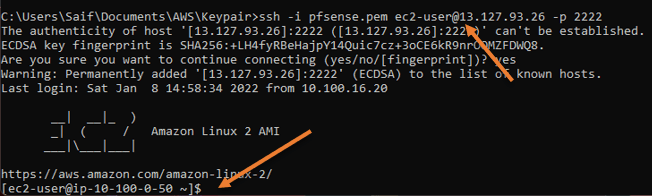
13. Test the connectivity to the private host.
Right after you updated the routing table on the private subnet you will see the private host is now able to talk to the Internet, but how do we check that?
We already have a private host in the private subnet, but how do we reach the private host?
We can use something called port forwarding here, as you can see, I have done a port forwarding to the private host on SSH with port number 2222 and I could get into the private host! Awesome!
Check out the article here to learn more about port forwarding on fortigate firewall.
Note: You need to also allow port 2222 on the AWS security group for the fortigate as well (Fortigate-WAN-SG)

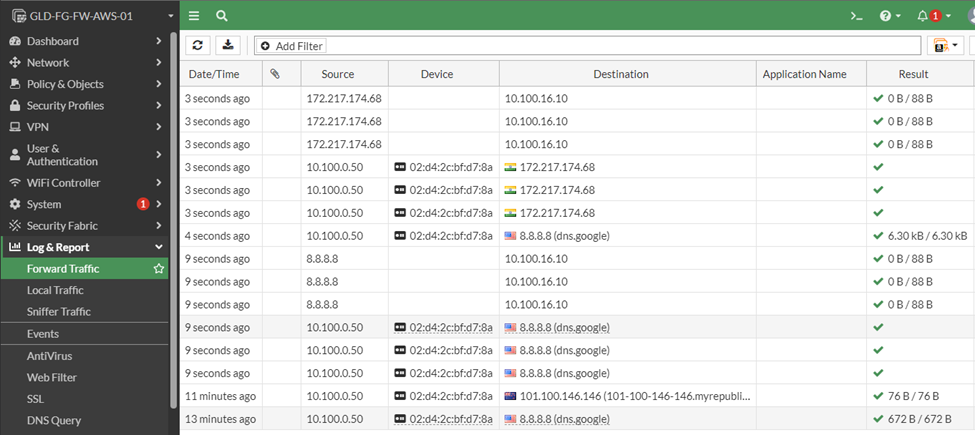
As you can see, I am able to ping the Internet, and the traceroute shows it is taking the fortigate firewall path.

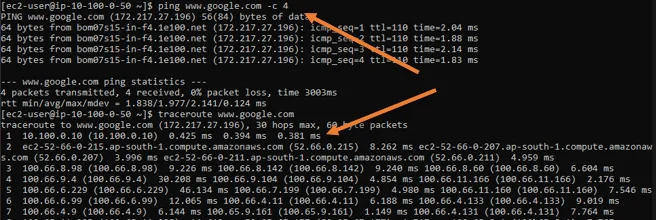
You now see the traffic is flowing through the firewall as well.