
In my last blog post, I have covered how to install a pfsense firewall in the AWS cloud. And in this blog, we will install and configure the Paloalto firewall in the AWS cloud using EC2.
Once the Paloalto is in place, the devices in the private Subnet can go out to the Internet via Paloalto.
We can enable many Paloalto features, such as a dynamic update to secure the cloud environment. Block specific IPs and apps with a policy. Enable site-to-site VPN from Paloalto firewall to corporate DC or another cloud provider. You could even bring up Global protect VPN for end users. Many features Paloalto provide traditionally on corporate networks will also be available on the cloud. If I start discussing Paloalto and its features, I could go on and on, I don’t think a single blog post would be enough.
When we installed the pfsense firewall, we could use the free tier t2.micro from the list, but Paloalto requires more resources than the pfsense.
In AWS, the Paloalto subscription is free for two weeks, and upon completing two weeks, you will be charged for the subscription. That is the charge for the Paloalto subscription alone. You are required to also pay for the EC2 instance type you use.
After completing the lab, this is what my total bill was in the Mumbai region, not so bad, is it.
For EC2 instance.


Elastic IP’s – I forgot to remove the elastic IP after the lab 🙂


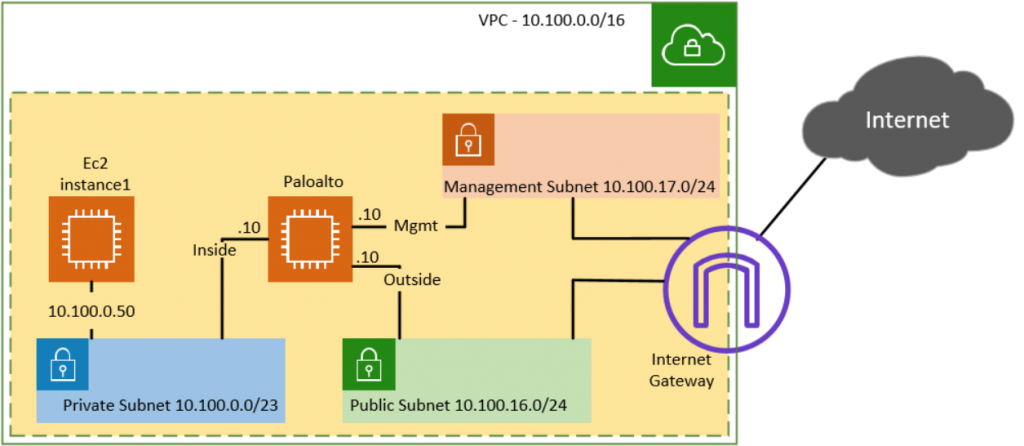
Below is the topology that we are going to build.
- We have three subnets, private, public and management.
- Managment and the public subnet has the routes towards the internet.
- Paloalto interfaces are connected as follows.
- Management interface will connect to the management subnet.
- Inside/Trusted interface will connect to the Private subnet.
- Outside/Untrusted interface will connect to the Public subnet.
- To test the connectivity, we will start a VM on the private zone.

1. Setup Private, Public and Management Subnet on AWS.
Before you even start deploying the Paloalto firewall, you should make sure that you design your VPC first. I have covered how to set up a private and public subnet on AWS VPC here. And we are going to start this lab from there. With the current private and public Subnet, only the public Subnet has the reachability to the Internet, and the private host does not have internet access. After implementing the Paloalto firewall, we will ensure private hosts can go out to the Internet via the Paloalto firewall. And we could see the traffic is passing through the firewall.
Apart from the private and public Subnet, I would also create a management subnet. So the Palo Alto firewall can connect its management interface to the management subnet. And we would also assign a public IP during the Paloalto deployment to the management interface.
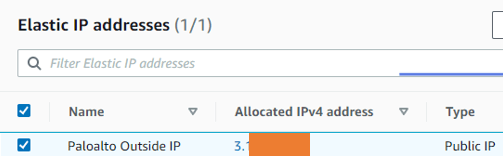
2. Create Elastic IP.
When you deploy an instance with a default Public IP from AWS, the assigned IP address will keep changing whenever you reboot the firewall. To make the public IP permanent, you will need to create an Elastic IP in the AWS EC2. And attach the public IP to the Firewall outside IP. So the IP will never change. Elastic IP is similar to a Static IP that you get from an internet service provider. Since that IP is permanent, you can create a DNS entry and use it for the GPVPN. The same IP can be shared with the 3rd parties to create an IPsec tunnel with the Palo alto firewall.
In production, it is also recommended to have Elastic IP for the management subnet. However, we are going to use some random public IP. And I don’t mind changing it because it’s a lab.
Goto AWS->Services->EC2.
The EC2 console will now open.
Network and Security->Elastic IP’s ->Click on Allocate Elastic IP address.
Choose Amazon’s pool of IPv4 addresses, and click on Allocate.
You can now see a new public IP is assigned by elastic IP address.

3. Create a security group.
We need to create a security group for the Management inside, outside the Palo Alto firewall interfaces. Let’s go and create a security group for the Management interface first and then the Outside interface. After that, we will create the security group for the internal interface.
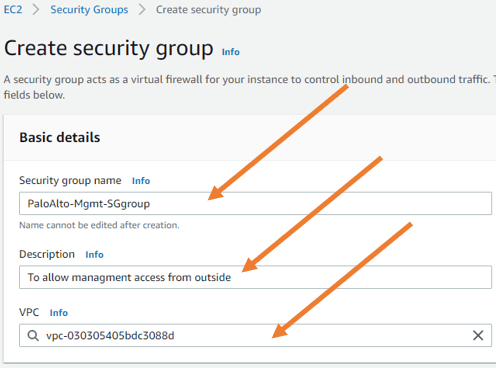
Goto EC2->Network&Security->Security Group->Create Security Group.
Security group for the management interface.
Security Group name: PaloAlto-Mgmt-SGgroup.
Description: To allow management from outside.
VPC : Chose the VPC.

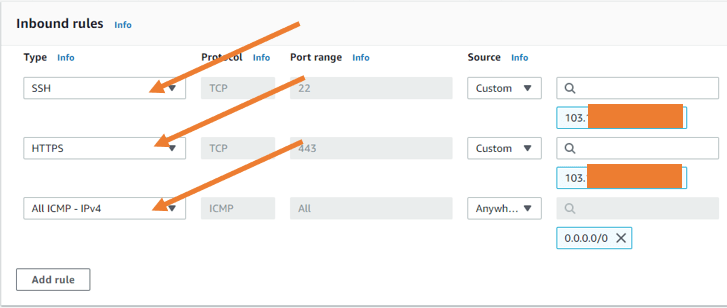
By default, AWS would create rules that would allow SSH and HTTPS from anywhere on the Internet when you launch an instance, which is not good. So you must ensure the SSH and HTTPS access are allowed only to a known IP or a trusted IP for the management traffic. So I’m going to provide my static IP for that. If you don’t have any static IP, I recommend you get your dynamic IP by clicking here and entering the dynamic IP here instead. And by any chance, if you are unable to access the Palo Alto firewall, it could be due to that particular dynamic IP from the ISP would have changed. So to regain access, you have to re-add the public IP again to the security group, and you should be able to get back to the access.
- For SSH and HTTPS, provide the static IP as the source.
- I will also allow ICMP from everywhere.

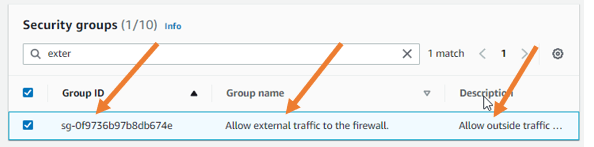
Security Group for an Outside interface.
- Provide the security group name. For example- Allow external traffic to the firewall.
- Choose a VPC.
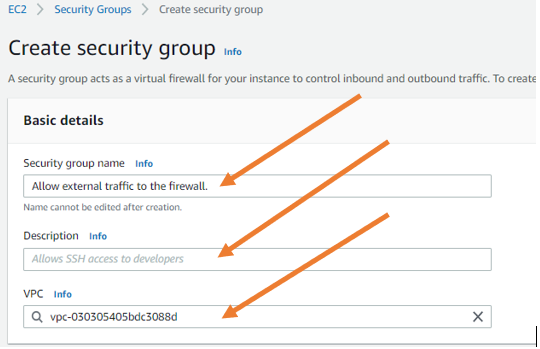

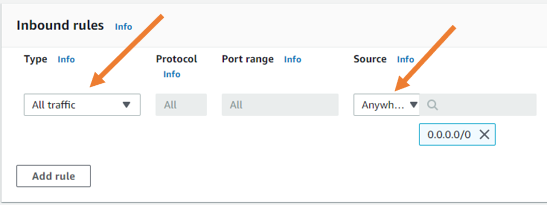
- Allow all traffic- On the inbound rules, allow traffic from everywhere.
In case if you are wondering why I am allowing all the external access to the firewall, that’s because I am going to implement the firewall, and I can control all the traffic coming to the firewall outside the interface within the firewall.
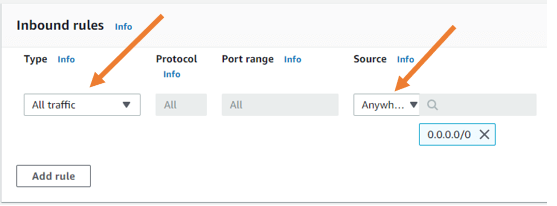
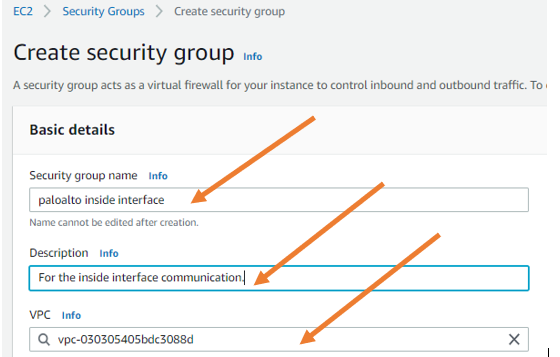
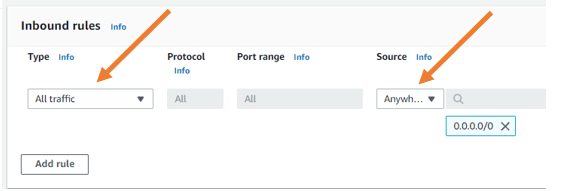
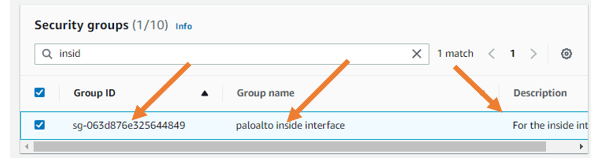
Security Group for an inside interface.
Similarly, create a security group for the inside interface as well. Name the security group. Give a description and choose a VPC.
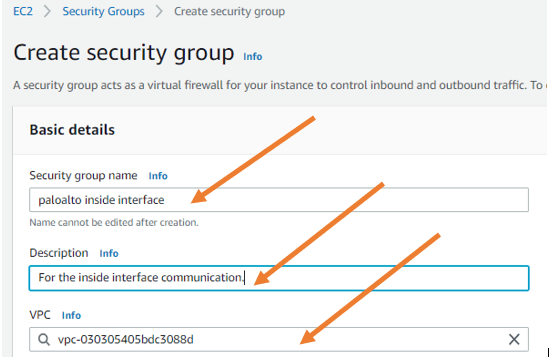
In the policy inbound rules. Allow all traffic from anywhere.

4. Create an Elastic network interface.
We will start with the management interface when we start the Palo Alto VM. Later we would have to add the Palo Alto inside interface and the outside interface. So we need to create an elastic network interface known as ENI in the AWS, which later can be plugged (attach) into the Palo Alto Firewall.
Goto EC2->Network & Security->Network interfaces->Create network interface.
Create an outside interface.
The Palo Alto network interfaces options create click-on create network interface.
- In the description, provide a name which is Palo outside.
- Choose the public Subnet that we have created earlier.
- Under Private IPV 4 address, choose custom and choose IPv4 address, which is 10.100.16.10.
- Attach the security group.
Call the Security Group that we created for the outside interface in the security group.

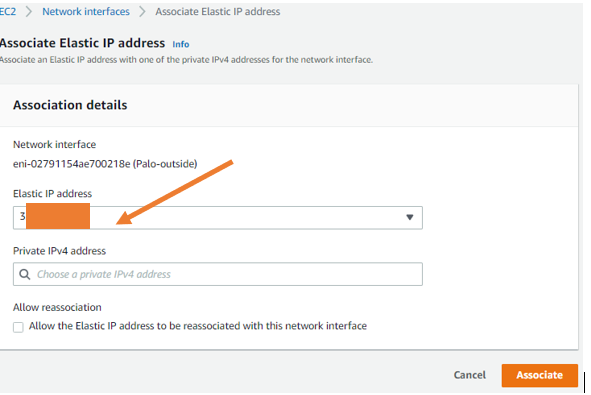
- Associate Elastic IP.
Next, we will associate the Elastic IP we created in the AWS with Palo Alto outside interface.
- Select the Paloalto outside interface, click on actions and click on the Associate address.
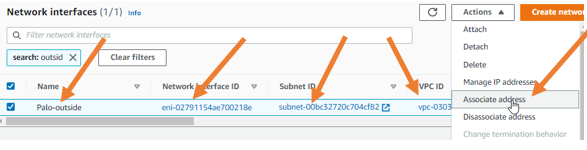

Choose the elastic IP from the dropdown and click on associate.

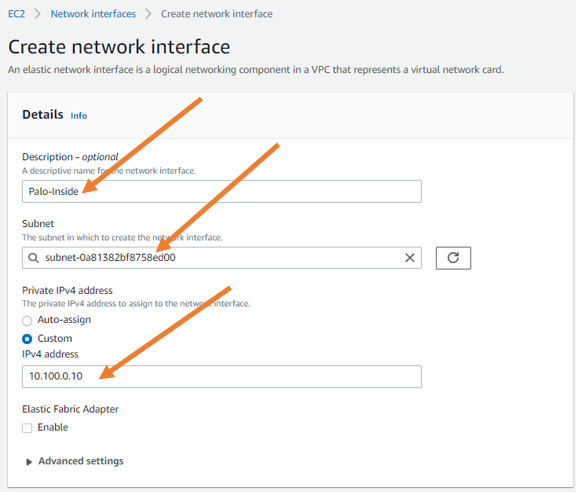
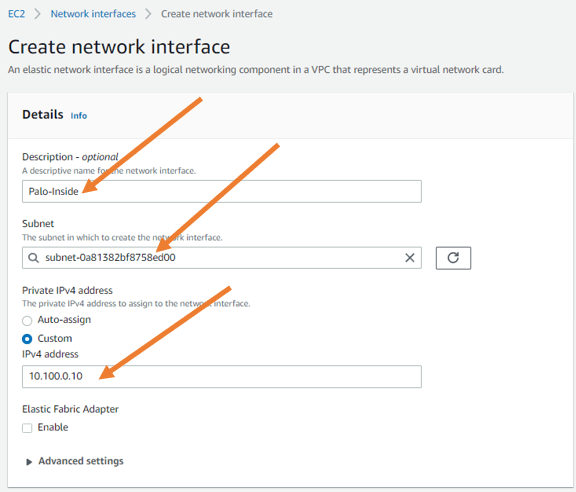
Create an inside interface.
Like we configured the Palo Alto outside interface, we will now create the Palo Alto inside interface. But this time without the elastic IP.
- Under description, type Palo inside.
- Choose a subnet. Here we have to choose a private subnet because we’re going to connect the Palo Alto firewall inside interface to the Private Subnet.
- In the private IPV 4 address, you have to choose custom and choose the IP address 10.100.0.10.
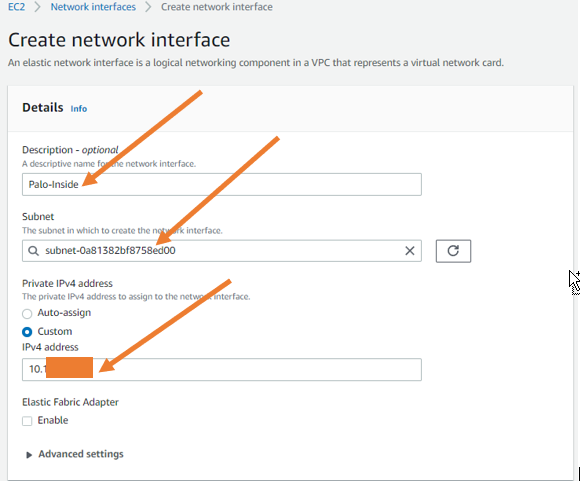

- Assign the security group.
Under Security group, call and assign the Security Group we created for the Palo Alto inside interface.
- After that, click on create network interface.

5. Launch the Paloalto firewall in EC2.
In the EC2 instance dashboard, click on Launch Instance.
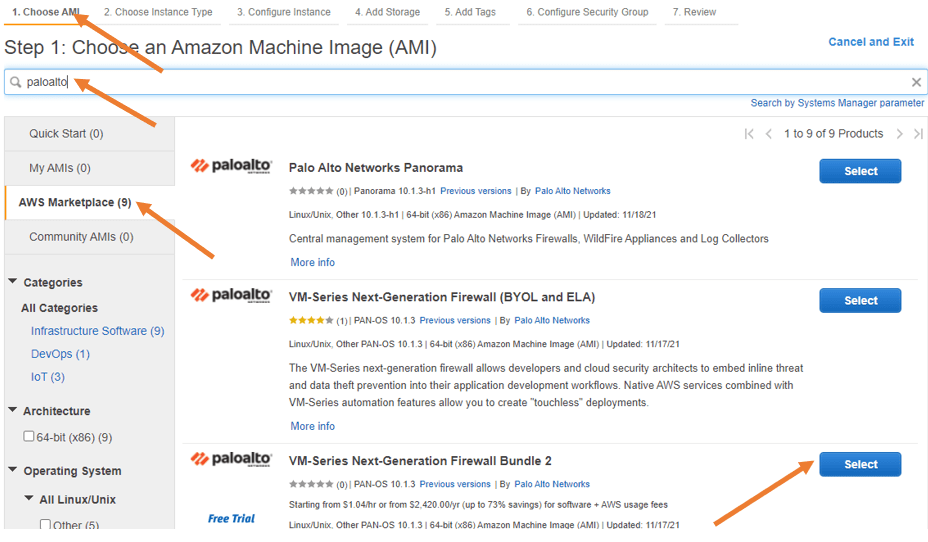
- Choose Amazon Marketplace, and search for Paloalto.
You’ll get multiple options to choose from. Bringing your own license (BYOL) is pretty straightforward, which means you can use that here if you have a license. And so many people get confused when they see bundle 1 and bundle 2. Bundle 1 doesn’t provide many features, whereas bundle 2 provides more features than bundle 1. So I recommend you go through each version of the documentation and choose the one that works for you.
- Scroll down and choose Paloalto firewall bundle 2. And click on select. When you click on select, you will get the properties of the Palo Alto Firewall, which explains the product’s pricing details. I’m going to use M5 Xlarge, which is not very cheapest compared to t2.micro available in the free trial.

Since the first Paloalto VM instance that you launch is free trial, there will be 15 days of trial that you could opt. This means you don’t have to pay for the Paloalto subscription fee. However. You have to pay for the EC2 charges.
Click on continue.
You will be taken into choosing instance type. In that, you have to choose M5.Xlarge. Which has a CPU of four and 16 gigs of RAM, and it also provides up to 10 Gigabits of network speed.


After the selection, click on the next configure instance details.
Configure instance details.
We need to configure the instance details now.
- On the network. You have to make sure that you choose the correct VPC. In my case 10.100.0.0/16, which we have configured already, and the Subnet, has to be on the management subnet because the management interface should reach the Internet to access the management side.
We could also configure the other interfaces for the firewall however, we are not going to do that right now, which we will do it later.
For now, Paloalto has been configured with a single interface, Eth0, that will act as a management interface.
The auto-assignment of public IP is selected as enable.

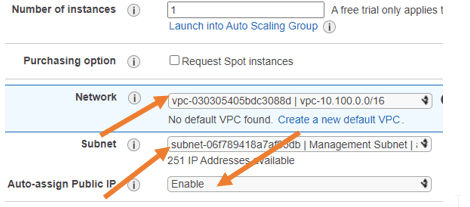
We will configure the primary IP address as 10.100.17.10


Rest all should be okay. Click on next, add storage.
Configure the storage.
We now have to configure the storage for the Palo Alto Firewall. By default, it will pick up 60GB of storage, So if you are planning to install it in the production, you required to provide more storage to save all the logs and everything from the firewall. I am okay with the 60GB, so leave the default and click on Next: Add Tags.
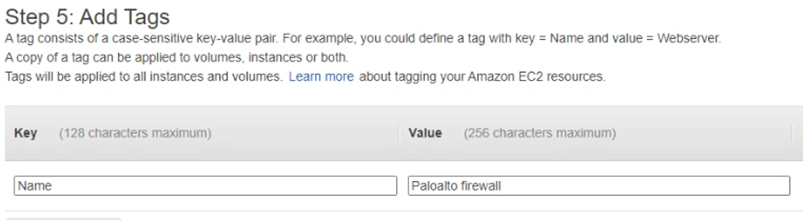
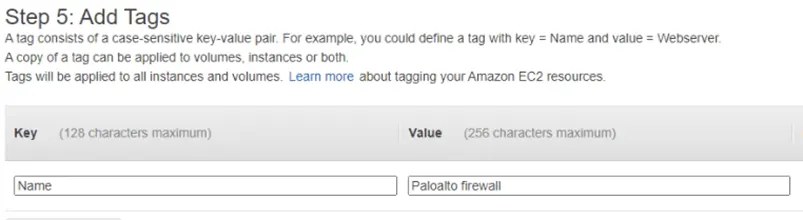
Configure the tags.
You could give a key as ‘Name’ and value as ‘Paloalto firewall’ just to identify the Palo Alto firewall VM.
Next, configure the security group.
Choose the security group.
We have already defined the security group for the paloalto instance, which is PaloAlto-Mgmt-SGgroup. Choose Select an existing security group and choose PaloAlto-Mgmt-SGgroup.
Click on review and launch.
You will be taken to the summary of the Palo Alto Firewall page. Review that and click on launch.
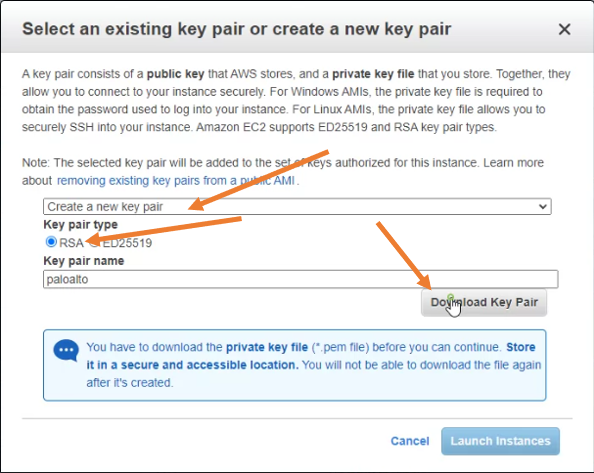
Select an existing key pair or create a new pair on the prompt.
I am creating a new key pair for this instance.
- Choose key pair type as RSA.
- Provide a user friendly keypair name.
- Click on Download Key pair.
- After the keypair is downloaded click on Launch instances.

.
Launching the instance will take some time because AWS has to Add the subscription to your account. So wait for a few seconds, and it’ll be done.
As you can see, the firewall is currently running. And it’s not ready yet, so it will take at least 10-15mins for the firewall to load completely.


So to know the status, you can select the firewall instance and click on actions-> the monitor and troubleshoot-> Get an instant screenshot.
You will most likely see the firewall is still loading, so you’ll have to wait for some more time.
When the firewall is ready, you can see the below screen where it’s asking me to enter the credentials, and it also says I got a DHCP IP address, so I should be good to go.


6. SSH into the Paloalto instance.
I’ll go to my Palo Alto firewall keypair folder on my windows. And I opened the command prompt from there and when the command prompt opened.
You may enter the below command.
ssh -i paloalto.pem admin@<public IP>And if everything is configured correctly. You will get a prompt, say yes to that. And you’ll be logged into the Palo Alto firewall.


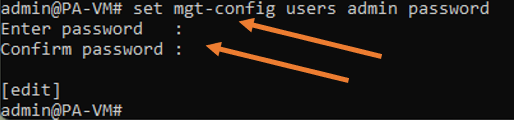
7. Reset the management IP.
Now that we have access to the firewall CLI, let’s go ahead and reset the password. So enter the below command to reset the password.
configure
set mgt-config users admin password
Once you enter the command, you will be asked to enter a new password. And confirm the new password.

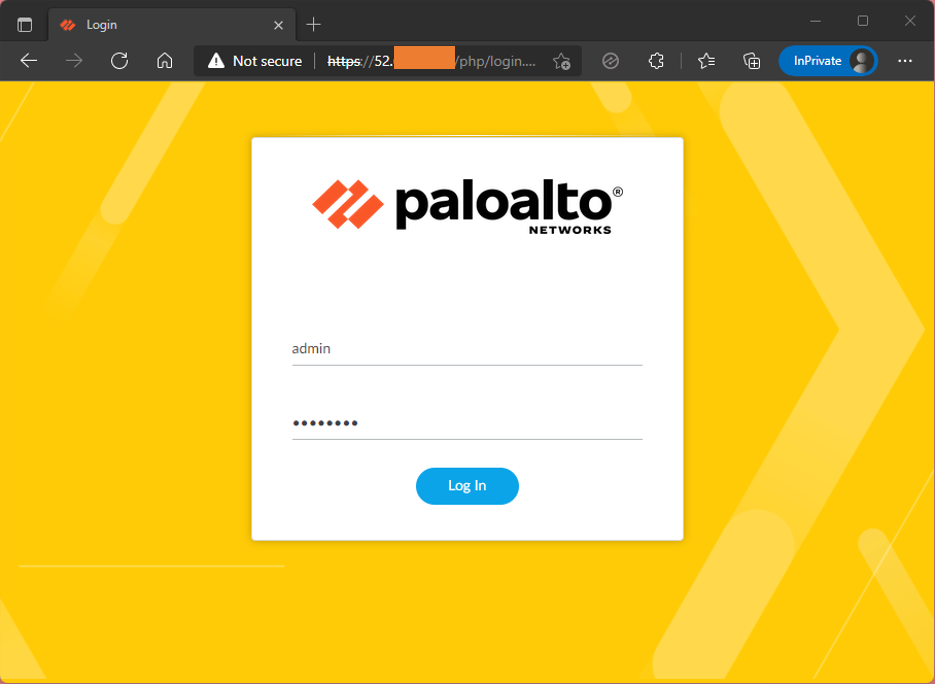
8. Access the Paloalto GUI in AWS.
Now that we have reset the password, it’s time for us to access the firewall management GUI. You can go back to the EC2 instance dashboard. Select the Palo Alto Firewall from there.
Under details, you should be able to see the public IPV4 address. Next to it just click on the open address. You will get a security warning. That’s because we don’t have a certificate for HTTPS access. You can ignore that and click on continue, and there you go. You got access to the Palo Alto Firewall GUI.
Enter the username as admin, and the password that you reset and click on Login.

9. Configure the interfaces.
We just deployed the Palo Alto firewall with the management interface. Let’s go ahead and configure the Paloalto firewall interfaces.
We are now going to configure the interface for the firewall, so first you can configure the outside interface connected to the public Subnet and the inside interface connected to the Private Subnet.
Configure the outside interface.
- Click on the network
- Go to network interfaces.
Here you will see the list of available interfaces for the Palo Alto firewalls. So you don’t see ethernet1/0 because that was taken for the management interface.
- The ethernet1/1 that we are going to configure for the outside.
- ethernet1/2 for the inside interface or trusted interface.
- Click on ethernet1/1.
Config
- Choose a virtual router as default.
- Interface type as Layer3.
- We have not created any security zone yet. So click on the dropdown on the security zone. And click on the new zone.
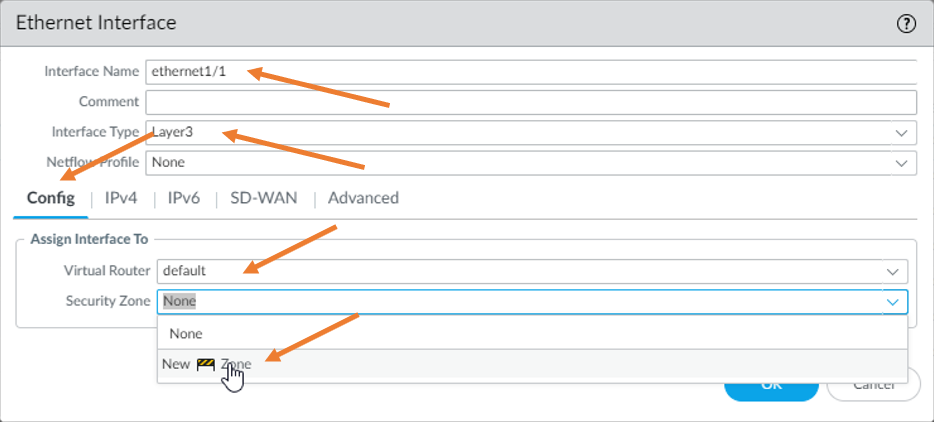

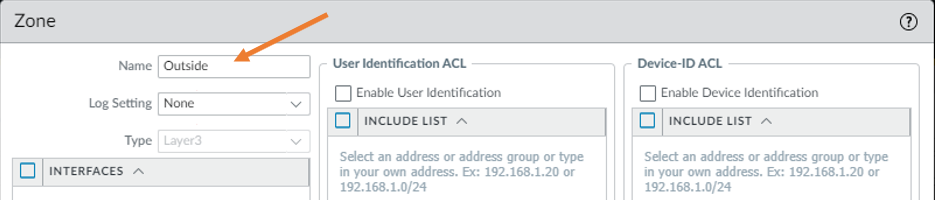
In the zone creation prompt. Type the name as outside and click on OK.

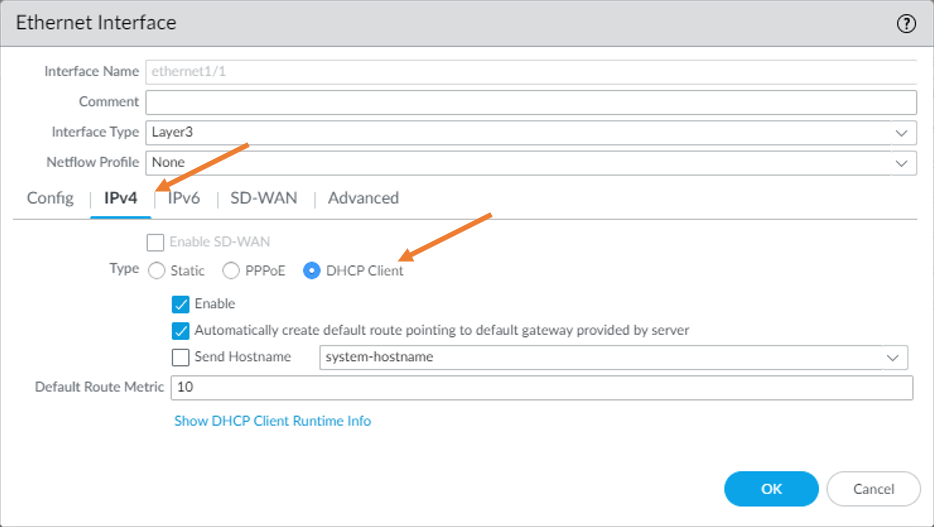
IPv4.
We have already configured IP address on the inside interface on the AWS side. So you don’t have to assign an IP address on the outside interface statically. Hence you may choose DHCP client. Under IPv4. Making the outside interface as DHCP, would automatically add a default gateway. This means you don’t have to configure the default route towards the Internet.

Advanced.
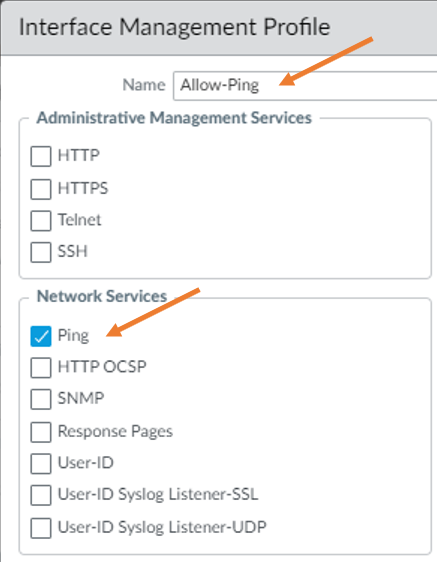
I want to allow ICMP communication from outside. Hence in advanced, I will create a management profile with ping enabled. So in the management profile dropdown. Click on the new management profile.

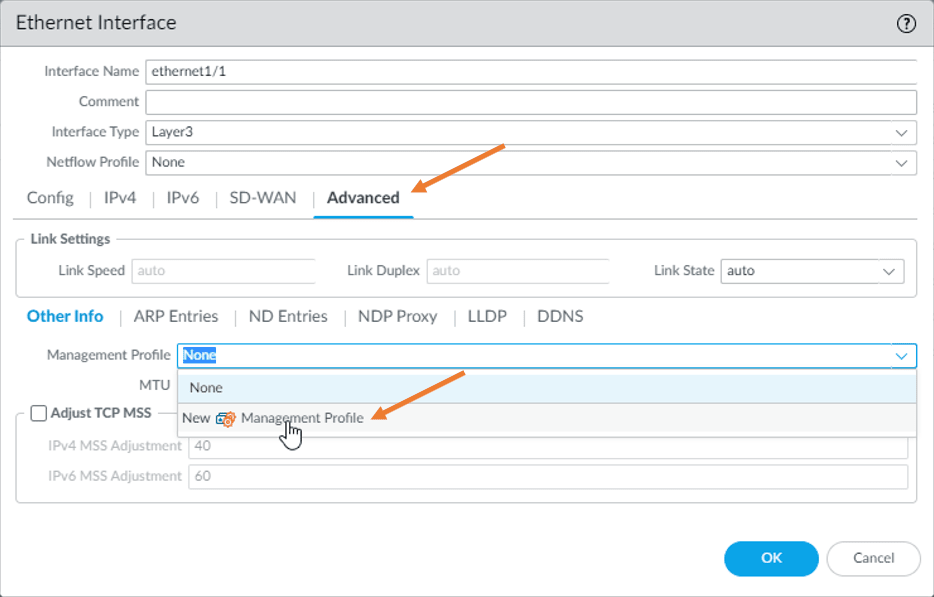
Name the management profile as allow-ping and check the option Ping. And click on okay.
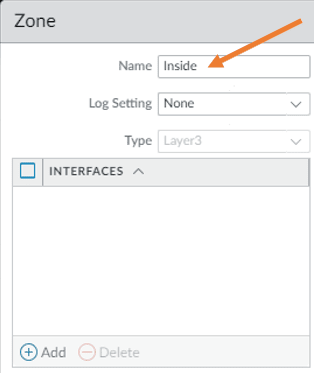
Configure the inside interface.
Let’s now go ahead and configure the Paloalto inside interface. Click on Ethernet 1/2.
Config
Choose the interface type as layer 3.
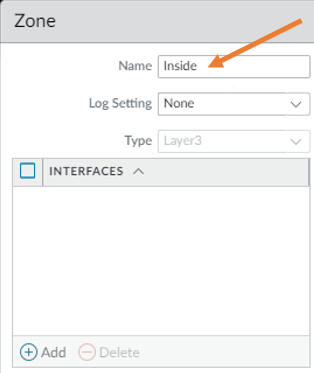
Choose a virtual router as default. And in the security zone, we haven’t created any security zone for the inside. So from the dropdown, click on create a new zone.

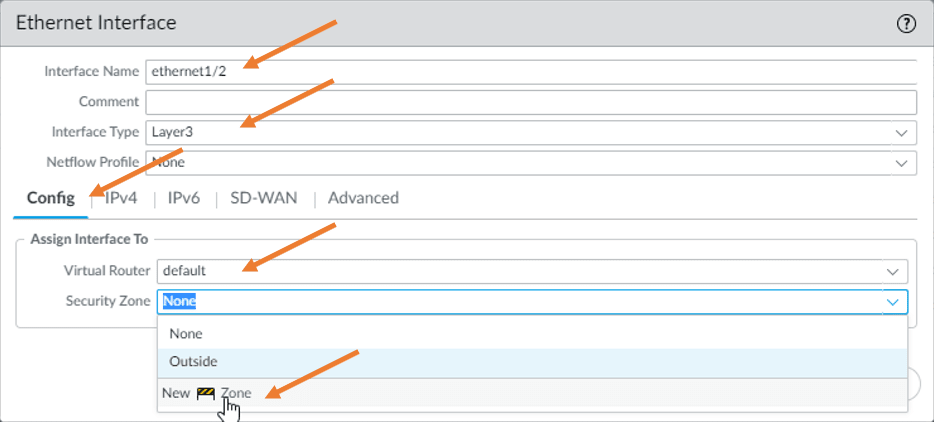
Under the name, just type inside and then click on OK.
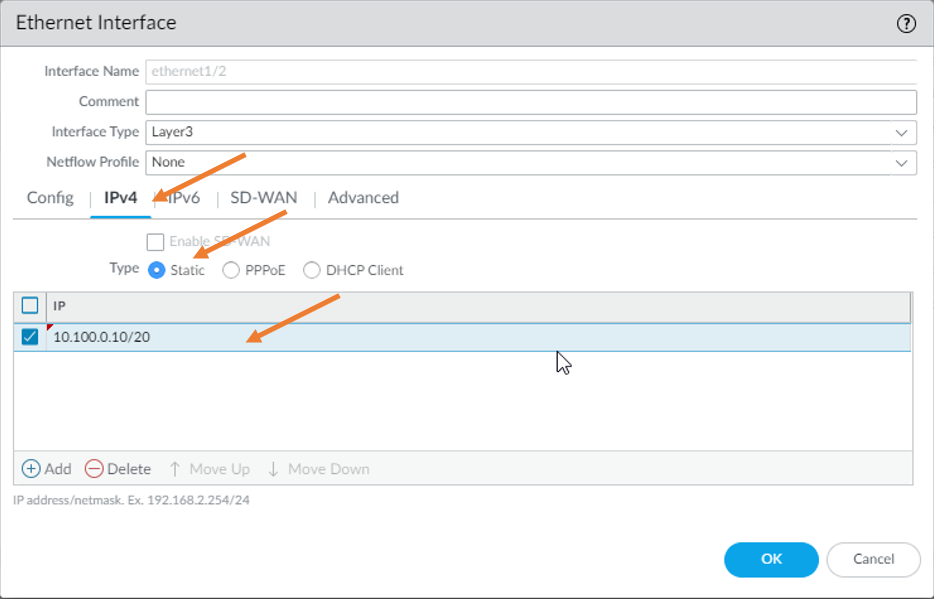
IPv4.
In the IPv4, we have to configure the IP address statically, though we configured on the AWS side. Hence just choose static and add the IP address 10.100.0.10/20. And click on Ok.

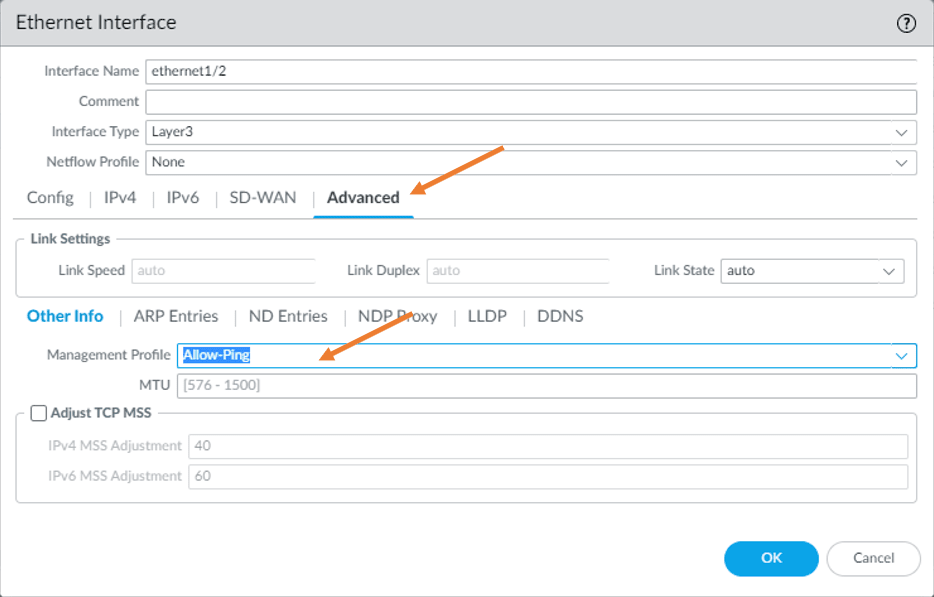
Advanced.
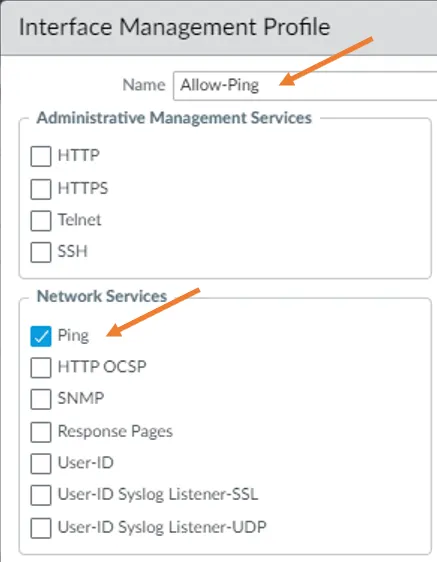
In advanced, choose the management profile we created before for the Ping packet to work.

10. Configure the Security and NAT Policies.
We have configured the interfaces. Let’s configure the security and the NAT policies so the devices in the private network can talk to the internet.
Security Policy.
Let’s configure the security policies. That way, the inside host can go off to the Internet.
Goto Policies->Security->Add.
General:
Name: Allow-inside-to-Out.
Source:
Source zone: Inside
Source Address: 10.100.0.0/20
Destination:
Destination zone: Outside.
Destinaion address: Any.
Application:Any.
Service/URL Category: Service-default.
Actions:
Actions settings: Allow.
Click on OK.
Create NAT policy.
We created the policy so the VM’s inside the Palo Alto Firewall can go out to the Internet. However, if you don’t have a NAT policy created, the EC2 instances will not communicate to the outside world. So let’s go ahead and create an NAT policy where if anybody from the inside wanted to go out to the Internet. It has to use the outside interface of the Palo Alto Firewall.
Goto Policies->NAT->Add.
General:
Name: NAT-to-OUT.
Original Packet:
Source zone: Inside.
Destination zone : Outside.
Destination Interface: ethernet1/1
Service : Any.
Source Address : 10.100.0.0/20
Translated packet:
Source Address Translation:
Translation Type: Dynamic IP and Port.
Address type : Interface Address.
Interface: ethernet1/1
IP address : 10.100.16.10/24
Click on Ok.
Commit the configuration.
11. Configure the AWS side.
We configured the Palo Alto side interfaces, policies, and NAT, but it will not work until you attach the interfaces on the AWS side. It’s like you have a physical firewall configured, and nothing has plugged into it, so let’s go ahead and do that right now.
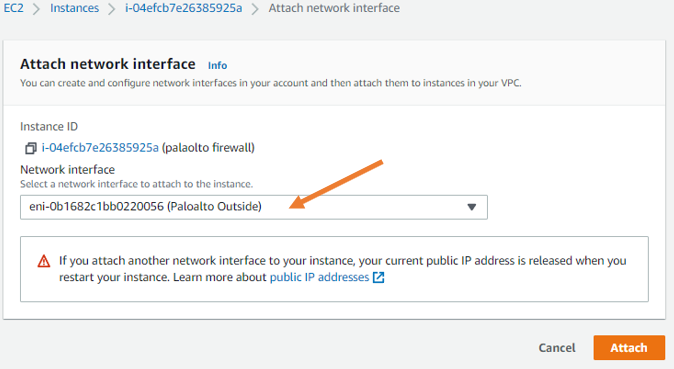
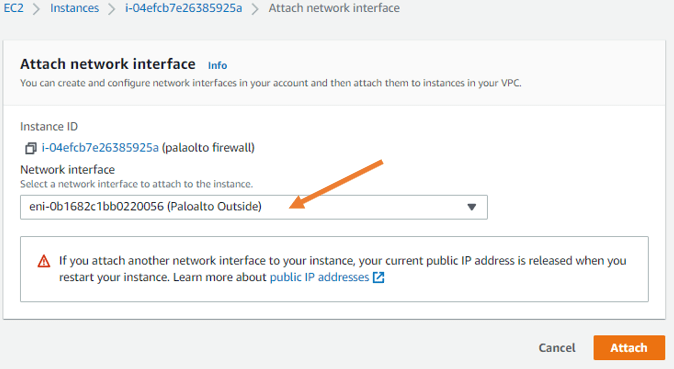
Go back to the instances. Choose a Palo Alto firewall. Click on actions-> Networking->Click on Attach network interface.

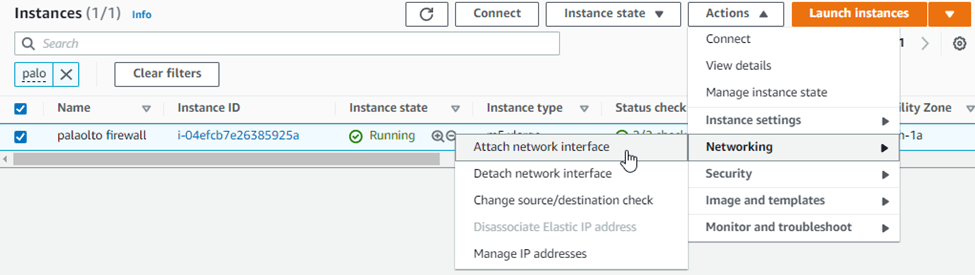
The first interface that you attach is the outside interface. Under the network interface, choose the PALOALTO outside interface that we created earlier.
And click on attach.
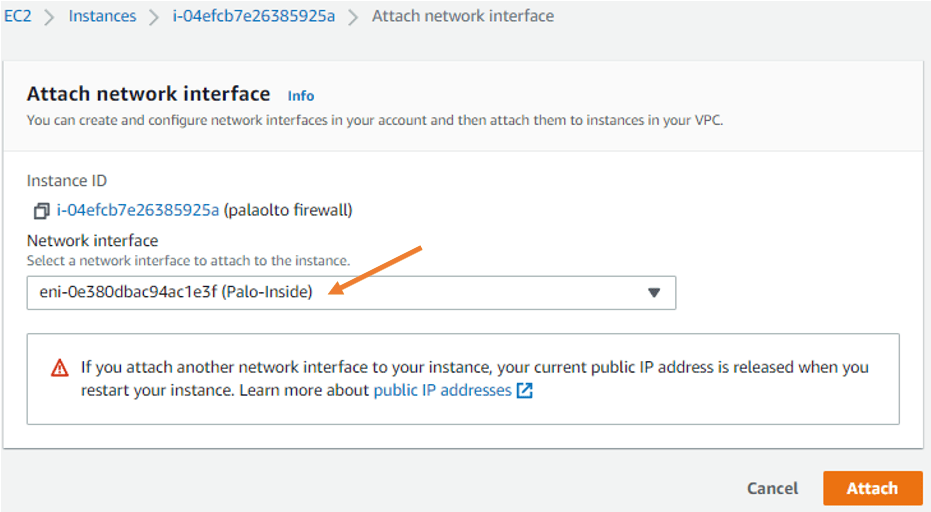
Similarly, you may address the Paloalto inside interface as well.

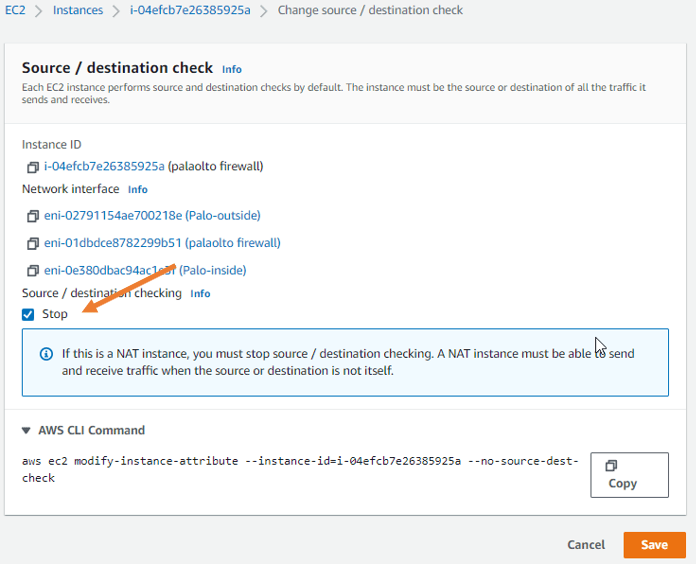
12. Change Source/Destination check.
When you deploy a firewall, you must disable source destination check.
Choose the Paloalto firewall instance, click on actions and the Networking -> Click on change source or destination check.


Under source or destination checking. Check the options stop. And click on save.

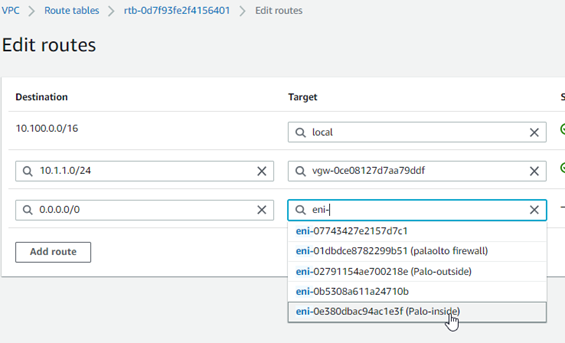
13. Update the private route table.
On the private Subnet, you can add a route that says if any traffic is destined to 0.0.0.0/0 should go to the Palo Alto inside interface. This means the Internet traffic on the private Subnet should send to Palo Alto in the inside interface.
Goto VPC->Virtual Private Cloud->Route tables->Select Private route table->Routes->Edit routes.
Add Destination as 0.0.0.0/0 towards the Palo-Inside.

14. Reboot the firewall.
That’s it, we configured everything on the AWS side as well, so it will not take effect until you reboot the firewall. So let’s go ahead and reboot the firewall now.
Get back into the GUI. And click on Device-> Setup-> Operations-> Click on reboot.
The firewall will reboot now, and it will take some time to come back. So let’s give it about 10Mins.
15. Verify the connectivity.
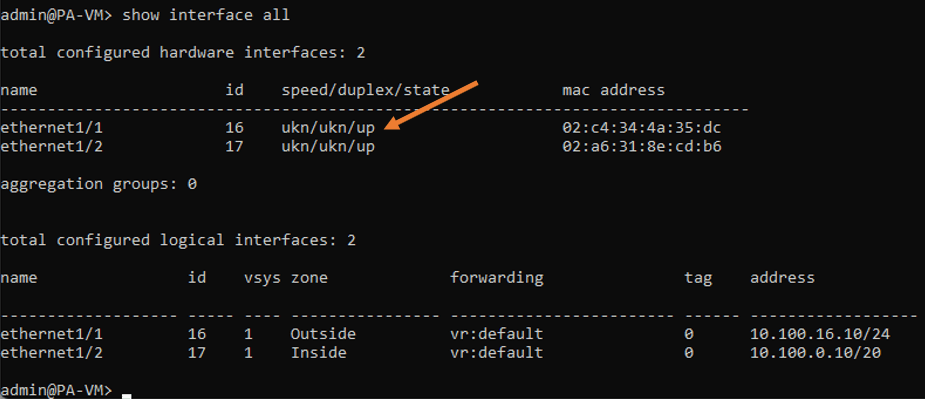
My firewall is back up now. Let me log into it and check the interface status.
So I’ve logged into it, and I checked the interface status, and I could see all the interfaces, both outside and inside are up.

Test the connectivity.
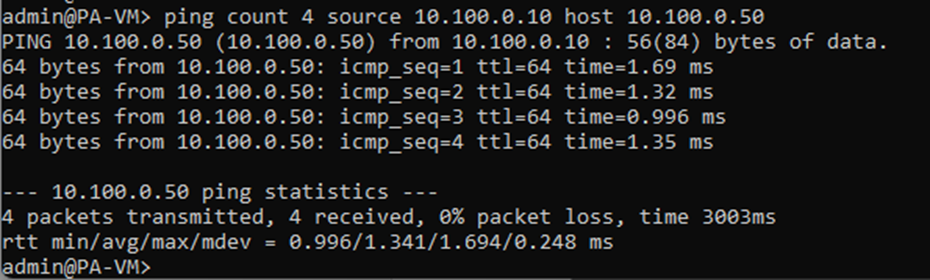
To test the connectivity, you require a host in the private Subnet. So spin up a host in a private subnet. And. Start sending a continuous ping to the private subnet host (10.100.0.50) from the inside interface of the firewall.
As you can see, the ping works, which indicates the LAN side of the firewall is working fine.
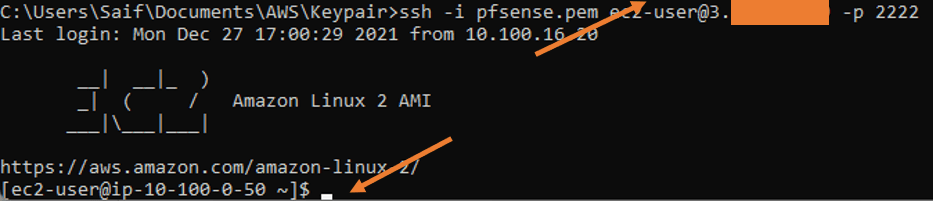
I configured the port forwarding towards the private host using the SSH port. And as you can see, I was able to SSH into the host from the Internet through my firewall.

And from the private host, I was unable to ping the Internet. After I spun up a firewall I can ping the Internet, which is again going via my firewall.

