In The last few blogs, we have built a small lab using the Paloalto firewall in gns3, connected the firewall to the internet, and allowed the internal users to the internet. In this blog, we are going to set up and configure a Global protect VPN on a Palo alto firewall and allow remote users to access the internal resources as well as the internet.
How to allow remote users to access internal network in Paloalto?
To allow outside users to access the internal network you can use something called VPN (Virtual Private network). In Palo alto, the end-user VPN solution is called Globalprotect VPN.
After you configured the Global protect VPN on the Paloalto firewall, end users who are connected to the internet will be able to establish the VPN with the Paloalto firewall and access the internal resources through the global protect VPN tunnel.
We are going to configure this Global protect lab in a GNS3 environment using Paloalto firewall VM.
The best part about the Paloalto firewall VM is that you don’t need to have a license to install a Global protect VPN, by default when you install them in your lab, you should be able to configure the Globalprotect as well. Which is pretty cool I would say.
However, there are some caveats if you don’t have a license, you cannot monitor the traffic using the monitor option, and you cannot activate the GP client automatically in Paloalto, neither any updates. And the rest all works pretty well.
Read also,
How To Install Palo alto In VMware Workstation?
How to Setup IPsec Tunnel between Paloalto and PFsense?
How To Configure Palo Alto Site To Site VPN Using IPsec?
How to Install Palo Alto in GNS3?
Palo Alto Firewall Lab Setup-Allow Inside Users To The Internet
Global Protect VPN LAB Objective.
- Setup the Global protect VPN on the Palo alto firewall.
- Also required policy for the end-to-end communication to work.
- Connect the end-user to the VPN and verify the connectivity.
- Validate the connectivity to the inside network as well as the internet.
- Enable split tunneling. User VPN tunnel for the internal network and internet access will be outside the tunnel.
- And finally, disconnect the remote user from the VPN, and connect to the internal network and again try to connect the VPN and observe the behavior.
Below is the topology that we are going to use.
I have built this lab in gns3, and already configured the lab as below, so if you wanted to follow step by step guide I would I highly recommend you configure the following and continue the lab.


- Already deployed the Palo alto firewall in GNS3, if you wanted to know how you can configure the palo alto firewall in GNS3, check out the article here.
- Paloalto firewall is configured with the internet and it can reach the internet from the wan side. I have covered the article here on how you can configure the WAN link on the firewall and allow inside users to the internet.
- Configured two zones (inside and outside) with a basic policy that says anybody from inside going outside is allowed.


- Also configured the NAT policy to convert the private IP to the public.
Note: Because this is a lab the internet IP is still from the private range.


- Internal devices have been configured with IPs shown in the diagram.
- And finally, internal users can access the internet, as you can see it is going via the Paloalto firewall.

- The remote client connected to the internet is configured as a windows box. I could have used different clients but without a license, I cannot use the GPVPN on another operating system other than windows.
- We can manage the Paloalto web GUI using a Ubuntu admin machine connected to the management network.
If you look on the right side, you can see multiple internal devices connected to the LAN side of the firewall, since I have sufficient resources on the GNS3server I can spin up those VM’s. If you don’t have enough gns3 resources my recommendation to build the lab as follows.
- Deploy the remote machine as windows.
- Deploy the Paloalto VM.
- To access the Paloalto GUI, use the local machine. You can follow the steps here.
- connect a cisco router on the LAN side to test the connectivity.
Globalprotect VPN configuration in Palo alto step by step
- How do I add a user to Globalprotect?
- Import or Generate Certificate for GloabalProtect.
- Configure the SSL/TLS profile in Paloalto.
- Configure the Global protect VPN tunnel interface.
- Configure the Global protect portal.
- Configure the global protect gateway.
- Configure the NAT policies for the Globalprotect VPN.
- Modify the security Policies for Globalprotect VPN.
- Enable VPN client version.
- How do I test the GlobalProtect client connectivity?
- Validate the network access on the Global protect client machine.
- How to enable split tunneling in Global protect VPN?
- Disconnect the VPN and connect back again.
- What if the user travels to the office and tries to connect to the VPN?
How do I add a user to Globalprotect?
When you wanted to connect to the Global protect VPN, you need to have user accounts associated with it. So how do you integrate user accounts as an authentication method in Paloalto?
There are multiple ways you can integrate the user accounts in Paloalto. You can either use the Radius server if you have one or local users if you wanted to use the firewall local users to be able to authenticate.
In a production environment, however, it is recommended to have a radius server as the option so that you have a separate entity that does the authentication and accounting. And mostly on the radius server, you will have an Active directory integrated as well. And the user management happens either on the radius server if you have them managed locally, or on the active directory.
If you still have a radius server in your lab and you wanted to integrate them with the Palo alto, you can go to Device>Radius and click on add to integrate the radius server.
Note: You will also have to configure the Paloalto firewall as the radius client on the radius server. Which is beyond the scope of this lab.
In our lab we are not using any radius server, hence we can rely on the local users on the firewall. Lets see how we can create local users on the Palo alto firewall.
1. Create local users.
To create the local users on the firewall.
Device>Local Users Database>Users
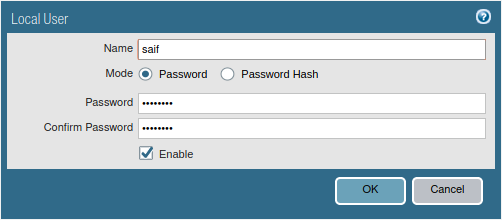
Click on Add to add new local users.
Enter the name and the password and check the box that says Enable, then click on Ok.

you may go ahead and commit the configuration.
2. Authentication profile.
We have successfully added a user to the Global protect VPN, you now need to tell the Palo alto firewall that you are going to use the local accounts for the globalprotect VPN.
To configure the Authentication profile Device>Authentication Profile.
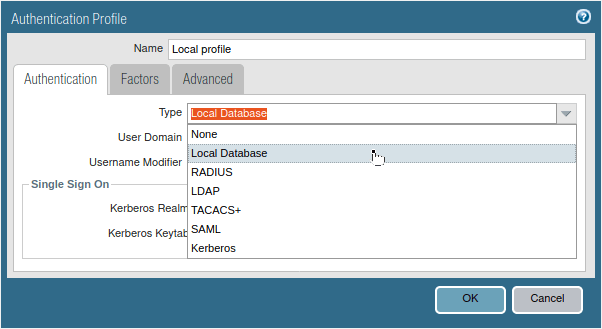
Click on Add, and provide a name to the authentication profile.
Choose the type, which is Local Database.

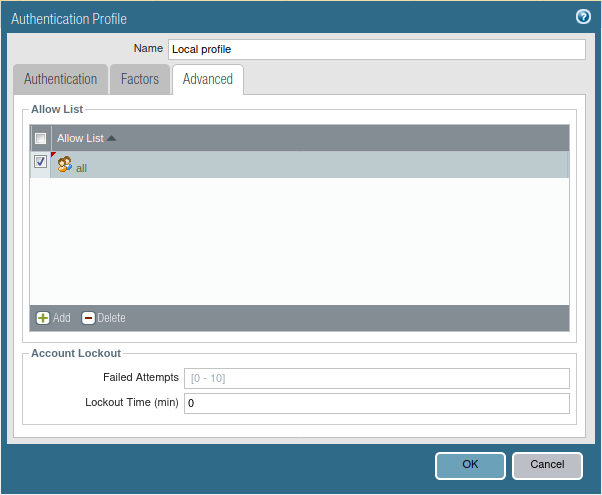
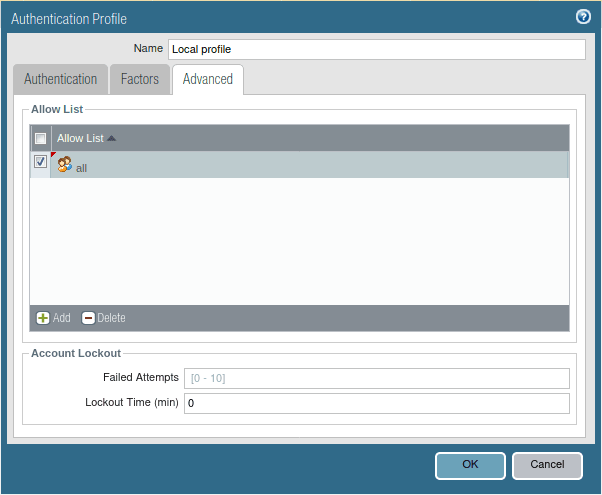
On the same screen, click on Advanced.
You can filter which users should be able to authenticate using this Local database profile. In a normal scenario, you can let everyone to the VPN by choosing it ‘all’ in advanced. Since I don’t have multiple users, I can just choose my single user account to be able to authenticate, however, I am choosing ‘all‘ for now.
What if I want the local users as well as Radius for Globalprotect authentication?
When you do a proof of concept you might likely want to try both the local users as well as the radius as an authentication source.
One such use case being, You can have a single or multiple IT admin users accounts locally on the firewall and you also want the radius authentication for the rest of the users.
When the IT users try to authenticate, it uses the local account on the firewall, and rest all the accounts Paloalto would forward the authentication request to the radius server. This can be done on the paloalto firewall.
First, you can create a local user profile and second you create a radius profile, now go ahead and choose the sequence for the authentication.
Goto Device>Authentication sequence.
Choose the local users as the primary mode of authentication and choose Radius as the second method.
In the event of the local users don’t exist then firewall will send the request off to the radius server.
Since we don’t have a radius server and we only have a local user authentication profile we can ignore the authentication sequence.
Import or Generate Certificate for GloabalProtect.
You can either use self-signed certificate or an external certificate. In production we normally use an external certificate however for this lab we can generate a self-signed certificate, to generate a self signed certificate goto Device>Certificate Management>Certificates.
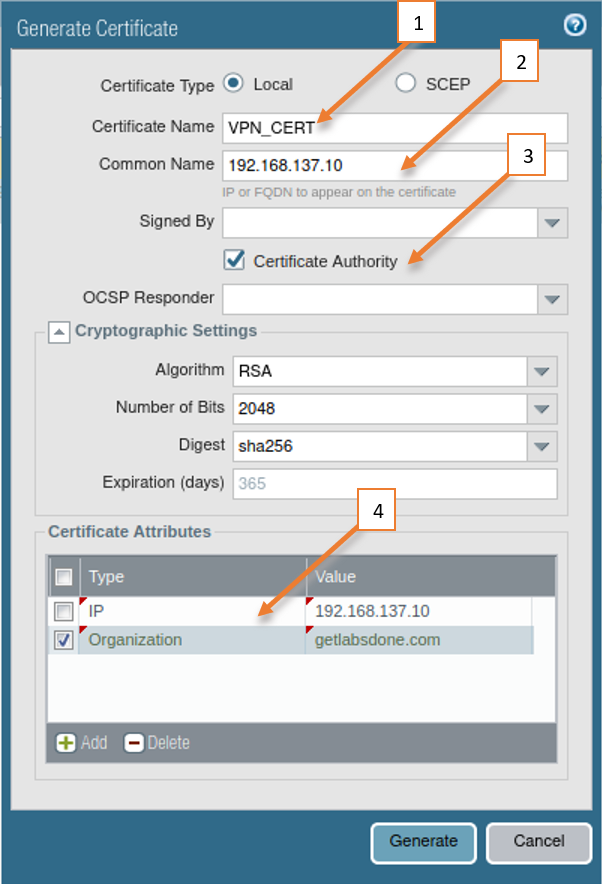
Click on Generate, A window will popup for the generation of the certificate.
- Name the certificate.
- Under the common name, provide the external IP address of the firewall that you are going to use with the global protect. If you have a DNS entry associated with it, you could add that as well.
- Check the Certificate Authority option.
- Under Certificate, Attributes provide the IP address as your external IP and the Organisation name.

If you have another certificate, you can use the import option down at the bottom.
Configure the SSL/TLS profile in Paloalto.
After you generated the certificate, you now need to create a SSL/TLS profile and call the above certificate into it.
On Device>Certificate Management>SSL/TLS Service Profile.
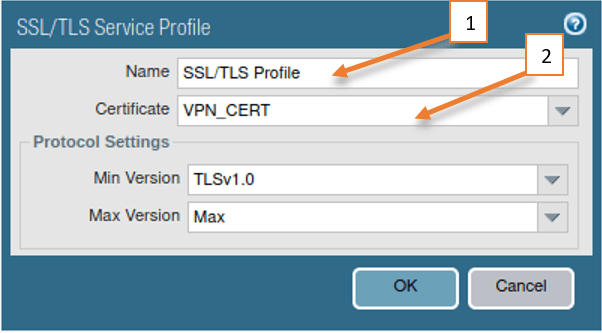
Click on Add to create new profile.
- Name the profile.
- Choose the above certificate.

Configure the Global protect VPN tunnel interface.
The Global protect VPN initiate from a tunnel interface on the Paloalto firewall, so you will have to create a tunnel interface by going into Network>Interfaces>Tunnel.
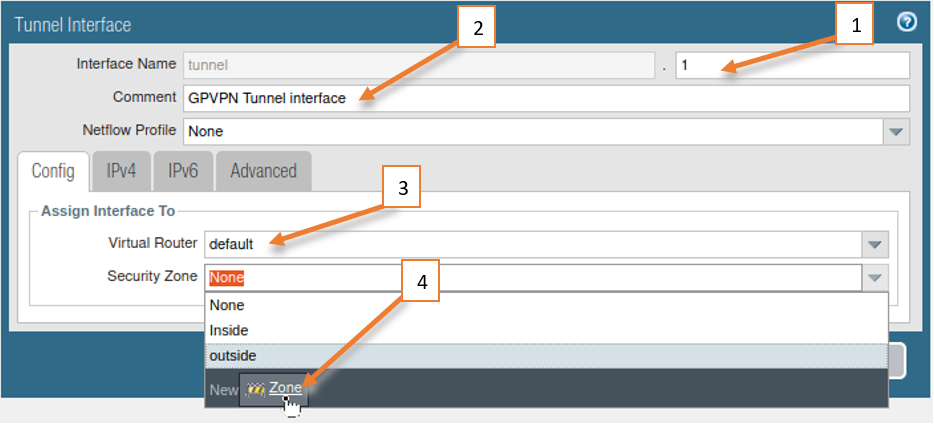
Click on Add create new tunnel interface.
- Number the tunnel interface.
- Describe the interface.
- Choose the virtual router, which is the default in my case.
- Choose the security zone, I need to create one.
As I mentioned earlier, I have only created two zones on my firewall, one is inside and the other one is outside. Though I can choose the inside as the Security zone, it is not recommended to put the VPN users in the inside zone, hence click on New zone and create a new zone specifically for the VPN.

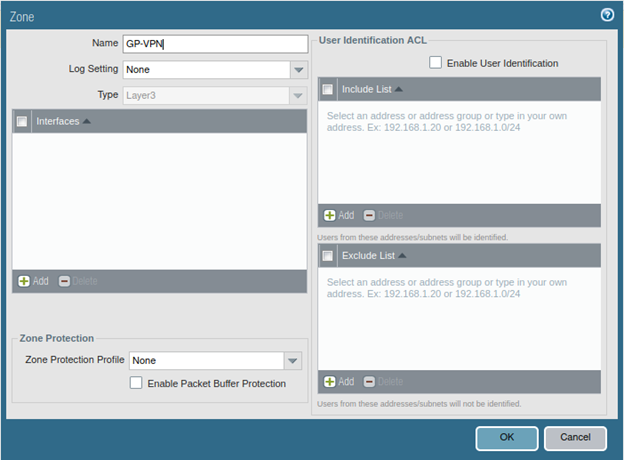
Name the security zone and click on OK, and you will be taken back to the tunnel interface screen click on Ok on that as well.

Configure the Global protect portal.
After the tunnel interface is configured, let’s now go ahead and configure the Global protect portal. Click on Network>GlobalProtect>Portals.
Click on Add, In General configuration add the below.
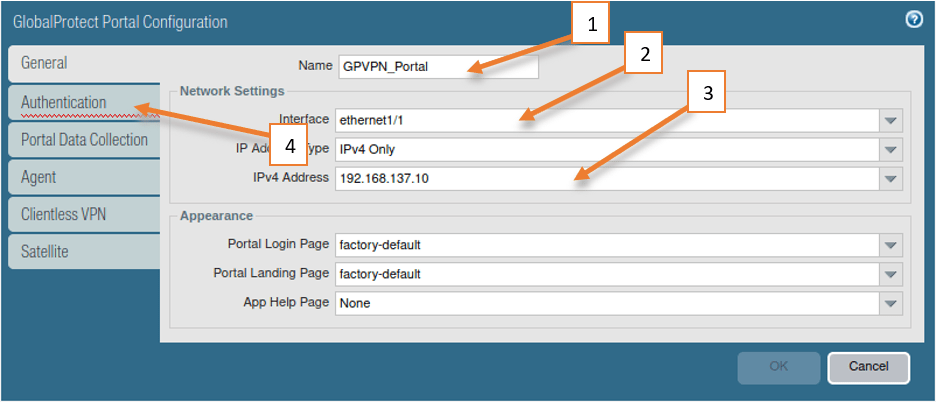
1. General configuration.
- Enter the name for the Portal.
- Choose the outside interface.
- Since we are configuring the IPv4, Enter the outside interface IP.
You can modify the portal login page and landing page, however, let’s leave them as factory default. - Click on Authentication.

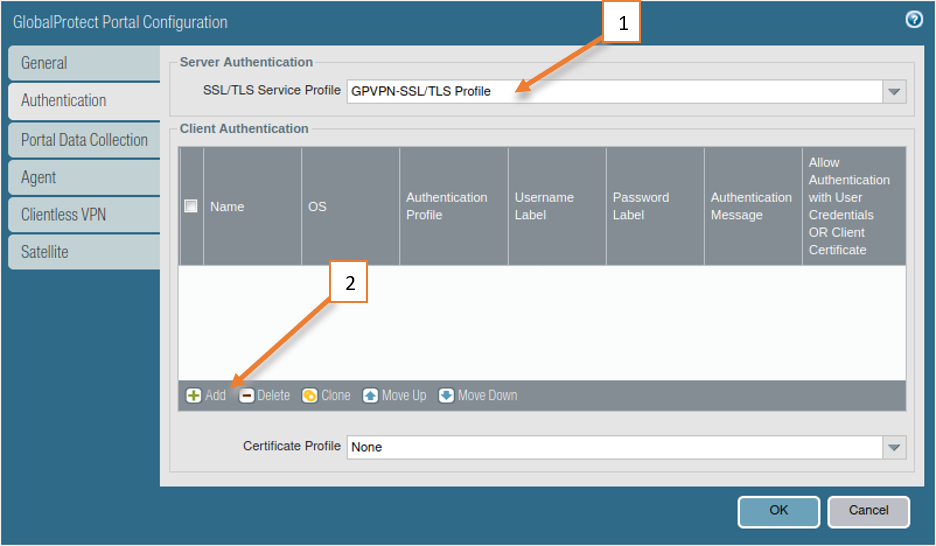
2. Authentication configuration.
1. Choose the SSL/TLS Service profile that we had created earlier.
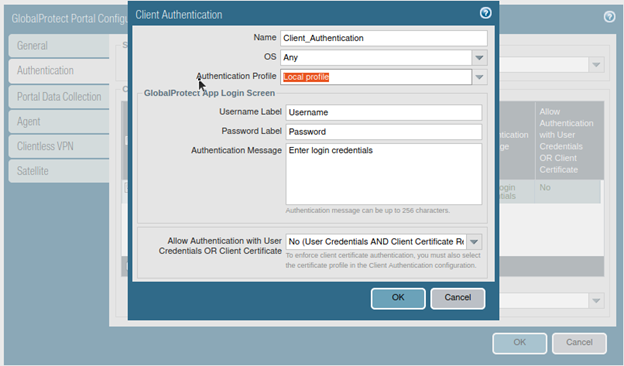
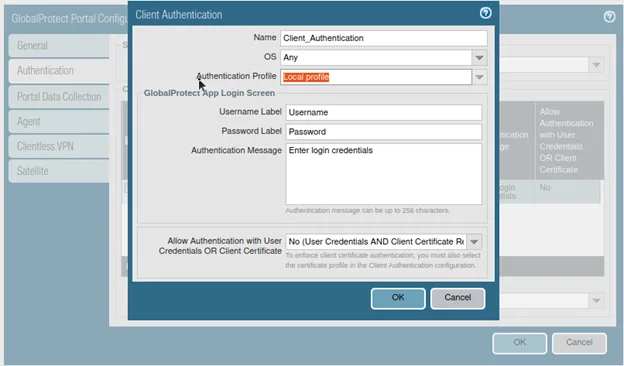
2. Click on Add on the Client Authentication. A new client Authentication window will pop up.

- Name the Client authentication.
- OS – choose any since this is a lab and I don’t have a license I can only connect to the windows machine though I selected any.
- Choose the Authentication profile as Local Profile and click on Ok.
Based on the authentication that you have set up, you need to choose the profile, if you have an authentication sequence you can call them under the authentication profile itself.
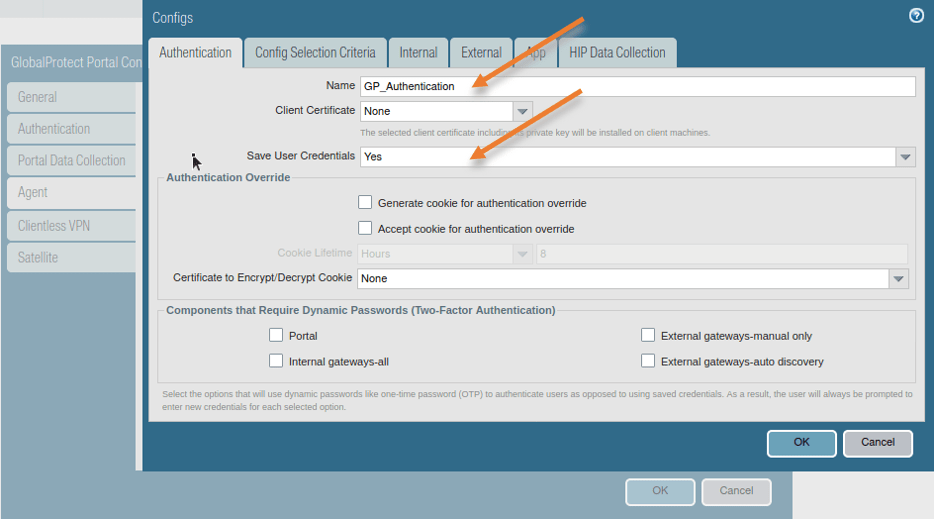
3. Agent configuration.
And click on Add to add the Authentication agent.
1. Name the configs.
2. Save user credentials to yes.
You can have the GP client to either save the credentials or not. For the best user experience, I choose Yes.

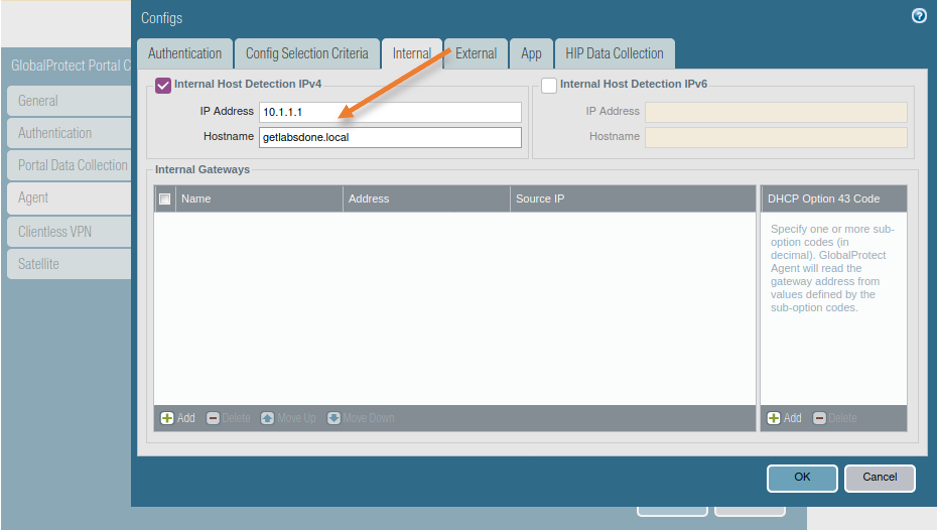
3. Click on Internal and under the internal host detection IPv4, add the internal IP address and the hostname.
The is to recognize whether the user is in the internal network or not, when the user tries to connect to Global protect VPN while at the office, the client will first try to communicate with the internal Host Detection IPv4/IPv6, if the internal IP is reachable, it would know that the user is at the internal network Hence it would bypass the VPN and connect as an internal network. We will do the test later on.
Note: Whatever the hostname that you have added here should have FQDN associated with it. I have IP address 10.1.1.1 with host A record getlabsdone.local on my internal DNS server.

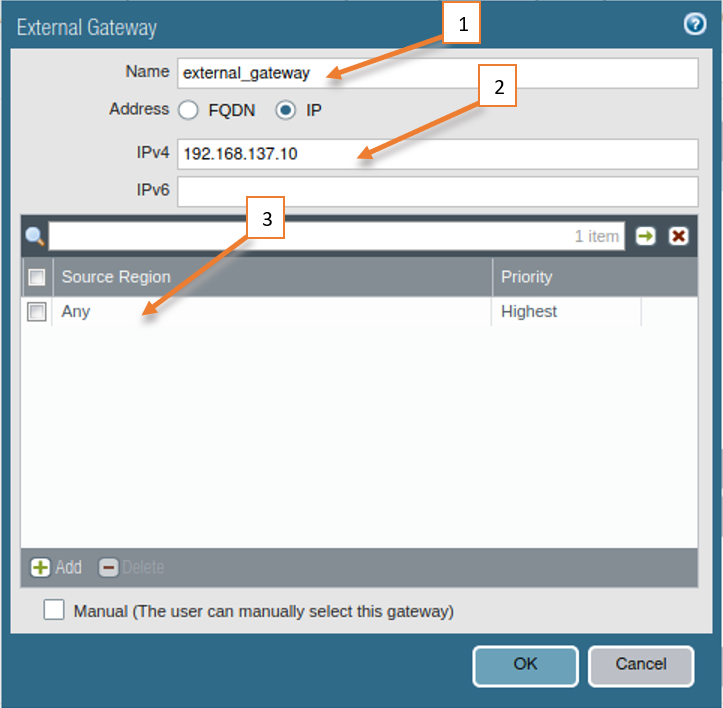
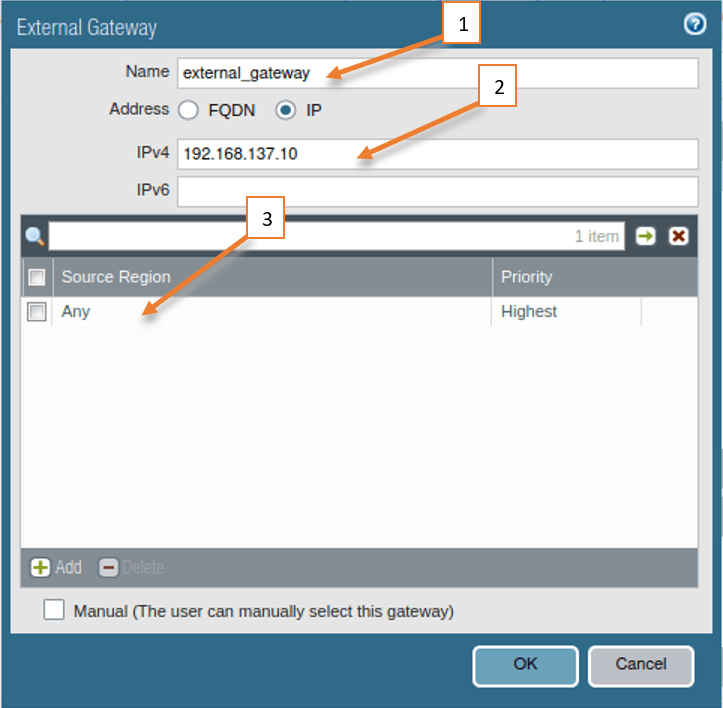
4. Click on External And click on Add under the External Gateways.
- Name the External Gateway.
- Enter the FQDN or IP.
If you have FQDN, choose FQDN and enter the address, in this lab I don’t have a DNS configured for an external IP address hence I entered the IP instead of FQDN which is again my firewall outside IP.
3. Add the source region as Any and Click on OK here.
Choose the Trusted RootCA.
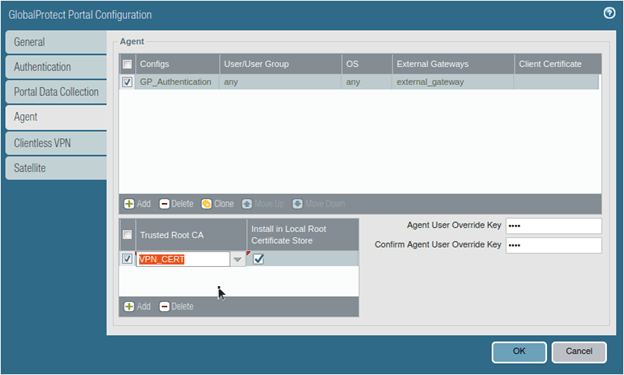
5. You are now back to the global protect Portal configuration.
You also have to choose a certificate under the Trusted Rood CA.
Choose our existing Certificate and check the option that says install in local root certificate store and click on OK.

Configure the global protect gateway.
We have now completed the global protect portal configuration lets now go ahead and configure the Global protect Gateway. To setup the global protect gateway, go to..
Network>Globalprotect>Gateways.
Click on Add to add a gateway.
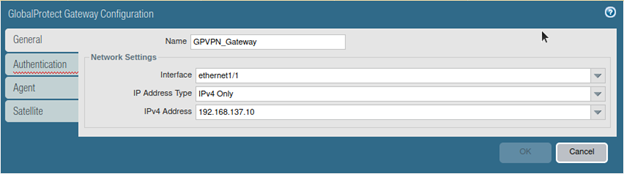
1. Gateway General configuration.
1. Name the Global protect Gateway configuration.
2. On the interface choose the outside interface.
3. And the outside IPv4 address and click on Authentication.

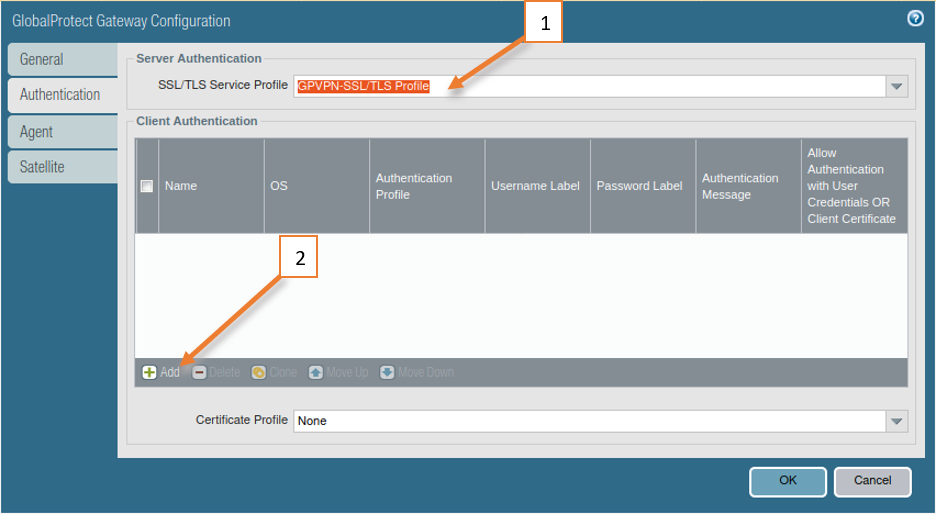
2. configure the Gateway authentication.
- Choose SSL/TLS service profile that we had created earlier under the server authentication.
- And click on Add under client authentication.

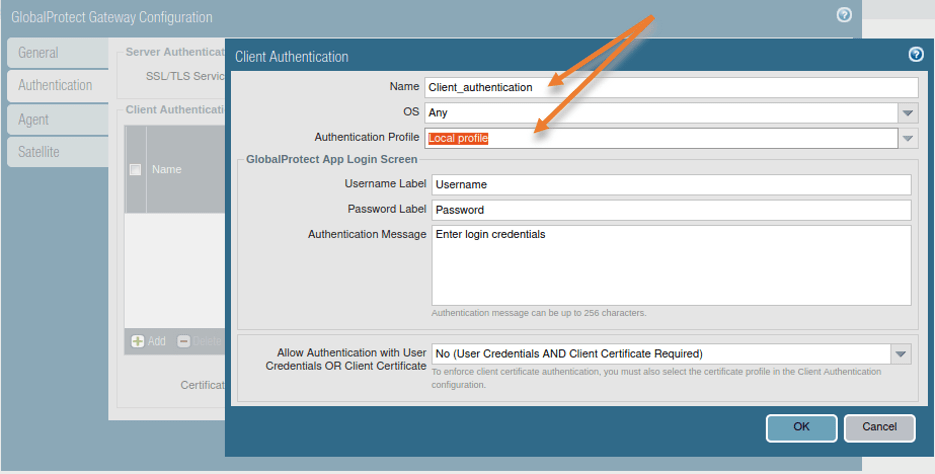
In client Authentication.
- Name the authentication.
- And choose the authentication profile as a Local profile or Radius profile based on how you have setup. Leave everything else as default and click on Ok.

3. Configure the Gateway Agent.
1. Enable Tunnel mode.
Remember that we have created a tunnel interface initially, you need to call the interface here and check the option that says Enable IPsec and Click on Client settings.

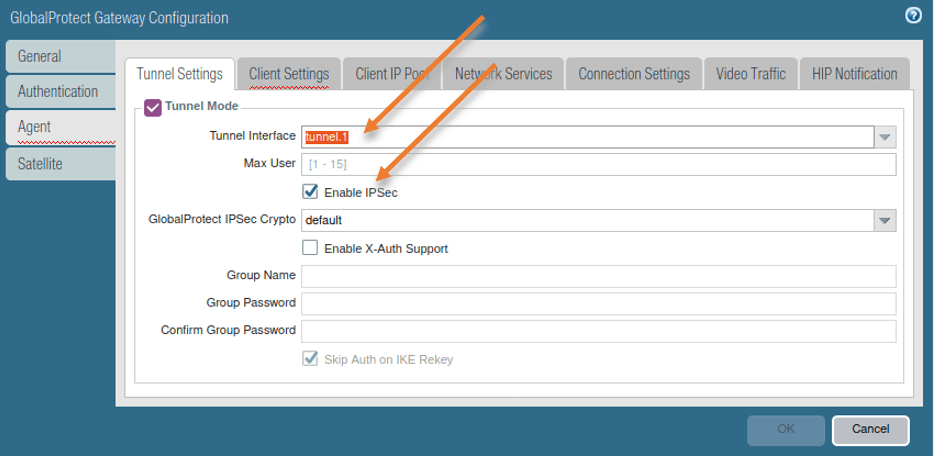
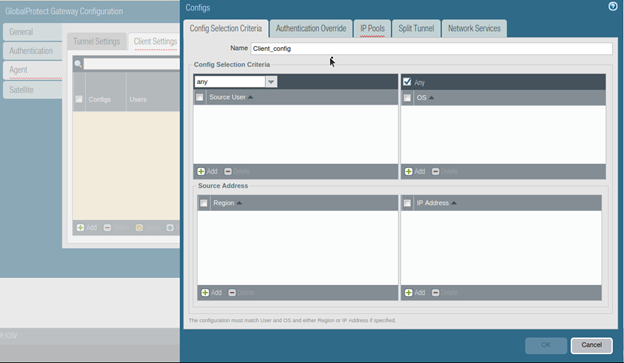
2. Configure the client settings.
In the client settings tab click on Add.
Name the configs.

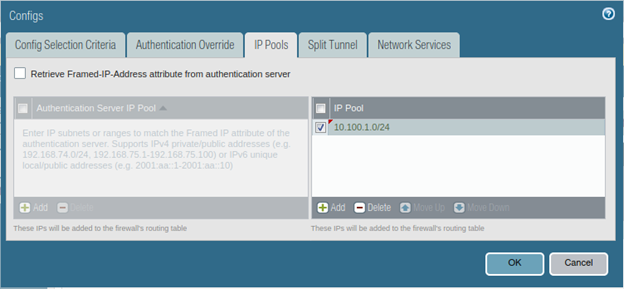
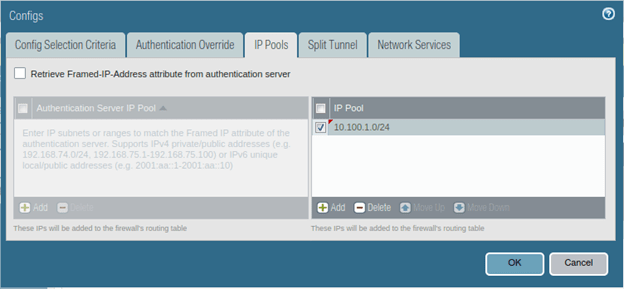
3. Configure the Global protect VPN subnet.
When remote users connect to the VPN, they need to get an IP address from the VPN gateway. To lease out the Ip address, you need to add the subnets under the IP pools.
Based on our topology, I have reserved the IP subnet 10.100.1.0/24 so add them under the IP pools.
We are not making any changes to the Split tunnel option right now, more on that later. Click on Ok now.
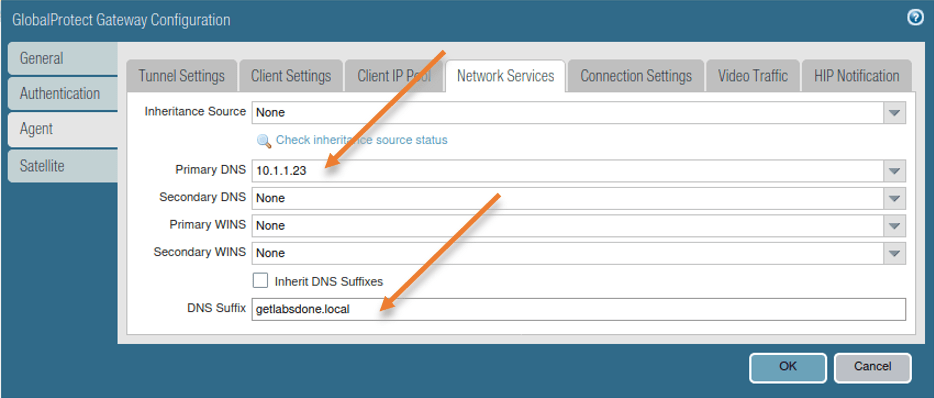
In the production network, you will have your internal DNS servers configured, and once the remote user is connected to VPN you would want the remote client to talk to your internal DNS servers so you can mention the DNS servers here.
I configured my DNS server as 10.1.1.23, and I don’t have a secondary one.
Also the domain name under DNS suffix.

That’s it we have now completed the VPN configuration. You can go ahead and commit the configuration that you have made thus far.
Will the user be able to connect to the VPN now?, yes the VPN connectivity should work fine, however, the user cannot access the internet as well as the internal resources because we have not configured any policy to allow it. Let’s go ahead and configure them now.
Configure the NAT policies for the Globalprotect VPN.
Earlier I showed you the NAT policy that I have configured before I begin the VPN configuration. In that, I have only chosen the inside zone. Modify the same nat policy to choose the GP-VPN zone as the source zone.
Click on Policy>NAT, edit the NAT policy and under Original packet in Source zone>Choose GP-VPN and click on Ok and commit the changes.
From now on, the VPN user will have the NAT IP from the firewall.


Modify the security Policies for Globalprotect VPN.
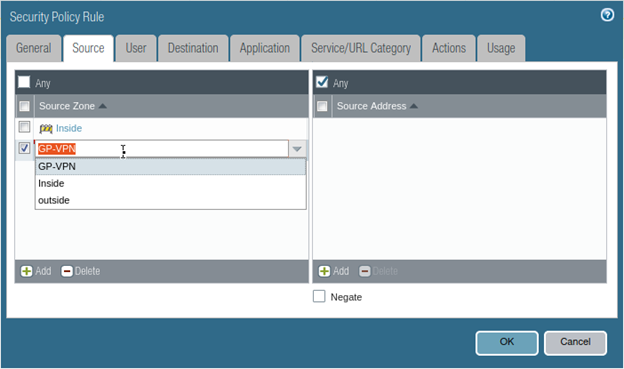
Similar to the NAT policy even for the security policy we have allowed the network access from inside to outside. On the same policy add the GP-VPN as the source zone. That way when you are allowing internet access through the firewall, it can go out.
Device>Policy>Security
Edit the policy and under source, choose GP-VPN in Source zone and click on OK and commit the changes.

We allowed the communication from the GP-VPN to outside, now will the VPN user be able to communicate to the inside network?
No!, you have to create a new policy to allow the VPN user to be able to communicate with the internal network as well.
On the security policy option click on Add.
- Name the policy.
- Click on Source zone and choose GP-VPN.
- On the Destination zone choose Inside.
- Service and URL category as any.
- Under Action allow the communication.
- Click on OK and commit the configuration.
Modify the security Policies for Globalprotect VPN.
After the VPN configuration is completed it’s time for end-user testing. You can ask the user to go to the VPN web portal by typing https://vpnfqdn in my case https://192.168.137.10 and when you open the page, you will be prompted for authentication.
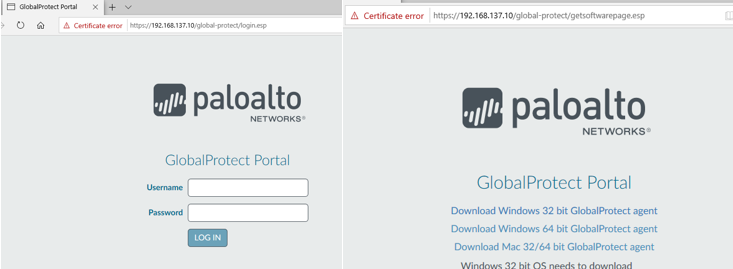
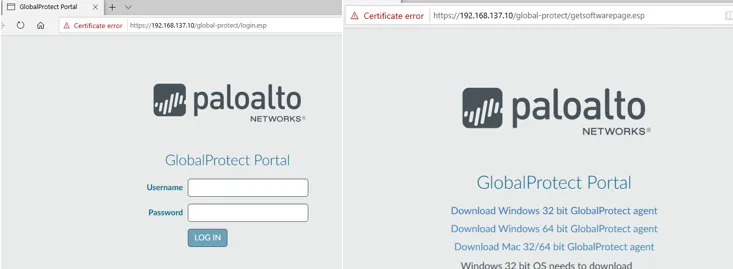
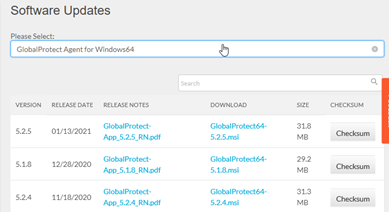
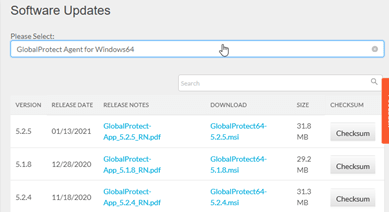
Once authenticated, the user will have a choice to download the client software that the user can use to connect to the VPN, however, there is a problem here. You have not activated the version of the VPN client that the remote user wanted to use. and as an admin, you need to identify which version of the Global protect client that you are going to allow for the VPN users.
Click on Device>Globalprotect Client choose the desired version and click on Activate.
After client activation, the users will be able to download the client from the portal and install them on the respective operating system.
As I am using the Palo alto VM for which I don’t have a license, I cannot activate the version in the Paloalto firewall, neither I can download the software from the portal. If I try to activate the VPN client, I would get an error that says No update available. Hence, I need to go to the Palo alto support portal and download the Global protect client for windows, and choose the desired version.
Once downloaded transfer the client to the remote user and I can test the connectivity.
How do I test the GlobalProtect client connectivity?
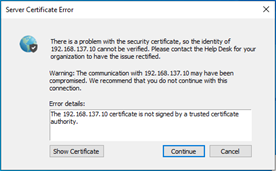
After the GP client is installed, the client will prompt you to enter the portal address. Type the portal address and click on connect.


You will get an error, if you are using a self-signed certificate, just ignore the warning for now and click on Continue.

You now would get a prompt to enter the user credentials.
Remember, that we have already defined the local credentials, you will have to enter them now here and click on Sign in.
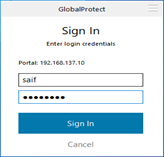
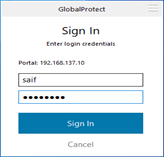
You will get an option that says the VPN is connected.


Validate the network access on the Global protect client machine.
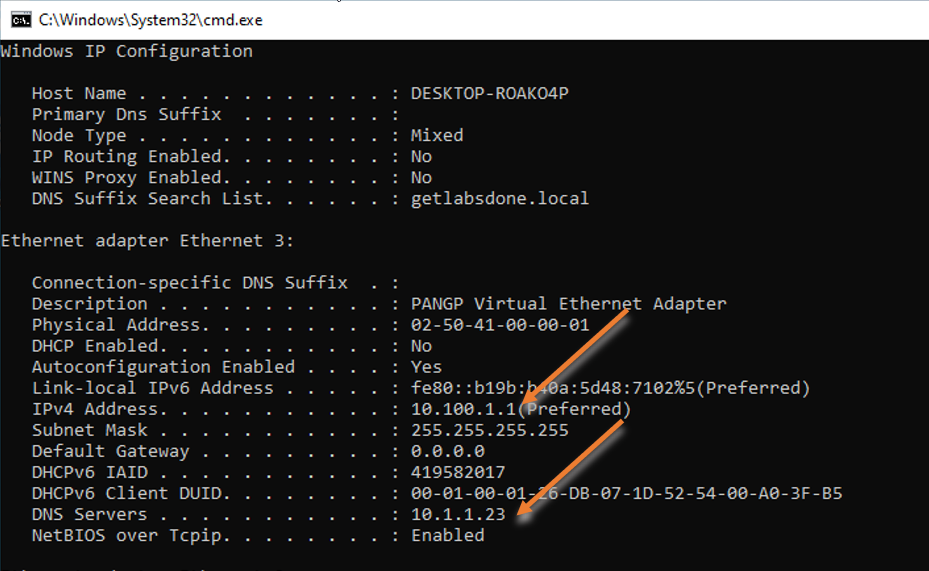
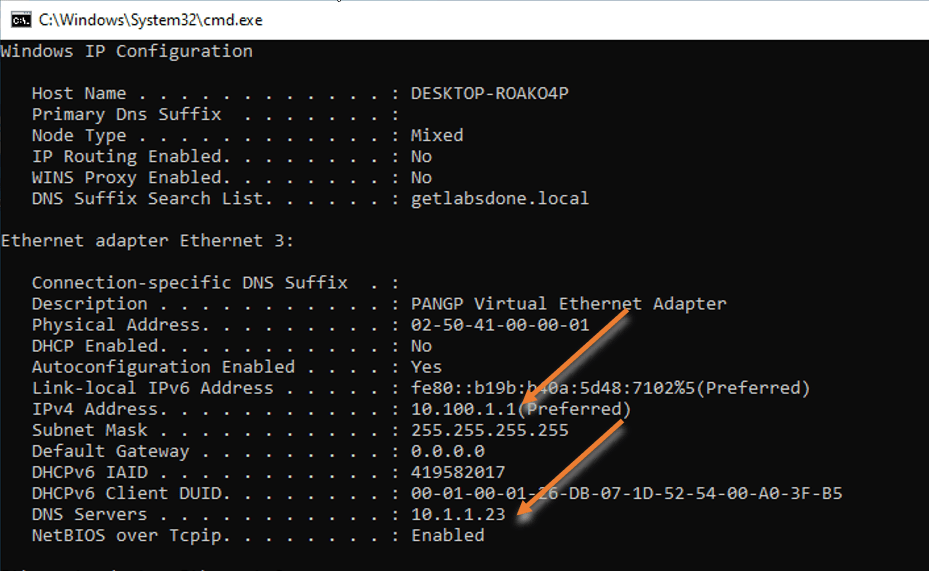
1. Check the IP address and the DNS server.
In ipconfig/all, As you can see the IP address is from the 10.100.1.0/24 subnet. Also, you can see the private DNS server that we have defined.
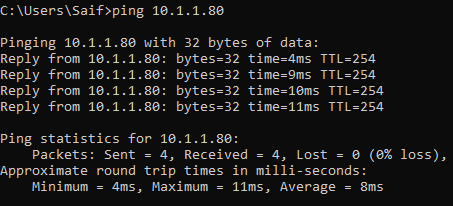
2. Check the network access and the route.
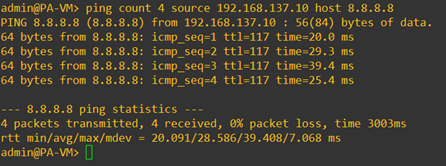
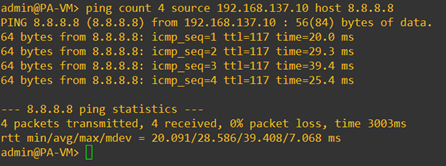
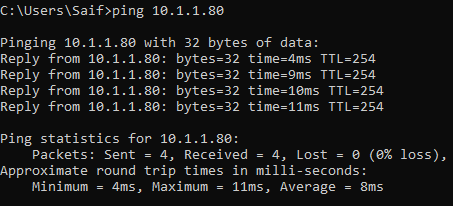
I am trying to ping the internal IP address, it is responding over the VPN.
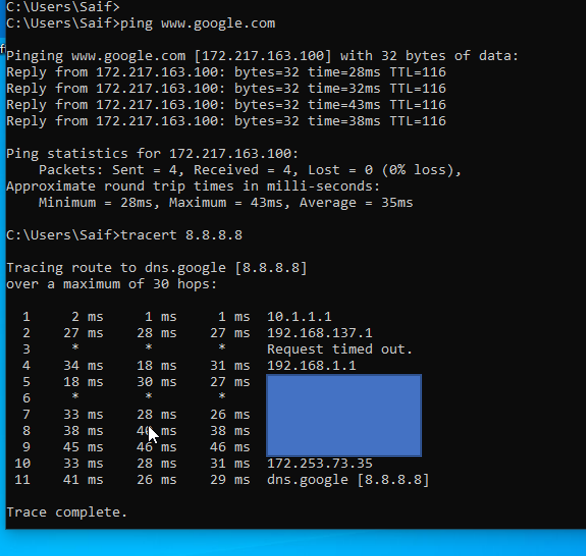
Let’s validate the internet access.
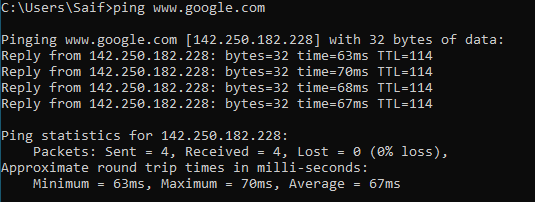
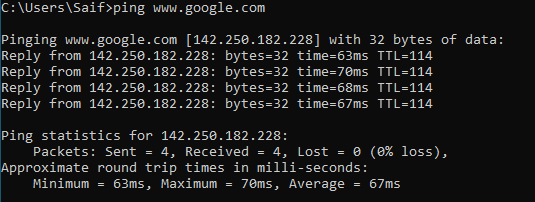
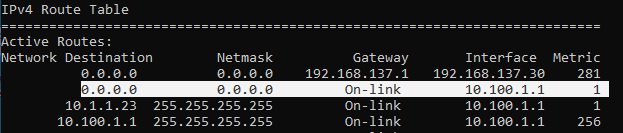
Even the internet access is working fine, that again going via the branch firewall gateway rather than its original default gateway, that’s because we have the split tunnel disabled.
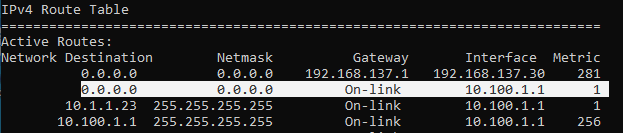
How do I know internet traffic is taking the VPN route? You can type route print to see the routing table on windows, as you can see I have two default routes but the default route towards the VPN has more precedence because it has a lower metric value of 1.
How to enable split tunneling in Global protect VPN?
Based on the output above, we know that the all the internet and internal traffic goes by the Globalprotect VPN gateway. Let’s enable the split tunneling and see how the network behaves.
- Goto Network>Globalprotect>Gateways
- Edit the Gateway, click on Agent>Client Settings, and click on the Client configuration.
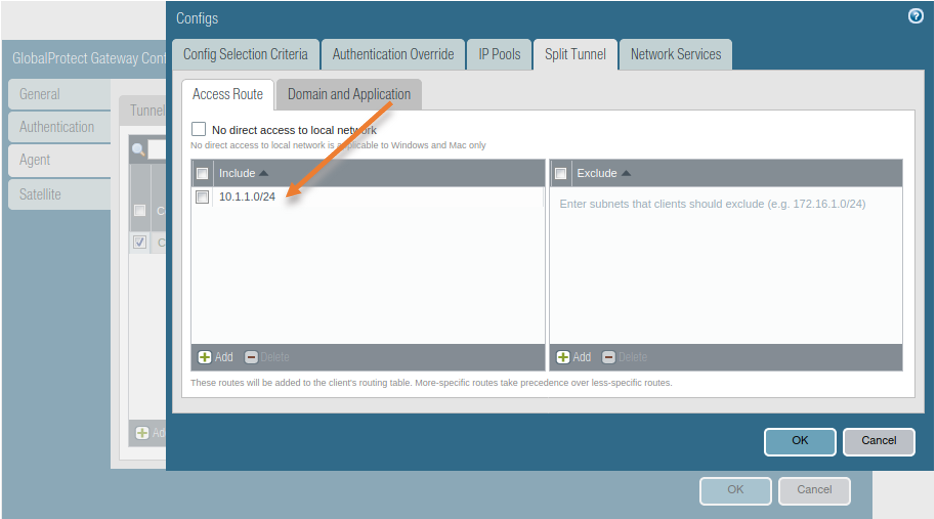
- Click on the Split tunnel and add the remote subnet that the remote client wanted to talk to.
The branch subnet we want to talk to is 10.1.1.0/24, add that under include list and click on OK.
Click on OK on the global protect gateway configurations as well.

Commit the configuration.
Disconnect the VPN and connect back again.
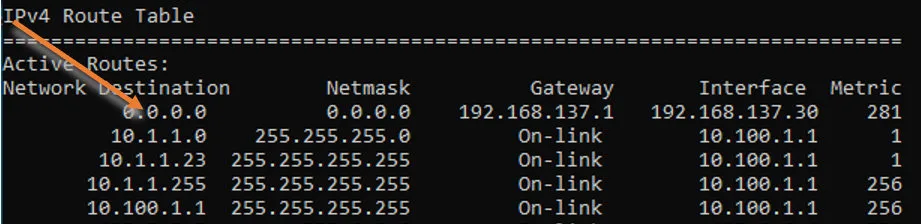
Check the routing table on the windows machine, as you can see there is no default route towards the firewall now, it is now pointed to the internet default gateway.
Since we specified the DNS servers, the DNS queries and the network 10.1.1.0/24 will send to the firewall rest will be sent to the internet.

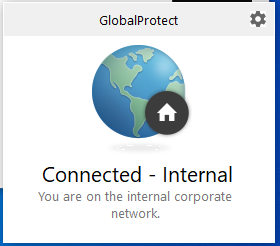
What if the user travels to the office and tries to connect to the VPN?
After the user finished working remotely he/she traveled back to the office, as soon as he connects to the office network he gets an IP address from the internal DHCP server. At the same time, when he tries to connect to the VPN, the client would first check if the internal detection IPv4 that we configured during the VPN setup is reachable or not. The moment the user connects to the office network, it should automatically be reachable, so instead of showing connected to VPN, it would just bypass the VPN and show you are on the internal corporate network. That is cool.