
Port forwarding is a popular feature many networks use to allow access to your servers inside your network over the public internet. It is used primarily for the webservers, where you want to expose ports 80 and 443 to the public. However, it is used by many other applications as well.
In this blog, we will look at how you can configure port forwarding on a FortiGate firewall. We will see the port forwarding to http and HTTPS traffic, SSH traffic, and eventually RDP traffic.
Is the port forwarding safe on FortiGate?
There is some risk regarding the port forwarding configuration on the FortiGate firewall, just like any other firewall. First of all, You must know what you are doing; otherwise, you may put your firewall to risk of an attack. Port forwarding the webserver is okay on ports 443 and 80. However, if you want to access a service using the management protocol such as SSH, RDP, it is always better to use SSL VPN or create an IPsec tunnel if possible. So traffic will be encrypted through a tunnel, and none of the traffic is traversing over the plain internet.
You need always to keep track of port forwarding that you have configured on the firewall and review it every month if possible. You may have created some port forwarding rule long back, and if you no longer see any hits on that rule, it is better to disable them.
With the above in mind, let’s go ahead and configure the port forwarding on the FortiGate firewall.
Below is the network that we are going to work on. We have a FortiGate firewall connected to the internet, and there are three machines connected on the LAN side.

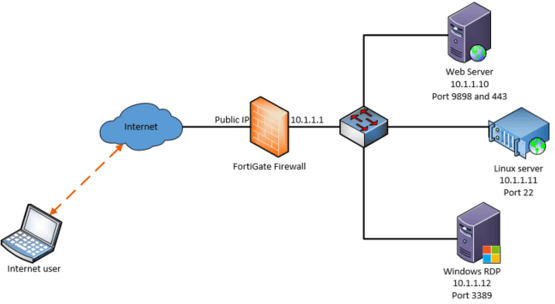
In the following configuration, we are going to take a look.
1. An internal webserver listening on ports 9898 and 443, we have to configure the port forwarding to the internet to listen on ports 80 and 443.
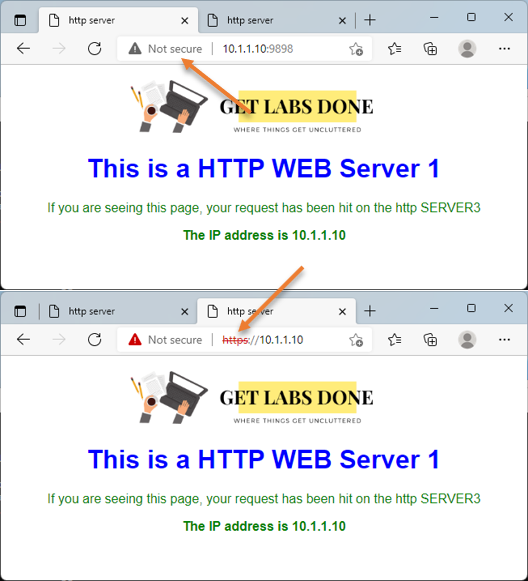
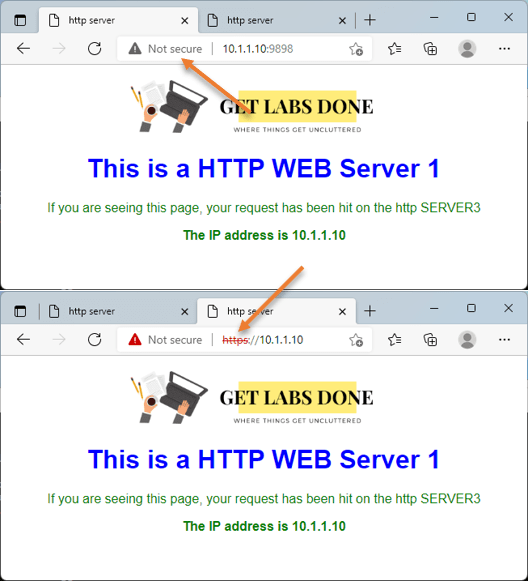
As you can see from the LAN side, we can reach the webserver on ports 9898, and 443 as well.
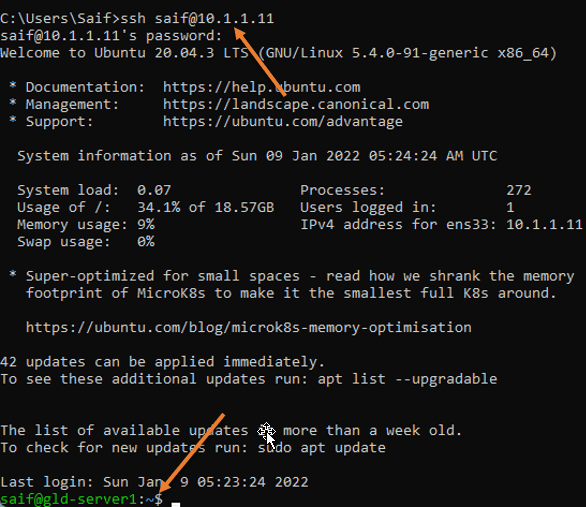
2. An internal Ubuntu Linux server is enabled for SSH internally, and you need to allow port forwarding externally with port 2222 to specific IP.
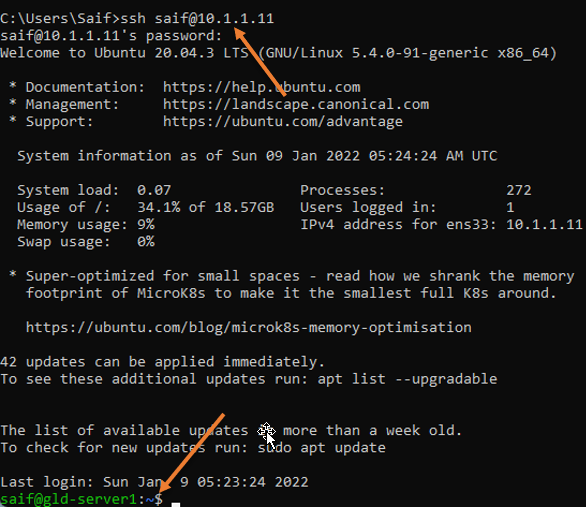
From the LAN side, I can confirm that I can reach the Linux server on the default ssh port number port 22.
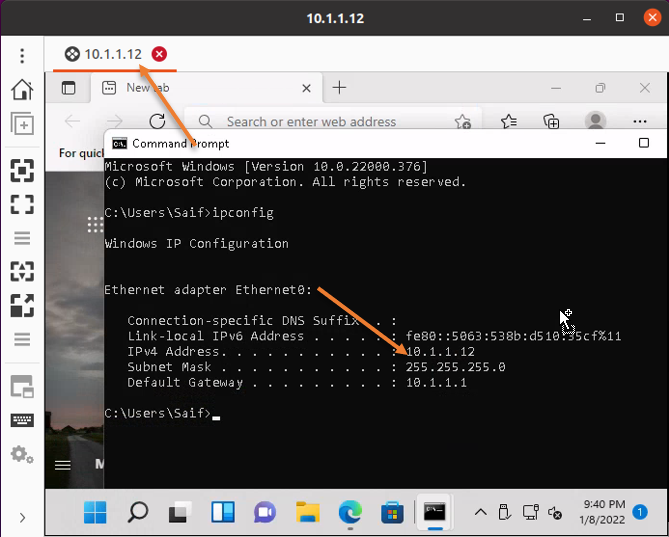
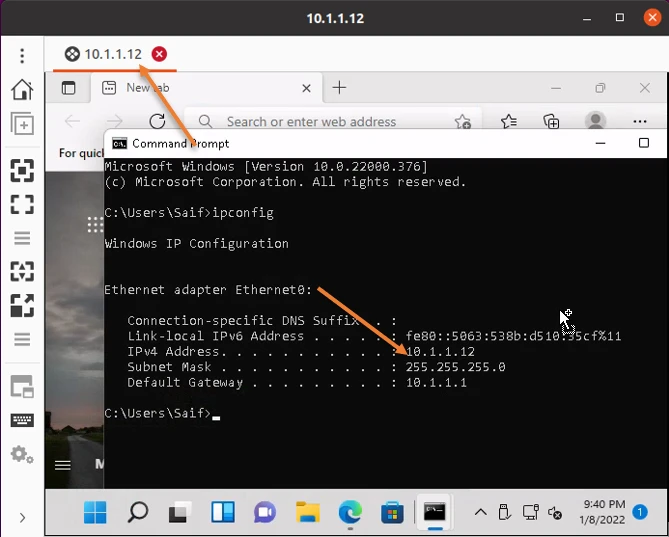
3. Windows machine enabled with RDP with default port number 3389, as you can see we are able to access the RDP – We need to allow the RDP access on port number 33890 instead of default port number 3389, To secure the access restricted to only a specific IP from the internet.
1. Configure HTTP and HTTPS port forwarding in FortiGate.
We are going to configure the port forwarding for the web traffic
HTTP port forwarding configuration.
We will take a look at nonsecure HTTP traffic first, but before configuring the port forwarding security policy, we need to define the virtual IPs and port for HTTP traffic.
Configure the HTTP Virtual IP.
To configure the virtual IP, log in to the FortiGate firewall
Policy&Objects-> Firewall Policy-> Virtual IPs -> Create New -> Virtual IP
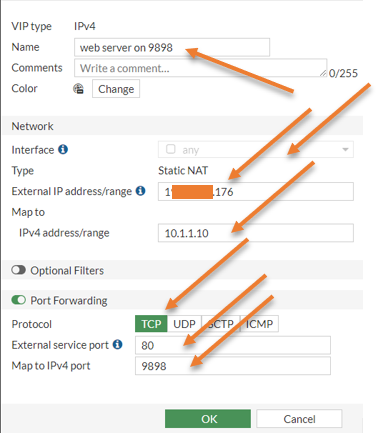
Name: Webserver on 9898.
Interface: You can keep it to any.
Type: Static NAT.
External IP address/range: enter your WAN public IP connected to the internet.
Map to IPv4 address/Range: Enter the web server Ip address, which is 10.1.1.10
Enable port forwarding by checking the Port forwarding option.
External port: 80 – This is what the users on the internet will use. We wanted them to use port 80, which means http, that will redirect to 9898.
Map to IPv4 port: 9898 – Our web server local port.
Click on okay.

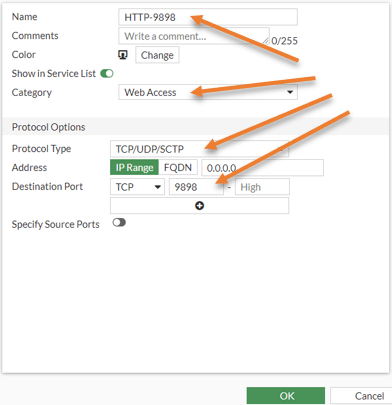
Add an http service on port 9898.
The service we configure will be later called into the policy that we will create.
Policy&Objcets-> services ->Create new -> service
Name: Provide a user-friendly name e.g.: HTTP-9898
Category: Web access
Protocol Type: TCP/UDP/SCTP
Destination Port: TCP 9898.
Click on OK.

Configure the port forwarding policy.
Next, we have to configure the port forwarding policy so anyone on the internet can talk to the internal server.
Let’s now configure the security policy for port forwarding.
Policy&Objects-> Firewall Policy-> Create new
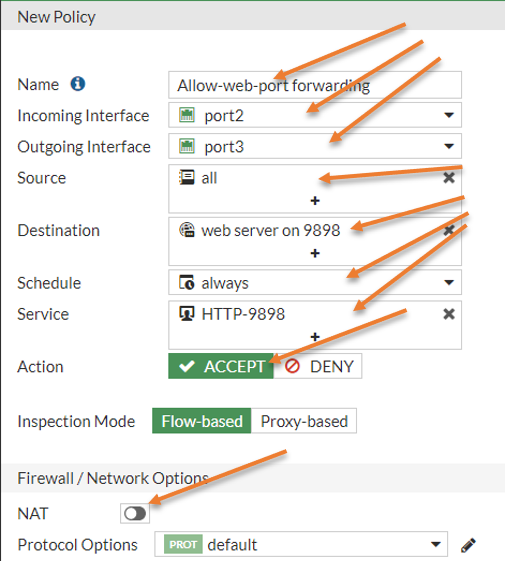
In the policy creation wizard, define the policy as below.
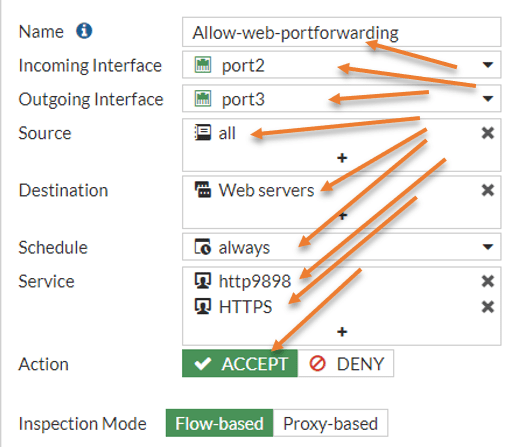
Name: Allow-web-9898 port forwarding.
Incoming interface: Port 2 – The reason we chose port2 is because it is the WAN link exposed to the internet and all the internet traffic will hit on the WAN link.
Outgoing interface: Port3 – This is the LAN interface connected to the webserver.
Source: All – Most of the time, the web service is allowed to everybody on the internet, so you should choose all. If you want to let the web traffic to a specific IP/ subnet, you can create an address object and choose that instead, which we will do for SSH and RDP protocols.
Destination: Choose the Virtual Ip we created.
Service: Choose the http-9898 service that we created.
Note: In case if you are wondering why we are allowing port 9898 instead of 80. That’s because the port forwarding will happen first, and check the policy second. So after the port forwarding, the destination port becomes 9898 instead of 80.
Action: Allow.
Nat: It should be unchecked.

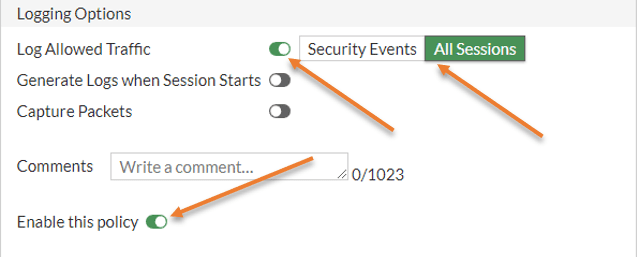
Under logging Options, you may choose all sessions, and this will be helpful during the troubleshooting.

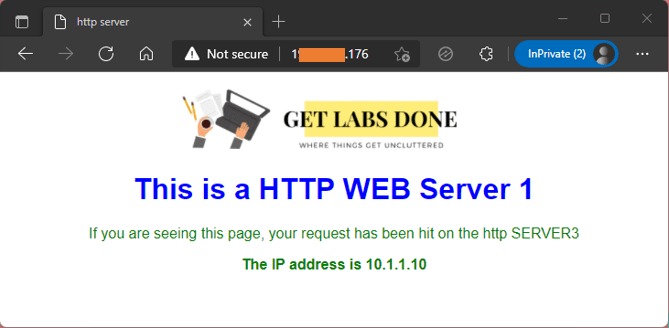
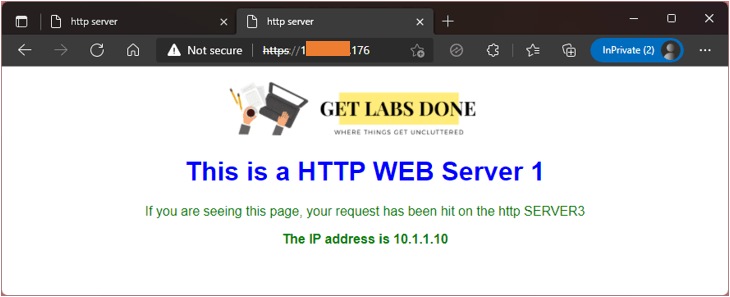
Test the http configuration.
That’s it, you may check the connection now from an external machine. You need to make sure that when you try to access the URL this time, you should not use 9898. You have to type the URL as http://<firewall outside IP>

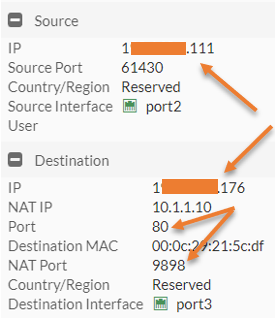
You can also see the logs for the traffic that says the traffic came from the public internet, and in the destination, you should see the NAT took place and the port number changed from 80 to 9898.

Configure the FortiGate port forwarding on HTTPS traffic.
Let’s configure the port forwarding for 443.
Configure the HTTPS virtual IP.
Like we did for port 80, we can now create a virtual Ip for port 443.
Policy & Objects -> Virtual Ips -> Create New-> Virtual IP.
Note: You will get an error message that says Conflicts with the External IP of another VIP when you try to use the same external-facing IP. However, it will disappear when you choose port forwarding and a different external Port.

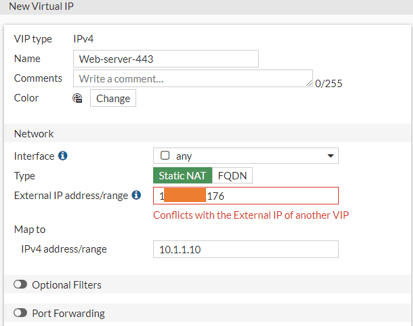
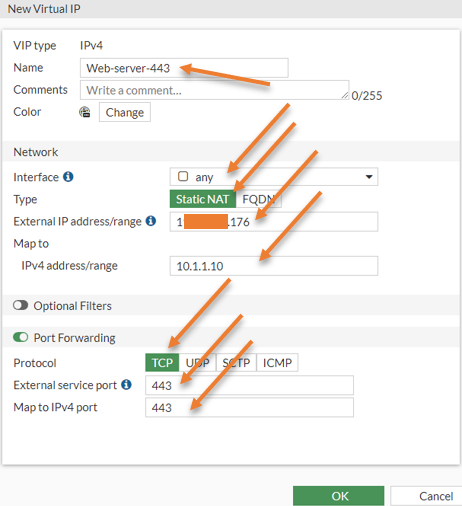
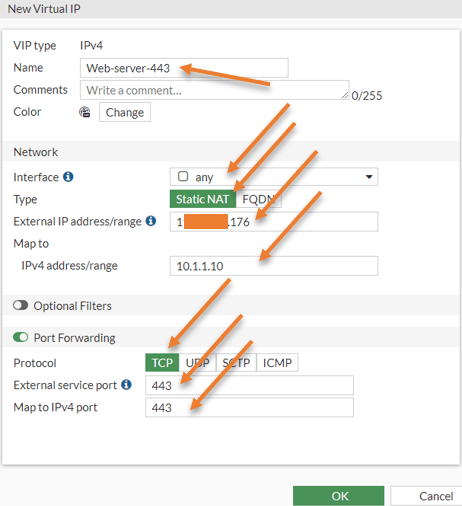
Name: Web-server-443
Interface: Choose Any.
External IP address: Enter the outside IP address of your firewall.
Map to IPv4 address: 10.1.1.10 – Our web server.
Enable the port forwarding option.
Choose protocol TCP.
External Service port: 443.
Map to IPv4 port: 443.
Click on okay.
Note: here, the port number will never change, it is always 443.
Configure the HTTPS port forwarding with web server group.
You can now go back to the policy and choose the newly created destination and allow the service 443 and it will work. However, to make policy management easier, let’s create a virtual IP group.
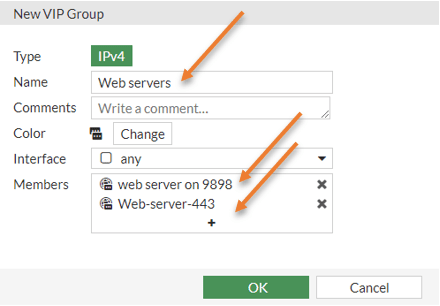
Policy&Objects-> Virtual Ips-> Create New-> Virtual IP group
Name: Web servers.
Members: You already have web server 9898 added under members, you may add web server 443 to the member’s list.
Click on okay.

Go back to the policy&Objects-> Firewall Policy
Double click on the firewall policy that we just added.


2. Configure the SSH port forwarding in FortiGate.
We have configured the web port forwarding to everybody on the internet so that anyone can reach your website. However, when you configure management protocol like SSH port forwarding, you need to ensure that you allow specific IP addresses instead of all as sources.
If you enable SSH to everyone, you have put your server at risk, and if someone tries to make a brute-force attack with random credentials, they will be able to get into the server. To restrict the access to IP addresses that you trust. Instead of using the default ssh port on the external side to secure the policy even further, we could use port 2222.
Goto Policy&Objects-> Virtual IPs-> Create New-> Virtual IP.
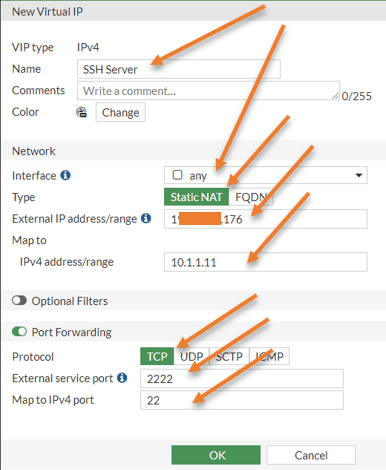
Name SSH Server.
Interface: Any.
Type: Static NAT.
External IP address: Firewall outside IP.
Map to IPv4 address: 10.1.1.11 (Our internal SSH server)
Enable port forwarding.
Choose the Protocol: TCP.
External Service Port: 2222
Map to IPv4 port: 22.

Add the external IP address object.
As I said earlier, we will create SSH traffic to a specific IP that you trust, so you may create an address object that we can call into the security policy.
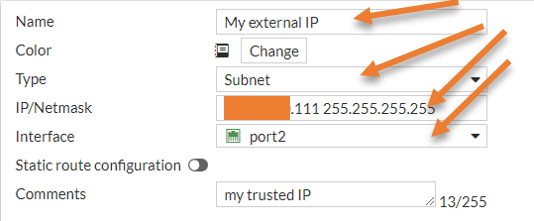
Policy&Objects -> Addresses-> Create new -> Address.
Name : My External IP.
Type: Subnet.
IP/Netmask: remote IP address and it’s subnet. For example x.x.x.x/32
Click on okay.

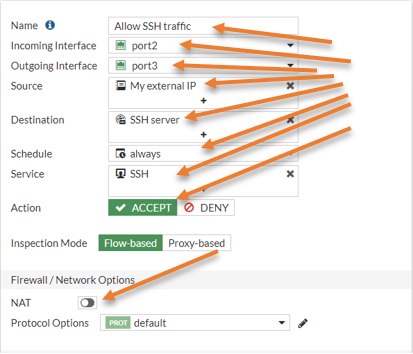
Configure the SSH port forwarding policy.
Policy&Objects -> Firewall Policy-> Create New.
We are going to create a separate policy for the SSH traffic.
Name: Allow SSH Traffic
Incoming interface: Port2 – WAN interface.
Outgoing interface: Port3 – LAN interface
Source: Call the external Address object that we created.
Destination: Choose the SSH server virtual IP that we created.
Service: SSH.
Action: Accept.
Uncheck the NAT policy.

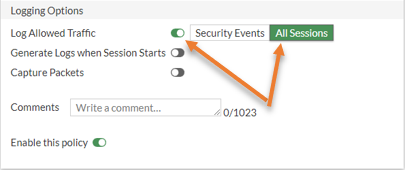
Enable logging for All sessions and click on OK.

Test the ssh access.
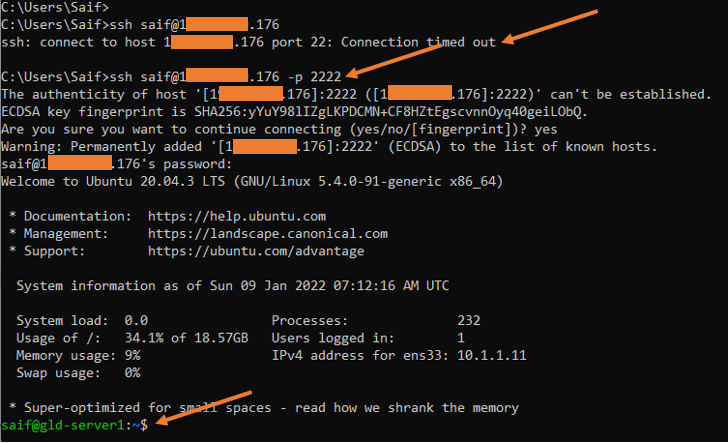
From your external host, try to ssh into the firewall outside the IP address using port 2222, and you will be able to log in using SSH.
As you can see, when I tried with the default ssh port, it got timed out. However, when I tried port 2222, it let me into the server through the FortiGate firewall.

You can check the logs in the firewall and that says, the source is my external trusted IP, and the destination you can see it came with port 2222 and got translated to 22.


3. Configure the RDP port forwarding using FortiGate.
Just like we configured the SSH, we will configure the port forwarding for the RDP traffic as well. And even here, instead of allowing all the source IP, we will allow only the static IP that we trust, and on the default RDP port number 3389, we will use port 33890 instead.
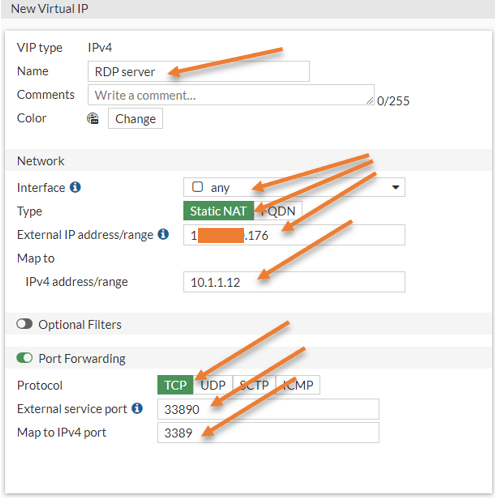
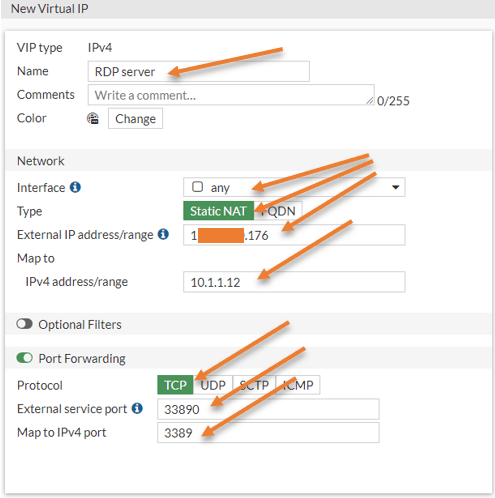
Configure RDP virtual IP.
Policy & Objects-> Virtual IP’s-> Create new-> Virtual IP.
Name : RDP Server.
Interface: Any.
External IP address: Firewall external IP.
Map to Ipv4 address: 10.1.1.12.
Enable port forwarding
Protocol: TCP
External Service Port: 33890
Map to IPv4 port: 3389 – The default port of RDP.
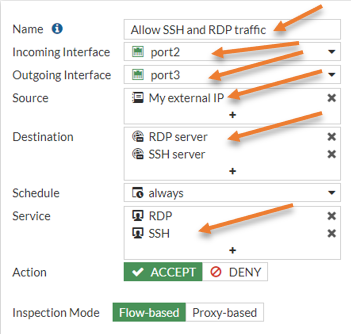
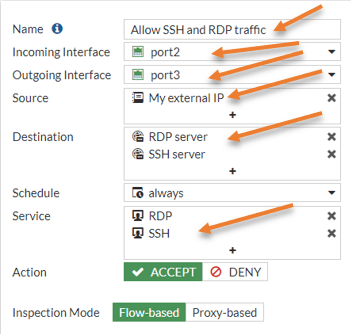
Configure the RDP port forwarding policy.
Instead of creating a separate policy for the RDP connection, let’s go ahead and add the RDP into the existing SSH policy that we created earlier.
Policy & Objects -> Firewall Policy-> Double click on SSH policy.
Name: Change the name to Allow SSH and RDP traffic.
Destination: We already have an SSH server here. Click on the plus icon to add the RDP server.
Service: Add the RDP service to the list by pressing the plus icon.
Action: Accept.
Click on OK.
Test the RDP connectivity.
You may try to RDP into the server using the port 33890, so in the RDP prompt, you will have to enter <firewall external IP:33890> As you can see, I can log in to the RDP.
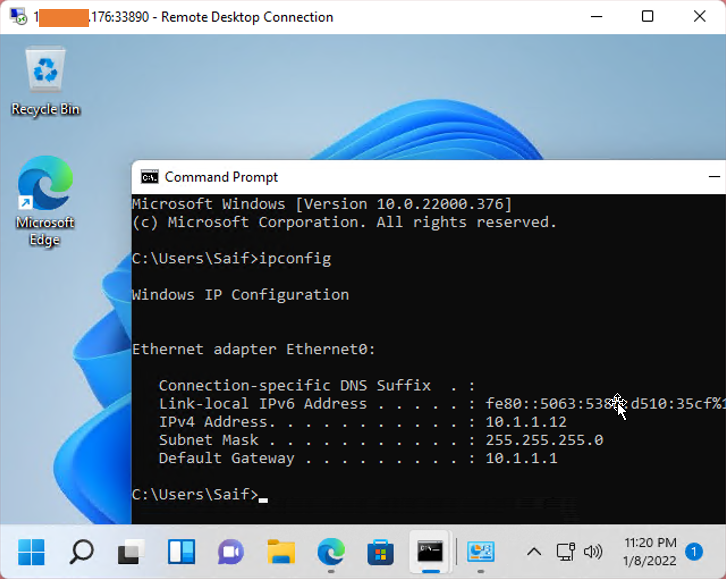

In the log it says, the traffic was destined to port 3389, and that got translated to 33890.


If I try the RDP using the default port number, it will not work.


Conclusion.
Port forwarding is an excellent way to allow certain services to the internet. There are multiple ways you can configure the port forwarding on a FortiGate firewall. So consider the above as the baseline, and you will be able to configure the port forwarding successfully on your environment.