

Hosting a website using a domain provider is not so difficult. You have to choose the domain name, register it and have them hosted on their servers. If you are looking for a cheap hosting option, you can opt for shared hosting. When the traffic increases, you may realize that shared hosting is not ideal for good performance. Because in shared hosting, there would be multiple websites using the same resources from the host. If your hosting server has multiple websites in them and when any of the websites gain more traffic to any one of those websites will decrease your site’s performance. When I started my website, I initially started with shared hosting itself. Then I decided to move onto different options as the traffic grew.
My first plan was to set up my webserver and host the web services at my home, but I decided to cancel the project after writing down the advantages and disadvantages.
Advantages
- From the ISP side, 100MB upload and download, I can even go up to 1Gbps speed if I want to.
- Got my own static IP.
- Running firewall already on the edge of the home network, so managing the inbound and outside traffic is easy.
- Have some old gears if I want to run web servers.
- If planning for new hardware’s it is a one-time investment.
Disadvantages
- The internet connectivity isn’t reliable. So, the uptime isn’t guaranteed.
- May not be able to fix the issue right away when something goes wrong.
- We need to have someone monitoring the site health 24/7.
- The reoccurring internet and the electricity bill.
- If you are serious about hosting, you should consider investing in good hardware, which will be expensive compared to the hosting provider.
After analyzing the above, I decided to move out of my shared hosting and move to a different hosting provider which is reliable and has good 24/7 support.
Currently, I am using WPX as my hosting provider. If you are running WordPress and just wanted to focus on your work and do not want to deal with the technical stuff, WPX is the best place to start. It automatically takes the backup of your site for 28 days, and you get the support response within 30 seconds, which is great.
For a beginner, you don’t have to use WPX. You can use a shared hosting plan to begin with, which will be much cheaper.
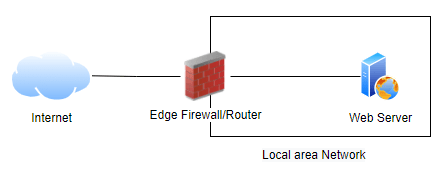
So after analyzing everything, you decided to host a website at your home, so let’s look at how you can host a web server in your home.
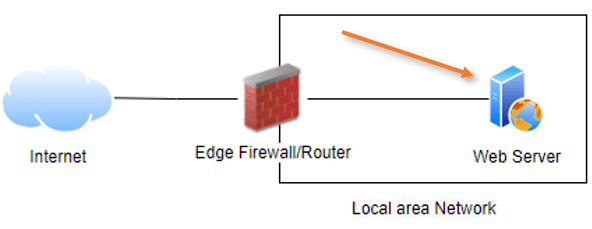
1. Get the drawing on the whiteboard.
The first step in the process is to draw the network diagram using Visio or some other tools to make it easy for us to understand what we are working on in a given period.

2. Reliable internet service provider.
The first important step is to get a reliable internet connection to your home; always choose the internet service provider who provides the same upload and download speed. However, it would be best if you also speak to your ISP to understand whether it is allowed by them to host web services at your home in their terms of service. Some internet service providers won’t allow that, so it is better to clarify it beforehand. When your site goes live, based on your traffic, the ISP will notice the inbound connection to your network based on how much traffic you have. So it is easier for the ISP to see that.
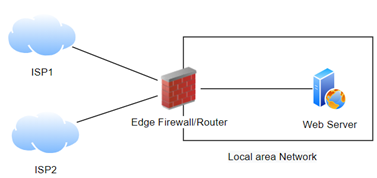
You could also have two ISP providers for redundancy, but you will have to configure your DNS name accordingly, which we will talk about in step 3.

3. Get the static IP.
After getting your internet connection set up and working, you will have to request a static IP.
Most household internet connections will have IP provided by the ISP via DHCP, meaning the IP will keep changing when the DHCP lease expires. The IP address you have now will not be the same after a few hours/days. To mitigate that, you need to get a static IP from your service provider. The static IP is something that will never change. And it is assigned to your name.
There will be some nominal charge depending on your provider apart from the monthly internet bill.
4. Register your domain.
After having the IP address on your name, you can head to any hosting provider to register your domain name. There are plenty of providers out there. I suggest Namecheap because it is easier to set up. There is no specific reason I have chosen Namecheap, it was the hosting provider I have been using since I started to build websites.
Once you buy the domain name, you have to configure your DNS record. Meaning, you will have to map your static IP address with the domain name that you have registered. When in doubt, reach out to the domain provider support and ask them to map your IP address with your domain name.
5. Configure the webserver.
When you host a website with a hosting provider, they save all your website information on their server, and we pay for their service. So when it comes to hosting your website at home, you need to have a server or an old PC, which you can use to configure as a web server.
There are multiple ways you can configure a web server. The best and easiest way is to install Ubuntu on a server/old PC and configure WordPress on it. So without worrying about code and everything, you can start building a website and writing your blogs from day one.
Now you may be wondering, should I dedicate a whole physical machine for the hosting purpose?
You don’t need to if you have virtualized software known as hypervisor on the physical box. You can install Ubuntu as a Virtual machine as well and configure WordPress on it. The common virtual hypervisors are.
- VMware esxi.
- Linux KVM.
- Windows hyper-v.
What if you don’t know anything about the above hypervisors?
Then you can have a regular windows 10 or 11 operating system installed on the machine and run VMware workstation or Virtualbox in it and start building the VM’s on that.
You can use either bridged interface or NAT network with port forwarding as the network configuration while using either VMware workstation or Virtualbox. It depends on how you want to set it up.
I have covered, VMware workstation network and VirtualBox network configuration in the below blog articles. It might help if you want to understand more on the network side.
How to Configure Port Forwarding in VMware Workstation?
How to Fix VMware Bridged Network Not Working in Windows 10?
How to Use VirtualBox Command Line?
Virtualbox Network Settings – How to Manage?
You could even use your android phone to host a website, but c’mon, you don’t really want to do that, do you?
6. Install the SSL certificate.
It is hard to see any non-secure HTTP traffic these days on the internet. The http traffic is not encrypted, so somebody who got access in the middle of your network can sniff the data and should be able to see information that the client and the server exchange.
For secure connectivity, you need to have an SSL certificate enabled on your website. As a result, the users will access the resources using HTTPS, so the client and the server communication is encrypted.
You can reach out to your domain provider for an SSL certificate as well, and they will guide you through how to set it up.
7. Enable port forwarding on your network.
You set up a web server, and you made sure all the communications are working as expected on your local area network. Now, how will you allow internet users to reach your site?
For that, we use something called port forwarding. By default, all the traffic coming from the internet (outside of your network ) to your local area network is blocked. So we need to unblock some of the ports to allow internet users to inside.
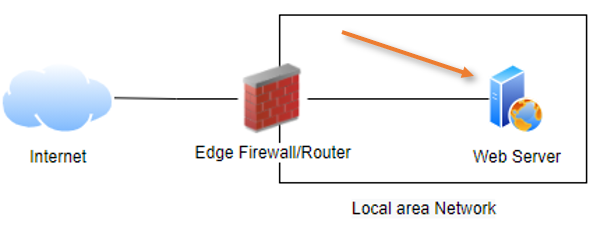
For the website traffic, we use port numbers 80 for http and 443 for HTTPS, and we need to open this port to the internet. So anybody on the internet can type your FQDN and will be able to reach your edge router/firewall, and the edge device will forward the request back to your local server.


If you are using a regular consumer router, I have covered how you can port-forward on a router here.
If you got your firewall setup maybe pfSense or opnsense, I have covered how you can set up port forwarding on each.
8. Some security best practices.
For better security, it is recommended to use a firewall at the edge of your network instead of regular consumer routers. You don’t have to spend on expensive firewall gears. You can go for open-source alternatives, such as pfSense or opnsense.
If you have an old machine lying around, you want to use it as a pfSense firewall for free?. Follow the article here on how to do that.
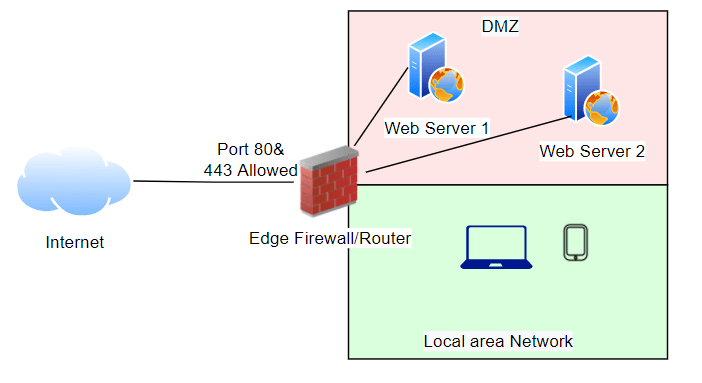
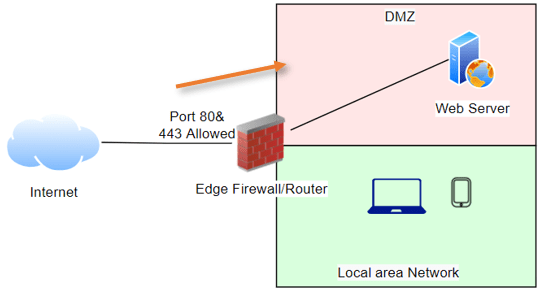
Seperate the web traffic from LAN.
It is not good practice to keep a public server part of your local area network, so as a best practice, you have to create a separate network/zone called DMZ. So your local area network and your DMZ networks are separate from each other. And when somebody from the internet trying to reach your web server, the request would go to the web server located in the DMZ instead of your local area network.

9. Use public CDN for better performance.
Your website is up and running on the internet hosted at your home, end users are happy, and more importantly, you are excited too. But there is a problem.
Let’s suppose you are from the US and you hosted the website at your home, but when somebody from Europe or Asia wanted to reach your site, they have to come all the way to the US and to talk to your local server. What if there is a way your web server files are cached by other servers near to the user’s location instead of hitting your local server. For example, if somebody wants to visit your site from Europe, they could talk to the server nearest to them instead of coming to the US. It is possible with the help of CDN service.
Fortunately, Cloudflare is one of the best CDN provider, who provide free CDN services for anyone to use. Though it is free, it is very reliable and I haven’t seen many issues with Cloudflare. They even have paid plan as well.
Just follow this article here, and you will be able to connect your website with the Cloudflare CDN and the site will be much faster anywhere in the world because cloud flare has its services in most of the locations.
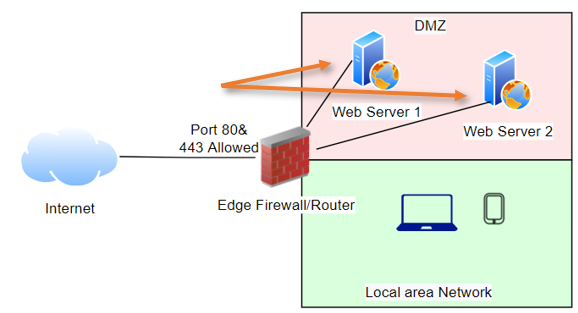
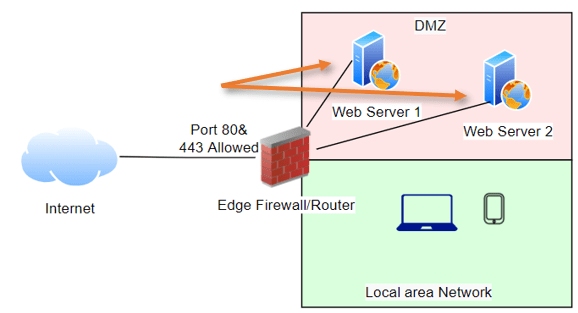
10. Add redundancy.
When you start to build your web server, you may not think about having redundancy in place for your web servers. If you plan for redundancy, you need to have two web servers or more, and whatever the changes you make on the primary server should replicate on the second one or even on the third one.
It would be best if you also set up a web server load balancing so you share the traffic in a round-robin fashion. When the primary server goes down, you have the redundant server always taking care of your web traffic. You can use the pfsense firewall itself for the load balance feature. Follow the article here for help.
That’s all you need to know to set up a web server at your home.
Conclsion
It is not so easy to set up a webserver at home, but if you want to go through all the technical hurdles and set up your own web server at home. This is the way to go.