
Quick Answer / Prerequisites To avoid the “This PC can’t run Windows 11” error during installation, you must install the software TPM emulator on your Linux host before creating the VM.
Run these commands on your host (Ubuntu/Debian):
sudo apt update
sudo apt install qemu-kvm libvirt-daemon-system libvirt-clients bridge-utils virt-manager swtpm swtpm-tools -y
(The package swtpm is the key to emulating the required TPM 2.0 chip)
If you try to install it like a standard Windows 10 VM, the installer will fail. This guide walks you through setting up the swtpm emulator, configuring the XML for Secure Boot, and installing the VirtIO drivers for maximum performance.
What We Will Configure
- Host Setup: Installing KVM and the Software TPM (swtpm).
- VM Creation: Configuring the chipset (Q35) and Firmware (OVMF/UEFI).
- Drivers: Injecting virtio-win drivers so Windows can see the hard disk.
Steps to install Windows 11 on KVM.
Prerequisites.
- Before you proceed, you need to have the windows 11 iso image downloaded. Follow the article here on how to download the windows 11 iso image officially from Microsoft.
- Windows 11 virtio drivers – click here to download.
- Follow the steps below to install the KVM on your Linux machine.
I am using Ubuntu; however, the steps mentioned here are identical for other Linux distributions as well.
Ubuntu.
sudo apt install qemu-kvm bridge-utils virt-manager libosinfo-bin -yCentos/Redhat.
yum install qemu-kvm libvirt virt-install virt-manager virt-install -yFedora.
sudo dnf -y install bridge-utils libvirt virt-install qemu-kvmKali Linux.
sudo apt install qemu-kvm libvirt-clients libvirt-daemon-system bridge-utilsLinux mint.
sudo apt install qemu-kvm bridge-utils virt-manager libosinfo-bin -yHere is the video with the same step by step instructions, for those who are interested.
1. Configure TPM and Secure-Boot.
To emulate the TPM we are going to install a software called swtpm-tools. Follow the guide here to install the TPM on your KVM host.
In the same guide, we covered the command to install the secure boot as well in case if it is not installed.
Once you have them configured come back here for the creation of windows 11 VM in KVM. We will enable the TPM and the secure boot during the installation.
What if I want to bypass the TPM and Secureboot ?
I recomend using the TPM and secureboot, however by any chance if you prefer to by pass those, you can bypass the TPM and secureboot by following the guide here, post which you can skip the instruction on TPM and secureboot during the windows 11 installation in KVM.
2. Create the Windows 11 VM in the KVM.
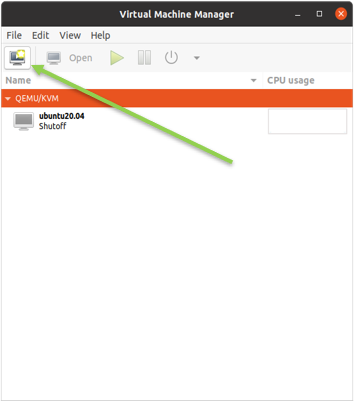
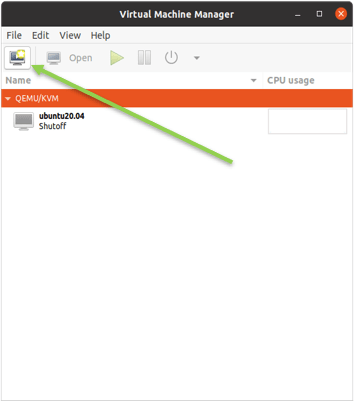
Open terminal in your Linux host (CTRL + ALT + T) and on the command line type virt-manager, this will open up the virtualization manager GUI on your machine.
On the GUI type, click on the icon on the top left that says create a new virtual machine. This will open up the KVM virtual machine creation wizard.
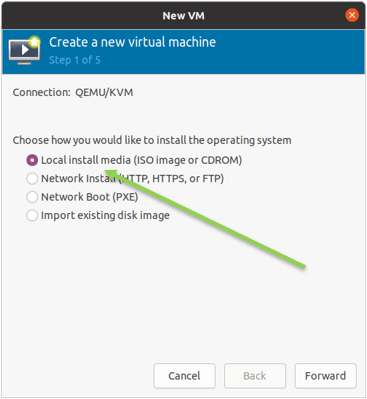
Choose the Windows 11 image for the installation.
We will install windows 11 with an ISO image, so choose the option that says Local install media and click on forward.

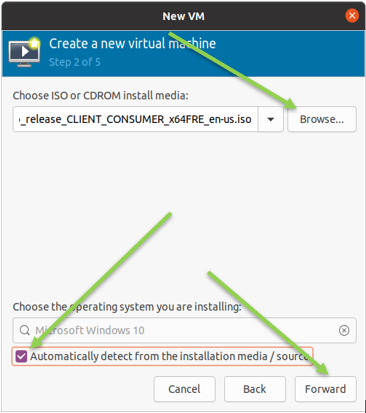
Attach the windows 11 iso.
Click on Browse to attach the windows 11 iso file.
The KVM will automatically detect the operating system like Windows 10, at the time of this writing the windows11 is not in the KVM supported operating systems.
So you won’t be able to find the windows11 by manually choosing the option either.
Windows 10 should work fine, so click on forward.

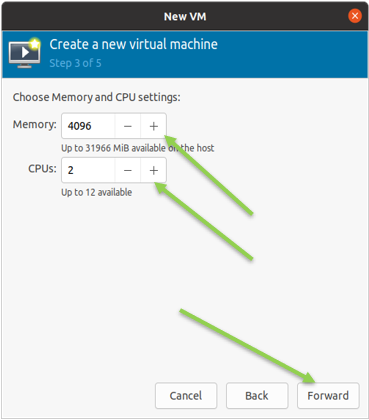
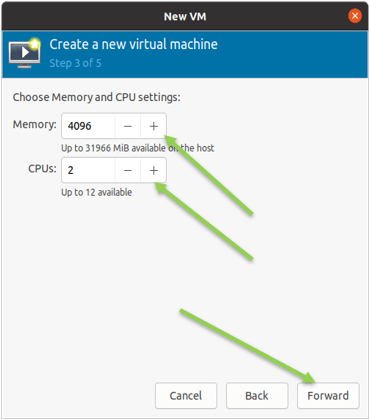
Configure the Memory and CPU for windows 11.
By default, Qemu KVM will choose the Memory as 4GB and 2 CPUs, which is more than enough for daily operations.
If you wanted to make changes here, you may increase it as per your requirement. We will be further changing the CPU configuration later on, Click on Forward.
Create windows 11 virtual hard disk.
You can leave the default virtual hard disk storage as 40GB, but for my requirement, I would require 60GB, so choose the storage based on your requirement.
40GB will be more than enough for most of the installations. If you would like to extend the storage later on in the KVM, you can follow the article here to extend it.
After defining the storage, Click on Forward.


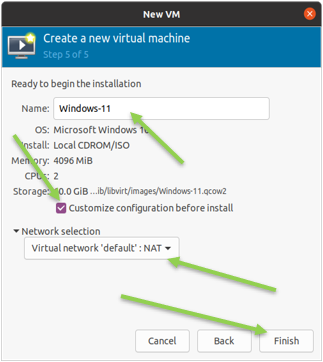
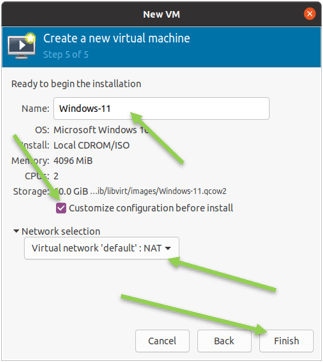
Specify the VM properties.
- Define the Name.
Here you need to specify the VM name because the VM was picked up as windows 10 initially, the name also shows win10, and I am going to change it to Windows 11.
- Choose the Customize configuration before install.
- Choose the network.
Here I choose the default NAT interface, so the virtual machine can go out to the internet, which is the safe and best option.
If you want this VM to be part of the same network as your host machine, you could choose the bridge interface known as the host device. But I am not going to do that here.
After the changes, click on Finish, a VM customization window will now pop up.
3. Configure the virtual hardware for windows 11 in KVM.
For the windows11 VM to work perfectly on the KVM, we need to make some changes on the virtual hardware, lets’s go ahead and do that now.
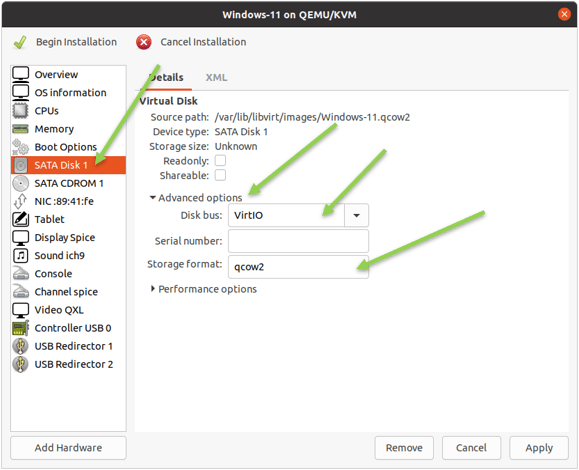
Choose the Virtual hard disk as qemu VirtIO.
We need to tell the KVM to use virtio as the hard disk bus type in the customization window.
- Click on SATA Disk 1.
- Under details click on Advanced options.
- Choose the disk bus as VirtIO, and leave the hard disk type as qcow2.
If you want to get good performance, you can make the storage format raw, but that will have limitations on taking snapshots, expanding the storage, and so on. So I am okay with qcow2, in case if you would like to have a good performance, you may change it to raw.
After the selection click on Apply.

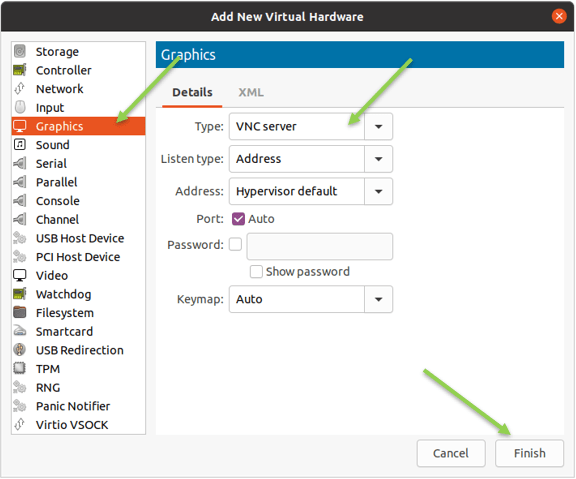
Configure the graphics.
We have to add a VNC viewer as the graphics, click on add hardware option on the bottom,
In the Add new virtual hardware window, click on Graphics, and choose Graphics type as VNC Server, and click on Finish.

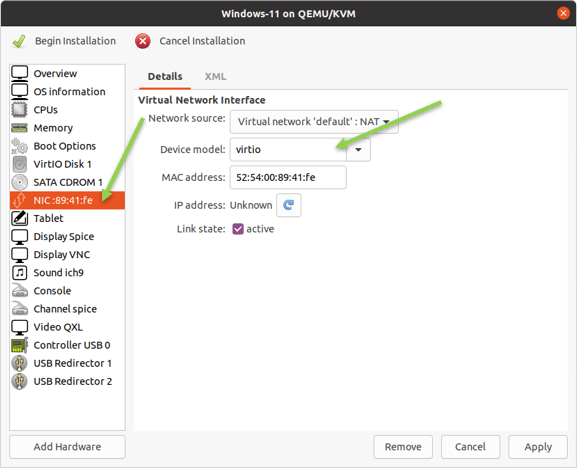
Change the network interface as Qemu KVM compatible.
Click on the Network interface, in the device model you can see the interface as e1000e, change the interface to virtio.
Click on Apply.

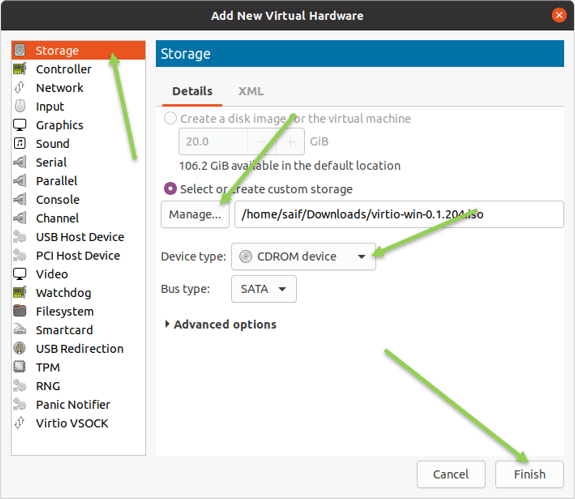
4. Add the windows 11 virtio driver.
Remember we have downloaded virtio driver, you need to attach that ISO as CD driver here, so that the windows 11 operating system can choose the KVM virtio virtual drivers during the installation.
- Click on Add hardware.
- Select storage, click on Manage to attach the virtio driver that you have downloaded.
- Choose the Device type as CDROM Device.
- Click on Finish.

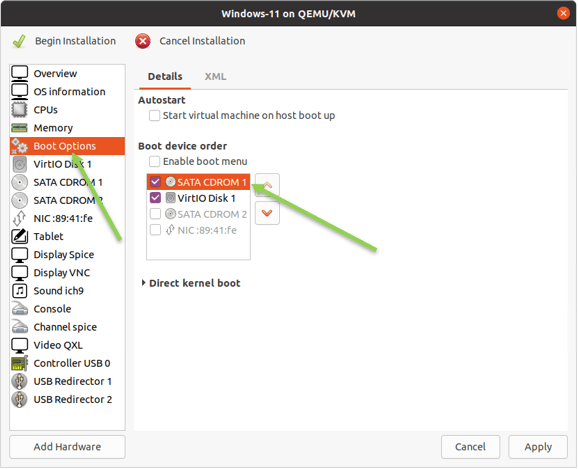
5. Change the boot order.
At this point, you will have two virtual CD-ROMs attached to the VM, the first one has the windows 11 iso, and the second one has virtio drivers.
You need to make sure the CDROM1 gets selected during the boot. Click on Boot options. Under boot device order, check the SATA CDROM1 and click on the up arrow on the right to move it up.
You now will have CDROM1 as the primary and virtual hard drive, and then CDROM2. After the selection, click on Apply

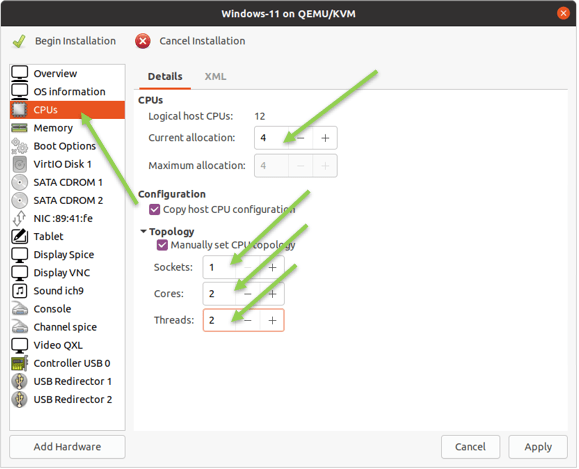
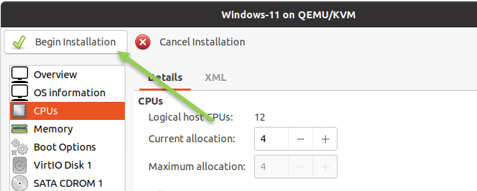
6. Configure the CPU for windows 11.
I have enough CPU cores on my machine, and I will give 4 CPUs for the windows 11 guest machine.
Click on CPU, Choose the current allocations to 4.
- Under topology, Select manually set CPU topology.
- Select socket as 1.
- Core as 2.
- Thread as 2.
Note: If you would like to change the CPU to just two, you may change the allocation to 2, and the core as 1, and the thread as 1. If the CPU doesn’t support threading, you can choose the core as 2 and click on Apply.

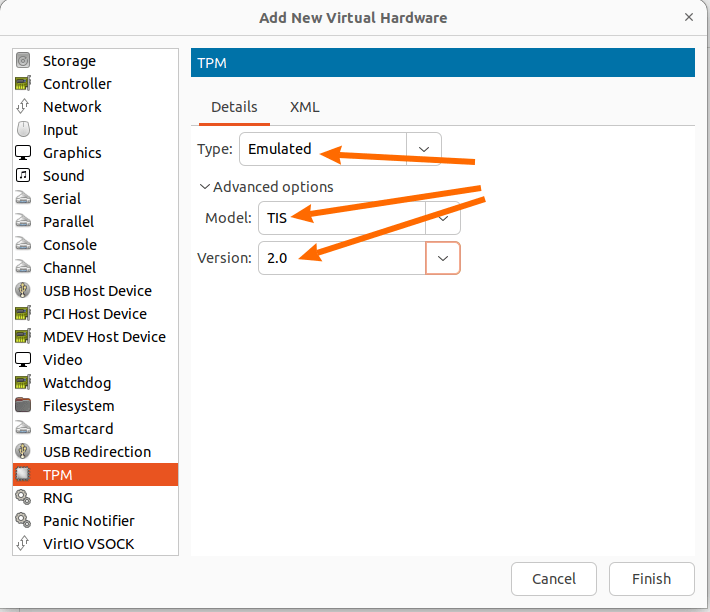
7. Enable the TPM.
For the windows11 installation to complete successfully, you will need to have TPM and secureboot enabled, in case you want to bypass the TPM and secure boot, you may follow the step-by-step guide on how you can do that, then you can skip this option.
In the installation wizard, click on Add hardware.


Add the TPM as below.
- Model – You will see two models, choose TIS,
- Backend – select Backend as Emulated.
- Version – 2.0
Click on Finish.

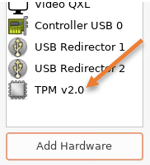
You will see TPM v2.0 under the VM hardware list now.

8. Enable Secure-Boot.
The secure boot/UEFI is available by default when you have installed the KVM program on your machine. If it is not available by any chance, you may enter the command below to install it.
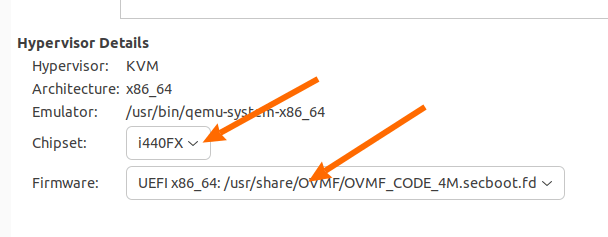
sudo apt install ovmfTo enable Secure boot or UEFI boot, click on the Overview option during the VM installation and change the following settings.
- Chipset – i440FX
- Firmware – UEFI x86_64:/usr/share/OVMF/OVMF_CODE.fd
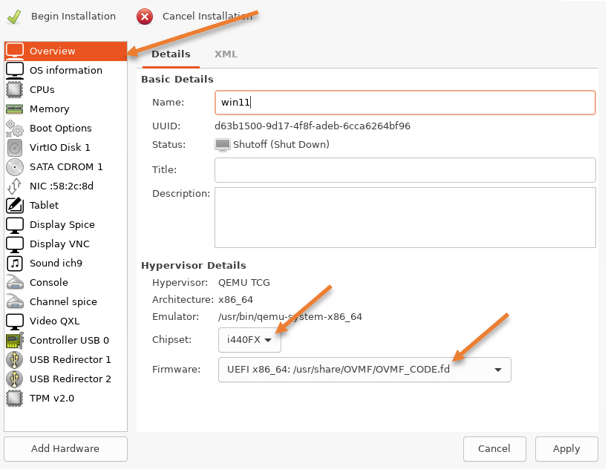

or
If you are on latest version of secureboot, you will see UEFI x86_64:/usr/share/OVMF/OVMF_CODE.4m.secboot.fd , either versions should work

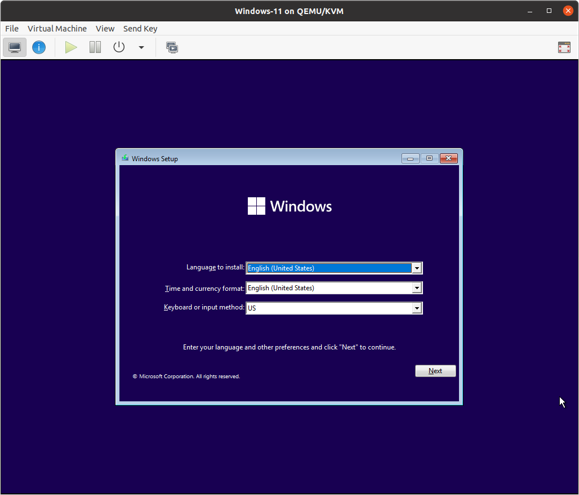
9. Begin the Windows 11 installation in KVM.
You may now click on Begin installation in the top left corner

The windows 11 installation will begin, choose the language and keyboard layout of your choice and click on Next and choose to Install now.

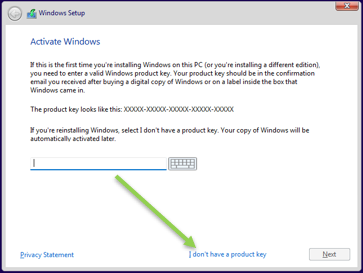
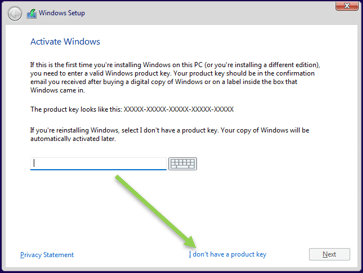
Since I don’t have the product key, check the option that says, I don’t have a product key.
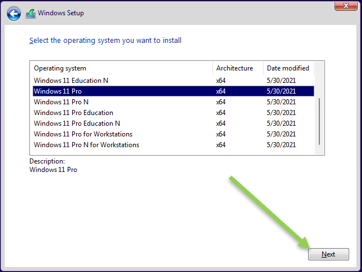
Choose the version of your choice.
I am choosing Windows 11 pro, and click on next.

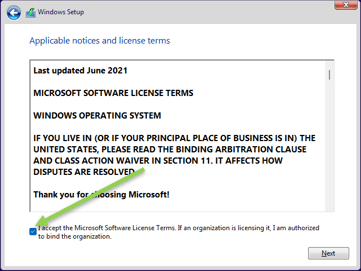
Accept the license agreement and click on Next.

Choose the type of installation as custom.
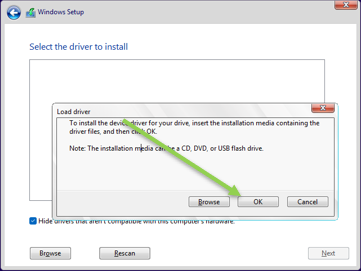
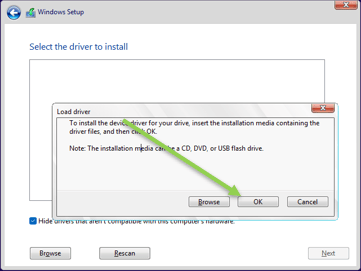
You won’t be able to find the hard disk that you have added,
Click on Load driver. In the prompt, click on OK.
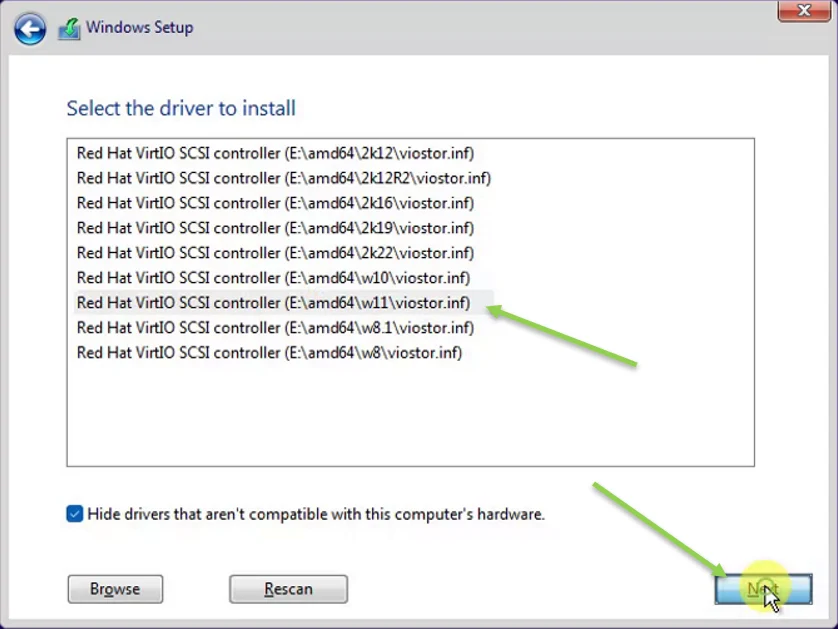
Because we have attached the virtio IO driver iso file while customizing the VM, you will see the list virto drivers listed for each windows operating system. We have to choose windows 11 driver here, and click on Next

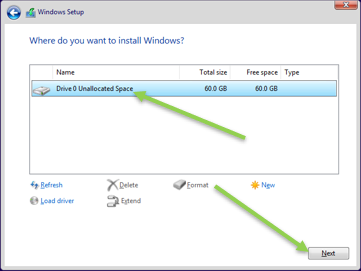
You should now see your virtual hard disk listed in the windows 11 setup wizard.
Choose the hard disk, and click on Next.

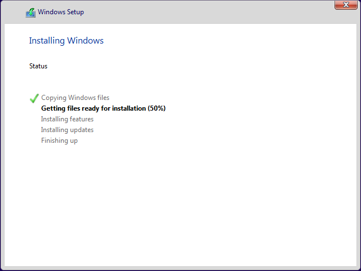
The installation will now begin, and this process will take time depends on your hardware.

10. Complete the initial setup wizard.
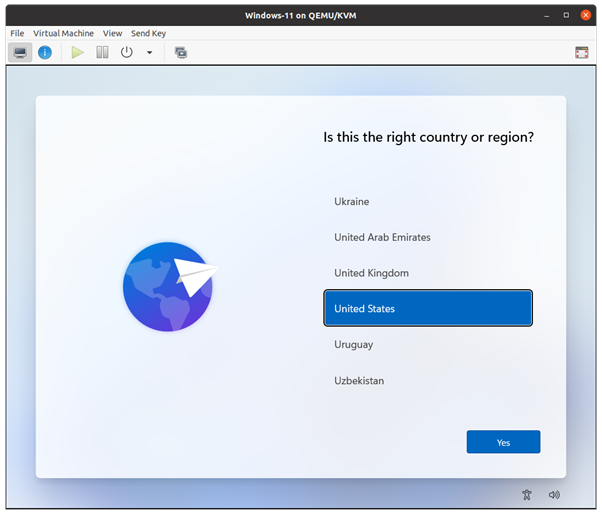
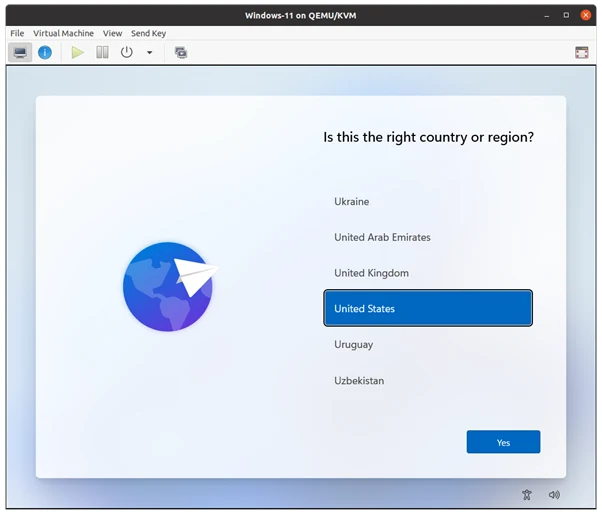
After the installation, you will be presented with the initial setup wizard.
Choose the country of your choice and click on Next.
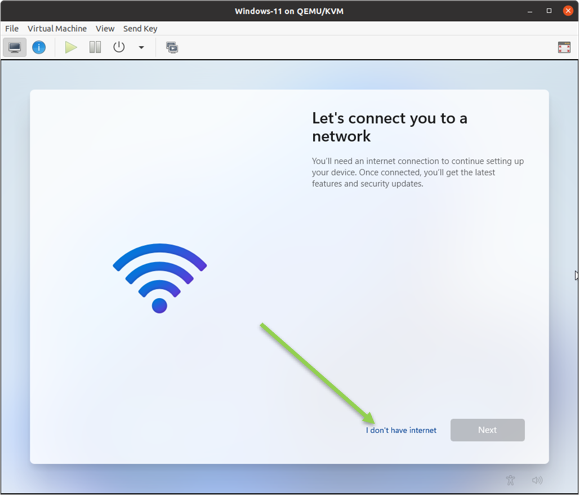
On the screen where it says, let’s connect to the network, choose I don’t have a network.
I dont have internet Option is grayed out?
For some newer iso installations, you may notice that even after selecting windows 11 pro during the installation, you will be stuck at a screen, where it is asking you to connect to the internet.
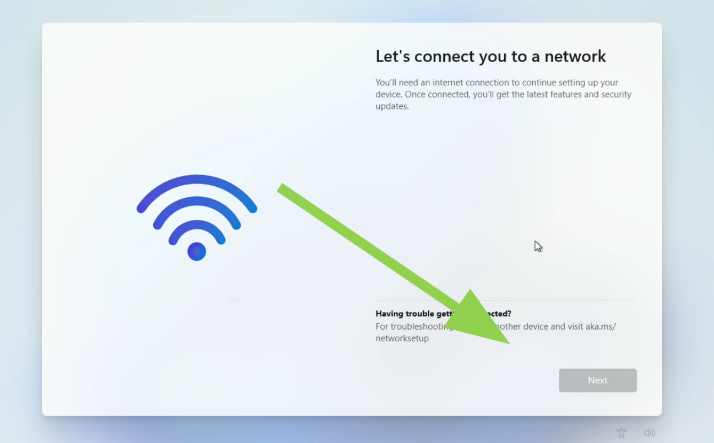

Though microsoft want you to connect to the internet, it cannot really connect to the internet, because, the KVM windows 11 VM doesn’t have network access yet to connect to the internet.
Which we will fix eventually by installing the drivers, however we need to bypass this step for now.
For that press shift + f10, (you might need to press the function key for this to work)
In the command prompt enter the following command and hit enter.
oobe\bypassnro
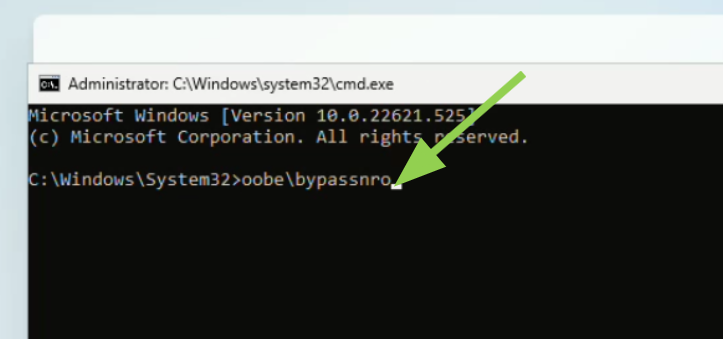
It will restart the system automatically to the previous initial setup wizard screen.
After the initial selection, you will be presented with the same screen, but this time with an option that says I dont have internet.
Even if you try to connect to the network, it won’t let you connect because you don’t have windows 11 qemu drivers installed yet, which we will do later.
On the next screen, choose to continue with a Limited setup.
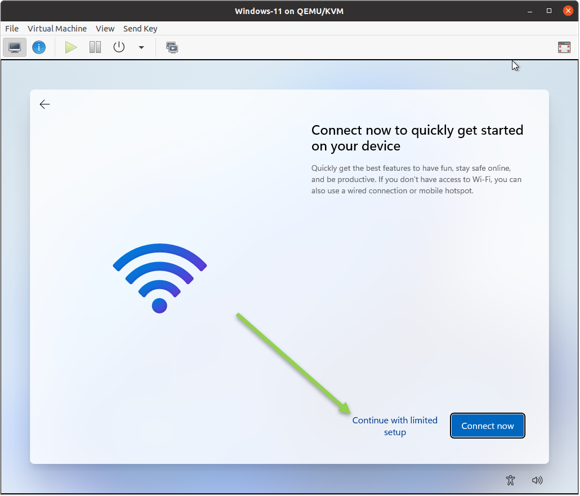
You will have to create a local account to begin with, enter the username and password, and you also need to setup 3 security questions as well.
After that privacy settings, accept the privacy setting based on your requirement.
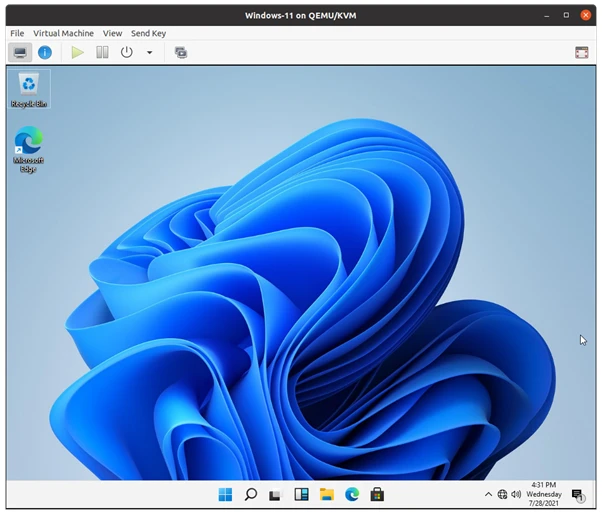
Wait for a couple of minutes and you will boot into the windows successfully.

11. Install QEMU virtio drivers for windows 11.
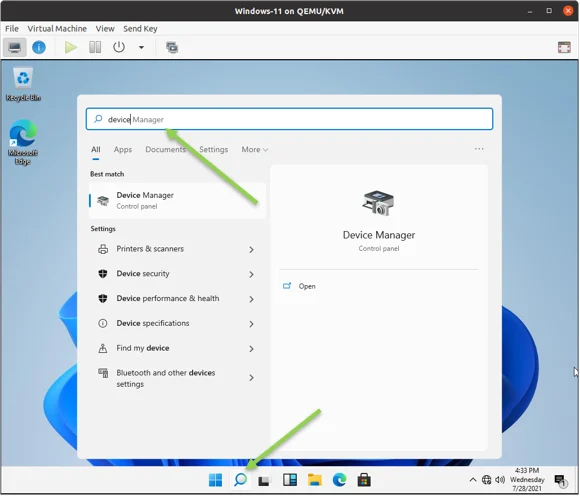
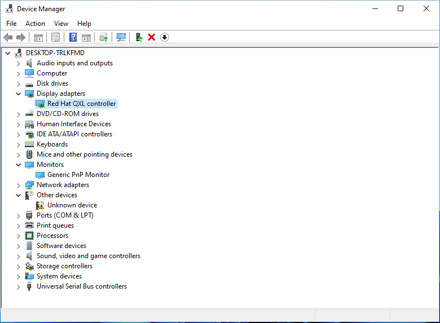
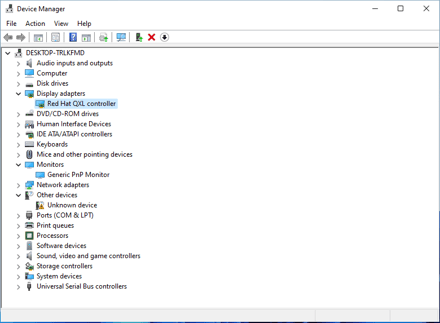
Click on the search button and search for Device Manager, just open it.
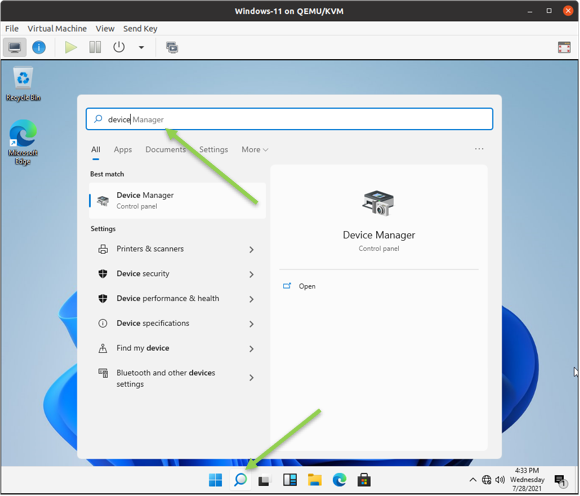
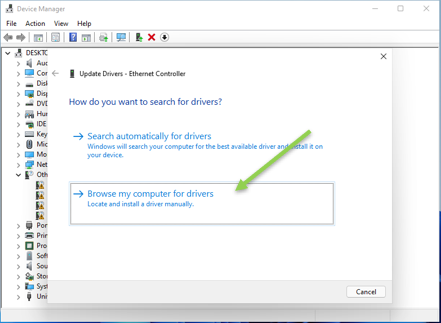
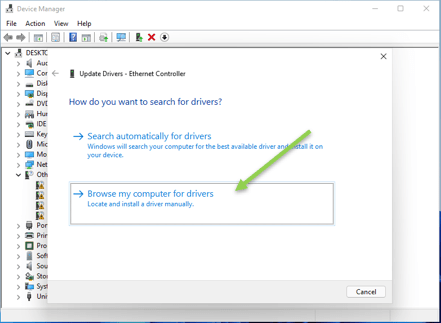
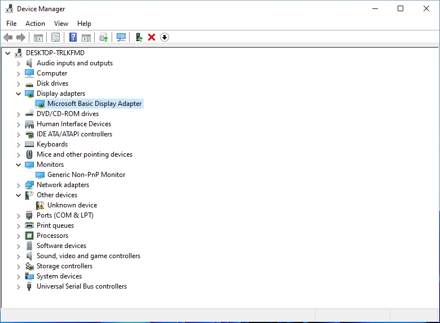
Here you will see the list of drivers that you have on your machine. If you notice under ‘other drivers‘, you should see some drivers are not installed.
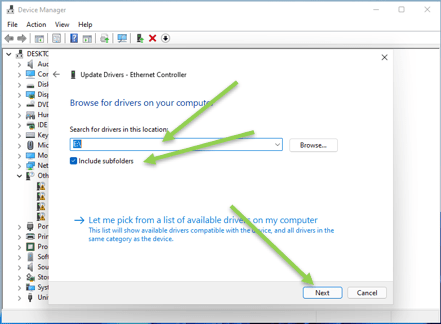
- Right-click on the Ethernet adapter and click on update driver.
- In the update windows driver wizard click on Browse my computer for drivers.
Click on browse and choose the virtio iso file that we have attached earlier as CDROM.
And click on Next.
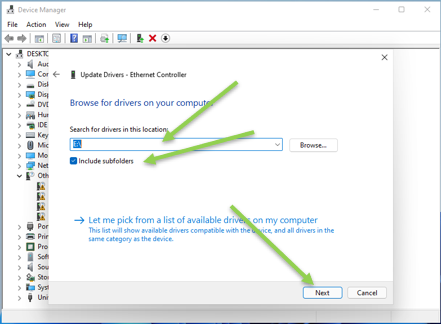
You should see the ethernet adapter driver installed successfully.

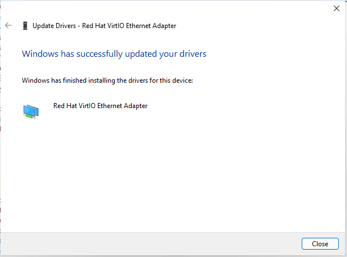
You can also notice that your computer is now connected to the internet.
Follow the same steps for all other drives, except ‘unknown device’, which you cannot install with the virtio driver and it is okay to leave it as it is.
12. Update the Display adapter.
After completing the installation of other devices, you may now go ahead and install the Display adapters.
If you look under Display adapter, you should see Microsoft Basic Display Adapter by default installed, right-click on the driver and click on update driver.
Follow the same steps that you followed for other device drivers and you should see the display driver got updated with Redhat QXL Controller.
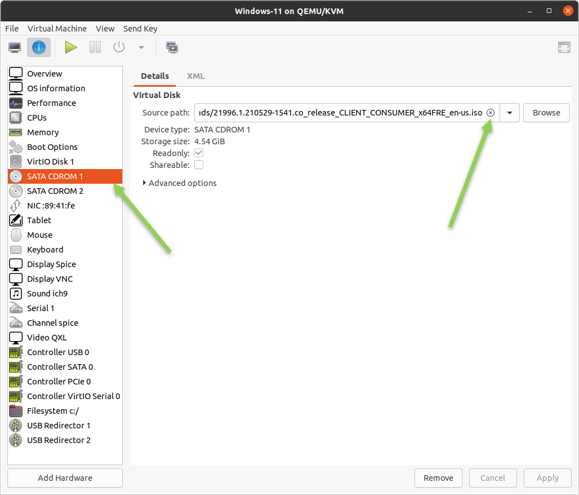
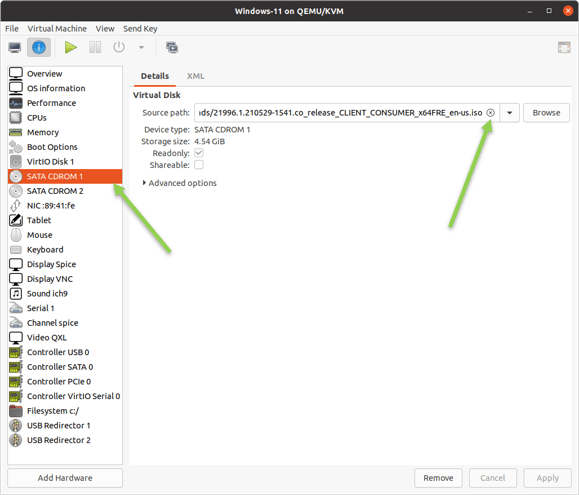
13. Remove the CDROM from the KVM.
After the driver installation, let’s go ahead and remove both the windows 11 iso and virtio driver from the cd rom.
- Select the CDROM1, click on the x icon to remove the file, and click on Apply.
- Follow the same steps for the CDROM2 as well.
How to enable the audio for windows11 in kvm?
Follow the guide here to enable the sound on the windows machine.
That’s it, you have successfully installed the windows 11 operating system on a KVM environment.
How to start using windows 11 in KVM ?
You can start using the windows 11 virtual machine using either virt-viewer or Remote Desktop.
Here are the step by step instructions on how you can do that.
Conclusion.
The windows11 works perfectly fine in KVM with virtio drivers, and I have been using it for quite some time now, haven’t really had any issues with it.
BillMo
Monday 8th of September 2025
I followed this guide and it's great, really the premier guide on the net, but I still had terrible performance for Windows 11. Windows 10 was fine. After months of head scratching research which always led to virtio drivers (not the problem), I found the following (specify the actual CPU, not using passthrough) and/or disabling "core isolation" in windows. You may want to update the list with post install check.
See this link: https://forum.proxmox.com/threads/windows-11-virtual-machine-very-slow-performance.122048/
"If your windows 11 Core isolation -> Memory Integrity is enabled, the performance will be BAD in VM. Try to disable it then reboot VM... Windows 11 VM already use hardware virtualization to create a virtual environment. With Memory Integrity active on the host, you’re essentially running virtualization within virtualization (nested virtualization). This adds extra layers of processing, as the CPU has to manage both the host’s VBS and the VM’s virtualized environment. Not all processors handle this efficiently, leading to performance degradation."
"VBS running status can be checked from running "msinfo32.exe".
BTW I checked this in the Win10 setup, it was off by default.
Also this one fix approaching the problem from QEMU/KVM side:
"As I understand it, when using the "host" CPU type, Windows spends a lot of time applying CPU vulnerability mitigations, but when using a more specific CPU type, these mitigations are disabled."
https://forum.proxmox.com/threads/cpu-type-host-is-significantly-slower-than-x86-64-v2-aes.159107/
Also I found it handy to have the latest "virtio-win-guest-tools" handy in case the drivers (specifically the non-captured mouse) get blasted along the way. https://fedorapeople.org/groups/virt/virtio-win/direct-downloads/
Hope this helps someone, I was dying with my perfect install, this was the final tweak, now it's same as native boots from disk.
Thanks again!
Bill
G C
Tuesday 5th of August 2025
Followed the steps to successfully install Windows 11 in vm (through Virtual Machine Manager) running on Fedora 42 (running on old ThinkPad W540 with 12GB RAM). One of the complete how-to guides I've seen. Thanks so much for sharing this.
While my comment above is real and genuine, the email address I'm providing below (to be able to thank you through this comment) is temporary email. I'm sorry, there is no reason to provide my real email address just to be able to comment here.
Ronald
Wednesday 21st of May 2025
Thanks, Nice Article - I am looking to install on a server where I just have ssh access.
Do you have a CLI version of the article?
Or can you export the config as yaml/xml.
Rudi Salm
Saturday 23rd of March 2024
Hello Saifudheen,
thanks a mil for this great article!
Works well so far - addapted it for Fedora 39.
But this is wrong:
Its not oobe\bypassnro - its oobe\bypassNRO
Would be helpfull to change this.
Thanks
Rudi
Syafril Hermansyah
Tuesday 5th of March 2024
Thank you for this article. I have stuck with "internet Option is grayed out".
My server has PCI-e, so I have used to Firmware Q35 instead of I440FX. And I use firmware UEFI. But everything is done, Win11 running well so far