
When you want to extend your network with 3rd party vendors the best way to do that is by configuring an IPsec tunnel towards the third-party devices. The challenge, however, most of the remote ends may not have the same equipment as you have. Let’s say, for example, you may have a cisco router as your edge router that connects to the internet, and the remote site will be of different vendors. So as a network engineer you should be able to set up an IPsec tunnel between different vendors.
Does IPsec support all the vendors?
IPsec is not a single protocol, it comprises a set of protocols with multiple RFC’s and since it is standard it does support most of the network routers and the firewalls vendors. In this lab, we are going to build a simple IPsec site-to-site VPN network between a cisco router and a pfSense firewall.
I have covered how you can set up an IPsec tunnel between two cisco routers and we are going to use the same configuration that we followed in the previous lab. The difference is that on remote branch 1 we would keep the same router, and on branch2 we would replace the cisco router with a Pfsense firewall.
Read also,
How to Setup IPsec Tunnel between Paloalto and PFsense?
pfSense IPsec Site to Site VPN Setup – Step by Step.
How To Configure IPsec Site-to-Site VPN On Cisco Router?
How To Configure Palo Alto Site To Site VPN Using IPsec?
Below is the topology that we are going to use, I have covered how you can set up this topology in my previous blog, you may follow that and come back here to continue the IPsec lab.

Steps to configure IPsec tunnel between Cisco router and Pfsense firewall.
Configure the branch1 cisco router for IPsec configuration.
Since the topology that we use here are the same as the previous one, we are going to configure the IPsec as the previous lab. So, follow the guide below to configure the IPsec phase1 and phase 2 configuration on a cisco router step by step.
Here is the complete configuration from the cisco router.
Branch1(config)#crypto isakmp policy 5
Branch1(config-isakmp)#hash sha256
Branch1(config-isakmp)#authentication pre-share
Branch1(config-isakmp)#encryption aes 128
Branch1(config-isakmp)#group 2
Branch1(config-isakmp)#lifetime 28800
Branch1(config-isakmp)#exit
Branch1(config)#crypto isakmp key getlabsdone address 2.2.2.2
Branch1(config)#access-list 100 permit ip 10.1.1.0 0.0.0.255 10.2.2.0  0.0.0.255
Branch1(config)#crypto ipsec transform-set Branch1set esp-aes 128 esp-sha256-hmac
Branch2(config)#exit
Branch1(config)#crypto map branch1map 5 ipsec-isakmp
% NOTE: This new crypto map will remain disabled until a peer
        and a valid access list have been configured.
Branch1(config-crypto-map)#set peer 2.2.2.2
Branch1(config-crypto-map)#set transform-set branch1set
Branch1(config-crypto-map)#match address 100
Branch2(config-crypto-map)#set pfs group2
Branch1(config-crypto-map)#exit
Branch1(config)#int g0/0
Branch1(config-if)#crypto map branch1map
Branch1(config-if)#
*Feb 27 14:39:11.605: %CRYPTO-6-ISAKMP_ON_OFF: ISAKMP is ON
Branch1(config-if)#exit
After you configured the above, it’s time to configure the PfSense firewall for the IPsec configuration.
IPsec configuration on the PfSense firewall.
I have already configured the PfSense firewall with the following.
WAN interface with the IP address 2.2.2.2/24 and the LAN side with the IP 10.2.2.1/24.
LAN side is also configured with the DHCP so the end-users on the branch2 would automatically get an IP address.
If you are new to PfSense and don’t know how to set up a PfSense firewall on a GNS3, I have covered the article here on how you can deploy a PfSense firewall in GNS3.
1. Configure the phase1 configuration.
Open the pfSense web GUI and goto VPN>IPsec, click on Add P1, to configure phase 1 of the IPsec configuration.
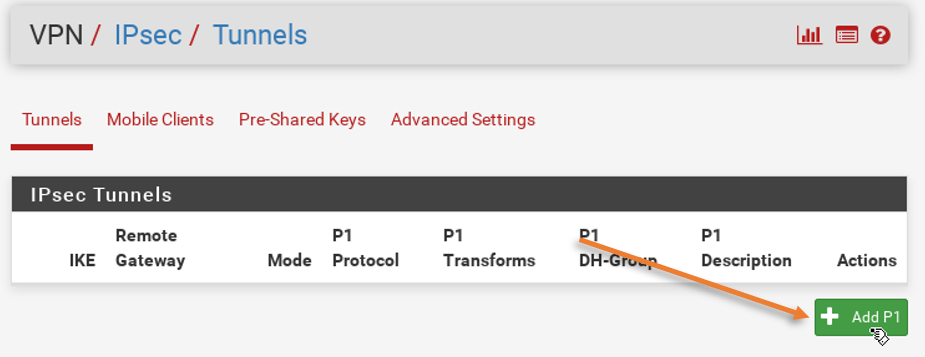

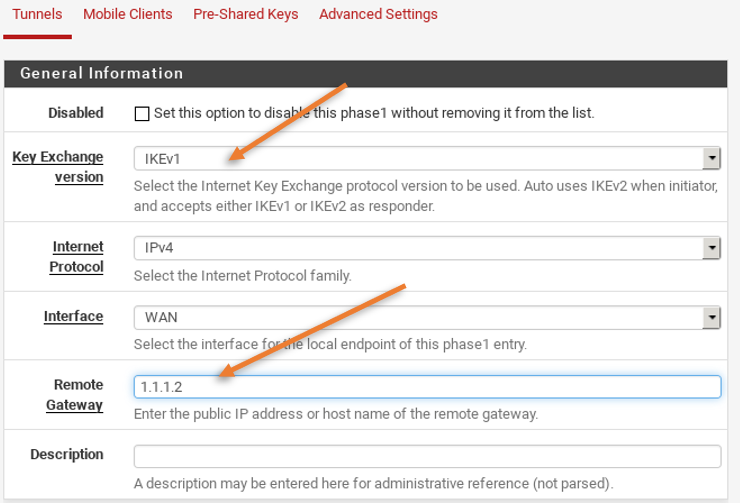
You will now be prompted with the IPsec phase 1 configuration.
- Under General information click on the drop-down of the key exchange version and select IKEv1.
- In remote gateway type 1.1.1.2

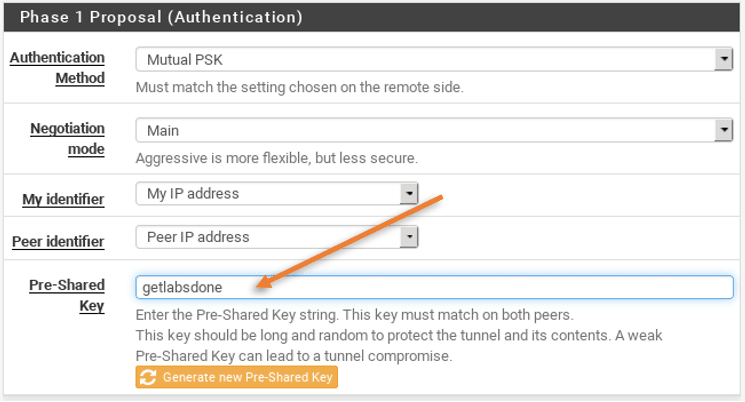
In the Phase1 proposal enter the same pre-shared key that you configured on the cisco router side. Which is getlabsdone. You may also click on the generate new pre-shared key button to create a new key, however, the key that you generated here should be applied on the cisco router side as well.

You can now configure the phase 1 proposal.
- In Encryption, the algorithm chooses AES 128.
- Hash sha256
- And the Defi helmen group as 2.
- Lifetime as 28800

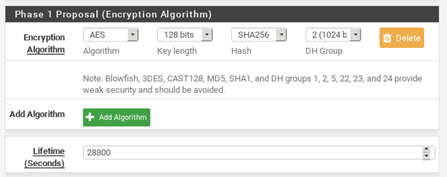
That’s it and click on Save to complete the Phase1 configuration of the Pfsense Ipsec configuration.
2. Phase2 configuration of the IPsec on Pfsense firewall.
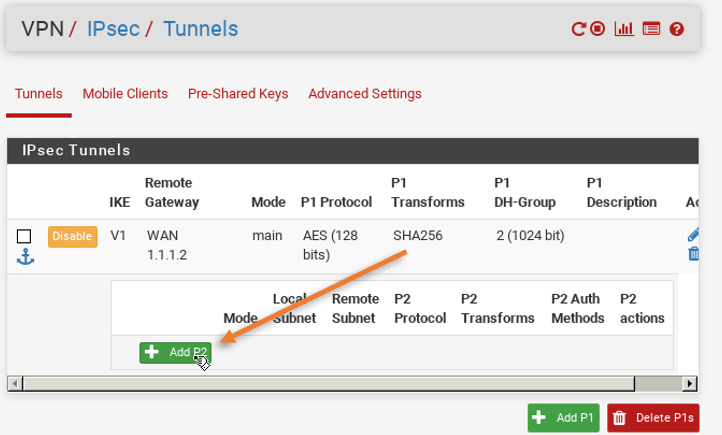
On the same IPsec configuration screen clicks on show phase2 entries.
And click on Add p2 which means adding the phase 2 configuration on the IPsec.

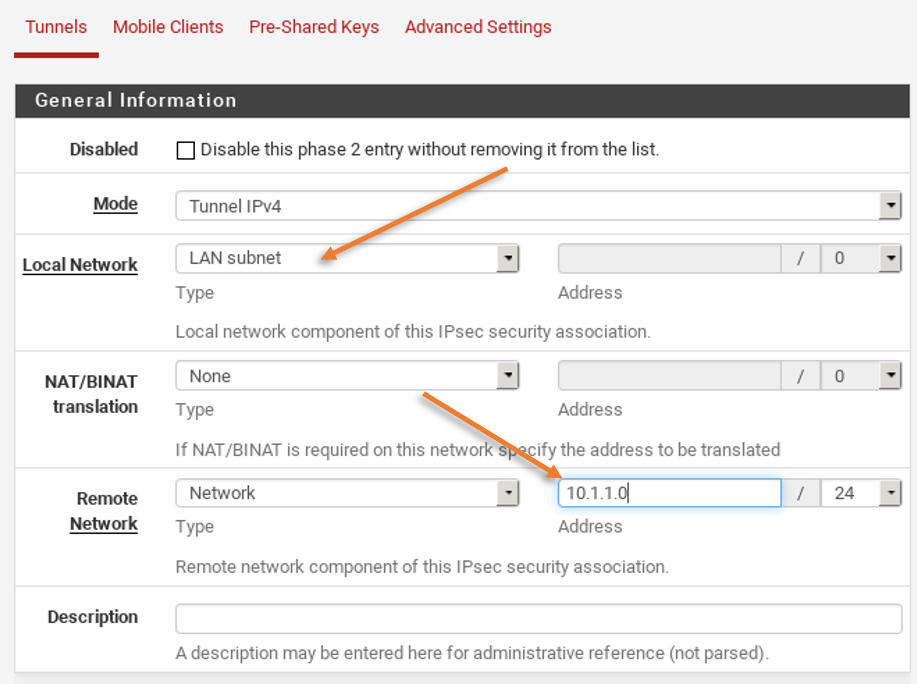
You will be taken to the general information page where you need to configure the remote network,
- The local Network you can leave as a LAN subnet.
- You need to configure 10.1.1.0/24 as the remote network.

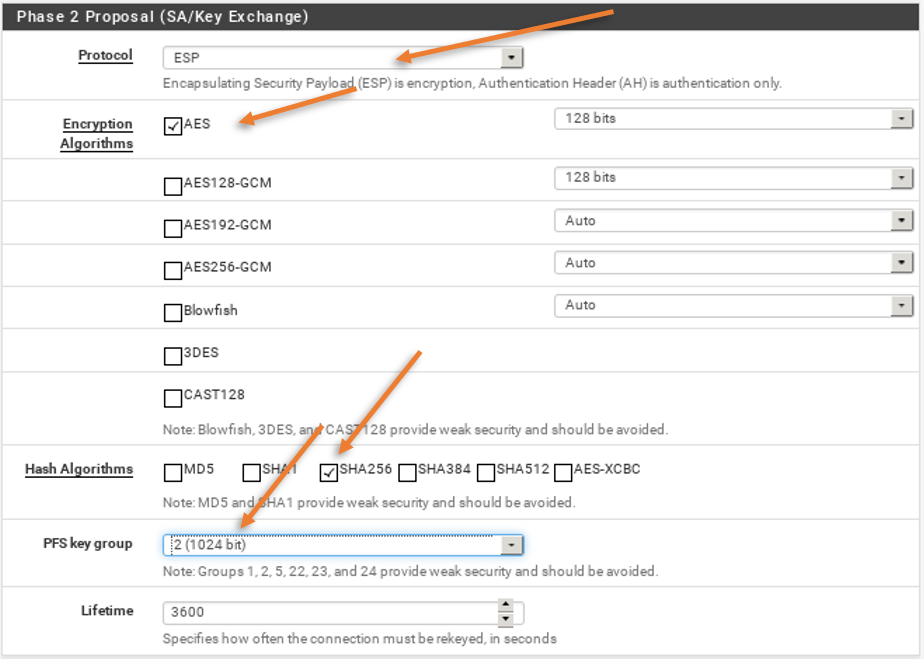
Next is the phase2 proposal.
- Choose the protocol as ESP and Encryption algorithm as AES 128.
- Hash algorithm as sha256.
- Pfs group as group2.
- And finally the lifetime as 3600

Click on Save and apply the configuration.
3. Validate the configuration.
Next, we need to verify whether the IPsec tunnel has been built or not.
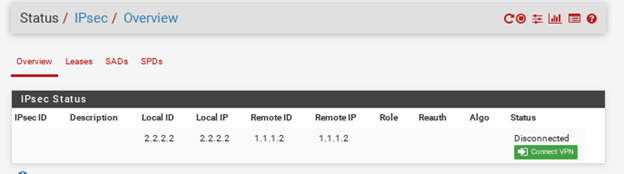
On pfSense click on Status>IPsec.
You will be able to see the IPsec tunnel status, with a button that says Connect VPN. Which means the tunnel is not established yet.
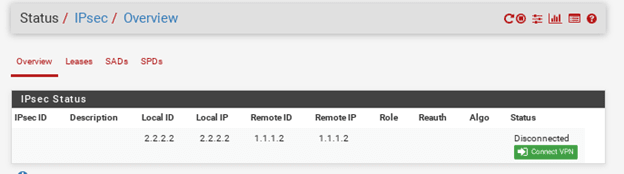
So how do you bring up the tunnel?
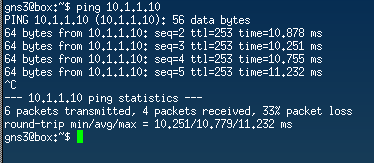
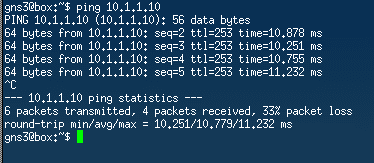
You either click on connect VPN or start sending a packet from either of the remote sites to bring the tunnel up, I am going to send a continuous ping from the remote and see what happens.
I tried to ping the branch1 LAN IP, though the first ping took some time to respond it eventually responded.
Let’s now go ahead and check the status of the IPsec tunnel. As you can see the moment the traffic is initiated the tunnel is established.
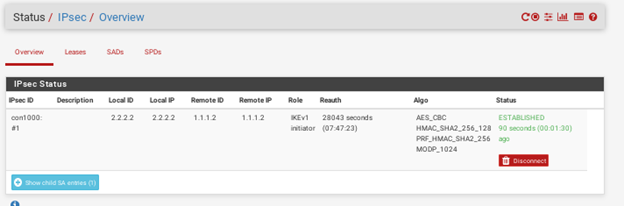

We now know the tunnel is up and the communication is allowed from the branch2 Pfsense firewall to branch1 Cisco router LAN side, how about the Branch1 to Branch2 will it work fine? Let check out.
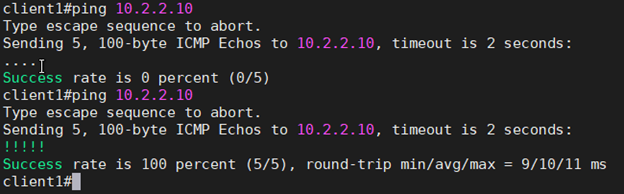
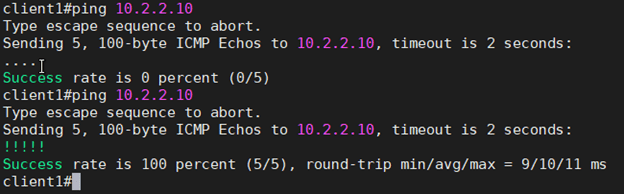
Start pinging 10.2.2.10 from the branch1 LAN side client.


Well, we are not able to ping the branch2 LAN side, what could be the issue and how do we fix this?
We validated that the tunnel is up by checking the tunnel status also sending the ICMP packet from branch2 to branch1, which means the network transport is up, so the communication problem is because the Pfsense is not accepting the packet from the 10.1.1.0/24 network.
Remember we configured the ACL for interesting traffic in the Cisco router?, but we didn’t configure them on the Pfsense side.
To configure that, let’s check the logs first.
Click on Status>System logs.
Click on Firewall, and you should be able to see that the traffic from branch1 (10.1.1.10) is blocked by the firewall.
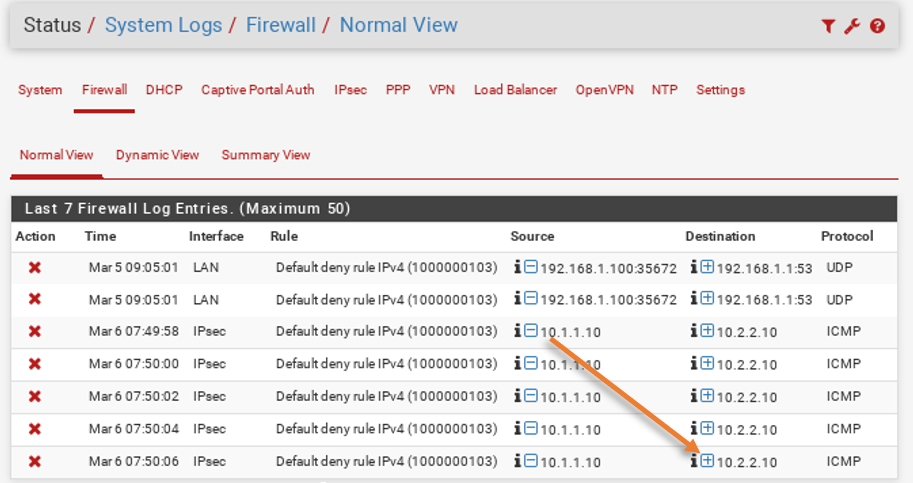
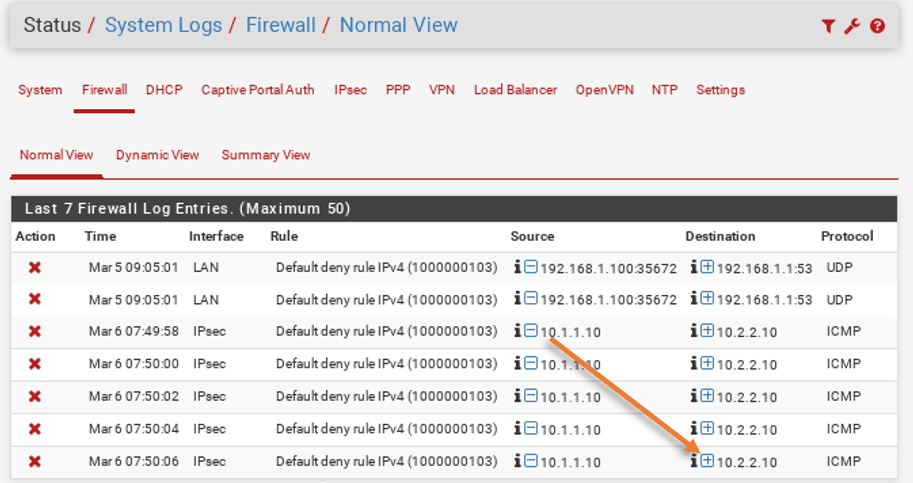
Click on the plus icon on the destination to add the pfsense firewall easy rule.
Click on Confirm.

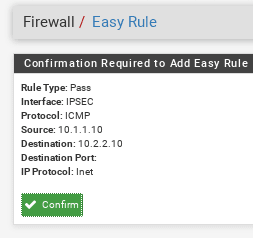
Now the ICMP communication between the branch1 to branch2 will be allowed, however in a real-life scenario, allowing just ICMP will not help, so it is either recommended to allow all the protocol between site to site traffic or if you know the list of specific protocols and ports add them here as well.
Moreover, we just allowed only ICMP traffic only between single hosts (10.1.1.10 to 10.2.2.10) You will need to modify to use the entire LAN subnet which is /24.
For now, I am going to modify the policy to allow all the traffic.
The easy rule that we just added will be in the IPsec rules.
You can click on edit on the same rule.


And change the protocol from ICMP to any.

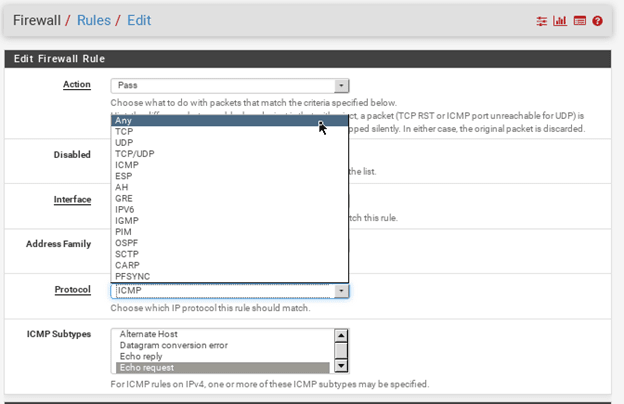
And then click on SAVE and apply the configuration.
Let’s see if we can start the communication between branch1 to branch2 now.
After I modified the policies I am now able to communicate between branch1 to branch2 as well, the first ping is before the policy change and the second is after modifying the policy.
Yus
Friday 30th of May 2025
Thank you for the article. Noticed a typo: Here you are creating a transform-set "Branch1set" from capital letter: Branch1(config)#crypto ipsec transform-set Branch1set esp-aes 128 esp-sha256-hmac
Here you are assigning this transform-set to the crypto-map, but without the capital letter. Branch1(config-crypto-map)#set transform-set branch1set.
By they way, for me this guide does not work for some reason with Cisco 881 (Cisco IOS Software, C880 Software (C880DATA-UNIVERSALK9-M), Version 15.3(3)M2) and pfsense 2.7.2.
Phase 1 and phase 2 are established which is seen in pfsense and in cisco, but ping from cisco to pfsense ip (ping 192.168.255.4 source 172.20.0.1) (vice versa as well) does not work. Cisco just does not want to encapsulate packets which is seen in "show crypto ipsec sa": #pkts encaps: 0. Though ACL is hit: seen in "show access-lists": 10 permit ip 172.20.0.0 0.0.255.255 192.168.255.0 0.0.0.255 (14 matches)
Spent a lot of time and simplified the lab to a minimum but so far did not succeed. Debug logs on cisco do not show anything during ping. Will continue my troubleshooting...
Borys
Tuesday 22nd of October 2024
Why You set remote ID/IP on PfSense side to 1.1.1.2 when on the diagram Cisco Branch Router WAN IP is 1.1.1.1?
Saifudheen Sidheeq
Saturday 2nd of November 2024
@Borys, thanks for the comment, my bad, corrected it now :)