The Sophos firewall is a powerful next-generation firewall commonly used by enterprise networks. As a network administrator or engineer, you may want to set up a test environment where you can make changes without impacting the production network. The best and cost-effective way to do this is by setting up a virtual lab.
In this lab, we will take a look at installing the Sophos firewall in VMware Workstation. After installation, we will have a virtual Sophos firewall and test the network by initiating traffic from the client virtual machine to the internet.
Since VMware Workstation is not free, I have also set up a Sophos firewall in a virtual environment using the VirtualBox hypervisor. so for those who are interested, you may check out the article here.
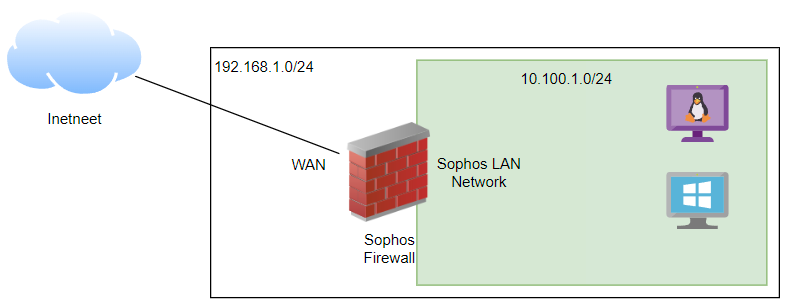
The topology I will work on below requires configuring two interfaces: one for the WAN connection and another for the LAN, where our virtual machines are connected.
We would use a bridge interface for the WAN network and the LAN Segment network in VMware for the LAN.
The WAN Network (192.168.1.0/24) is my actual LAN network and we would setup LAN with IP subnet of 10.100.1.0/24
Prerequisites:
- Before proceeding, you need to have VMware Workstation installed. You can download it from here.
- Download the Sophos firewall image for VMware which we will look next.
1. Download sophos firewall image for VMware workstation.
You can go to this link and click on download on “Virtual Installers: Firewall OS for VMware.”
You will be asked to fill in some details and once you submit, you can download the software onto your machine.
The file is in Zip format, Once downloaded extract the file in the download directory or the location of your choice.
Once done, you will be able to see all the files from the zip folder as shown below.

2. Import the sophos firewall vm to vmware workstation.
To import the firewall into the VMware environment, double-click on the sf_virtual.ovf file, and you will be prompted to enter some details regarding the virtual machine.
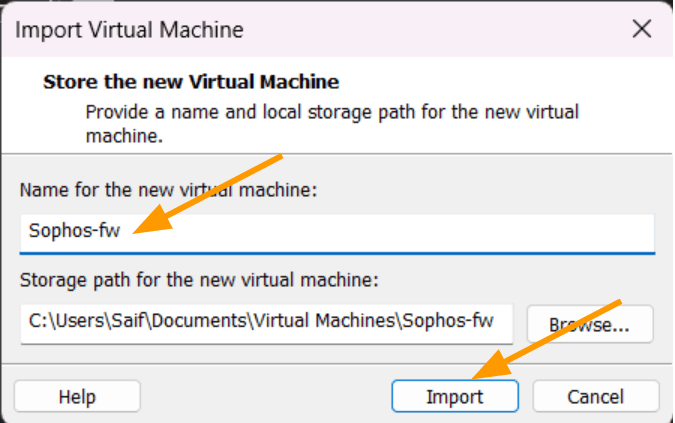
Enter the name and storage path for the Sophos virtual machine and click on import.

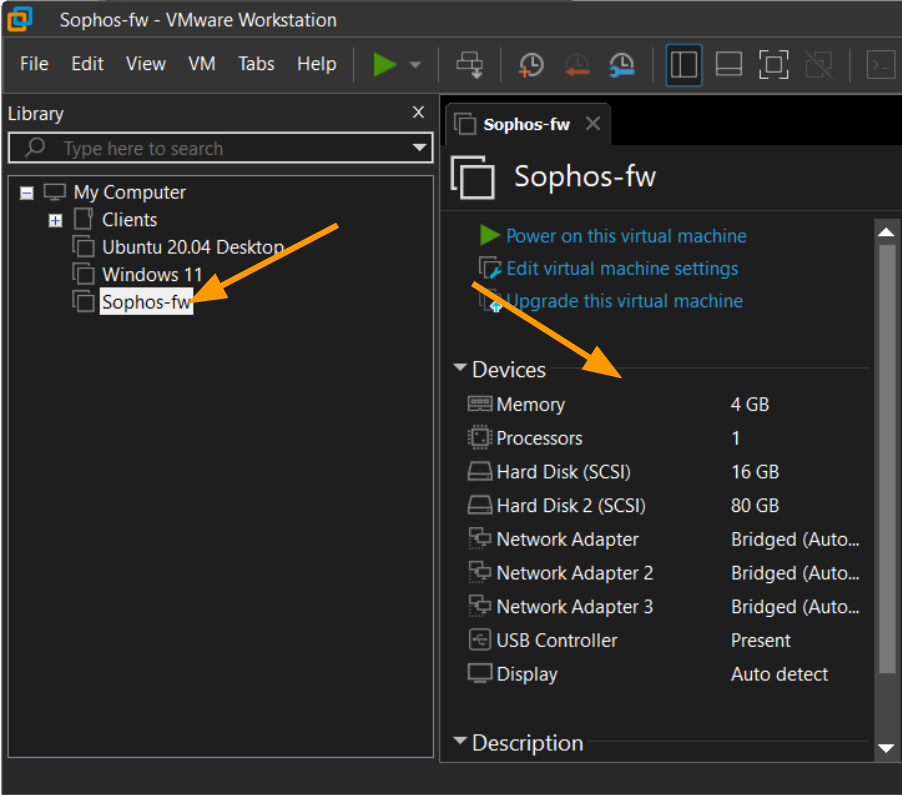
You can now see the sophos firewall has successfully imported into the vmware workstation pro.
As you take a closer look at the Sophos firewall, you’ll notice that it comes pre-configured with 4GB of RAM, 1 CPU, and 3 network interfaces.
For this lab’s purpose, we only require the WAN and LAN networks to simplify the setup process and focus on the task at hand.

3. Setup Sophos LAN network in VMware workstation.
As I want to connect my VM to isolate it from my LAN network including the host machine, I could choose something called LAN segment.
If in case, you want to bring the host machine as well to the sophos LAN network, you need to choose a host-only adapter, that way the Virtual machine and the host will be on the same network.
I have explained in detail how to choose each network in different scenarios in my previous article, you may check them out if you are interested.
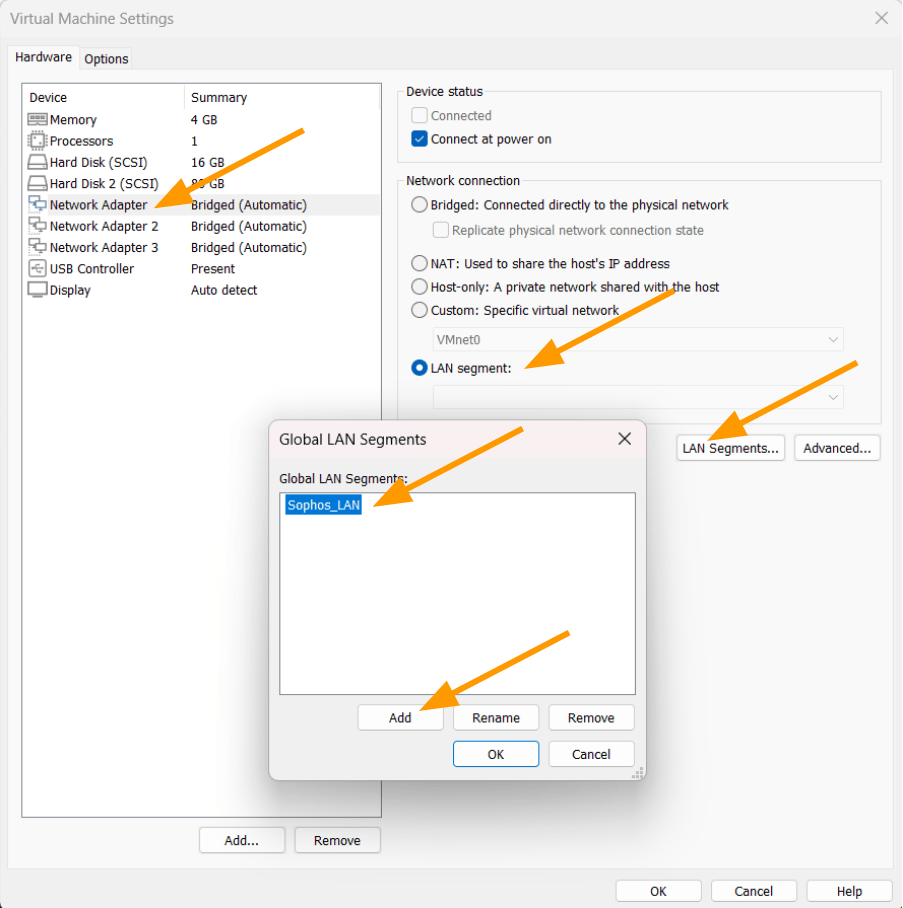
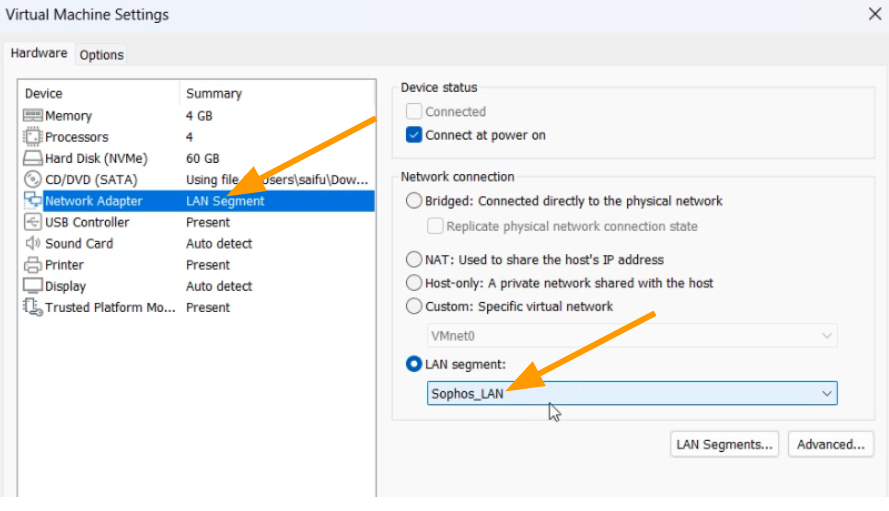
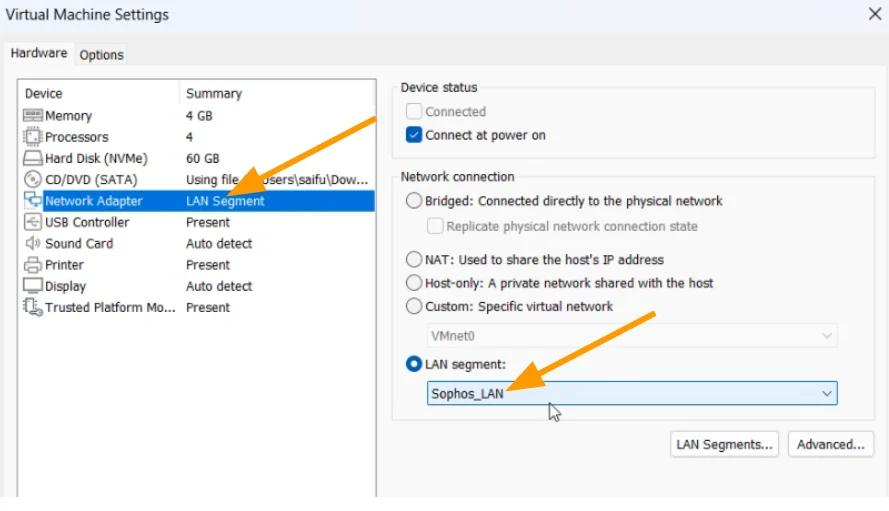
Right click on the sophos firewall vm and click on settings.
- Select the first network adapter as it is the Sophos virtual LAN adapter.
- Choose LAN segment.
- From there click on LAN Segments.
- Click on Add to add a new LAN segment for sophos.
- Add the name of your choice and click on Ok.
- From the LAN segment drop down choose the newly created LAN segment.

4. Setup the WAN interface for Sophos Firewall.
The WAN network is where you configure the internet for the firewall.
The common method to connect the Sophos virtual firewall to your host LAN network, you need to choose a bridge interface.
Sometimes the bridge interface may not work well, you may check out the article here to troubleshoot the issue.
If the troubleshooting didn’t go well, then the only option you have is the NAT network.
You can check out the article here regarding the VMware workstation different network types.
Remove the third interface.
As we are not configuring any other network other than WAN and LAN, we can remove the third interface. As you can see, we now have only two interfaces.


Note: In case if you are planning to to setup a DMZ network using sophos in vmware workstation you can keep the third network as well.
5. Validate the Sophos firewall network configuration.
You may now power on the Sophos virtual machine.
before we proceed further, we need to ensure that whatever the configuration we just made has been applied and it is working the way it should. So let’s go ahead and verify the LAN and WAN network configurations.
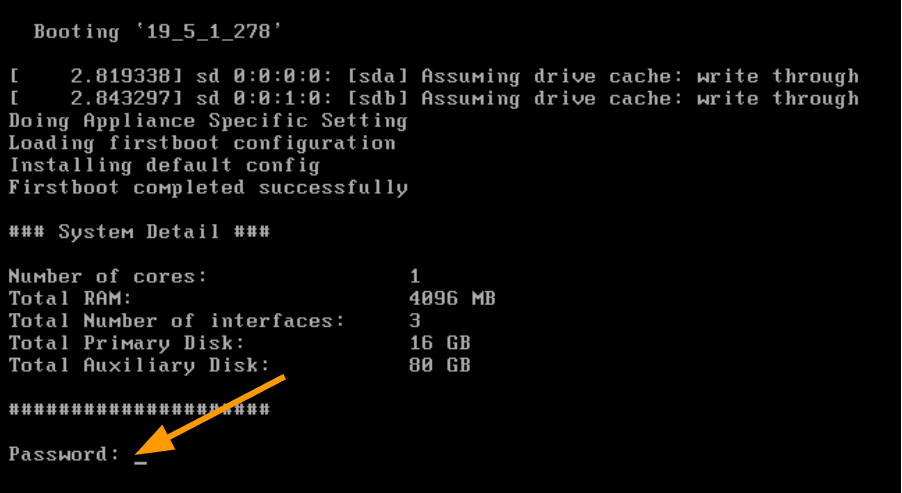
After a few seconds, you will be getting a console screen where it is prompting you to enter the password.
Enter the password as admin and hit enter.

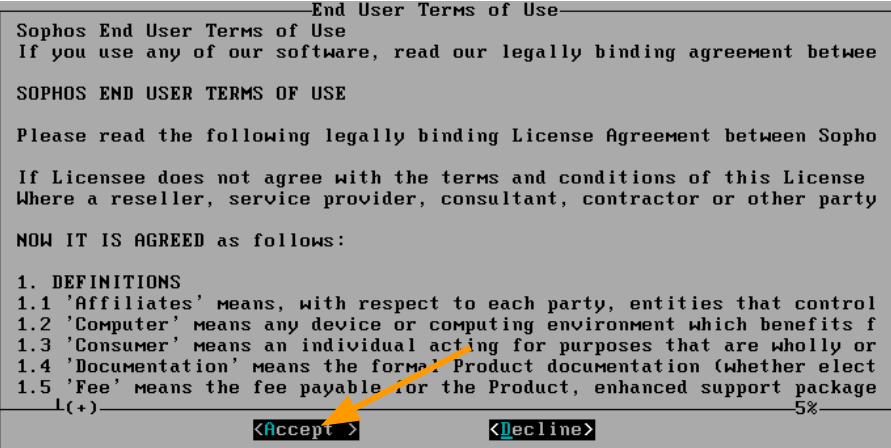
You will be asked to accept the licence agreement, use the tab key to switch the menu and accept the licence agreement.

After a few seconds, you will get below screen with options.
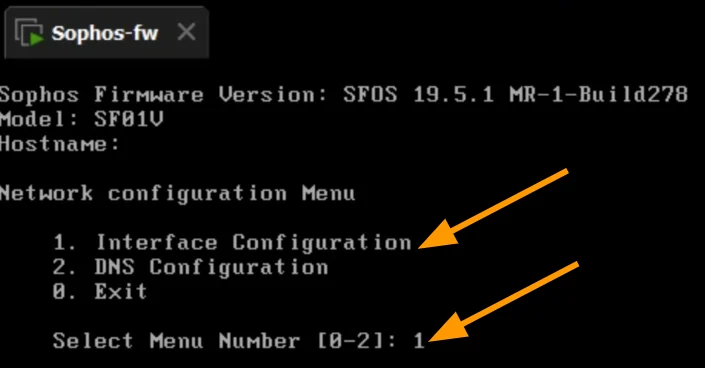
To see the network for both LAN and WAN, you may type 1 and hit enter.

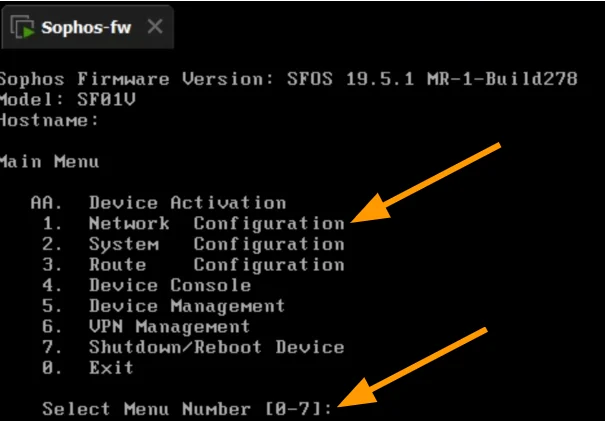
In the next network configuration menu, choose interface configuration by typing number 1 and hit enter.

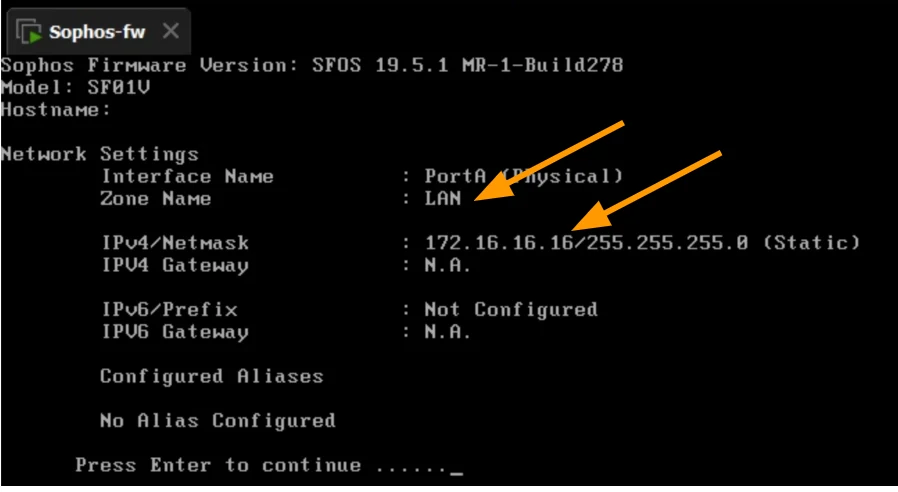
The first network interface that we get to configure is the LAN, as you can see, it has by default got an IP address 172.16.16.16/24.
You may press enter to move into the WAN interface menu.

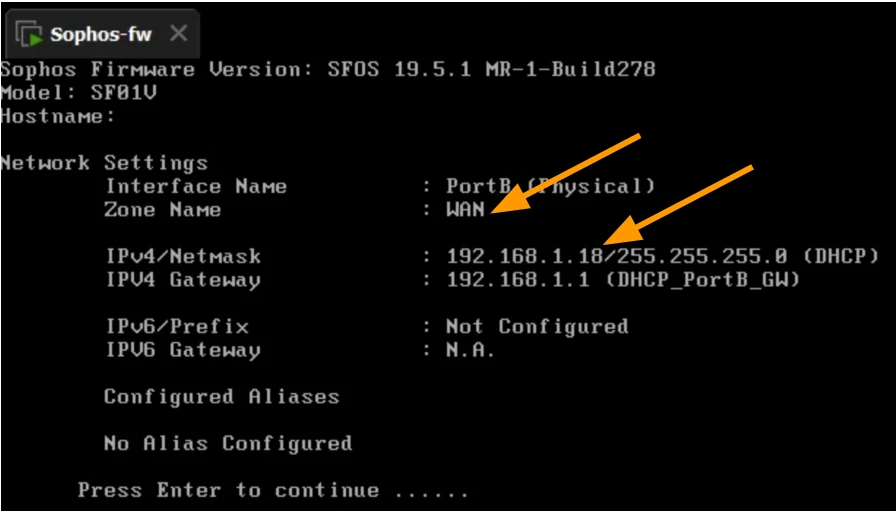
The second interface is the bridge interface that is connected to our host machine LAN network.
As you can see, my local router automatically assigned 192.168.1.18 IP address on the WAN side which is good.
Press Enter to proceed

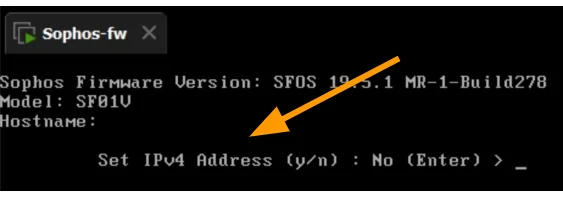
If you would like to change any of the WAN or LAN IP address you can say yes to do so by typing ‘y’ otherwise hit enter.
Since I will proceed with the IP change in the GUI, I am leaving the default and hit enter to proceed, here Enter means no.

6. Configure the Client Virtual Machine network.
We have installed and configured the Sophos firewall in VMware workstation, but we have to do some more configuration.
First, I need to finish the initial setup wizard of the sophos firewall and second configure the LAN side IP address according to our lab.
So to access the sophos firewall GUI, you need to configure the virtual machine network to be part of the same sophos lan segment network.
I have already installed windows11 and ubuntu on my VMware workstation pro, and I am going to use both these virtual machines to test the network.
Right click on the virtual machine and click on settings.
In the network adapter, choose LAN Segment, and from the drop down choose Sophos_LAN that we created earlier.
And then click on Ok.
I have done the same step on both the virtual machines.
Power on the virtual machine.
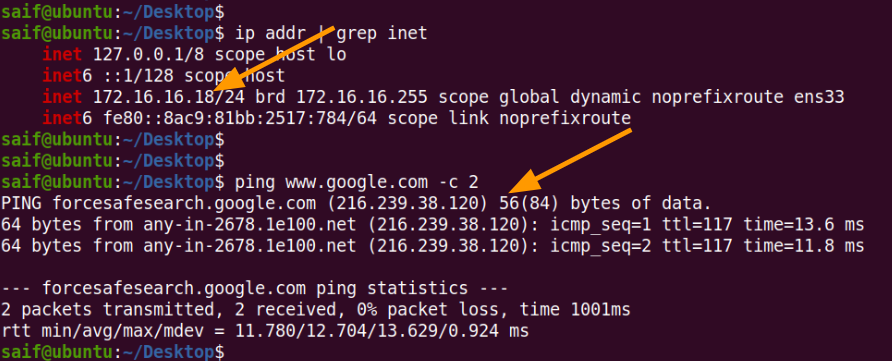
After I powered on the virtual machine, as you can see, I have got an IP address from the sophos LAN side which is 172.16.16.18, I can also ping google.com, which means, sophos by default created a policy as well as NAT to to allow the traffic out.

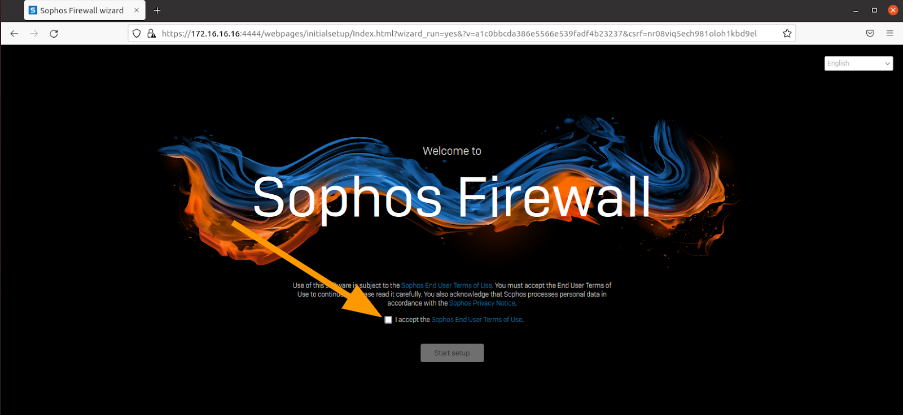
7. Complete sophos initial setup wizard.
Open your browser in your VM, and enter the url as follows https://172.16.16.16:4444
Ignore the security warning, and accept the licence agreement and click on start setup.

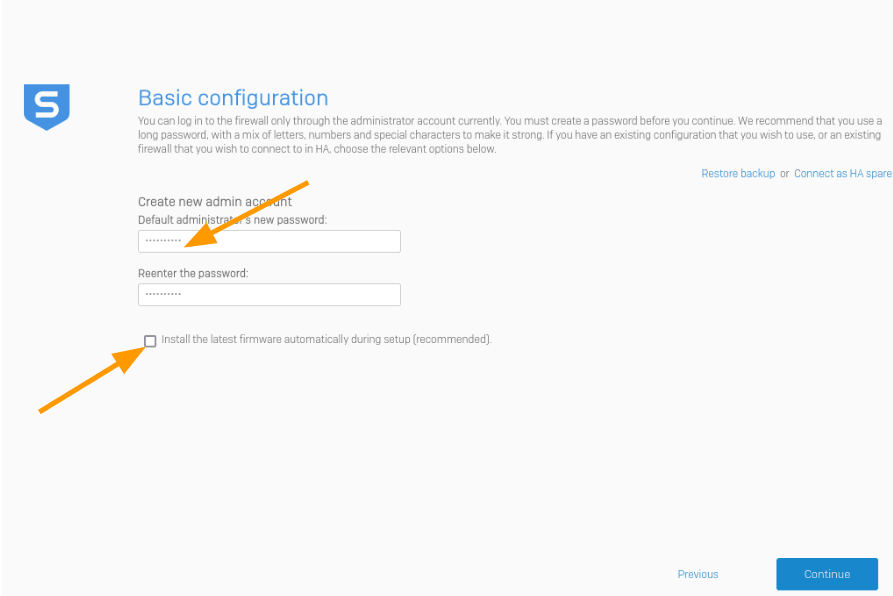
Setup the admin password and continue.
Note: You should not select the ‘install the latest firmware automatically during setup option’, as it will delay the setup process during the installation. So uncheck this for now.

Choose the timezone and continue.
You will be asked to select the timezone of your choice, select the timezone and click on continue.
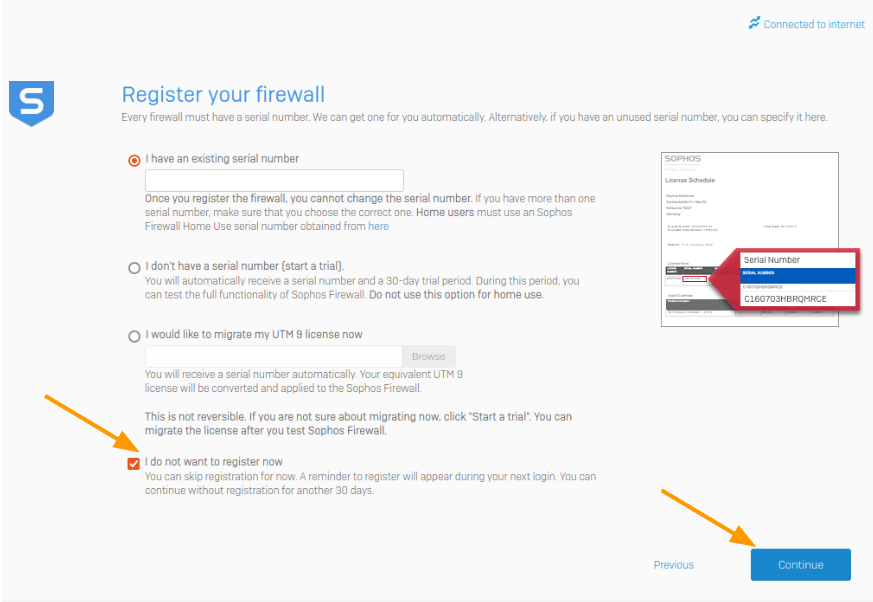
Skip the registration.
Since this installation is for the lab and I am just evaluating the product, I will check the option that says I do not want to register now and click on continue.
In case, if you have a registration key, you may register it, for me I am not doing the registration.

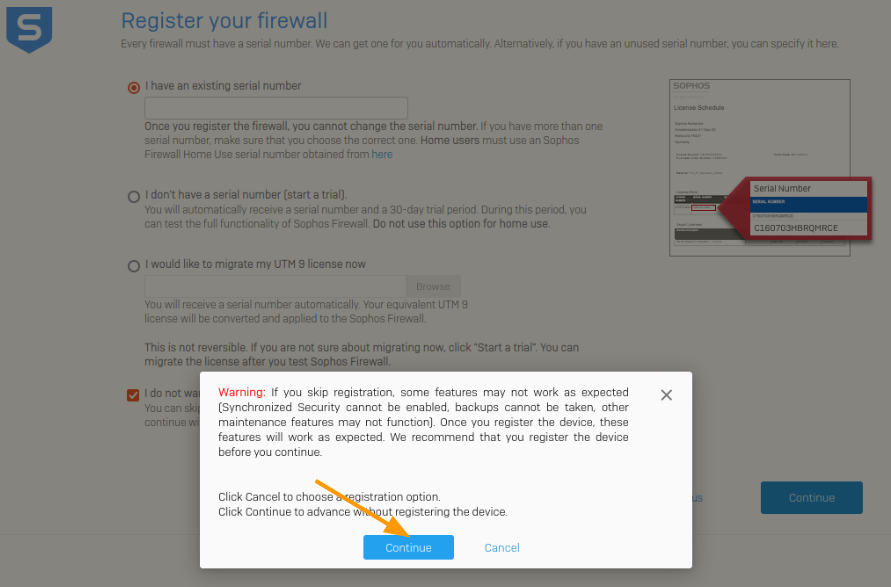
You will get a warning, if you continue without registering, you may click on continue in it.

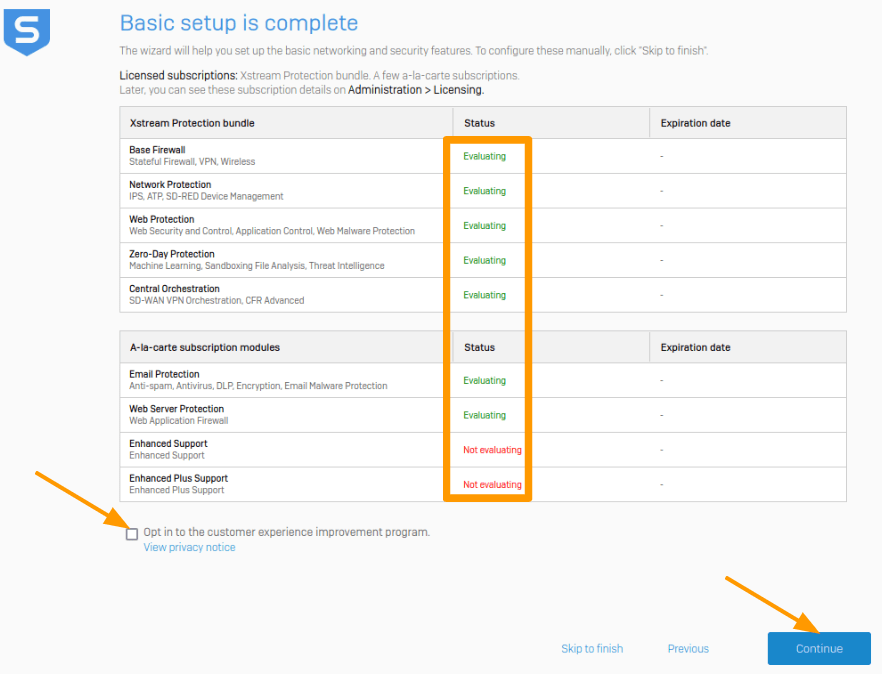
You will get an option that says the basic setup is complete and there is an option to Opt into the customer experience, for which I have unchecked for now.
Click on continue.

8. Setup the LAN network.
Though we could change the LAN network using CLI, we are going to change that to our network using the GUI.
In the gateway, choose This firewall (route mode)
In the LAN IP address enter the IPaddress from our range which is 10.100.1.1 and this will act as a gateway for the virtual machine.
You may also enable the DHCP option as well.
In the DHCP lease settings, I have reserved the first 20 IP addresses for static configuration rest is for the DHCP assignment.
And click on Continue.


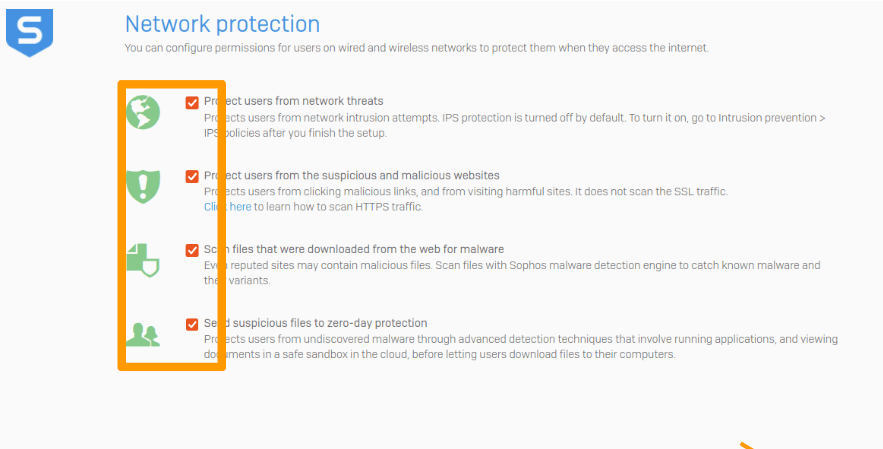
In the network protection, you may check the desired option.
I am selecting everything.
Click on continue.

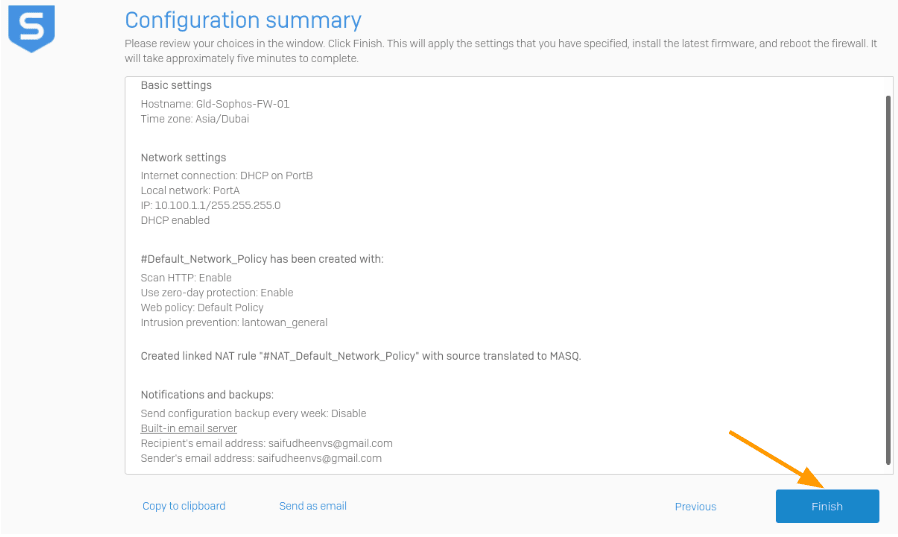
You will get the summary of the configuration, you may click on finish here.

9. Test the VM network with new IP.
From the virtual machine, you may continue to ping 172.16.16.16 and as soon as you lose the connectivity you know that the LAN side IP address of the firewall is now changed.
You may disable the network on the Client virtual machine and enable it back.
Post which you will get a different Ip address.
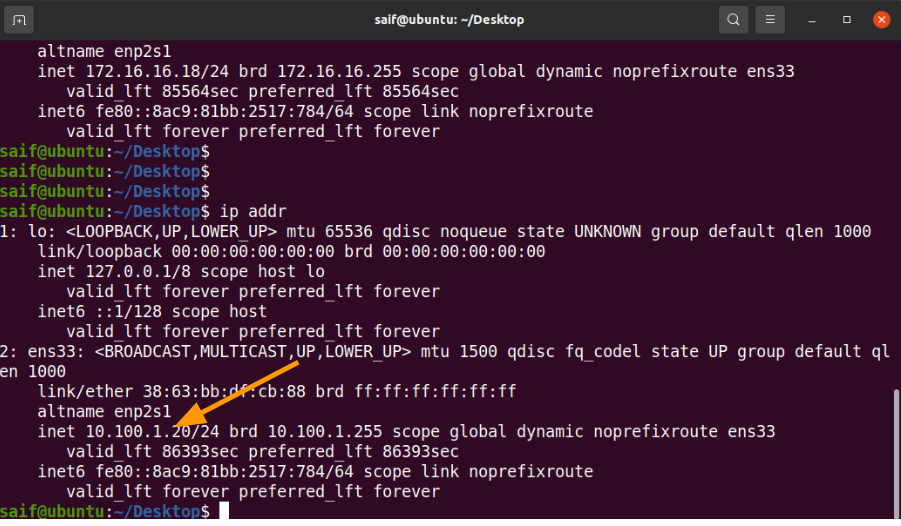
As you can see, I got the IP address 10.100.1.20 from the sophos firewall DHCP service.

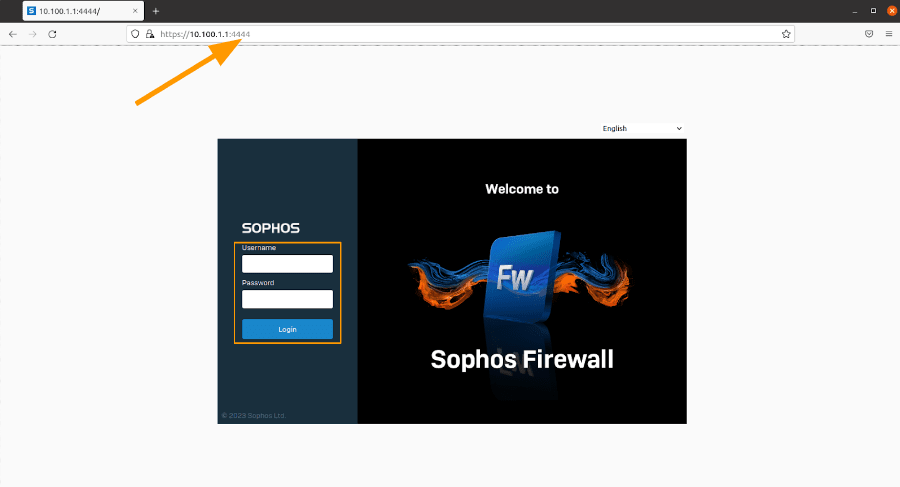
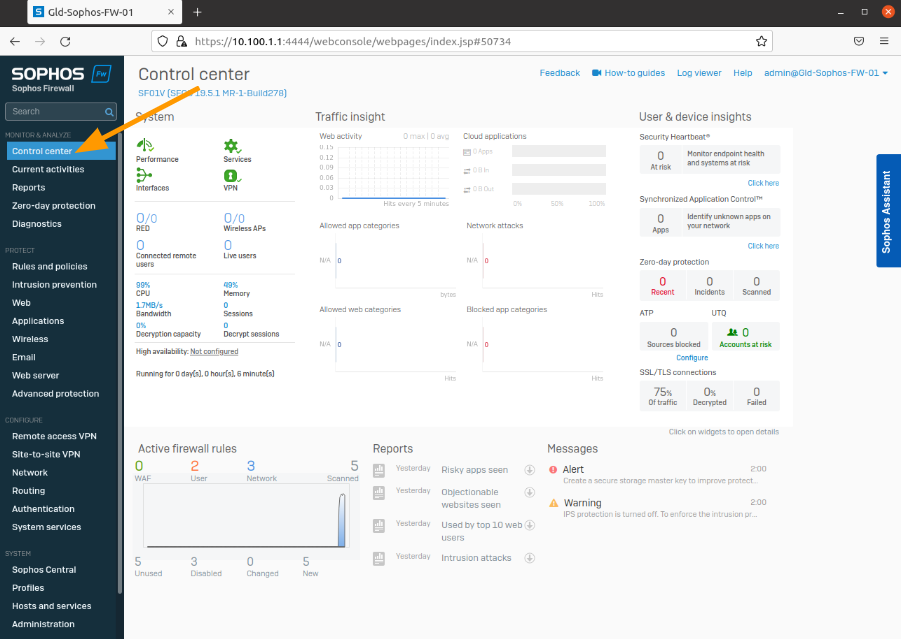
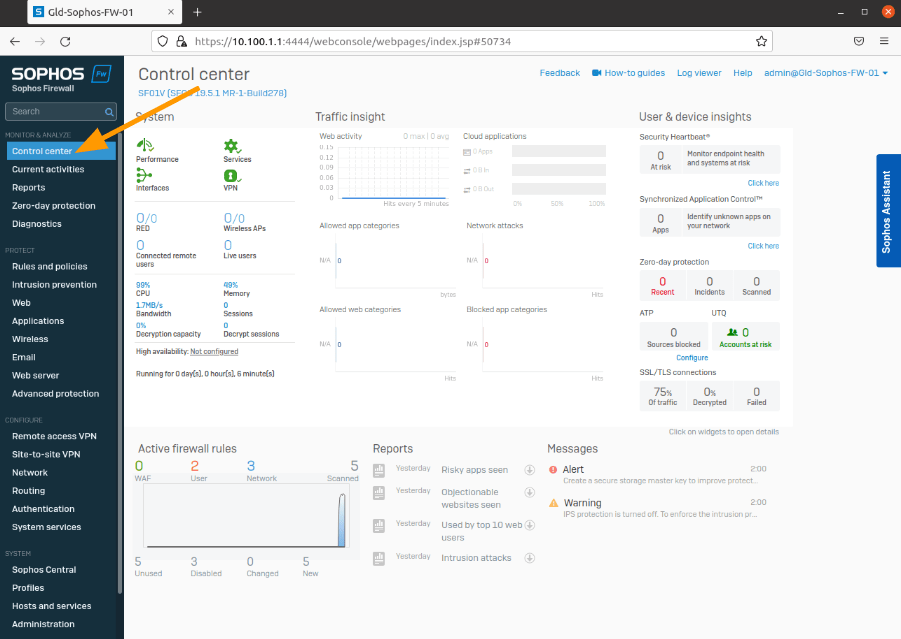
You may wait for 5 mins and try to access the sophos firewall web GUI with the url https://10.100.1.1:4444
You will be asked to enter the username which is admin and the password you have set during the initial setup and click on login.

Here you can see the sophos firewall home page where everything looks good at the moment.
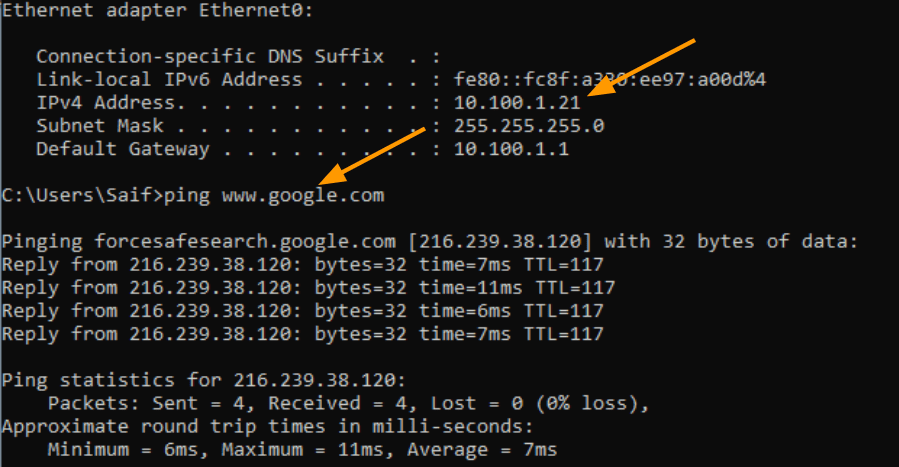
Remember we had another VM which was Windows 11, let’s check that virtual machine as well.
As you can see, we got the second IP address from the dhcp scope which is 10.100.1.21 and I can also ping the google as well.