
The VMWare Workstation pro is one of the popular virtualization software out there. it is free for personal use, and if you would like to know how you can get a copy of a free VMware workstation, check out the article here.
In my previous articles, I have created multiple blog posts related to how you can install client, server operating systems, firewalls, and so on in the VMWare workstation.
When you configure a VM in the VMWare workstation, you would likely get confused when you see multiple network types on the VMWare workstation, and you don’t know what to choose from.
In this blog, we will look at each network type used by the VMware workstation and see in what scenarios these network types fit best.
What are the different networks in the VMware workstation?
There are multiple network types supported by VMware workstation pro. You must understand each network type to manage your VM’s easily. By default, when you install VMWare Workstation, it will set up three network types.
- Nat Networks – Use virtual adapter Vmnet8
- Bridge network – Use virtual adapter Vmnet0.
- Host-only network – Use virtual adapter Vmne1.
- However, there is a fourth one called LAN segment, which we can create later on, we will discuss that as well.
To see the list of network connections in the VMware workstation, You could go to Edit -> Virtual Network adapter->Change Settings.
Here you will see the list of VMware virtual network interfaces.

We have covered the installation of Firewall VMs in VMware workstation with different network types, you may check out the article below to understand more about it.
How to Install OPNsense on VMware Workstation?
How to Install PfSense on VMware Workstation?
How to Configure Port Forwarding in VMware Workstation?
How to FIx VMware Bridged Network Not Working in Windows?
How to Install Windows 11 on VMware Workstation? | with TPM and SecureBoot.
1. VMware Workstation NAT networks.
VMware Nat Network is a common network type that you get when you spin up a new VM. In most cases, you would want your VM to go out to the Internet securely, and you don’t need any other hosts in your LAN network, nor your host machine could talk to the Virtual machines. Then this Nat network will be ideal for you. However, the VM can talk to the LAN hosts.
When you configure VM to be part of Nat networks, it will assign an interface called VMNet 8 as the adapter. You can change that, however.
It translates the VM’s IP address into the host IP address, so when you initiate traffic from the VM, The VM IP address will get translated to the host IP address and go out of your host machine. With a NAT network, the VM can easily go out to the Internet. From the host, if you were to do a packet capture. You will see the traffic actually coming from the host machine itself, instead of the VM IP address.
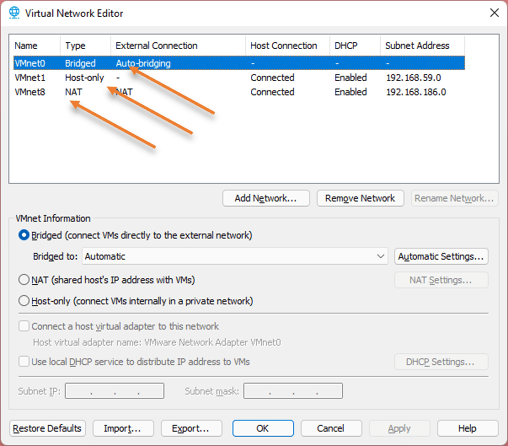
If you look into the Virtual Network Editor you will notice,
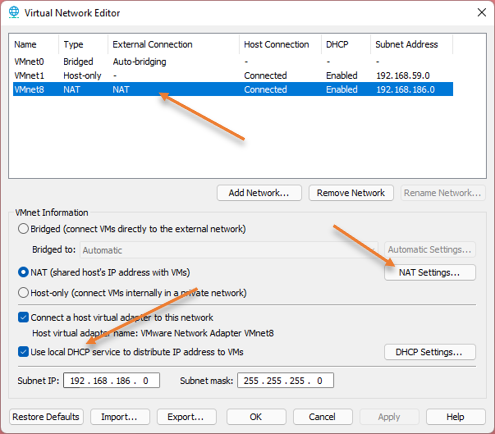
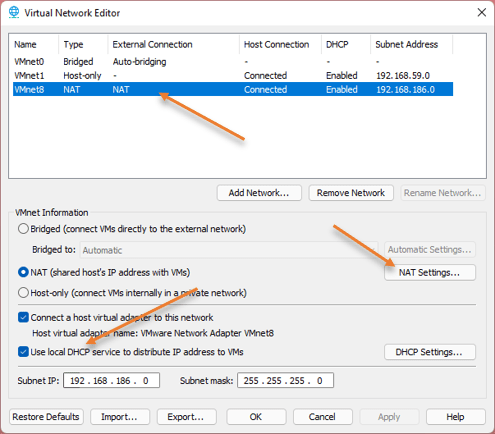
- VMnet8 is configured as NAT.
- It uses a DHCP service, meaning any client that connects to the NAT network will get the Ip address from the VMware DHCP service.
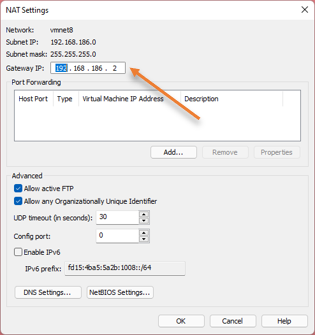
- Click on NAT settings, you will see the IP address configured with 192.168.186.0/24, The Gateway IP address is configured on the VMnet8 adapter on the host.

Let’s spin up a VM in the NAT networks and see how it behaves.
I have started two VM’s, one is windows 11, and another is an Ubuntu server.
Windows 11 got an IP address 192.168.186.129, and Ubuntu got 192.168.186.130.
As you can see from below capture from the VM, the VM in the Nat network can;
- Communicate with the other VM’s in the NAT network.
C:\Users\Saif>ipconfig

Windows IP Configuration


Ethernet adapter Ethernet0:

   Connection-specific DNS Suffix  . : localdomain
   Link-local IPv6 Address . . . . . : fe80::5063:538b:d510:35cf%11
   IPv4 Address. . . . . . . . . . . : 192.168.186.129
   Subnet Mask . . . . . . . . . . . : 255.255.255.0
   Default Gateway . . . . . . . . . : 192.168.186.2

C:\Users\Saif>ping 192.168.186.130 -n 2

Pinging 192.168.186.130 with 32 bytes of data:
Reply from 192.168.186.130: bytes=32 time<1ms TTL=64
Reply from 192.168.186.130: bytes=32 time<1ms TTL=64

Ping statistics for 192.168.186.130:
    Packets: Sent = 2, Received = 2, Lost = 0 (0% loss),
Approximate round trip times in milli-seconds:
    Minimum = 0ms, Maximum = 0ms, Average = 0ms

C:\Users\Saif>
- Talk to the host machine.
C:\Users\Saif>ping 192.168.0.10 -n 2

Pinging 192.168.0.10 with 32 bytes of data:
Reply from 192.168.0.10: bytes=32 time=9ms TTL=128
Reply from 192.168.0.10: bytes=32 time<1ms TTL=128

Ping statistics for 192.168.0.10:
    Packets: Sent = 2, Received = 2, Lost = 0 (0% loss),
Approximate round trip times in milli-seconds:
    Minimum = 0ms, Maximum = 9ms, Average = 4ms

C:\Users\Saif>
- Go out to the Internet.
C:\Users\Saif>ping www.google.com

Pinging www.google.com [142.250.76.68] with 32 bytes of data:
Reply from 142.250.76.68: bytes=32 time=25ms TTL=128
Reply from 142.250.76.68: bytes=32 time=17ms TTL=128
Reply from 142.250.76.68: bytes=32 time=19ms TTL=128
Reply from 142.250.76.68: bytes=32 time=16ms TTL=128

Ping statistics for 142.250.76.68:
    Packets: Sent = 4, Received = 4, Lost = 0 (0% loss),
Approximate round trip times in milli-seconds:
    Minimum = 16ms, Maximum = 25ms, Average = 19ms

C:\Users\Saif>
- Talk to the other hosts in my LAN networks.
PS C:\Users\Saif\Desktop> ipconfig

Windows IP Configuration


Ethernet adapter Ethernet0:

   Connection-specific DNS Suffix  . : localdomain
   Link-local IPv6 Address . . . . . : fe80::5063:538b:d510:35cf%11
   IPv4 Address. . . . . . . . . . . : 192.168.186.129
   Subnet Mask . . . . . . . . . . . : 255.255.255.0
   Default Gateway . . . . . . . . . : 192.168.186.2
PS C:\Users\Saif\Desktop> ping 192.168.0.50 -n 2

Pinging 192.168.0.50 with 32 bytes of data:
Reply from 192.168.0.50: bytes=32 time=46ms TTL=128
Reply from 192.168.0.50: bytes=32 time=54ms TTL=128

Ping statistics for 192.168.0.50:
    Packets: Sent = 2, Received = 2, Lost = 0 (0% loss),
Approximate round trip times in milli-seconds:
    Minimum = 46ms, Maximum = 54ms, Average = 50ms
PS C:\Users\Saif\Desktop> ping 192.168.0.111 -n 2

Pinging 192.168.0.111 with 32 bytes of data:
Reply from 192.168.0.111: bytes=32 time<1ms TTL=128
Reply from 192.168.0.111: bytes=32 time<1ms TTL=128

Ping statistics for 192.168.0.111:
    Packets: Sent = 2, Received = 2, Lost = 0 (0% loss),
Approximate round trip times in milli-seconds:
    Minimum = 0ms, Maximum = 0ms, Average = 0ms
PS C:\Users\Saif\Desktop>
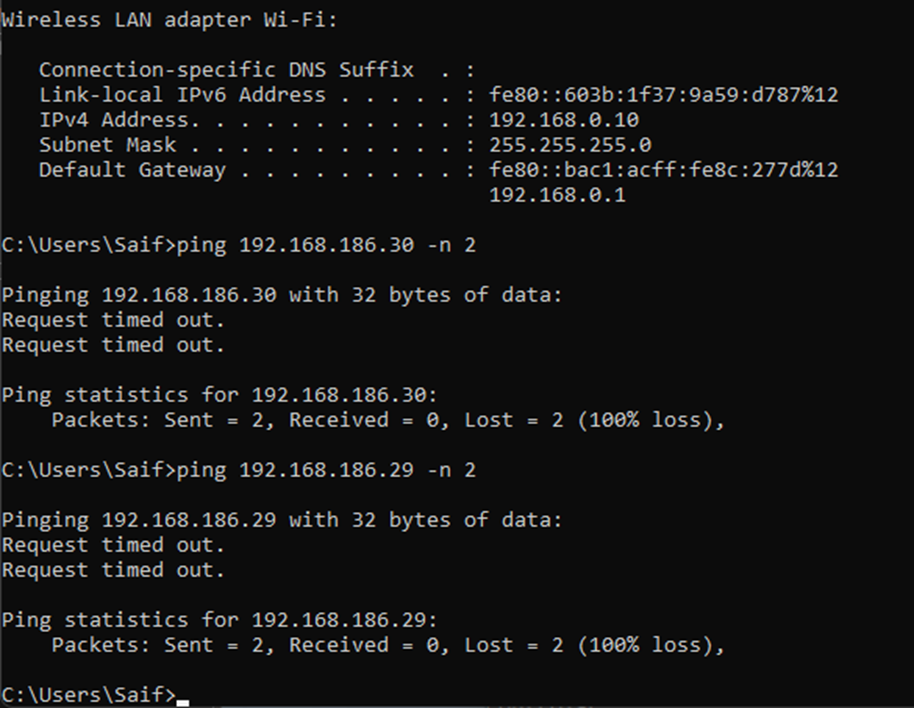
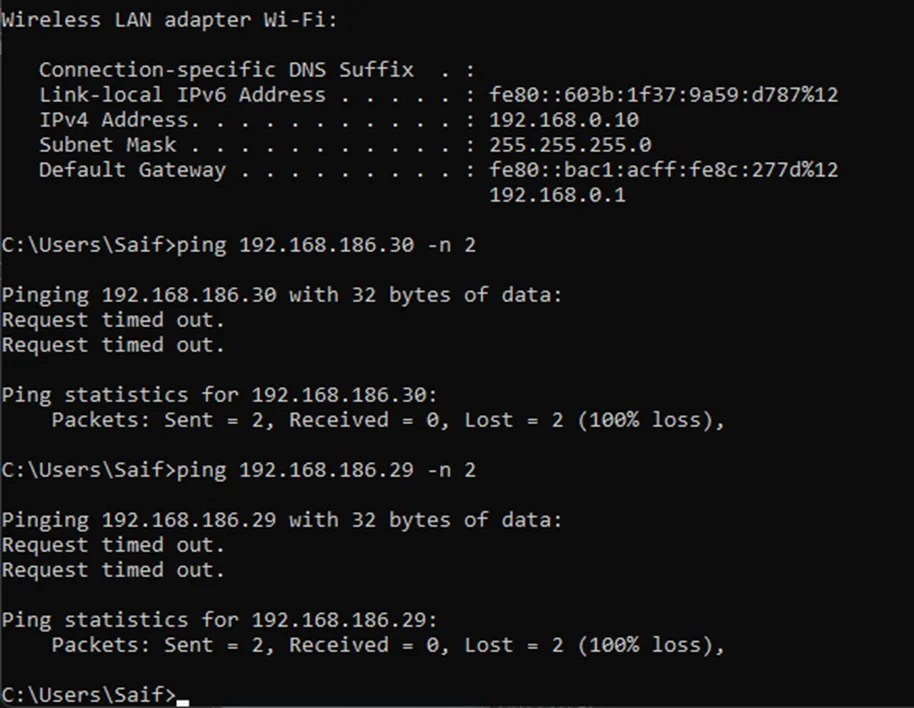
- However, the hosts in my local area network cannot initiate communication with the VM’s in NAT network.
Note: If you still need to talk to the VM from the Local area network to NAT network VM’s you can work around that using something called VMware port forwarding. Check out the article here to learn more.
The NAT network is ideal if your Virtual machine wanted to talk to the internet, other VM’s and to the hosts.
To summarize, in the NAT network configuration in VMware Workstation, virtual machines can:
- Communicate with other virtual machines in the same NAT network by using it’s NAT IP address.
- Communicate with the host machine by using the it’s NAT IP address again.
- Access the internet by using the host machine’s IP address.
- Communicate with other hosts on the physical LAN network with host machine IP address.
However, the following is not possible:
- Physical hosts on the LAN network cannot communicate with virtual machines on the NAT network. But one workaround would be to use VMware port fowarding.
2. VMware workstation Bridged network.
In terms of networking, If you require your VM to act just like any other host in your your LAN network, you will use the bridge network. In bridged mode, VMware will assign the VMnet0 adapter and get the IP address from the local area network to the virtual machine.
When operating in bridge mode, the virtual machine becomes a new host on the local network, allowing it to communicate with other VMs and any other hosts on the LAN.
Additionally, like the host machine, the VM has access to the internet. If you were to examine the packets being sent, you would see that they are generated by the virtual machine, with the source IP address always being the IP address of the VM.
Other hosts on the local network will also be able to communicate with the virtual machine.
To change the network adapter from NAT to bridge mode, you may right-click on the VM, and click on Settings.
Network adapter-> Change from NAT to bridge mode.
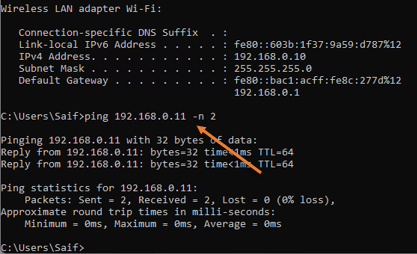
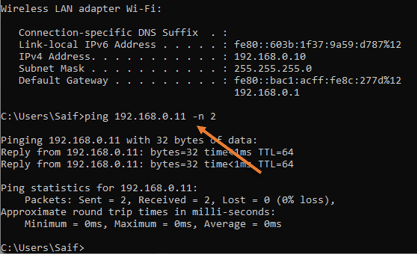
I made the changes on two VM’s that is already running and after a few seconds, both got IP addresses 192.168.0.9 and 192.168.0.11 from my LAN router.
In bridged mode the virtual machine can;
- Talk to the other VM’s in the same bridged network.
- Also to other hosts in the LAN.
- The Internet also working fine.
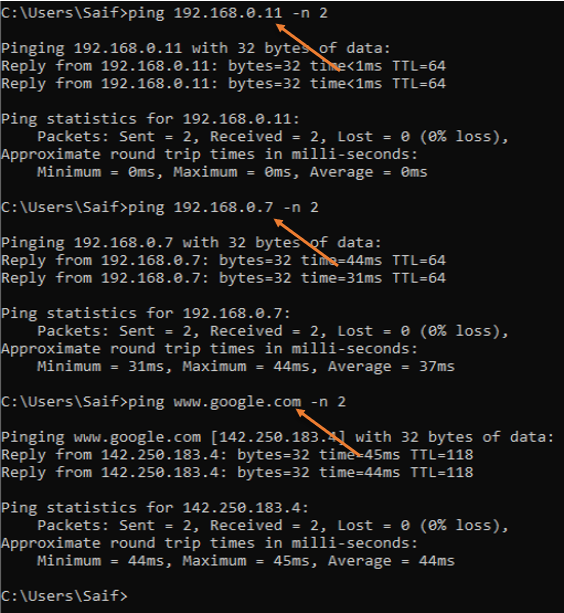
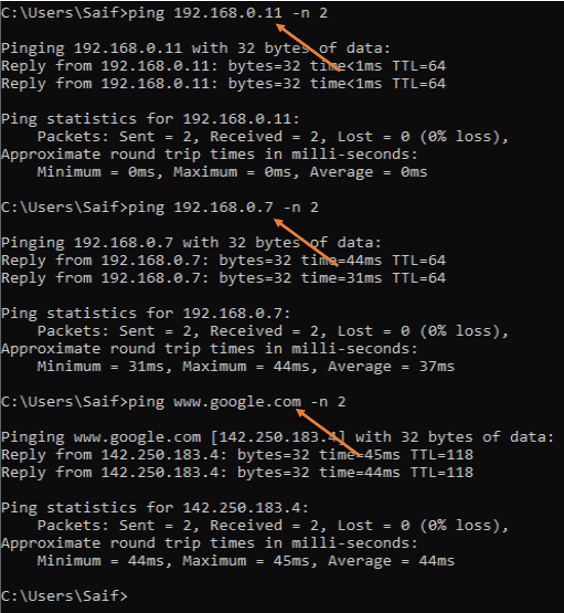
- The other hosts in the LAN can talk to the VM as well.
There are times, you might notice the bridged network won’t assign an IP address to the VM’s, so you need to troubleshoot the configuration. You may check out the article here to trouble the configuration.
You can use the bridged network when you want your Virtual machine to act just like your host machine, and it can talk to all the hosts in the LAN network and can go out to the internet as well.
This bridged network also ideal when you want to spin up virtual firewall or web server in your dev enviroment.
3. VMWare workstation host-only network.
You can make the VM to be part of the host-only network. In this mode, the VM’s will be able to talk to each other, and they can also speak to the host machine, but it cannot go out to the Internet or any other devices on the local area network.
- Right-click on the virtual machine and click on settings.
- Change the network to a Host-only adapter.
- Both the VM’s will have an IP address from the VMware host-only adapter DHCP service.
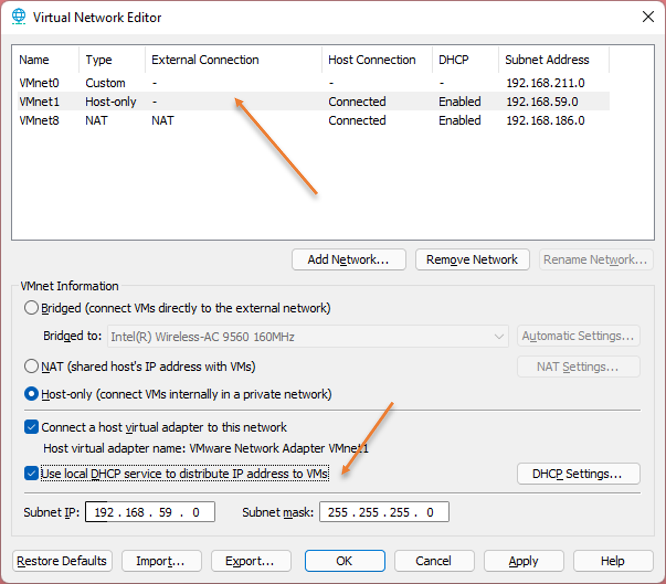
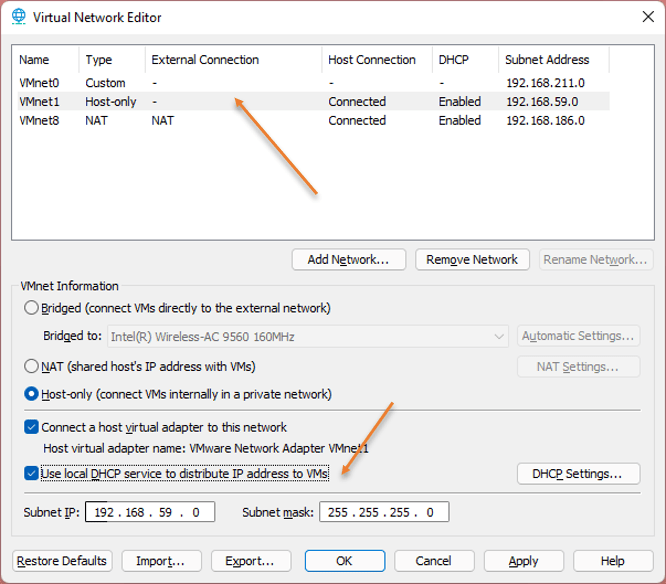
Note: In case if you have not got any IP address for the VM’s, it is most likely the DHCP service is disabled for the VMnet1 adapter, if so you may go to,
Edit-> Virtual Network Editor -> To see all the settings click on Change settings.
Choose VMnet1 and make sure it has DHCP enabled as shown below.
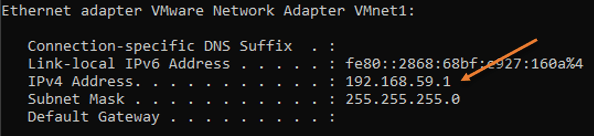
My windows 11 machine got an ip address 192.168.59.128 and the Ubuntu got 192.168.59.129.
On your host machine, go to CMD and type ipconfig to find the IP address of the VMnet1. As you can see, I got an IP address 192.168.59.1, and if you try to ping this IP from the VM you will be able to reach it.

In the Host-only adapter, your VM can;
- Talk to other VM’s in the host-only network (192.168.59.0/24).
However, it cannot reach the host machine with the it’s LAN IP (192.168.0.10/24), so how can we sure the host communication is enabled?
The only way VM can talk to the host is by using host-only adapter’s IP address, which is the VMnet1 adapter IP.
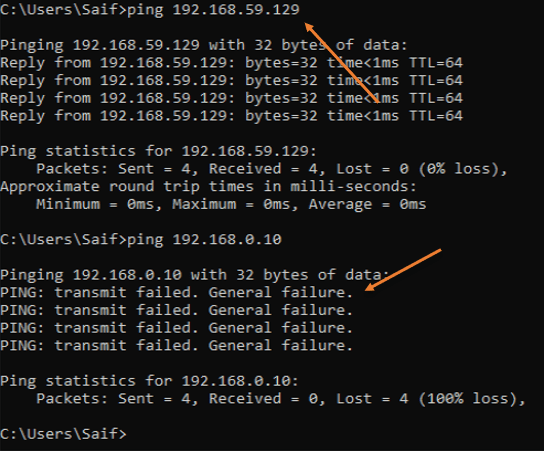
As you can see, I am able to ping Ubuntu VM (192.168.59.129./24) in the same host-only network, however when I try to ping the host IP from the VM I am getting General failure error, which is expected.

From ubuntu VM.
- I can ping my host machine VMnet1 IP address as well.
saif@gld-server1:~$ ping 192.168.59.1 -c 4
PING 192.168.59.1 (192.168.59.1) 56(84) bytes of data.
64 bytes from 192.168.59.1: icmp_seq=1 ttl=128 time=0.306 ms
64 bytes from 192.168.59.1: icmp_seq=2 ttl=128 time=0.366 ms
64 bytes from 192.168.59.1: icmp_seq=3 ttl=128 time=0.799 ms
64 bytes from 192.168.59.1: icmp_seq=4 ttl=128 time=0.378 ms

--- 192.168.59.1 ping statistics ---
4 packets transmitted, 4 received, 0% packet loss, time 3070ms
rtt min/avg/max/mdev = 0.306/0.462/0.799/0.196 ms
saif@gld-server1:~$
From the host machine.
- I can reach the Vm as well, infact the above VM output was captured from the host SSh into the Ubuntu VM connected to host only network.
C:\Users\Saif>ping 192.168.59.129

Pinging 192.168.59.129 with 32 bytes of data:
Reply from 192.168.59.129: bytes=32 time<1ms TTL=64
Reply from 192.168.59.129: bytes=32 time<1ms TTL=64
Reply from 192.168.59.129: bytes=32 time<1ms TTL=64
Reply from 192.168.59.129: bytes=32 time<1ms TTL=64

Ping statistics for 192.168.59.129:
    Packets: Sent = 4, Received = 4, Lost = 0 (0% loss),
Approximate round trip times in milli-seconds:
    Minimum = 0ms, Maximum = 0ms, Average = 0ms

C:\Users\Saif>
And of course, the VM cannot talk to the Internet.
C:\Users\Saif>ping www.google.com
Ping request could not find host www.google.com. Please check the name and try again.

C:\Users\Saif>
You can use host-only network if you want your VM to talk to other VM’s in the host-only network and also to the host machine.
4. VMware Workstation LAN segment.
You can think of the LAN segment as a private isolated network, where the VM’s that are part of the LAN segments can talk to each other.
A LAN segment can be thought of completely isolated network, basically it’s like a layer 2 switch that hasn’t been connected. By plugging each virtual machine into the LAN segment, you create a private network and the VMs that are connected to the segment can communicate with each other.
It cannot speak to the host machine nor can it go out of that particular LAN Segment network. This kind of setup is good when you want to test something out inside your virtualization environment, and you don’t want the network to leak out of your environment.
In case it is necessary for the VMs in the LAN segment to have internet access, it is possible to configure a firewall to act as a NAT device between the host machine and the private LAN segment. As I mentioned eariler.
It is possible to create several isolated LAN segments, where the virtual machines in each segment will not be able to communicate with the virtual machines in other segments. For instance, the VMs in LAN segment 1 will not be able to talk to the VMs in LAN segment 2.
This network will not have any DHCP service enabled from the Vmware workstation. Hence you have to configure the IP address statically, or you could spin up another DHCP server in the LAN segment to hand out the Ip address.
In LAN segments the Virtual Machine can;
- Talk to all the other VM’s in the same LAN segments.
It cannot;
- Talk to the host machine.
- Talk to other VM’s in a different LAN segment.
- Go out of a particular LAN segment, hence it cannot even talk to the host machine.
The LAN segment is suitable when you want to create a separate isolated private network for your Virtual machine. In LAN segment, only VM’s can talk to other VM’s in the SAME LAN segment, rest all will be blocked.
Summary
In conclusion, VMware Workstation provides several network types that can be configured to suit various use cases. Whether you need to provide internet access to VMs, create isolated LAN segments, or set up custom networks, VMware Workstation offers the flexibility to do so. By following the step-by-step instructions and troubleshooting tips provided in this article, you should be able to configure the desired network type in VMware Workstation with ease.