The windows server 2019 is the popular version of the Windows server operating system used by many enterprise users worldwide, not only in the on-premises network but also in the cloud.
Our previous blog covered how you can install Proxmox VE on a server using a USB drive. We even spun up multiple firewalls virtual machines in it.
In this blog, we will take a look at the installation of the window server on the Proxmox VE server. After the installation.
Is windows server 2019 compatible with Proxmox?
For the windows server 2019 to work well with Proxmox and get a good performance, you need to use VirtIO drivers during the installation. Once the installation is complete, the Windows Server would work fine as you would install them in any other hypervisors, such as ESXi, the popular hypervisor in the enterprise network.
After you deploy the Window server 2019 in production, the cost associated with running the virtual machine will only be the windows licensing and the hardware cost, as the Proxmox hypervisor software is open source, and it is free for anyone to use. For the enterprise setup, it is recommended to have a Proxmox subscription, which will incur some cost, so in case anything goes wrong, you can always reach out to the support providing peace of mind.
Before you begin, you need to have windows server 2019 iso downloaded.
Note: If you use Windows server 2022, you may follow the article here.
- You can click here to download the windows server.
- In the windows server 2019- choose the ISO file. You will be required to fill in a form.
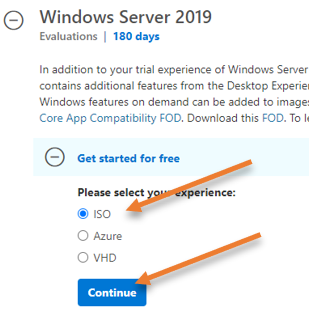

Post filling up the form, you will be asked to choose the Language of your choice, and click on download.
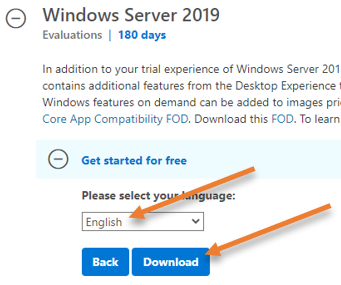

The download will start automatically.
- Proxmox server installed and up and running – follow the article here to learn more about the installation of Proxmox VE on a server.
- VirtIO Drivers -> Click here to download the latest virtio drivers.
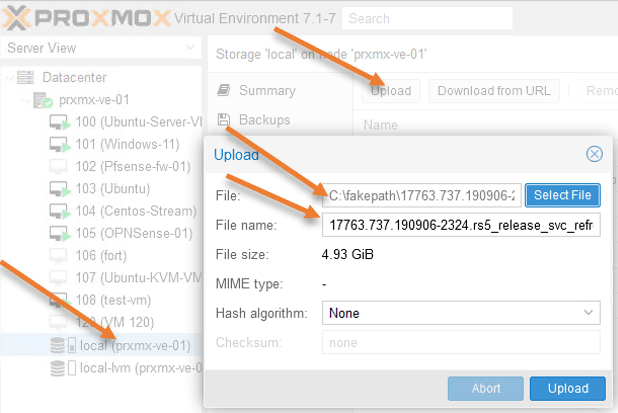
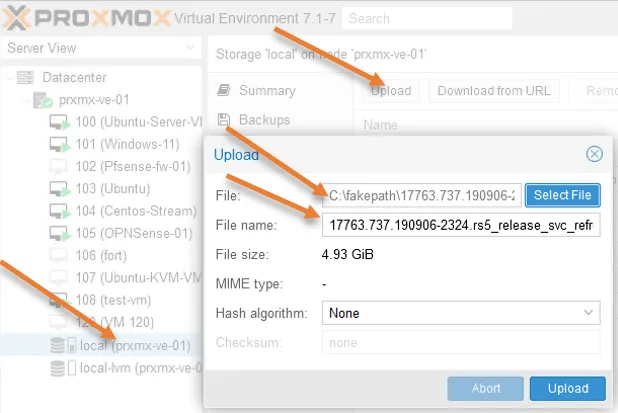
Upload the windows server iso into Proxmox VE.
We already have a windows server iso file. Let’s go ahead and upload it to the Proxmox Server.
Select the Proxmox Server where you are going to install the windows server.
Click on Local file system-> ISO images-> Click upload to upload the windows server iso image.
The upload will take time, depending on the network connectivity between the management system and the Proxmox Server.
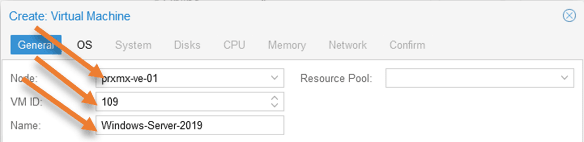
Create a windows server VM.
Login to the Proxmox Server, and click on Create VM on the top right corner.
Node: Choose the Proxmox node where you will install the Windows server operating system.
VM ID: The VM ID will be automatically created by the Proxmox VE server starting from 100, you may leave the default or choose a different ID.
Name: Provide a name for the virtual machine.

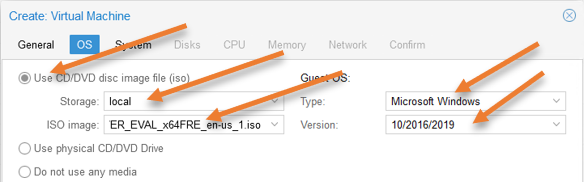
Choose the OS.
In the OS configuration, choose Use CD/DVD image file and select the Windows server disk image file we uploaded in the ISO image.
Guest OS:
Type: Microsoft windows
Version: You can see that Proxmox supports almost all the versions of windows servers. We are going to choose 10/2016/2019 as we will install windows server 2019.

Leave everything default on the System configuration and click on Next.
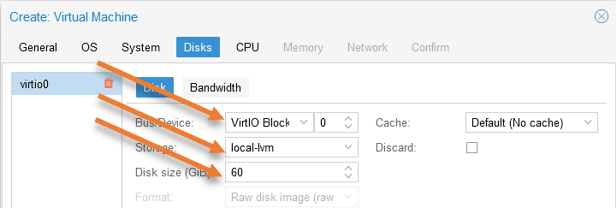
Windows Server virtual disk configuration.
In the disk configuration;
Bus/Device: Choose VirtIO Block.
Disk Size: By default, Proxmox would choose 32GB of storage, the absolute minimum recommendation from Microsoft. So I am choosing 60GB of storage for my Virtual machine.
Click on Next.

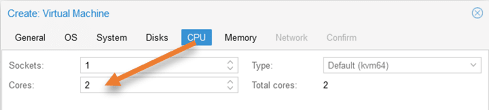
CPU configuration.
I am choosing 2 CPUs for my Windows Server. Hence under cores, pick 2 and click on Next.

Memory configuration.
2GB of default memory is acceptable; however, I am choosing 4GB of Ram based on my requirement. So you may decide based on your need. And click on Next.


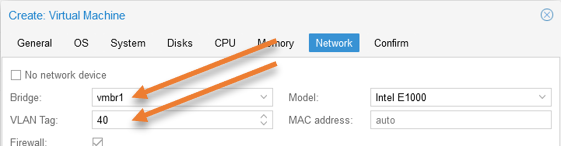
Network configuration.
Every Proxmox network setup would be different. In my setup, vmbr0 is the management network for the Proxmox Server, and the vmbr1 with VLAN 40 is for the VM traffic. The interface that connects to the Proxmox Server is configured as a trunk allowing VLAN 40. You can learn more about the VLAN tagging configuration in Proxmox Server here.
In your setup, you may not be using VLAN, so based on your configuration, make a choice.
Bridge: Choose the bridge interface for the VM traffic.
VLAN tag: You may specify the VLAN tagging here if you are using VLAN tagging.
Firewall: If you are not using any firewall as a VM in your Proxmox, you may leave the default firewall option checked.
Click on Next.

You will get a summary of the configuration. Ensure the Start after created option is unchecked because we need to add virtio driver iso to the windows server VM.
Click on Finish.
Attach the VirtIO driver.
You can now see the window server virtual machine added into the Proxmox Server, and you may choose the virtual machine and click on Hardware-> Add-> CD/DVD Drive.


In the pop-up, choose Use CD/DVD disk image file.
Storage: Local
ISO image: Choose the iso image we uploaded and click on Create.
Start the windows server installation in Proxmox.
Select the virtual machine-> Console
Click on Start to start the virtual machine.
You will get a message that reads, press any key to boot from cd/DVD
You may press any key.
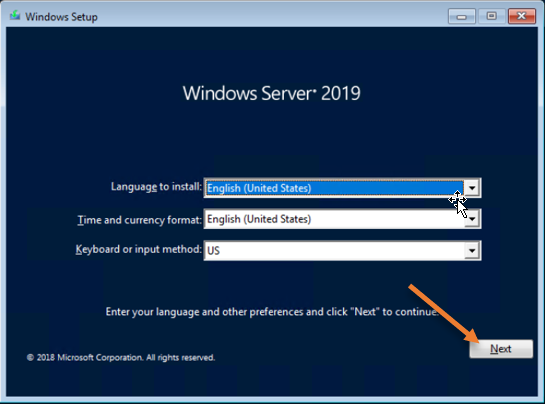
The windows server installation screen appears with loading files. After a few seconds, the windows server installation wizard will appear.
Choose the Language, time, and Keyboard layout and click on Next.

Click on Install Now.
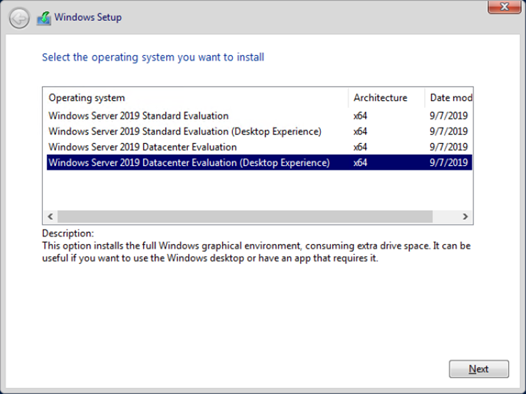
Choose the operating system version and click on Next.
Here you need to choose what version of the Server you would want. Whether it is CLI-based or GUI-based, you may choose the version without Desktop experience if you want only CLI access.
If you want GUI access, you would need to choose Desktop experience.

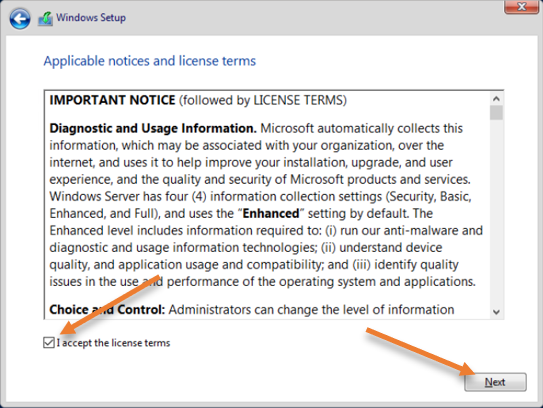
Accept the license agreement.

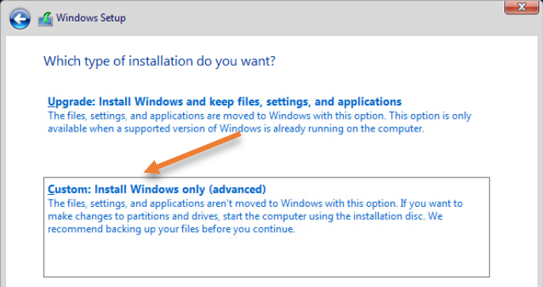
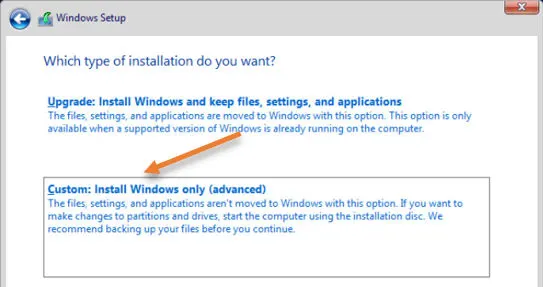
Choose the Custom install option.
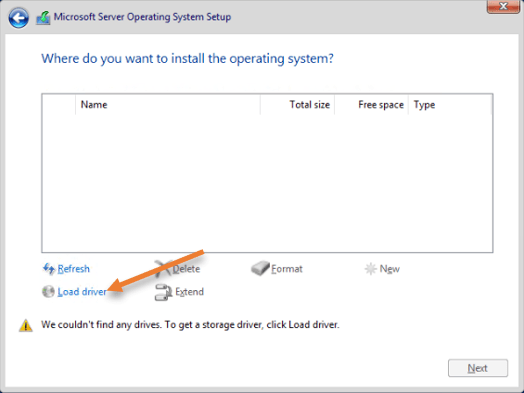
Configure the virtual hard disk in the windows server installation wizard.
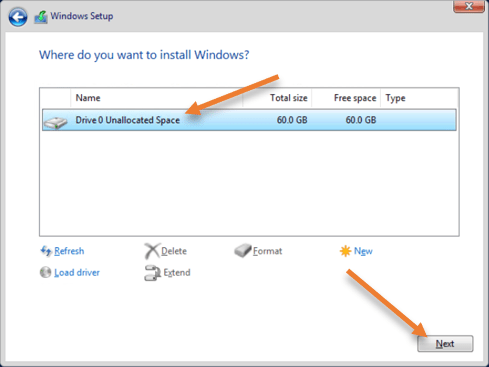
As you can see, there is no virtual hard disk for the windows server to install the operating system even though we defined it under Proxmox.
That’s because windows don’t have a driver to detect the virtual hard disk in the Proxmox.
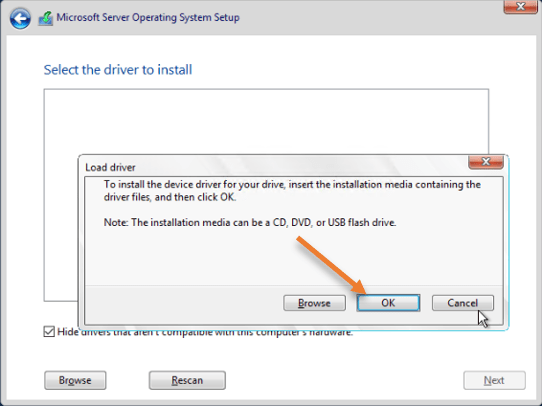
Click on Load driver.

In the pop-up, click on OK.

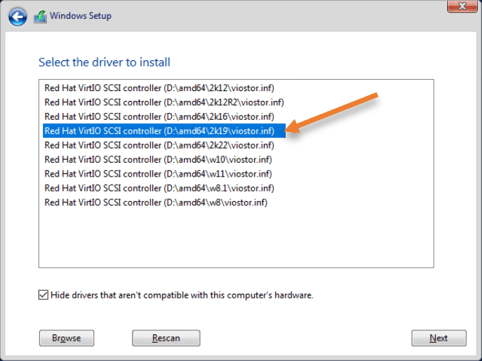
After a few seconds, you will get an option to select the driver to install.
From the list, choose the 2019 windows server driver. If you are using 2016, you may select that version instead and click on Next.

You can now see the hard disk we allocated in the Proxmox Server, choose the hard disk and click on Next.

The installation will begin, and the process will take some time to finish.


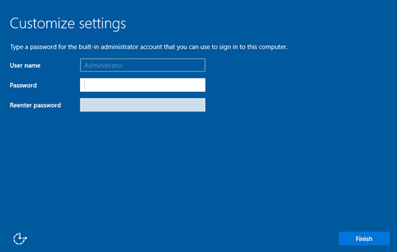
Set the password for the Administrator.
After the installation is finished, the VM will reboot a couple of times, and once done. It will ask you to set the administrator password.
Once you set the admin password, you may click on finish.
If you have selected the CLI version, you will get a CLI prompt to change the password.

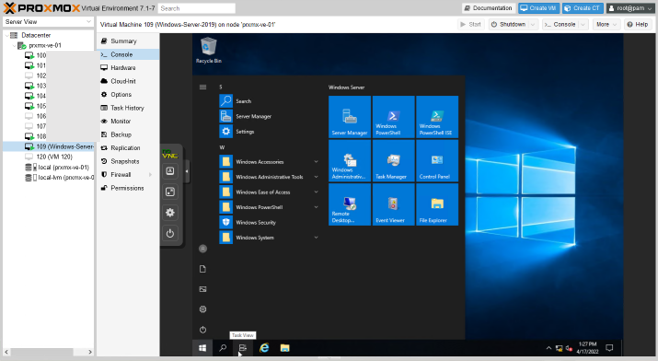
Log in to the windows server.
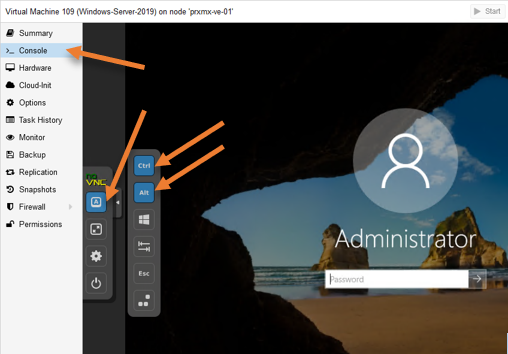
You will be taken to the windows logon screen, where it will ask you to press ctrl+alt+del, if you are using a Windows PC and when you press that, it will take you to windows PC settings.
So in Console, you may click on the A icon and select Ctrl and Alt from the submenu. While it is selected, you may click on Delete on your keyboard.
You will get a prompt to enter the password now. You cannot enter the password until you unselect Ctrl and Alt buttons in the VLC.
Unselect them and enter the password, and it should let you log in.

Install the KVM guest agent.
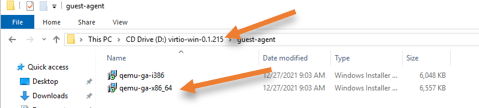
Finally, we need to install the KVM guest agent on the windows machine.
Open windows explorer and virtual CD/DVD drive -> Guest Agent -> Double click on the qemu-ga-x86_64 to install the guest agent driver.
Once the installation of the guest agent is finished, you may go ahead and reboot the Windows Server.
And there you have it. We have now successfully installed windows server 2019 on the Proxmox VE server.
You can now configure an IP address and enable RDP on the VM to access from outside Proxmox network.