
You are planning to build a server setup and are excited to turn your PC or Server into a Proxmox VE with which you can run multiple VMs in it. But there is a problem: the machine you will build the lab with has a single interface. It is good to run the management and the VM traffic on a separate network interface. So how do you separate that two traffic when you have a single interface?.
If you can extend the network interface, you can use one interface for management traffic and the second one for VM traffic. You can even club both the interfaces as one using LACP bonding and then create VLAN on top of it.
However, we have only a single interface in our situation, so how do we send multiple traffic on a single interface. Then the only option is to separate the Proxmox network traffic by using VLANs. And in this blog, we will look at how you can create a separate network for management traffic and VM traffic using VLANs. Maybe you configured the Proxmox VLAN tagging and it turned out it is not working, hopefully, by the end of this article, you will be able to fix the issue you have with VLAN tagging on proxmox.
Read also,
how to install the Proxmox server on a PC running windows 11 using dual-boot.
Install Proxmox VE on a server using USB.
Before you begin, you need to have;
- Proxmox server is up and running.
- A Layer3 switch that provides IP connectivity and inter-VLAN routing.
When separating the Network on Proxmox using VLAN, you need to have the interface connected to a switch that supports VLAN tagging, and enabling the communication between two VLANs you should require layer three capability.
Note: The layer3 switch is expensive, and you don’t require a layer3 switch if you don’t want to allow VLAN communication. For example, for the pfsense installation, we needed a WAN and the LAN network, so if you are creating WAN and LAN VLAN, you need them to be separate Networks so you could just use the layer2 switch and create VLAN for the same.
Each Network is different, and the setup that we will build should be a baseline for you to get started. As you know, it is impossible to show all the network designs in a single blog post. With that let’s get started.
We will build a Proxmox lab where we need to deploy different kinds of VMs. Below is the Network that we will build and their respective VLANs.
Proxmox management is where you configure the Proxmox IP address and access that IP from another machine.
As the name suggests, Windows and Linux VLAN are dedicated for windows and Linux machines.
| VLAN Name | VLAN Number | Subnet |
| Proxmox management | 40 | 10.1.40.0/24 |
| Windows | 100 | 10.1.100.0/24 |
| Linux | 200 | 10.1.200.0/24 |
- We have below Network where the Proxmox server has a single interface, connected to a layer3 siwth.
- The Layer 3 switch has internet access.
- And we will plugin the management PC after configuring the Proxmox IP and its VLAN.
- For the switch, I am using a layer 3 cisco switch.

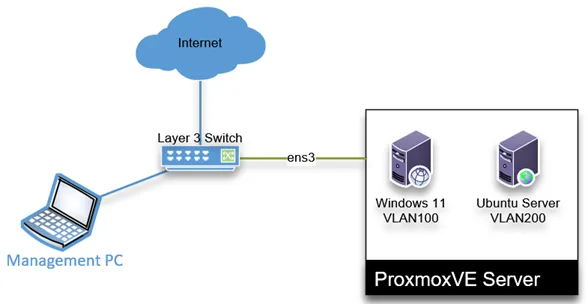
On a high level, the layer3 switch would provide the network connectivity to outside and to the internal LAN network. The connection between the switch and the Proxmox server will act as a trunk that carries multiple VLAN traffic, so we need to specify what VLAN is to be allowed on the trunk. We will configure the management PC port to be part of Proxmox management VLAN as an access port (untagged port) on the switch. In the end, the management PC should be able to communicate with the Proxmox management IP, and from the switch, we should be able to reach the VMs in the Windows and Linux VLANs.
1. Configure the VLAN on the switch.
We are using a cisco switch for the network connectivity, so if you go through the configuration it should be identical to all the other layer 3 switches out there.
Below is what we are going to configure.
- Create a layer 2 VLAN.
- The VLAN SVI (IP gateway)
- Trunk interface and tag the required VLANs.
- Create an access port for the management PC.
1. Create a layer 2 VLAN.
enable
!
configure terminal
VLAN 40
name Proxmox_mgmt
VLAN 100
name windows
VLAN 200
name linux
!
exit
2. The VLAN SVI (IP gateway)
configure terminal
interface VLAN40
 description Proxmox_mgmt
 ip address 10.1.40.1 255.255.255.0
 no shutdown
!
interface VLAN100
 description windows
 ip address 10.1.100.1 255.255.255.0
 no shutdown
!
interface VLAN200
 description linux
 ip address 10.1.200.1 255.255.255.0
 no shutdown
!
Type the command show ip int brief | in VLAN, and you should see all the VLAN interfaces are currently down, which will come up only when we tag this VLAN to any trunk or an access port.
gld-sw-01#show ip interface brief | in VLAN
VLAN40                 10.0.40.1       YES manual down   down
VLAN100                10.0.100.1      YES manual down   down
VLAN200                10.0.200.1      YES manual down   down
VLAN250                10.0.250.1      YES manual down   down
gld-sw-01#
3. Trunk interface and tag the required VLANs.
The link that is connected between the switch and the server is a Trunk port, which means it can carry multiple VLANs. So configure the interface gi0/2 as the trunk port.
Configure terminal
Interface gigabitEthernet 0/2
switchport mode trunk
By default, the Cisco switch will carry all the VLANs on the trunk, which is not a good practice, hence allow only the required VLAN.
For other vendors, such as Aruba, when you create a trunk port, none of the VLANs are allowed you need to assign the VLAN to trunk port exclusively.
Interface gigabitEthernet 0/2
switchport trunk allowed VLAN 40,100,200,250
After a few seconds, the VLAN interface will come up.
gld-sw-01#show ip interface brief | in VLAN
VLAN40                 10.1.40.1       YES manual up    up
VLAN100                10.1.100.1      YES manual up    up
VLAN200                10.1.200.1      YES manual up    up
VLAN250                10.1.250.1      YES manual up    up
gld-sw-01#
4. Create an access port for the management PC.
We need to configure an access port for the Proxmox management traffic. That way I can plug in my management PC to the access port I defined for management traffic and access the web GUI.
Since the layer 3 switch has the default route towards the router, The PC that I plugin can also reach the internet.
Interface gigabitEthernet 0/1
swithport mode access
switchport access VLAN 40
Connect a machine to the interface.
Configure an IP address from the same subnet 10.1.40.0/24, I have configured with 10.1.40.10
Check the reachability.
As you can see, I can reach the Network now.
C:\Users\saif>ping 10.1.40.1

Pinging 10.1.40.1 with 32 bytes of data:
Reply from 10.1.40.1: bytes=32 time=4ms TTL=255
Reply from 10.1.40.1: bytes=32 time=1ms TTL=255
Reply from 10.1.40.1: bytes=32 time=1ms TTL=255
Reply from 10.1.40.1: bytes=32 time=1ms TTL=255

Ping statistics for 10.1.40.1:
    Packets: Sent = 4, Received = 4, Lost = 0 (0% loss),
Approximate round trip times in milli-seconds:
    Minimum = 1ms, Maximum = 4ms, Average = 1ms

C:\Users\saif>
2. Set up the bridge on the Proxmox server.
At this point, you most likely will have CLI access to the Proxmox server. Hence you need to configure the management interface using the CLI. Afterward, you can access the Proxmox GUI from the management PC and start deploying the VMs and assigning VLANs.
In the bridge interface, you need to map the physical port, and make it VLAN aware. Based on your Network, you can turn on or off the STP, I am turning it off.
To configure the bridge interface, you have to change the Proxmox network configuration located in /etc/network/interfaces.
Below is my current configuration, when I installed the Proxmox server I have configured the IP address 192.168.100.2/24 on the bridge interface.

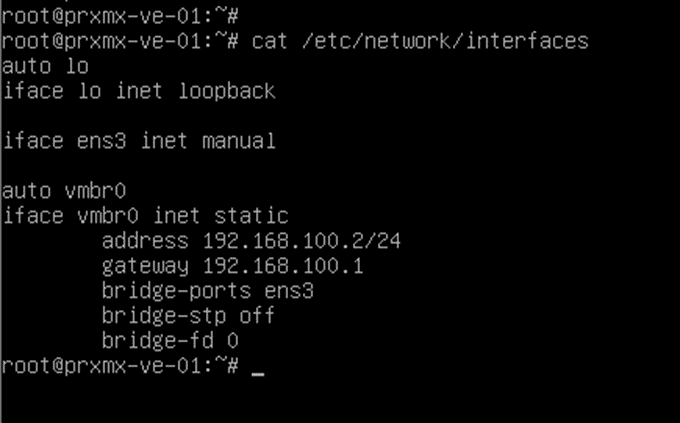
So the configuration may look different to you, I am going to wipe everything off and start from scratch.
Note: Your physical adapter name will be different so make sure that you choose the right physical adapter for your configuration.
Using nano or vim utility edit the interfaces file -> nano /etc/network/interfaces, and add the configuration as follows.
In the bridge interface vmbr0,
- I have mapped the bridge-port to the physical one ens3.
- Stp turned off.
- Made it VLAN aware.
- Added supported VLAN from 2-4094 – Here you can control what VLAN’s that you want to allow, I am basically allowing everything except VLAN 1.
auto lo
iface lo inet loopback

iface ens3 inet manual

auto vmbr0
iface vmbr0 inet manual
        bridge-ports ens3
        bridge-stp off
        bridge-fd 0
        bridge-VLAN-aware yes
        bridge-vids 2-4094
3. Create a Proxmox management interface VLAN.
Just below the vmbr0 configuration, you will have to configure the vlan interface, which will be part of bridge interface vmbr0.
In the configuration,
- We made the vmbr0.40 as static IP and configured the IP address for the Proxmox management interface.
auto vmbr0.40
iface vmbr0.40 inet static
        address 10.1.40.5/24
        gateway 10.1.40.1
Below is what the final configuration looks like.
Save the configuration restart the network services with the command below.
service networking restart4. Test the Proxmox management network.
We have the management PC plugged in and it’s part of the VLAN network 40 as accessport, and we also made the Proxmox server management be part of the VLAN 40 as tagged.
You may try to ping the IP address from your management PC, and it should get a response now.
C:\Users\saif>ping 10.1.40.5

Pinging 10.1.40.5 with 32 bytes of data:
Reply from 10.1.40.5: bytes=32 time=1ms TTL=255
Reply from 10.1.40.5: bytes=32 time=1ms TTL=255
Reply from 10.1.40.5: bytes=32 time=1ms TTL=255
Reply from 10.1.40.5: bytes=32 time=1ms TTL=255

Ping statistics for 10.1.40.1:
    Packets: Sent = 4, Received = 4, Lost = 0 (0% loss),
Approximate round trip times in milli-seconds:
    Minimum = 1ms, Maximum = 1ms, Average = 1ms

C:\Users\saif>
5. Access the Proxmox Web GUI.
We just configured the Proxmox VLAN management interface, You may try to access the web GUI of the Proxmox server now with the url https://10.1.40.5:8006
Ignore the security warning and log in to the Proxmox with the username and password.
Select the node and click on Network.
You will be able to see the list of interfaces that we have.
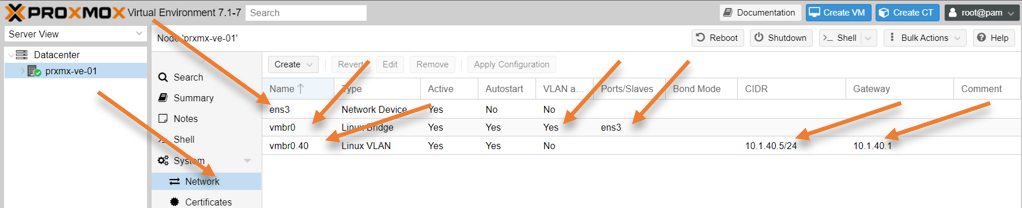

- We have got the physical interface which is ens3.
- We created bridge interface vmbr0 mapping the physical interface ens3 as a slave, ensuring it is VLAN aware.
- Finally, we created Proxmox management VLAN on the bridge interface and configured an IP address, and it’s gateway.
6. Configure the VLAN tagging on Proxmox virtual machines.
That’s how you create a Proxmox management VLAN interface.
How about other VLANs.
There is nothing much you have to do on the Proxmox side network configuration when deploying a virtual machine. During the VM deployment on the VM network settings, you need to make sure that you choose the vmbr0 interface and tag the VLAN, be it Windows or Linux.
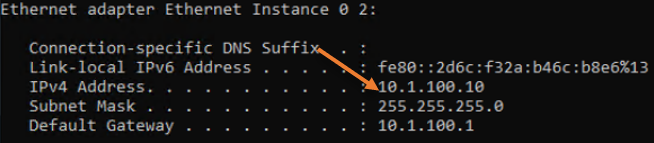
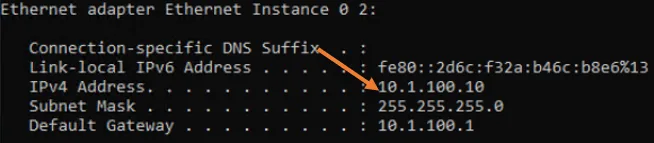
I have deployed a Windows 11 virtual machine in Proxmox following the article here and configured the IP address with the Linux subnet 10.1.100.10/24, basically, we are using a Windows machine in Linux VLAN for testing.
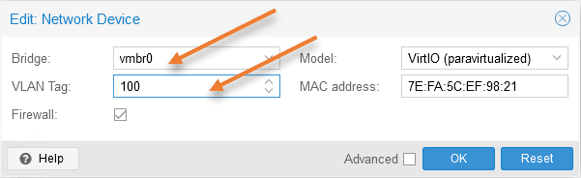
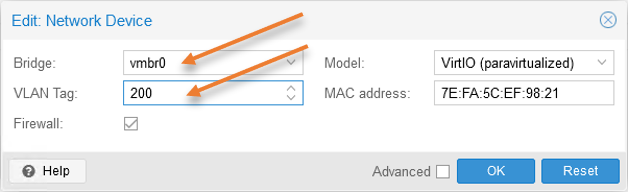
Go back to the VM properties -> Hardware
And in the bridge, choose vmbr0
VLAN tag: 100 (Linux vlan)
Click on Ok.

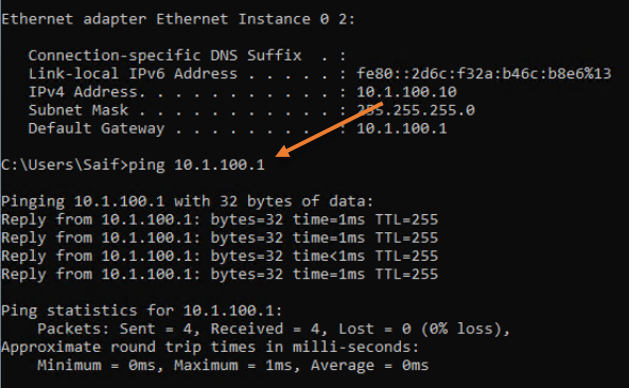
Try to ping the default gateway. As you can see, I can ping the default gateway located on the layer3 switch after I added the new VLAN.
You may change the IP address to Windows subnet now and try to ping the windows VLAN gateway, and you shouldn’t get a response. Because you still have the Linux VLAN 100 configured for the windows.
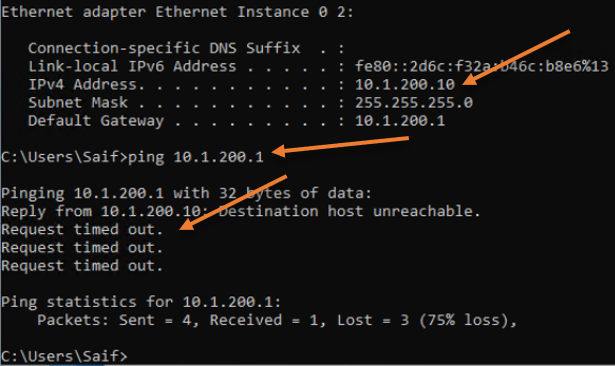
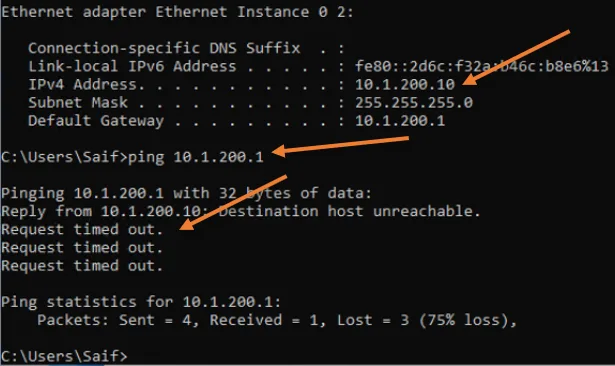
Go back to the VM hardware network settings, change VLAN from Linux to Windows, VLAN 200 and click on Ok.

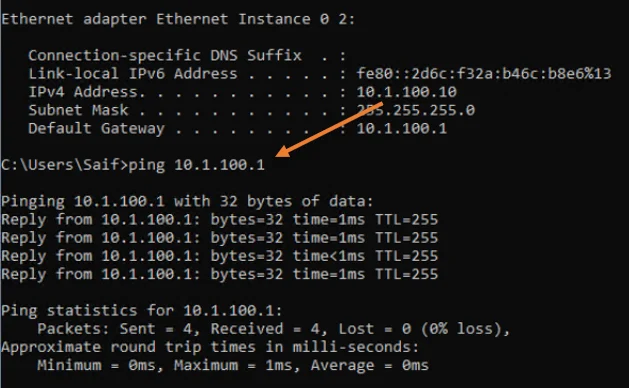
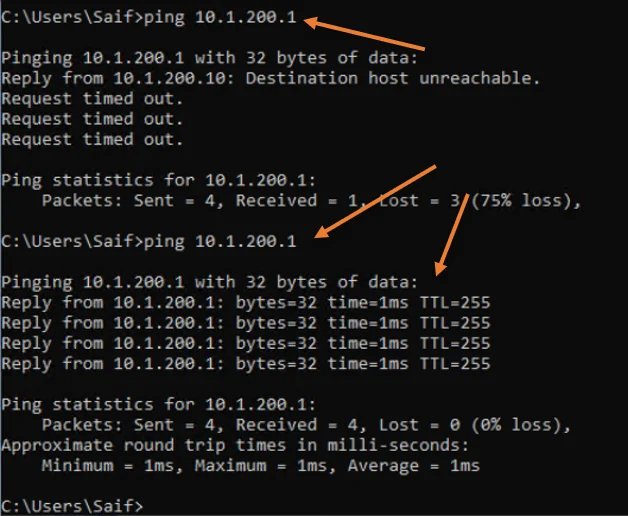
After making the change, I can now ping my default windows VLAN 200 default gateway.
The first ping is the failed attempt, and the second is after the VLAN configuration.

We have successfully created the VLAN interface on the Proxmox server. Only the Proxmox management VLAN interface requires some work. Apart from that, everything is easy.
You can now start deploying Windows and Linux virtual machines in Proxmox, and to make those machines part of the VLAN, you need to add the VLAN tagging in the networking and it should work fine.