
We use an IPsec site-to-site VPN tunnel to connect two sites. It provides security and is a lot cheaper than other means of connecting the WAN network. By default, most of the network will have internet access, and the devices they have at the edge of the network will have IPsec capability. That’s the only requirement for you to connect the sites using IPsec tunnels. You can build the IPsec tunnels with the existing network that you have. No need to buy expensive network gears.
We have covered plenty of blogs about installing IPsec site-to-site VPN between different network vendor equipment. And in this blog, we will take a look at the configuration of the IPsec VPN between FortiGate and the ASA firewall.
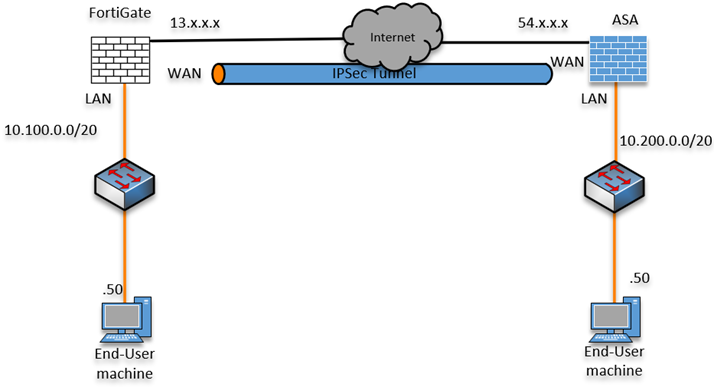
Below is the topology that we are going to use.
We have a FortiGate firewall at site1, and site 2 is connected with the ASA firewall. Both the site’s internet traffic is offloaded at the edge of each site. We will build an IPsec tunnel to connect the LAN networks of each site.
After the tunnel is built, we will test the communication from the ASA LAN side to FortiGate and vice versa.
We will start with the FortiGate firewall configuration and move on to the ASA side configuration.
Note: I have hidden the public IP address with the x.x.x on the last three octets for security purposes.
Read also,
How to Configure IPsec Site to Site VPN Between Cisco ASA?
How to Set Up IPsec Site to Site VPN Between ASA and Paloalto?
How to Configure IPsec Site to Site VPN Between PfSense and ASA?
How to Deploy Cisco ASAv in AWS? | Step by Step Guide.
Configure FortiGate IPsec tunnel.
The IPsec tunnel configuration consists of two phases, phase1 and phase2. Let’s go ahead and configure Phase 1 of the IPsec tunnel on the FortiGate firewall.
Phase1 configuration.
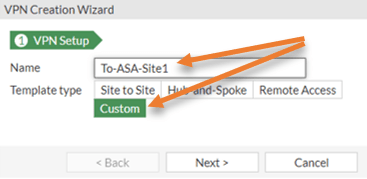
Goto VPN->IPsec Tunnels-> Create New-> IPsec tunnel.
Under VPN setup, choose Custom.
Provide a name for the IPsec VPN tunnel, for example, To-ASA-Site1.
Click on Next.

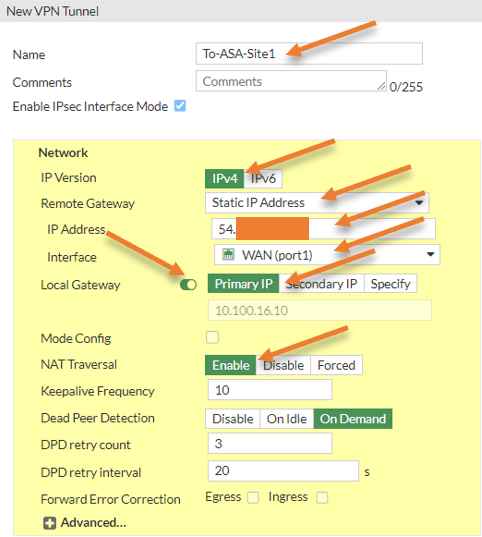
Configure the IPsec peer information.
You will get a new VPN tunnel creation wizard. Enter the configuration as follows.
Name: Provide a name for the tunnel towards the ASA.
IP Version: IPv4
Remote Gateway: Static IP address.
IP address: Enter the public IP address of the ASA firewall.
Interface: Choose the outside interface of the FortiGate firewall.
Local Gateway: Toggle the Local gateway switch and choose primary IP.
It will auto-fill the outside IP address of the FortiGate firewall.
Nat Traversal: If you have connected your firewall directly to the ISP with the public IP address, you don’t need to choose the NAT traversal option. You can disable it. However, when you have a private IP address on the WAN side and your FortiGate firewall is connected behind a NAT device, you need to Enable the NAT-T option for the IPsec to come up.

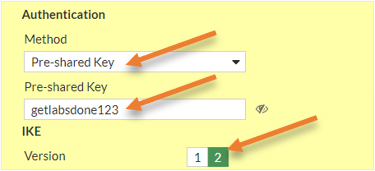
Choose the Authentication as PSK.
We need to enable the authentication as a pre-shared key. And both sides should match.
In the Authentication method, choose the pre-shared Key.
And fill in the pre-shared key that you have.
IKE – Choose the version as 2.

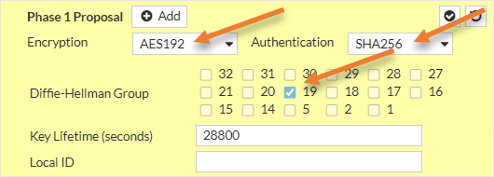
Configure the Phase1 proposal.
In the phase1 proposal, choose the encryption and authentication algorithms.
Encryption : AES192, Authentication : sha256.
Diffie-Hellman Group: 19.
Key Lifetime: 28800
Note: Just because I selected the above phase1 parameters doesn’t mean it has to be the same that you have to choose. The one I have chosen does provide enough security for the IPsec tunnel. However, you might as well try different combinations based on your requirements.

IPsec Phase2 configuraiton.
The phase1 configuration is complete, and it’s now time to configure the encryption for actual data traffic, which is for phase2.
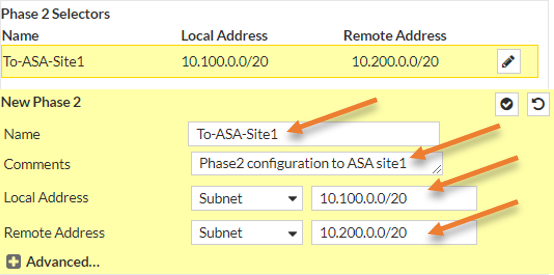
Under Phase2 selectors.
Name: Provide a meaningful name.
Local Address: You need to define the LAN address of the FortiGate firewall here.
Remote Address: Specify the ASA LAN address here.
Based on the subnet selection in phase2, the traffic between these two subnets will be encrypted.

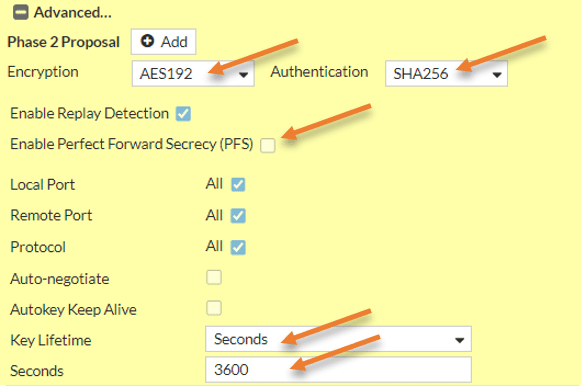
Phase2 proposal.
Like we did in phase1, we will configure the phase2 proposal. Here I am choosing the same Encryption and Authentication as the phase1. it doesn’t have to be identical to the phase1, however, it should match the phase2 configuration of the ASA.
Encryption : AES192.
Authentication: SHA256.
Enable Replay detection.
Uncheck Enable perfect forward secrecy.
Key lifetime seconds– 3600
Save the configuration.

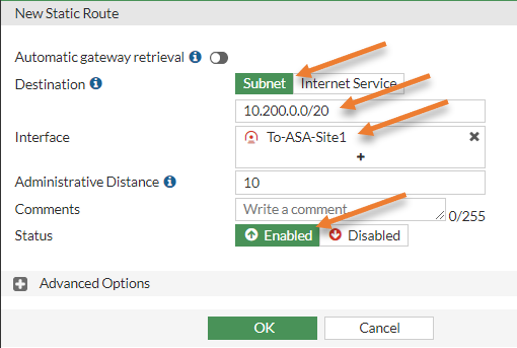
Add the static route pointing to the IPsec tunnel.
Once the tunnel comes up, you would want the traffic to go by the IPsec tunnels; you could choose Static routes or dynamic routes.
Here we choose static routes that say any traffic destined to 10.200.0.0/20 should go via ASA IPsec tunnel.
Goto Network-> Static Routes->Create New
Destination: Subnet
Interface: Choose the IPsec tunnel.
And click on OK.

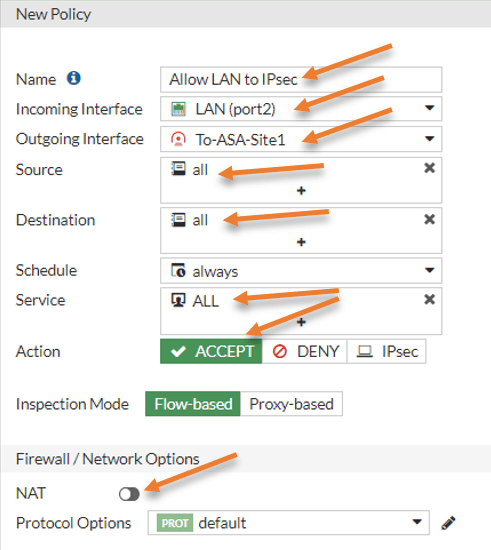
Allow traffic using a security policy.
Although we have added the routes, that doesn’t mean the traffic will be allowed to go through the IPsec tunnel, which must be allowed using a security policy. Let’s define a security policy to allow any traffic from LAN to IPsec and IPsec to LAN should be allowed.
Policy & Objects-> Firewall Policy-> Create new.
Name: Provide a name for the Policy.
Incoming interface: LAN.
Outgoing interface: IPsec tunnel.
Source, Destination, and Service should be all.
Action: Accept.
Nat: Unchecked.
And save the Policy.

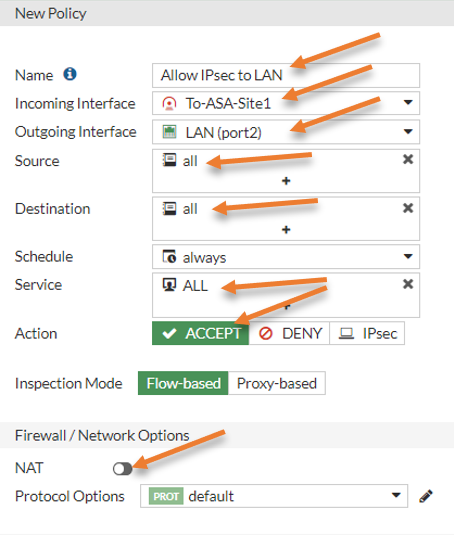
Add the Policy for reverse traffic.
Create new.
Name: Enter a name for the Policy.
Incoming interface: IPsec tunnel.
Outgoing interface: FortiGate LAN.
Source, Destination, and services should be all.
Action: Allow.
Uncheck the NAT option.
And save the configuration.
We have completed the configuration of the IPsec tunnel on the FortiGate firewall, and you should see the status as down. Even if you try to bring up the tunnel, it will still fail because we have not configured the remote side, which is the ASA.


Configure Cisco ASA IPsec Tunnel.
We have completed the FortiGate side of the IPsec tunnel. To bring the tunnel up and enable the communication, we now have to configure the IPsec phase1 and phase2 on the Cisco ASA.
Enable IKE protocol version 2 on ASA outside interface.
By default, any inbound traffic coming to the cisco ASA outside interface will be blocked, unless you put a hole for specific IPs.
To Allow IPsec traffic on the outside interface on the ASA firewall, you need to enable IKE service on the external interface. You could allow either IKEv1 or 2. Since we are performing the configuration for IKEv2, you may enable IKEv2 with the below command.
crypto ikev2 enable outsideSet up the Phase1.
In phase1 of the IPsec tunnel configuration, you may add the IPsec phase one encryption parameters matching the FortiGate side.
Tunnel group with the public IP address of the FortiGate firewall and add the authentication under IPsec-attributes with the pre-shared key.
crypto ikev2 policy 100
 encryption aes-192
 integrity sha256
 group 19
 lifetime seconds 28800
 exit
!
tunnel-group 13.x.x.x type IPsec-l2l
tunnel-group 13.x.x.x IPsec-attributes
 ikev2 remote-authentication pre-shared-key getlabsdone123
 ikev2 local-authentication pre-shared-key getlabsdone123
 exit
!
Set up the Phase2.
For the data traffic to encrypt and traverse across the tunnel, you need to define the phase2 of the IPsec parameters matching the FortiGate remote side.
!
crypto IPsec ikev2 IPsec-proposal site1prop
 protocol esp encryption aes-192
 protocol esp integrity sha-256
 exit
!
Remove NATting for the interesting traffic.
We already have a natting for internet traffic, and we need to exclude natting for the traffic that goes through the tunnel towards the FortiGate.
Create the object group with both LAN subnets and create a policy to exclude from NAtting.
object network ASA-Sub
subnet 10.200.0.0 255.255.240.0
object network FortiGate-Sub
subnet 10.100.0.0 255.255.240.0
nat (inside,outside) source static ASA-Sub ASA-Sub destination static FortiGate-Sub FortiGate-Sub no-proxy-arp route-lookup
Configure the interesting traffic with ACL.
For the traffic to go through the tunnel, we need to specify what traffic to pass. For that, we need to define an ACL specifying the remote and the local subnet. This is called interesting traffic.
Since we already have an object created before, we can also call the same objects to create the ACL.
access-list 101 line 1 extended permit ip object ASA-Sub object FortiGate-SubCreate a Crypto map.
We need to combine all parameters we defined above into the crypto map and apply it to the outside interface.
crypto map site1map 10 set peer 13.x.x.x
crypto map site1map 10 match address 101
crypto map site1map 10 set ikev2 IPsec-proposal site1prop
crypto map site1map interface outside
We have completed the IPsec configuration on both the FortiGate and the Cisco ASA firewalls. Let’s proceed with the testing to bring up the tunnel.
Test IPsec network.
To bring up the tunnel, you may initiate traffic from either side of the tunnel. As soon as the traffic hits the IPsec tunnel, it will get established, and you will be able to talk from the fortigate LAN side to the ASA LAN side and vice versa.
As you can see, I can ping from the FortiGate LAN side host (10.100.0.50) to the ASA side host (10.200.0.50)
[saif@FortiGate-site-host-01 ~]$ ip addr | grep eth0
2: eth0: <BROADCAST,MULTICAST,UP,LOWER_UP> mtu 9001 qdisc pfifo_fast state UP group default qlen 1000
    inet 10.100.0.50/20 brd 10.100.15.255 scope global dynamic eth0
[saif@FortiGate-site-host-01 ~]$
[saif@FortiGate-site-host-01 ~]$
[saif@FortiGate-site-host-01 ~]$ ping 10.200.0.50 -c 4
PING 10.200.0.50 (10.200.0.50) 56(84) bytes of data.
64 bytes from 10.200.0.50: icmp_seq=1 ttl=63 time=131 ms
64 bytes from 10.200.0.50: icmp_seq=2 ttl=63 time=131 ms
64 bytes from 10.200.0.50: icmp_seq=3 ttl=63 time=131 ms
64 bytes from 10.200.0.50: icmp_seq=4 ttl=63 time=131 ms

--- 10.200.0.50 ping statistics ---
4 packets transmitted, 4 received, 0% packet loss, time 3003ms
rtt min/avg/max/mdev = 131.042/131.475/131.899/0.414 ms
[saif@FortiGate-site-host-01 ~]$
The reverse traffic is also working as expected.
[saif@ASA-site1-host-01 ~]$ ip addr | grep eth0
2: eth0: <BROADCAST,MULTICAST,UP,LOWER_UP> mtu 9001 qdisc pfifo_fast state UP group default qlen 1000
    inet 10.200.0.50/20 brd 10.200.15.255 scope global dynamic eth0
[saif@ASA-site1-host-01 ~]$
[saif@ASA-site1-host-01 ~]$ ping 10.100.0.50 -c 4
PING 10.100.0.50 (10.100.0.50) 56(84) bytes of data.
64 bytes from 10.100.0.50: icmp_seq=1 ttl=63 time=132 ms
64 bytes from 10.100.0.50: icmp_seq=2 ttl=63 time=131 ms
64 bytes from 10.100.0.50: icmp_seq=3 ttl=63 time=137 ms
64 bytes from 10.100.0.50: icmp_seq=4 ttl=63 time=131 ms

--- 10.100.0.50 ping statistics ---
4 packets transmitted, 4 received, 0% packet loss, time 3001ms
rtt min/avg/max/mdev = 131.063/133.079/137.615/2.671 ms
[saif@ASA-site1-host-01 ~]$
Check the tunnel status.
You can check the status of the tunnel in FortiGate GUI by going to Dashboard-> Network -> IPsec tunnel status.
Both the phase1 and phase2 tunnels should be up with incoming and outgoing data passing through it.
Note: You could even bring up the tunnel by clicking Bring up the tunnel from the menu.


You can check the tunnel status in the ASA by entering the CLI command show crypto isakmp sa.
Note: Some outputs were truncated.
gld-asa-fw-01# show crypto isakmp sa

There are no IKEv1 SAs

IKEv2 SAs:

Session-id:1, Status:UP-ACTIVE, IKE count:1, CHILD count:1

Tunnel-id Local                                               Remote                                                  Status         Role
358972081 10.200.16.10/4500                                   13.x.x.x/4500                                      READY    RESPONDER
Similarly, you can also get the phase1 information from the FortiGate firewall with the command diagnose vpn ike gateway.
gld-frtgt-fw-01 # diagnose vpn ike gateway

vd: root/0
name: To-ASA-Site1
version: 2
interface: port1 3
addr: 10.100.16.10:4500 -> 54.x.x.x:4500
tun_id: 54.x.x.x/::54.x.x.x
remote_location: 0.0.0.0
created: 2460s ago
nat: me peer
PPK: no
To see the phase2 tunnel information, you may enter the command show crypto ipsec sa.
gld-asa-fw-01# show crypto IPsec sa
interface: outside
    Crypto map tag: site1map, seq num: 10, local addr: 10.200.16.10

      access-list 101 extended permit ip 10.200.0.0 255.255.240.0 10.100.0.0 255.255.240.0
      local ident (addr/mask/prot/port): (10.200.0.0/255.255.240.0/0/0)
      remote ident (addr/mask/prot/port): (10.100.0.0/255.255.240.0/0/0)
      current_peer: 13.x.x.x


      #pkts encaps: 30, #pkts encrypt: 30, #pkts digest: 30
      #pkts decaps: 30, #pkts decrypt: 30, #pkts verify: 30
      #pkts compressed: 0, #pkts decompressed: 0
The Phase2 status on the FortiGate tunnel can be found with the command diagnose vpn tunnel list.
gld-frtgt-fw-01 # diagnose vpn tunnel list
list all IPsec tunnel in vd 0
------------------------------------------------------
name=To-ASA-Site1 ver=2 serial=2 10.100.16.10:4500->54.x.x.x:4500 tun_id=54.x.x.x tun_id6=::54.x.x.x dst_mtu=9001 dpd-link=on weight=1
bound_if=3 lgwy=static/1 tun=tunnel/255 mode=auto/1 encap=none/512 options[0200]=frag-rfc  run_state=0 accept_traffic=1 overlay_id=0
proxyid_num=1 child_num=0 refcnt=5 ilast=1 olast=382 ad=/0
stat: rxp=58 txp=977 rxb=9512 txb=82068
litespirited
Wednesday 28th of August 2024
Thank you that is an excellent step by step guide. However, please could you clarify/Verify that this configuration is a 'Policy based' or 'Route based' Site to Site configuration and this is same for both sides ? ...or is one side different ?