
The Proxmox VE is one of the popular open-source hypervisors. You can see that the enterprise setup also uses the Proxmox server. So if you are new to Proxmox, what is the best way to learn about the hypervisor quickly?
You can turn an old laptop or PC into Proxmox by installing the Proxmox server in it however when you install the Proxmox server, it will utilize the entire hard disk on the machine and end up removing the existing operating system, and you cannot do anything really on the host machine. It will show you a black screen with the URL to access the Proxmox server web GUI. A workaround would be to use Proxmox and windows11 in the same machine as dual boot, which we covered extensively here.
But what if you don’t want to mess with the host operating system or dual boot and want to install the Proxmox server as a Virtual machine?
In that case, you can install Proxmox ve on a VirtualBox hypervisor. You are installing a hypervisor on top of another hypervisor.
And when you run a virtual machine on top of Proxmox using this setup, you are doing nested virtualization so that you won’t get good performance with this setup, the virtual machine will run a little slow, however, it can run most of the operating systems. This setup is only recommended for home lab or some testing.
The cool thing about VirtualBox is that it is open-source again and free for anyone to use it, and it supports most of the operating systems out there.
In this blog article, we will install a Proxmox server on an oracle VirtualBox hypervisor. After the installation, we will spin up a small VM in Proxmox and test the setup.
Before you begin, you need to have;
- Proxmox ve image – you can get it from here.
- VirtualBox installed on your machine – you can download the VirtualBox hypervisor here.
1. Create Proxmox virtual machine in VirtualBox.
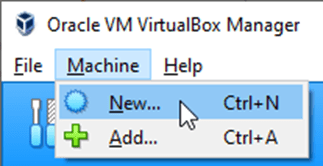
Open VirtualBox and click on Machine and New or press CTRL+N to create a new virtual machine.

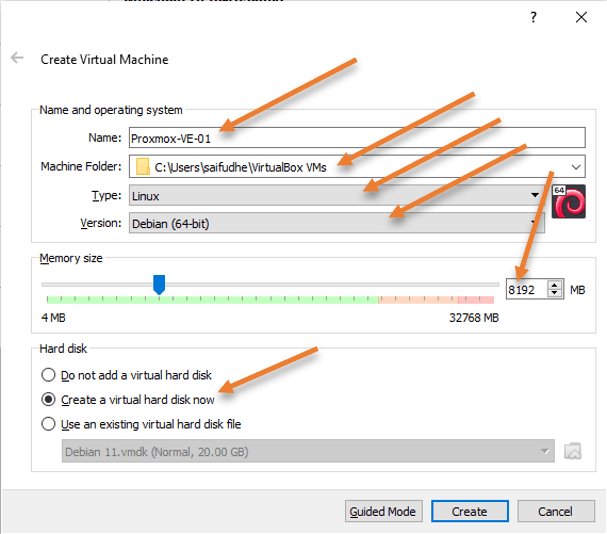
A new virtual machine creation wizard will now open up. Ensure you have chosen expert mode in the wizard, which provides more control on the Proxmox virtual machine that we are about to create.
Name: Provide a name for the virtual machine.
Machine folder: By default, it will pick up a location where the virtual machine is going to be installed. You can change the location if you would like to.
Type: Linux
Version: Debian (64bit) – As the Proxmox is based on Debian Linux, we choose Debian as the version.
Memory: As you will be running virtual machines or containers in the Proxmox server, it is recommended to have more memory. Hence I chose 8GB of memory.
Hard disk: Choose Create a virtual hard disk now and click on Create.

2. Create a virtual hard disk for the Proxmox server in VirtualBox.
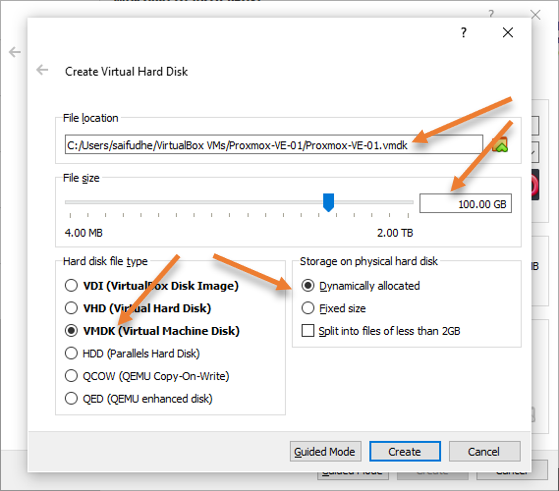
We will now create the Proxmox server’s storage in the virtual hard disk creation wizard.
File size: The more storage you provide, the more VMs you can store. I am giving 100GB of storage. Based on your setup, you can provide the storage size depending on the requirement.
Hard disk file type: By default, it will choose VDI, which is good in most installations, however, if you plan to move/copy this virtual machine to some other hypervisors, it is best to choose VMDK.
Storage on physical hard disk: Choose Dynamically allocated and click on Create.
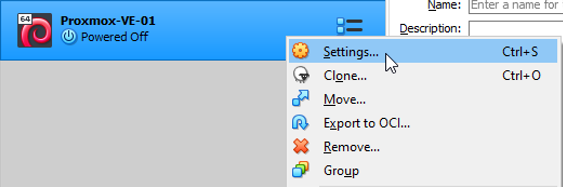
3. Configure CPU and Enable Nested VT-X/AMD-V on Proxmox VM.
You will see the Proxmox VE virtual machine created in the VirtualBox. Right-click on the virtual machine and click on settings.

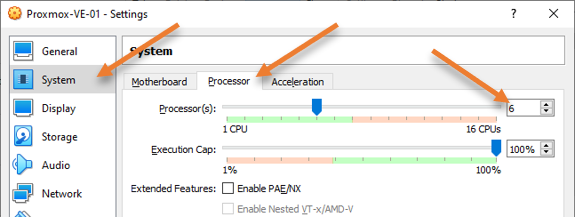
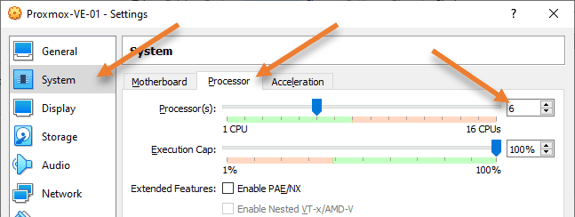
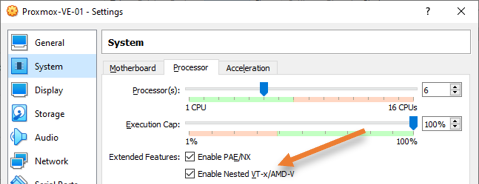
Configure the Proxmox CPU.
When we created the VirtualBox, we didn’t get any options to specify the CPU. Hence under the system, you can change the CPU from the default value ‘1’ to whatever you like.
Since I have enough CPU cores, I am giving 6 Cores, depends on your requirement, you may add the CPU.
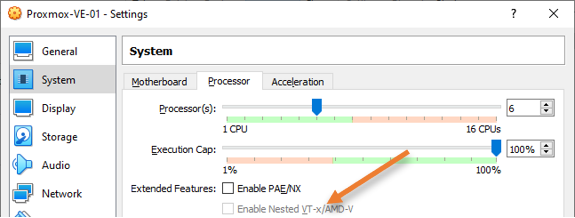
Enable nested VT-X /AMD in the GUI.
Before you proceed with the next steps, It is assumed that you already have intel VT-x/AMD-V enabled in your bios settings in your host machine. You can enable nested virtualization with a passthrough of hardware virtualization functions to the guest VM. So it is important that you enable intel VT-x/AMD-V on the bios settings.
I the same Processor configuration tab, you will see Enable Nested VT-X/AMD-V is grayed out for me.
If you are using a machine with AMD CPU, you may have this option enabled to check, so you may do so here.
If those who use intel-based machines will require this step to be performed using VirtualBox CLI.

Enable nested VT-X /AMD in the CLI.
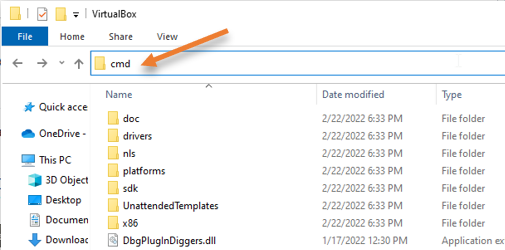
Open windows explorer-> Goto VirtualBox installation directory (C:\Program Files\Oracle\VirtualBox)
And type cmd in the address bar and hit enter.

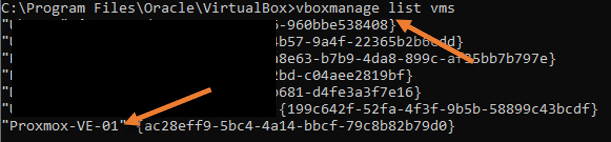
Type vboxmanage list vms to get the list of virtual machines that you have installed in the VirtualBox with the names. As you can see our Proxmox virtual machine name is Proxmox-VE-01. You can learn more about the usage of Virtualbox CLI here.

Enter the below command on the CMD to enable nested VT-X/AMD-V in VirtualBox.
VBoxManage modifyvm Proxmox-VE-01 --nested-hw-virt onYou can now see that nested vt-x/amd-v is enabled on the VirtualBox.
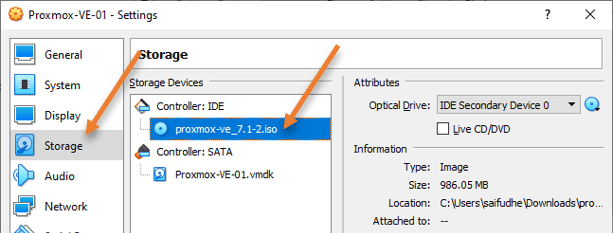
4. Attach the Proxmox ISO image.
To install the Proxmox virtual machine in VirtualBox, you need to point to the Proxmox iso file that we downloaded in the virtual CDROM in VirtualBox.
Click on Storage-> Under Empty disk -> Browse for the Proxmox iso image.

5. Configure the Proxmox network in VirtualBox.
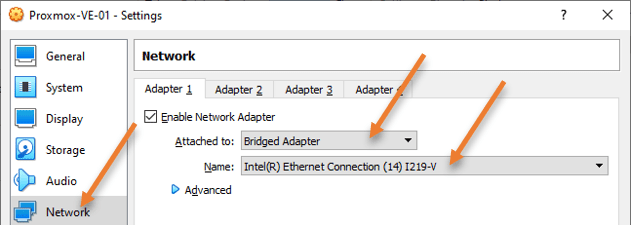
By default, the VirtualBox would assing NAT for any virtual machine you install. It will provide internet access to the virtual machine using the host machine’s IP address; however, it will not give inbound access to the Proxmox virtual machine, unless you configure the VirtualBox port forwarding.
After the Proxmox installation is complete, we will require to access the Proxmox management GUI from the host machine, and also, the virtual machine that we will install in the Proxmox should be able to go out to the internet. Hence we choose a bridged adapter and ensure that you choose the right adapter connected to the LAN network. In my case, it is the ethernet wired connection.
If you are using a laptop, in most cases, you will have a wifi adapter, so you may choose the network name depending on the connectivity.
The virtual box VM” s will become part of the LAN network in bridged mode. You can learn more about the VirtualBox network types here.

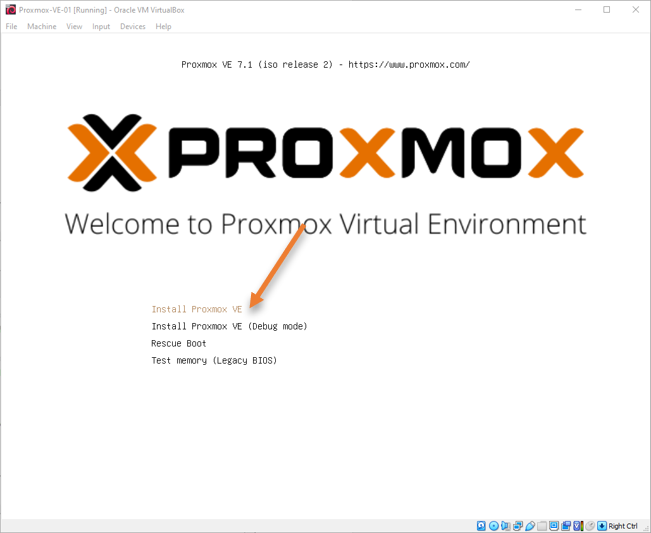
6. Install the Proxmox server in VirtualBox.
We have completed the virtual machine side of the configuration; let’s now go ahead and install the Proxmox VE on the VirtualBox.
Right-click on the virtual machine and click on start.
The installation wizard will now open. Choose install Proxmox VE.

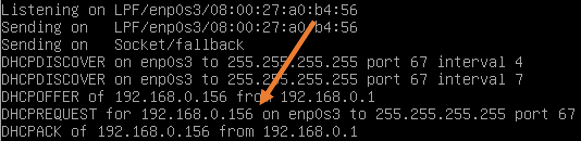
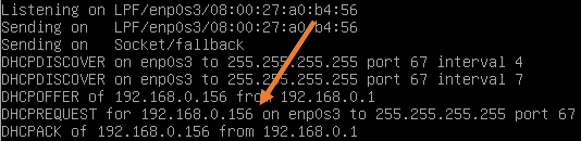
After a few seconds, you can see I have got an IP address automatically on my Proxmox virtual machine.
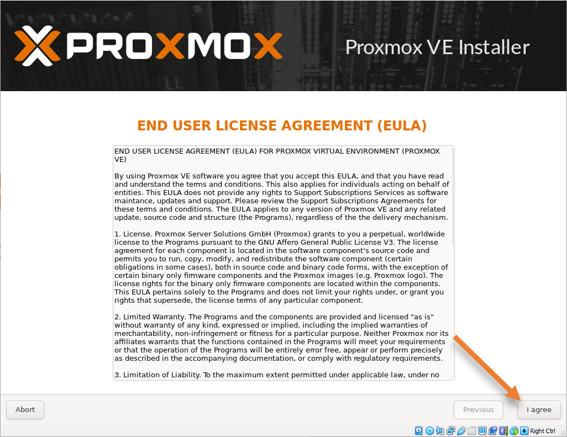
Accept the license agreement by clicking I agree.

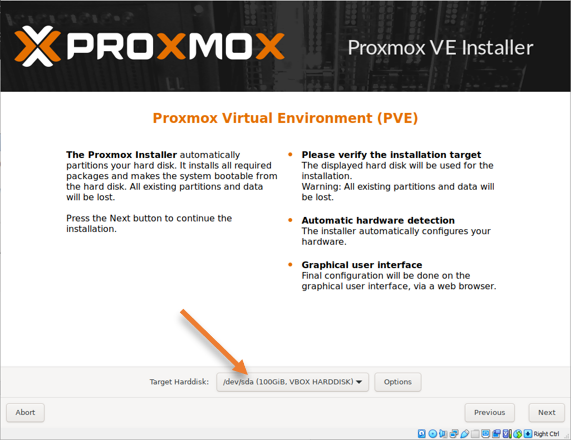
You will see the 100GB of the virtual hard disk that we defined in the Proxmox VM. Click on next.

- Choose the location and the language of your choice and click on Next.
- Enter the password and the email address.
You need to note this password as this will be required when you need to log in to the Proxmox server later on.
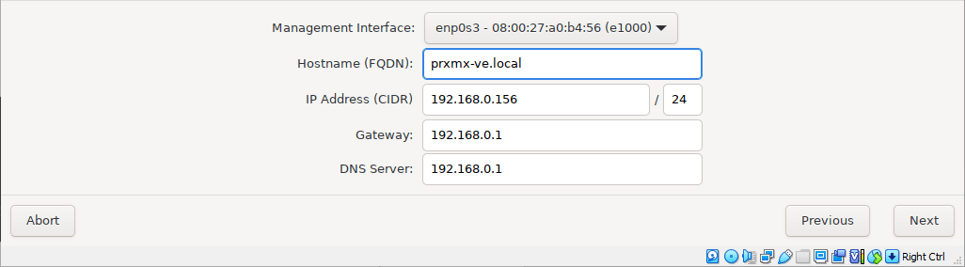
- You already have the IP address defined because it was assigned via DHCP, if there is no DHCP, you may configure the IP address manually here and click on Next. If there is no hostname, you may enter that here.

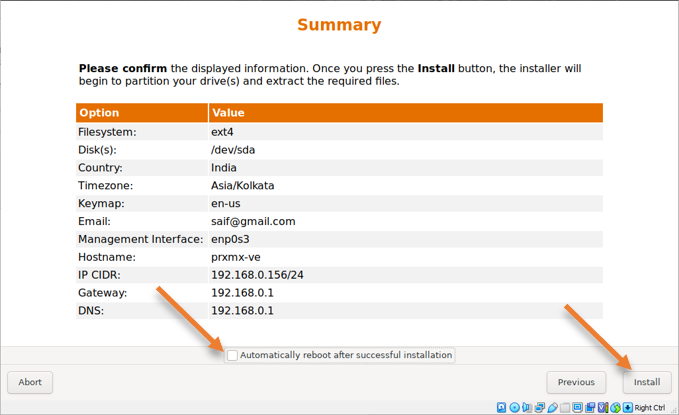
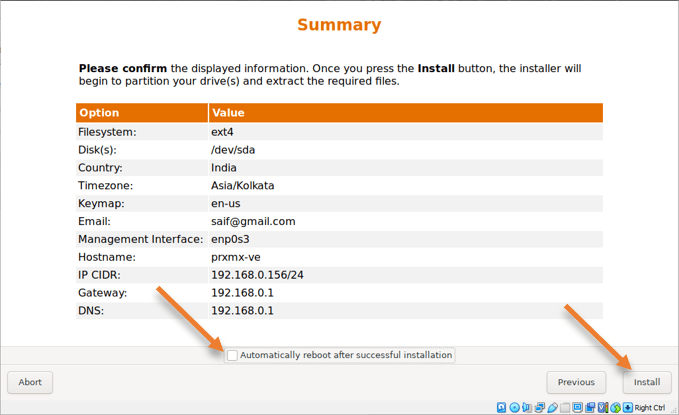
You will get the summary of the configuration, here, you need to make sure you uncheck the option that says Automatically reboot after successful installation and click on Install.
You must uncheck this option because we would need to remove the installation media before we go ahead and reboot.
After a few moments, you will see the installation is now complete. Do not click on Reboot yet.
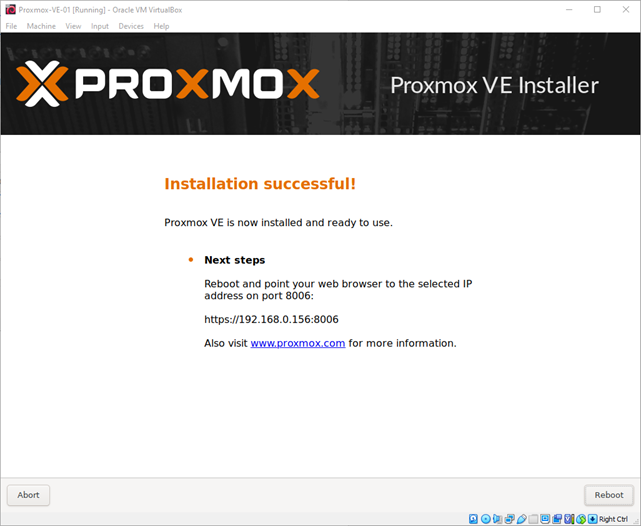
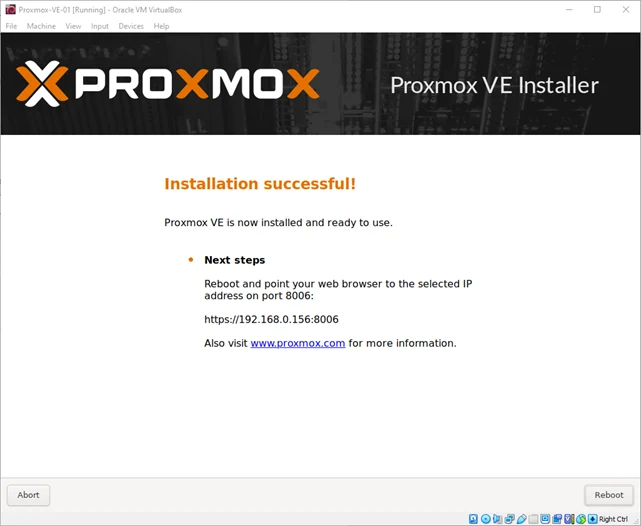
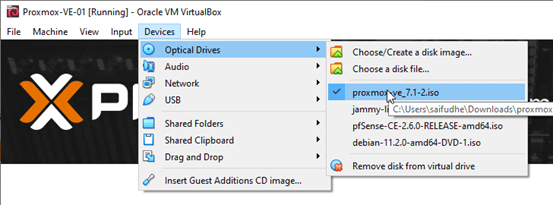
In the Devices-> Optical Drives -> Uncheck the Proxmox iso image that was already checked.

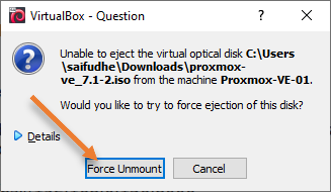
Click on Force Unmount on the prompt. After that, you may click on Reboot on the installation wizard.

7. Access the Proxmox virtual machine Web GUI.
In a few seconds, you will see the Proxmox server will load and You will get the below screen, where it shows the URL to access the web GUI of the Proxmox server and the login prompt.
Here, you can log in with the root as the username and password we set during the installation.

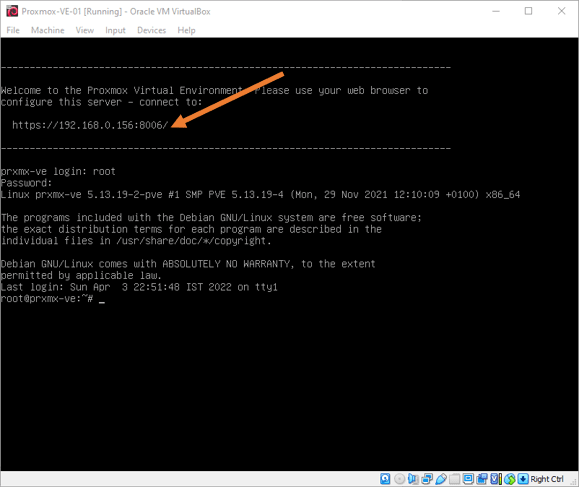
To access the web GUI, you may type the URL that you see on the Proxmox CLI. You will get a security warning which is expected. You may ignore that and continue.
Enter the username root.
and the password and click on login to the Proxmox web GUI.
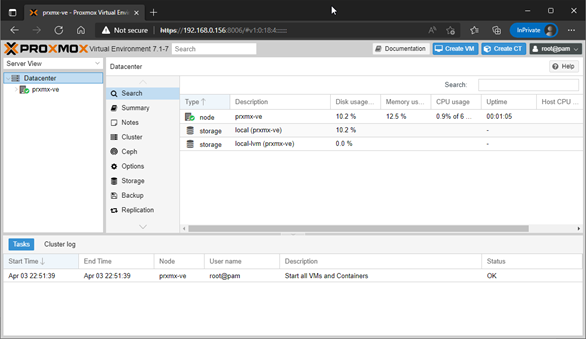
You will get the below Proxmox screen with the system information.

Conclusion
The installation Proxmox server on VirtualBox is a straightforward step. However, you need to keep in mind that we are doing nested virtualization. It is expected to have performance lag when managing the virtual machine on Proxmox installed in VirtualBox. You cannot expect the same performance that you get from a bare-metal server.