
Proxmox is one of the open-source, free virtualization software available for anyone to use. Sometimes you might wonder how you can dual boot windows machines with Proxmox?. Maybe you already have a pretty decent laptop or PC running with windows 11/10. For daily tasks, you would want to use windows 11, and for running multiple VMs, you can use Proxmox.
The problem with this kind of setup is that you can only use one operating system at a time, either windows or Proxmox. And it may not be ideal if you plan to use the Proxmox dual-boot to run Virtual machines 24/7. Instead, you get different hardware dedicated for Proxmox and run the virtual machines inside the Proxmox and use the windows machine as it is. Or you could deploy the Windows 11 operating system as the virtual machine in the Proxmox, and you could use the windows11 machine remotely using RDP from any other device, including iPad or even on a smartphone.
Can I dual boot Proxmox with windows 11?
Sometimes, you may not have the server or the resources to install Proxmox. The next option you think about is running the Proxmox on your windows laptop or a PC.
You can run Proxmox alone on a PC, and it will work fine. However, when you try to do dual boot Proxmox with windows11/10 it will delete the windows files, and you get the system with only Proxmox running. To run Proxmox on a pc along with windows without any conflict, you first need to install the Windows operating system on your machine. Reserve the storage for the Proxmox and install Debian 11 instead of Proxmox on the PC’s reserved storage. This will provide Debian and windows running on the same PC with dual boot. After that, you can install the Proxmox server on Debian and use it.
In this blog, we will look at how you can install Proxmox on a machine that is already running with windows 11 using dual boot.
If you want to wipe the entire operating system on your machine and install the proxmox, including the Windows operating system, you may install Proxmox using a USB drive on the PC, here are the steps on how to do that, it is not a dual boot but a Proxmox system alone. This procedure is useful when you want to turn your old PC into a Proxmox server.
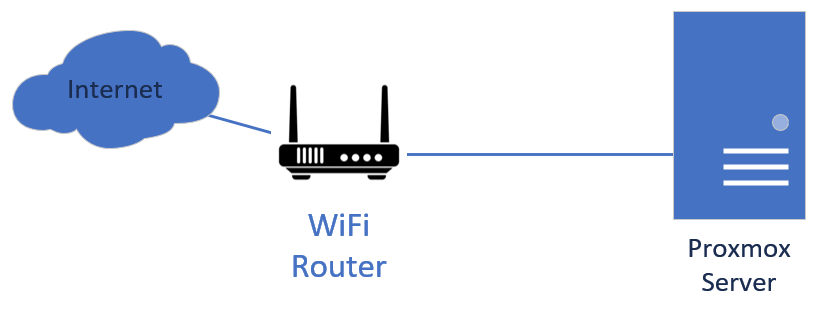
Below is my network setup.
I have a typical LAN configured with wifi and a wired network, the windows 11 machine that will become the Proxmox server has connected to the wifi router using the LAN cable. The wifi router act as a DHCP server as well.
Since I have only a single interface on the PC, and no VLANs configured on my network, all the traffic will go through the single interface.

Before you begin;
You need to have a good Windows 10/11 PC/laptop configuration with AMD and Intel virtualization support. These days, most of the PC have that enabled, so you should be good.
The minimum requirement I would say;
- Intel or AMD CPU with virtualization support.
- At least 4GB of ram – If you have more, even better.
- Windows11 is already installed and running.
The PC I am using has an i7CPU with 12 Cores and 32Gigs of RAM. You don’t need that much configuration. However, if you have that, that should be good.
Note: These steps will work fine with Windows 10, so either the win10 or 11 will work.
1. Setup Debian and Windows as dual boot.
When you dedicate a free unallocated space for the Proxmox to use in windows 11. Try to deploy Proxmox directly using the USB, it cannot identify the unallocated windows partition, instead it will take the whole partition. And there is no way to adjust the partitioning during the Proxmox installation directly on the PC.
Hence, we will perform a dual boot with Debian 11 and Windows 11, so the Debian Linux operating system can see the free space reserved by the windows machine, utilize the free space and install the OS in it.
After the Debian installation, you can go ahead and install the Proxmox packages on Debian and use the Debian for Proxmox.
Follow the article here to perform the windows and Debian 11 dual boot.
I like the installation of Proxmox on a Debian machine because when you install the Proxmox alone, you can’t really use that host for anything else. It will show you the backend Console of the Proxmox server similar to ESXi.
However, when you install the Proxmox inside Debian, you can use the Proxmox server with the url and use the GUI of the Debian and use it as another host. Moreover, you can open the Proxmox web GUI within the Debian firefox browser, which is fantastic.
After the Debian and windows dual boot is completed, come back and follow the steps below.
In the previous article, we also allocated the hard disk for Proxmox, 180GB.
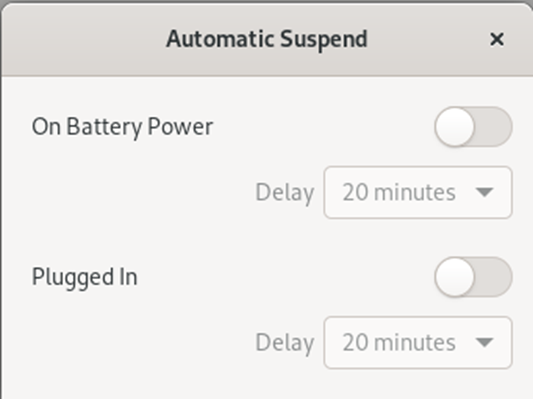
2. Disable Debian automatic suspend.
When using the Debian machine as the Proxmox server, you need to ensure that the system doesn’t sleep when working on something. To prevent that from happening, you need to disable the standby option in Debian when connected to the network.
Goto-> Settings->Power-> Automatic Suspend.
I turned off Automatic suspend on both battery power and even when it is plugged in.
3. Update the hosts file.
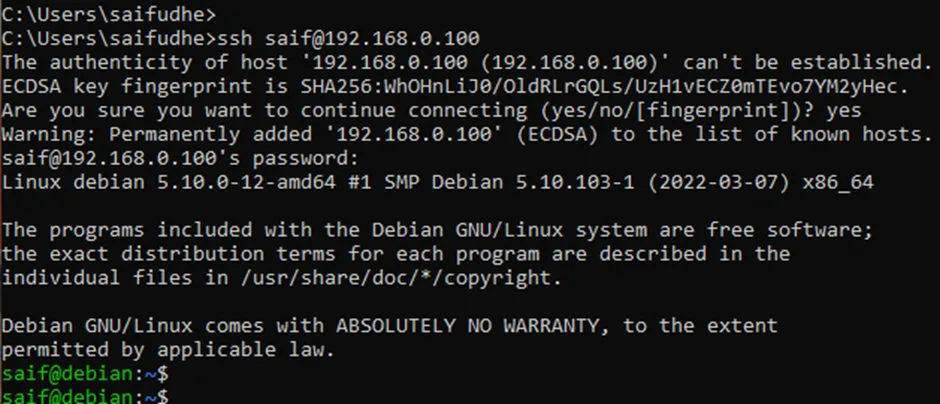
SSH into the Debian host, add the below entries in the /etc/hosts file, replacing the entry for 127.0.1.1.
192.168.0.111 prx-deb-01.getlabsdone.local prx-deb-01
Note: You will require to switch to the root user to modify the file. Use the SU command to switch to root user. Otherwise, you need to make the normal user as admin and use sudo instead.
saif@gld-deb-01:/$
saif@gld-deb-01:/$ su root
Password:
root@gld-deb-01:/#
root@gld-deb-01:/#
Before the change.
saif@gld-deb-01:~$ cat /etc/hosts
127.0.0.1       localhost
127.0.1.1       gld-deb-01.getlabsdone.local    gld-deb-01

# The following lines are desirable for IPv6 capable hosts
::1     localhost ip6-localhost ip6-loopback
ff02::1 ip6-allnodes
ff02::2 ip6-allrouters
saif@gld-deb-01:~$
After the change.
saif@gld-deb-01:~$ cat /etc/hosts
127.0.0.1       localhost
192.168.0.111	prx-deb-01.getlabsdone.local	prx-deb-01

# The following lines are desirable for IPv6 capable hosts
::1     localhost ip6-localhost ip6-loopback
ff02::1 ip6-allnodes
ff02::2 ip6-allrouters
saif@gld-deb-01:~$
4. Update the repositories.
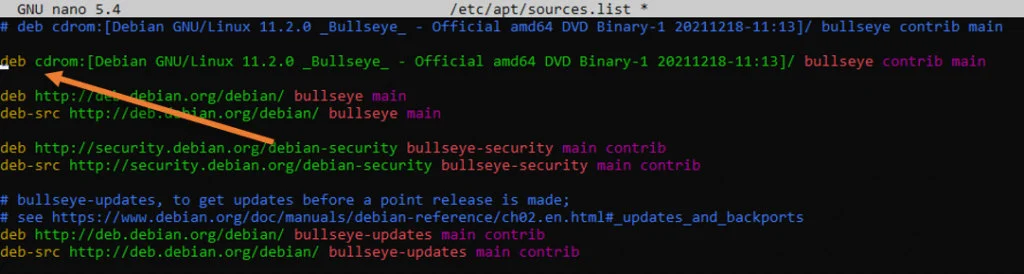
Since we have installed Debian 11 using CDROM just ensure that there is no deb cdrom: added in the source list. If yes, you need to comment it out.
For example,
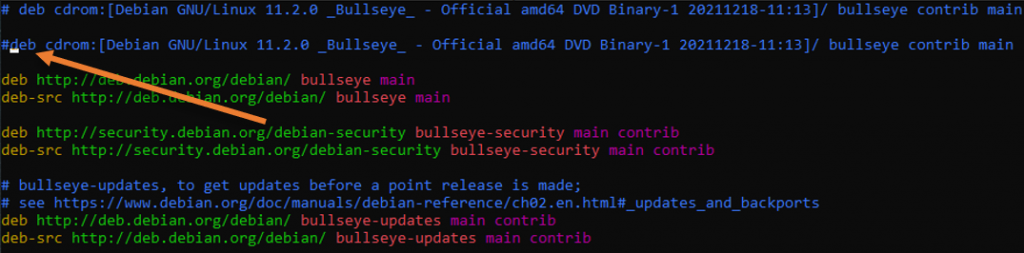
I can see the CDROM added in the sources list. Let me comment it out.
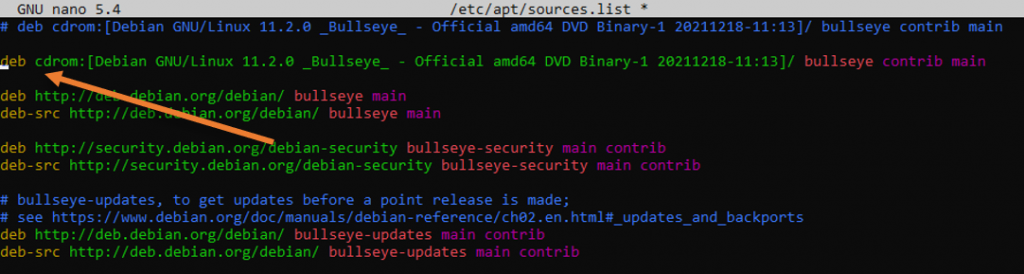
I commented out, and now it looks like below.
Add the Proxmox repository to the source list.
echo "deb [arch=amd64] http://download.Proxmox.com/debian/pve bullseye pve-no-subscription" > /etc/apt/sources.list.d/pve-install-repo.listAdd Proxmox repository key.
wget https://enterprise.Proxmox.com/debian/Proxmox-release-bullseye.gpg -O /etc/apt/trusted.gpg.d/Proxmox-release-bullseye.gpg Update the repository with the below command.
apt update && apt full-upgrade -y5. Install Proxmox on your Debian machine.
To install the Proxmox server, issue the below command.
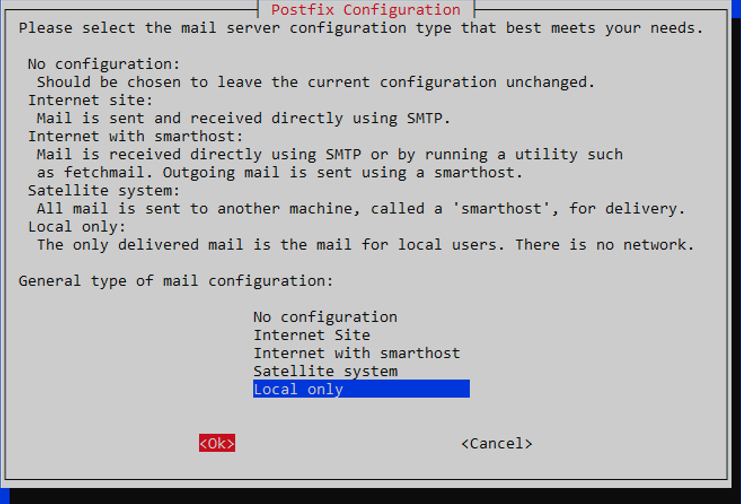
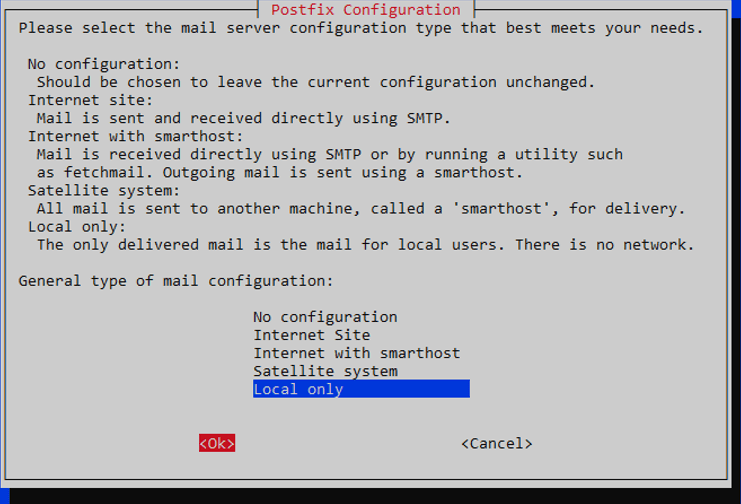
apt install Proxmox-ve postfix open-iscsi -yIf you get mail server configuration, you may choose satellite system as the mail configuration, this will act as mail relay.
If you don’t have a mail server, you may choose local only; I don’t have a mail server; hence I am choosing local only.
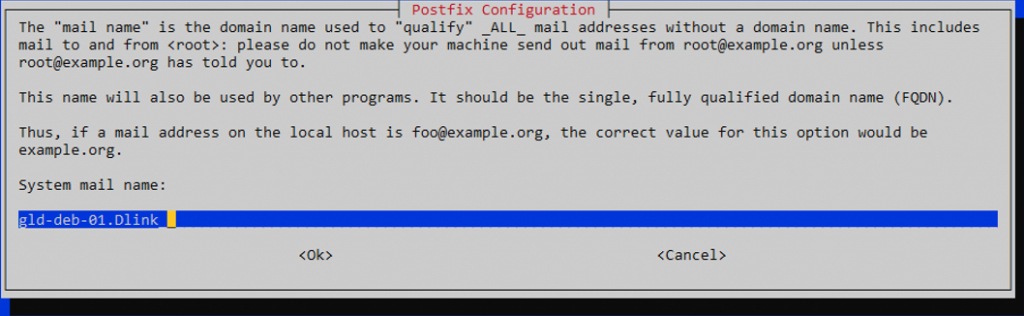
I leave the default hostname as the system mail name and choose OK.
Once the installation is complete, you are almost there.
6. Access the Proxmox web GUI.
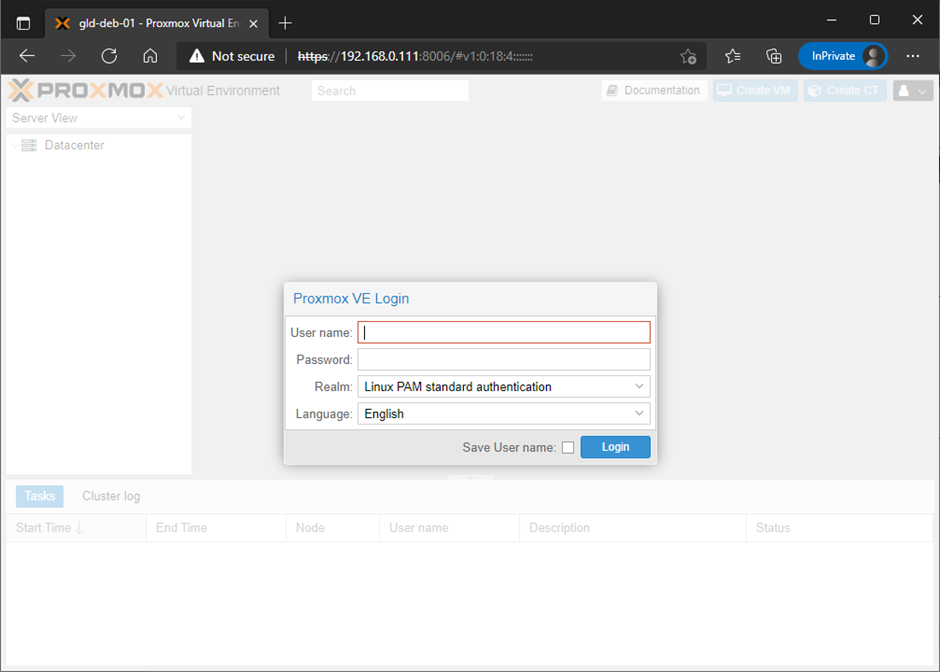
You can try to access the Proxmox web GUI in your local machine by typing https://<your IP>:8006
Which is https://192.168.0.111:8006 in my setup.
You may ignore the security warning and continue.
As you can see, we can access the Proxmox server web GUI prompting to enter the credentials.
Login to the web GUI using the username as root.
And your Debian 11 root password that you have set in the debian installation article.

You will get a notification that says no valid subscription. You can ignore that.
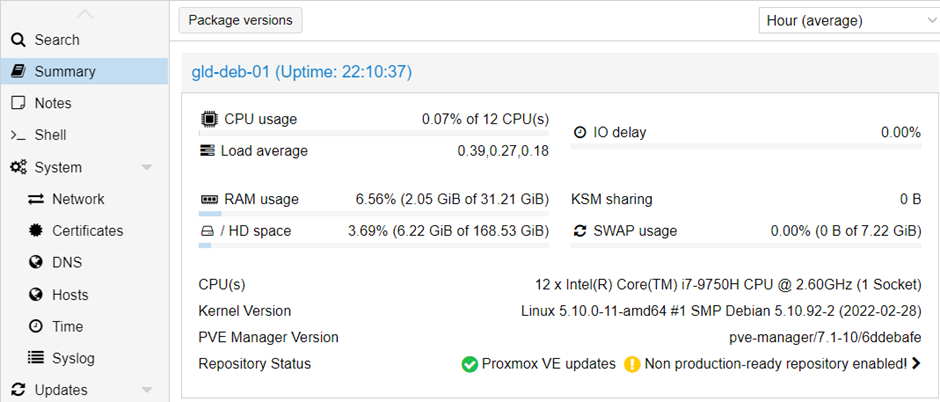
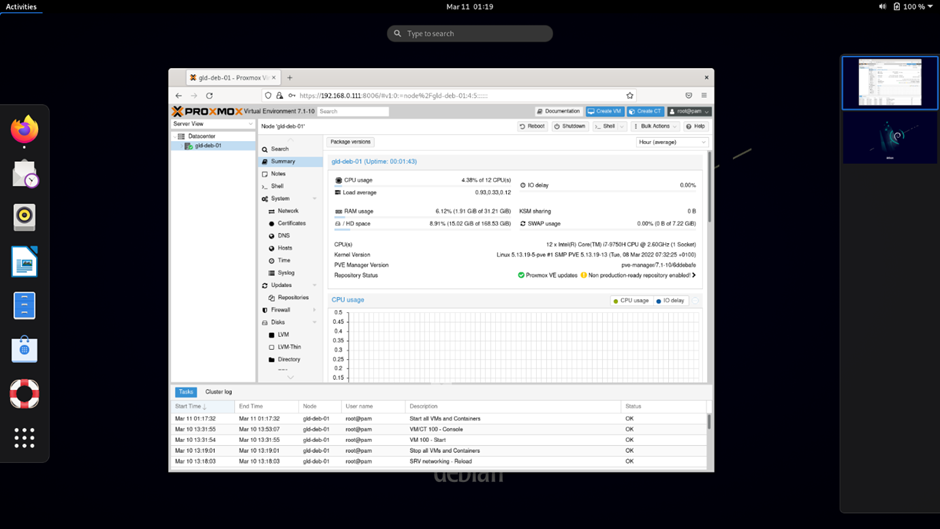
You can see the storage size by clicking the node-> Summary.
Here you will get the complete hardware information.
As you can see, I have close to 180GB of storage that we allocated for the root user, in which 6.22 is used by the Debian and Proxmox installation.
7. Create the bridge interface.
For the virtual machine to connect to the Proxmox server using the network and go out to the internet, the Proxmox server should have a bridge interface.
The host that we are using to install Debian 11 has only one single interface, and we are going to create a single bridge interface mapped to the physical interface. If you have multiple interfaces, you can send the VM traffic in one interface Proxmox traffic in another interface.
Because we are using only a single interface and there is no VLAN, we will use both the Promox management and the VM traffic on the same interface.
Note: After the bridge creation, The IP address of eno2 (physical interface) will be removed, so we will configure the same IP address on the bridge interface.
Click on the node-> Network
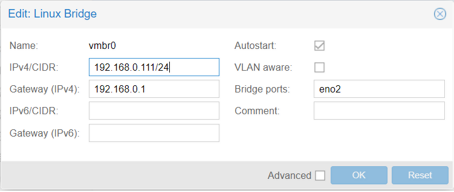
In the network interfaces, click on Create-> Linux Bridge.
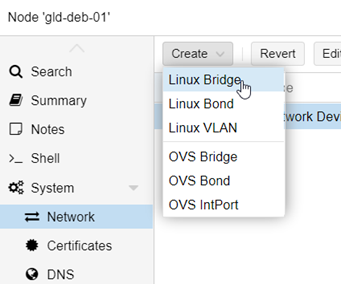
In the Linux bridge interface creation window.
- Name: Enter the name of the bridge.
- IPv4/CIDR : The IP address you already have on the Debian11, or configure a different IP address of your choice. You need to understand that going foreward, you will use the new IP address on the Debian 11 host.
In my case, the IP address is 192.168.0.111
- Gateway: Your LAN gateway.
- Bridge ports: And the physical interface that you are going to map the bridge interface.
Click on OK.

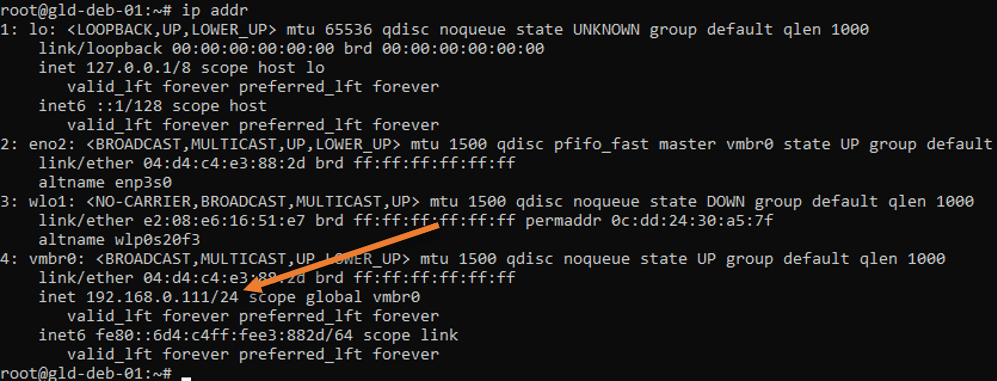
We have completed the configuration, we can now proceed to reboot the machine after the reboot you will see the vmbr0 interface that we just created becomes active.
You should see the IP address is now configured on the VMBR0.

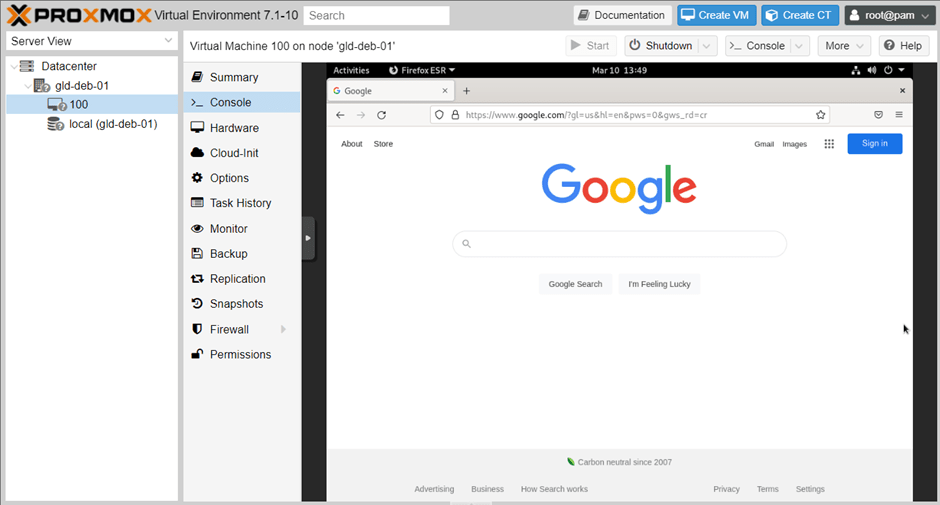
8. Deploy the virtual machine.
You can now start building your first virtual machine following the article here.
If you are missing your Windows 11 operating system experience while working on Proxmox, you may install the Windows 11 operating system in it following the guide here. After which, you can RDP into the machine.
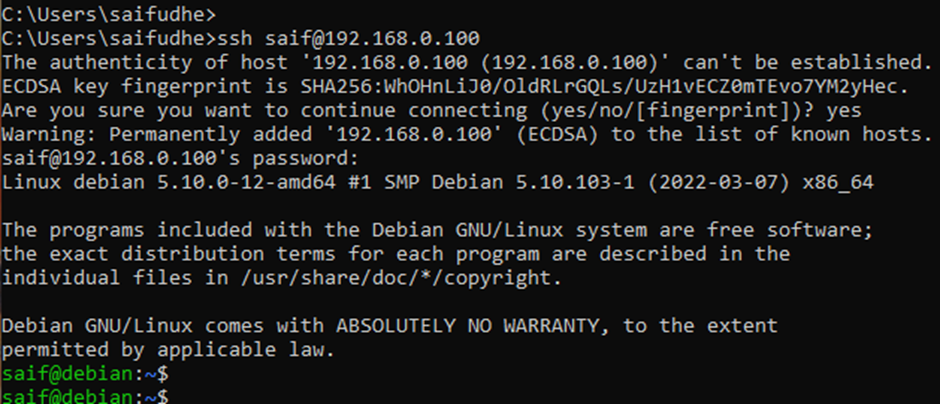
As you can see, I have deployed a Debian 11 virtual machine on my Proxmox server, and it got an IP address from my local DHCP server, and it can reach the internet as well.

If I have to do something remotely on this virtual machine, I can do that by ssh into the server. That is also working fine.
9. Access the Proxmox from the Debian host.
As we have installed the Proxmox service on the Debian host, you can now access the Proxmox web GUI within the Debian host. It is one of the benefits of using the Proxmox on Debian. You can not only run the Proxmox as a service and while it is running. You can use the Debian host for internet browsing or libra office applications.
Conclusion
Now you have a pretty good idea of how to dual-boot using the Proxmox and windows host. I have been using this setup for some time now, and it works great. The only issue is since I have only a single network, all the VM traffic and the management traffic is in the same broadcast domain. To avoid that, and separate each of the networks, either I need to get a PC with dual ethernet ports or use something called VLAN, which will be for another discussion.
Scott
Friday 7th of June 2024
Hmmmm many things you say here about the proxmox VMs being inaccessible locally...it's not right.
Saifudheen Sidheeq
Friday 7th of June 2024
Hi Scott,
Thanks for the comment.
Can you specify the section you felt that is not right?
I will look into it.
Thanks
Peporro
Thursday 21st of December 2023
Good afternoon. I have a similar lab but when I restart at the end of the Proxmox installation on Debian, Grub has removed the entry to start Windows, which I have installed on another disk in the same PC. Additionally, when Debian starts, I can verify that it has lost the network connection.