
FortiGate is one of the popular commercial firewalls used by enterprise networks. It is even available for home usage with a smaller hardware version. Sometimes, you might have a virtual license for the FortiGate firewall and wonder how you can virtualize the FortiGate firewall in your network. For the learning purpose, you can install the FortiGate firewall on the VMware workstation, however, if you want to set up a lab or use it as a primary firewall for your virtualized environment, you need to install FortiGate on ESXi or in Proxmox VE servers.
Can a FortiGate firewall be installed in Proxmox?
In Proxmox, the default way to install a virtual machine is by using an iso image. When you go about installing a fortigate firewall in Proxmox, you won’t be able to find an ISO image. Instead, you will have different image formats for cloud environment, VMware ova, KVM qcow2, etc. Because of that reason, many users think that they cannot install a fortigate firewall in Proxmox.
You can install a fortigate firewall using qcow2 image in Proxmox, and it works perfectly fine, just like any other operating system on Proxmox.
In this blog, we will install the FortiGate firewall on a Proxmox VE server and design a small network with it. After the deployment, we will test the network from the physical LAN and the virtual LAN. Both of them will have a virtual fortigate LAN interface as the gateway.
Before you begin, you need to have;
FortiGate KVM image – you can download that from here.
Click on VM images,
Select product – FortiGate
Select platform – KVM.
Choose the version and on the right, download the new deployment of FortiGate for KVM.

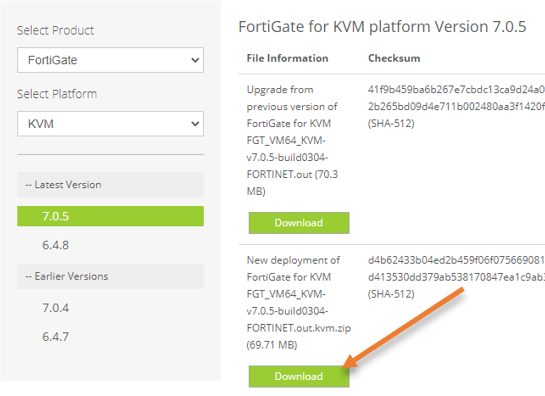
After downloading extract the file, and you will get fortios.qcow2.
Below is the topology that we are going to use.
We have a basic Proxmox setup. The Proxmox server is connected to a Layer 2 switch that provides internet connectivity for the VMs running in the Proxmox server and the LAN users, including the management PC.

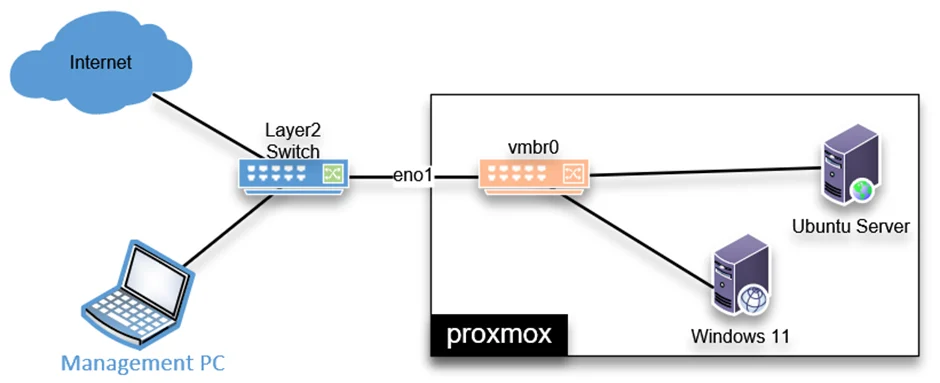
We will add a FortiGate firewall in this setup and see how that works.
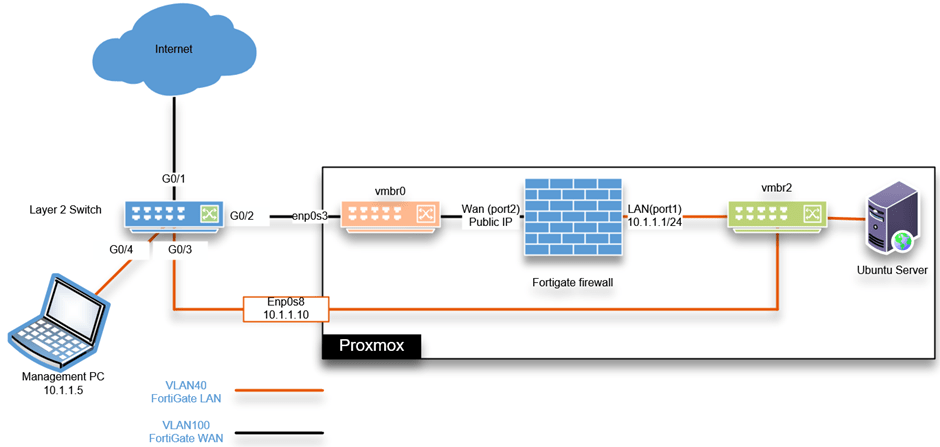
As you can see, I have separated the LAN and the WAN traffic using a VLAN on the Layer 2 switch. And deployed a FortiGate firewall in Proxmox, and its WAN link is connected to the internet VLAN bridge (vmbr0), which is 100 stretched to my internet modem in bridged mode.
The LAN interface connects to the LAN bridge vmbr2 on VLAN 40. You can learn more about the VLAN tagging on Proxmox here. All the LAN traffic will become part of the FortiGate LAN interface.
So after the deployment, the public-facing IP address will be at the FortiGate firewall WAN interface. If anyone on the LAN and VM side wanted to go out to the internet, it must go to the FortiGate firewall VM LAN interface.

Set up the switch with a VLAN.
You can use any switch for this configuration, but the switch should have VLAN tagging capability else, it will not work.
I am using a cisco switch here, and configurations are identical across all other types of switches.
- We will configure the layer2 VLANs, one for FortiGate WAN – VLAN 100 and the second is for FortiGate LAN – VLAN 40.
Configure terminal
Vlan 40
name FortiGate_LAN
!
vlan 100
name internet
- Tag the interface connected to the Proxmox server enp0s3 with VLAN 100. Second interface enp0s8 as VLAN 40.
Interface g0/2
description to_enp0s3
switchport mode trunk
switchport trunk allowed vlan 100

interface g0/3
description to_ enp0s8
switchport mode trunk
switchport trunk allowed vlan 40
- The connectivity from the switch to the internet is an access port (untagged port) on VLAN 100.
Interface g0/1
description connection_to_internet
switchport mode accessport
switchport access vlan 100
- From the switch to the Management PC, it is an access port on VLAN 40.
Interface g0/4
description to_LAN
switchport mode access
switchport access VLAN 40
Configure the bridge interface in Proxmox.
We will configure a static IP address 10.1.1.10 on the Proxmox server from the same LAN segment 10.1.1.0/24 from the FortiGate LAN. So when there is an issue with FortiGate, you can always reach the Proxmox server on the LAN and troubleshoot the problem.
If we are using a layer3 switch, I could have used a different VLAN for Proxmox management IP as it provides inter-VLAN communication. For example, from VLAN 40 for LAN and I could access the Proxmox management on VLAN 50. Since it is a layer2 switch, I would use the same LAN network VLAN 40.
I have covered the separation of VLANs on the Proxmox server using a layer3 switch here.
Open Proxmox CLI to configure the bridge interface.
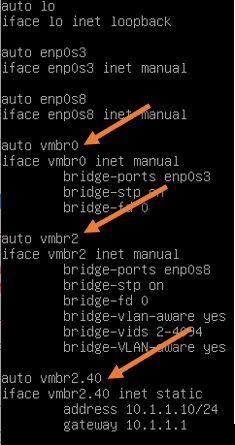
The network configuration is located in /etc/network/interfaces
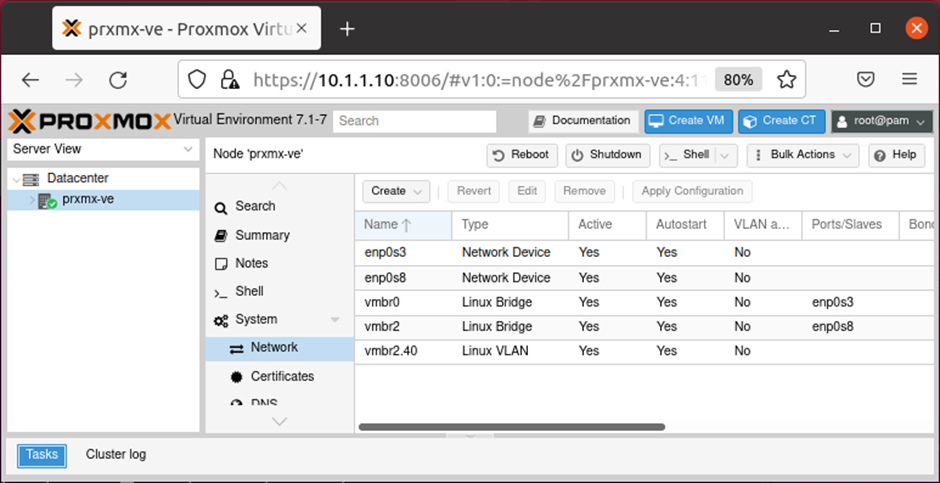
- Create two bridge interfaces. One is vmbr0, which provides internet connectivity to the FortiGate WAN side.
- And VMbr2 provides the FortiGate LAN connectivity.
- Assign an IP address 10.1.1.10 to the bridge interface to access the Proxmox management interface on VLAN interface vmbr2.40.
Below is the Proxmox configuration.

Restart the Proxmox network with the command service network restart.
Access the Proxmox server from the management PC.
We already defined the management PC interface g0/4 part of the access port on VLAN 40. We need to configure the management PC in the 10.1.1.0/24 network to reach the Proxmox IP.
I configured with 10.1.1.5 on the management PC.
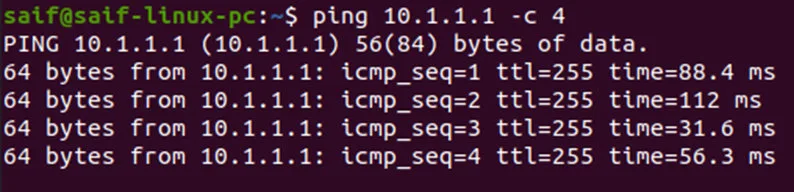
After that, you should be able to ping the Proxmox server.
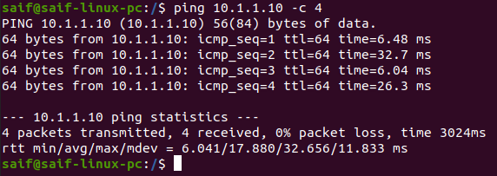
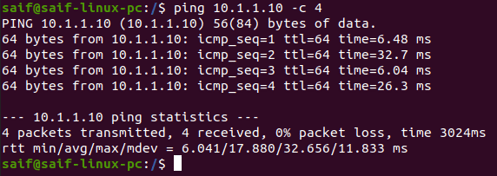
Access the Proxmox web GUI now with the URL https://10.1.1.10:8006
Ignore the security warning, and log in using the credential you have set up for the Proxmox.

We now have configured the Proxmox server without the dependency of the FortiGate firewall.
Deploy the FortiGate firewall in Proxmox.
You cannot deploy the FortiGate qcow2 image directly to the Proxmox server. We will first create a FortiGate virtual machine in Proxmox without the OS. After that, we will add the qcow2 image to the FortiGate firewall.
You can learn more about installing a virtual machine using qcow2 here.
Transfer the FortiGate qcow2 file to Proxmox.
We have already downloaded the qcow2 image from the Fortinet site and we now need to transfer this file to the Proxmox directory, I am choosing /var/lib/vz/image/qemu.
saif@saif-linux-pc:~/Downloads$ ls
fortios.qcow2
saif@saif-linux-pc:~/Downloads$ scp fortios.qcow2 [email protected]:/var/lib/vz/template/qemu
[email protected]'s password:
fortios.qcow2                                                                                           100%   72MB 184.7MB/s   00:00
saif@saif-linux-pc:~/Downloads$
Create a FortiGate virtual machine in Proxmox.
Login to the Proxmox web GUI, and Click on Create VM.
General configuration;
- Node: Choose the Proxmox node where you are going to install the FortiGate firewall.
- VM ID: It will be automatically added by the Proxmox.
- Name: Type a meaningful name and click on Next.


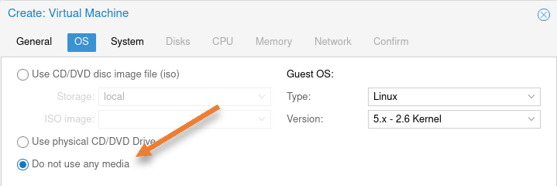
OS:
We are not attaching any OS here, choose Do not use any media.
- Guest OS:
- Type: Linux
- Version: 5.x
Click on Next.

Leave the system configuration to default.
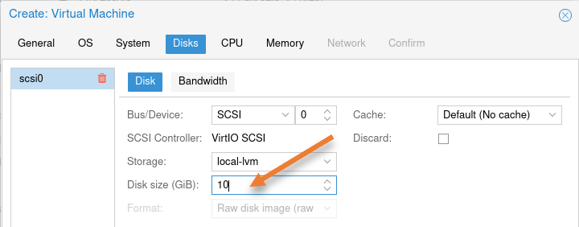
Disks configuration.
In the disk configuration, you will have a virtual hard disk created with 32GB of storage, I am reducing it to 10GB. Based on your requirement, you may adjust the storage.

Configure the CPU:
Provide at least 2 CPUs and click on Next.


Configure the memory.
And add the memory as 2GB.


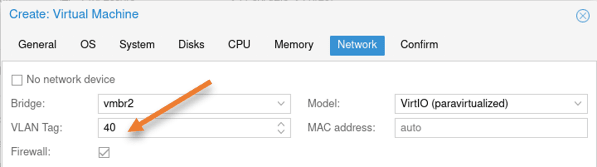
Network configuration.
As per the diagram, FortiGate’s first port will be configured as the LAN interface. Hence choose vmbr2 and tag with VLAN 40, it will act as the LAN interface.

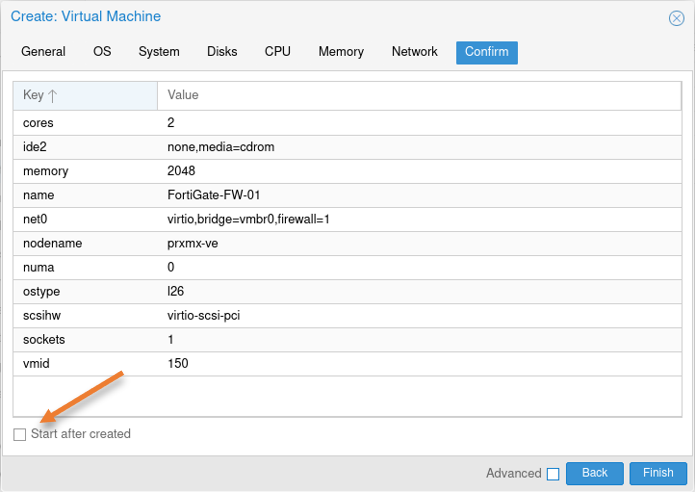
You will get a summary of the configuration. Ensure that the Start after created option is unchecked.

Add FortiGate WAN interface.
We have added only a single interface during the VM creation, which will act as port1 (LAN interface). We will now add the secondary interface that will serve as the WAN interface.
Click on Add -> Network Device.
In the pop-up, choose the following.
Bridge: vmbr0
VLAN tag: 100
Model: VirtIO
Click on Add.


Import the FortiGate QCOW2 image to the virtual machine.
We have already transferred the qcow2 image to the Proxmox directory. Let’s import the image into FortiGate VM.
- Goto the qcow2 image location, which is in /var/lib/vz/template/qemu
- Issue the below command to import the disk.
qm importdisk 150 fortios.qcow2 local-lvm
root@prxmx-ve:~# cd /var/lib/vz/template/qemu/
root@prxmx-ve:/var/lib/vz/template/qemu#
root@prxmx-ve:/var/lib/vz/template/qemu# qm importdisk 150 fortios.qcow2 local-lvm
importing disk 'fortios.qcow2' to VM 150 ...
  Logical volume "vm-150-disk-0" created.
transferred 0.0 B of 2.0 GiB (0.00%)
transferred 25.2 MiB of 2.0 GiB (1.23%)
.
.
transferred 2.0 GiB of 2.0 GiB (98.60%)
transferred 2.0 GiB of 2.0 GiB (100.00%)
transferred 2.0 GiB of 2.0 GiB (100.00%)
Successfully imported disk as 'unused0:local-lvm:vm-150-disk-0'
root@prxmx-ve:/var/lib/vz/template/qemu#
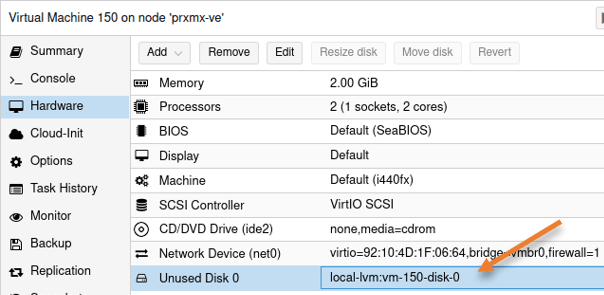
Add the new hard disk to FortiGate VM.
There is an Unused Disk 0 now added to the FortiGate virtual machine.
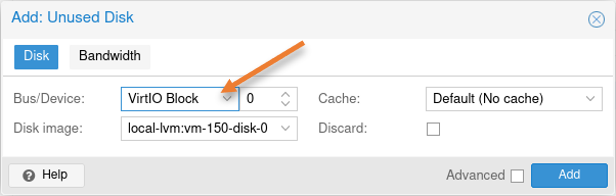
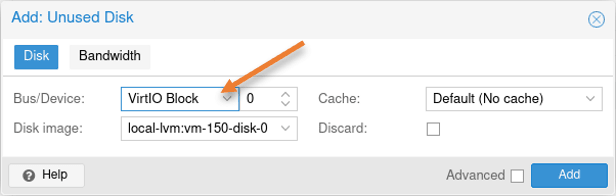
Double click on the unused disk 0.

In the pop-up to Add: Unused Disk, choose the following.
Bus/Device: VirtIO Block and click on Add.
Change the boot order.
We now have added two virtual hard disks to the FortiGate VM, virtio0 and virtio1; the virtio0 is the FortiGate qcow2 image, and we need to make the virtio0 the primary boot location.
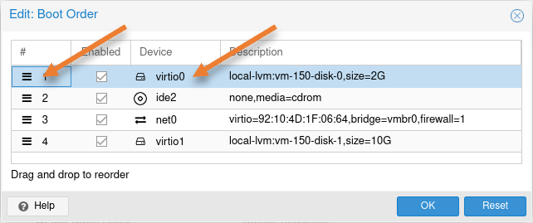
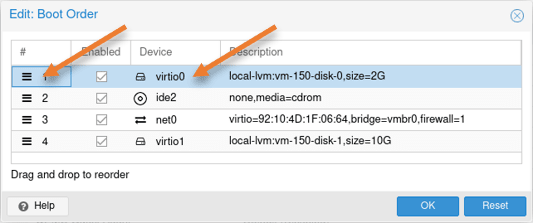
Select the virtual machine-> Options->Select Boot order and click on Edit.
Select the hamburger icon in the boot order pop-up, move the virtio0 to up, and click on Ok.
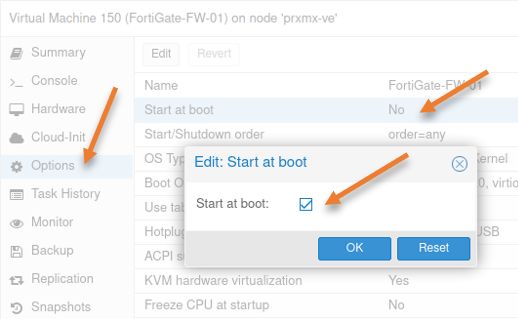

Enable auto-start at boot.
Whenever the server goes down and comes back, you would want the FortiGate firewall to come up automatically. Otherwise, the entire network will be down. So in the option, you can enable Start at boot.
Select Start at boot, and click on Edit in the pop up enable Start at boot and click on Ok.
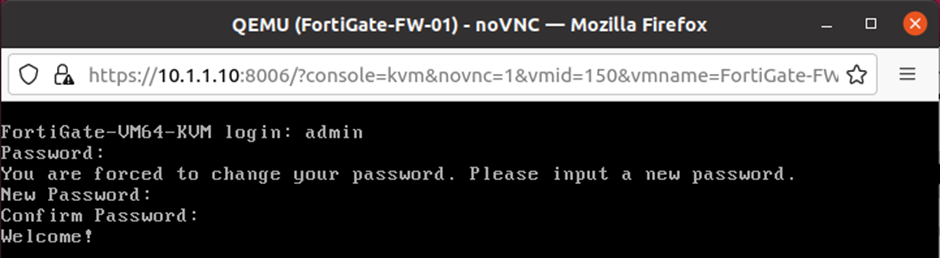
Set the credential for the FortiGate firewall.
Power on the FortiGate firewall VM and get into the console. At this point, you will have the default credential set to username: admin, password: none.
In the login prompt, enter the username as admin.
In the password field, press enter.
You will be required to set the password for the FortiGate firewall now, and you may enter the password and confirm the password as well.

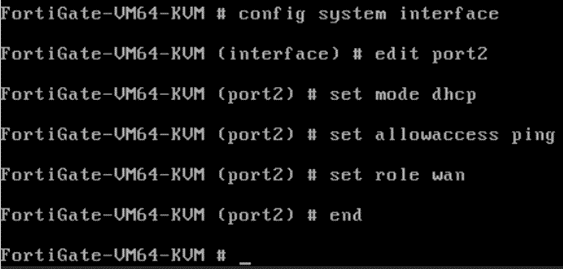
Configure the WAN interface.
At this point, you will have two interfaces configured with no IP address. Let’s go ahead and configure the WAN interface, so at least we will have reachability to the internet before we proceed with further steps.
The ISP configuration that I have is a DHCP one, so we need to enable DHCP on the port2 connected to the WAN interface of the FortiGate firewall.
Note: I have not chosen port1 as the WAN interface because of a security issue. By default, port 1 is configured with the DHCP, and it has HTTPS and SSH access enabled automatically. So when the interface comes up with a public IP address, anyone on the internet should be able to ssh/HTTPS into the FortiGate firewall wan interface. If you want, you can still use port1 as the wan interface, but before enabling the interface, you need to get rid of the HTTPS and SSH access from the port.
Set the port2 with the WAN IP address.
Below are the commands to set the WAN as DHCP mode. If you have a PPPOE WAN link, you may follow the article to configure the PPPoE on the FortiGate wan side.
Config system interface
edit port2
set mode dhcp
set allowaccess ping # this is to allow icmp
set role wan
end

After a sec or two, you will get an IP address automatically on the WAN interface port2.
You may enter the command diagnose ip address list to see the IP configuration. As you can see I got a public IP x.x.7.20.


Configure the LAN interface.
As per our diagram, our LAN side should be in 10.1.1.0/24 subnet, hence configure 10.1.1.1 on the FortiGate LAN interface. You also need to enable ping HTTPS, http, and ssh access on the interface, which is by default enabled.
edit "port1"
        set vdom "root"
        set ip 10.1.1.1 255.255.255.0
        set allowaccess ping https ssh http fgfm
        set type physical
        set device-identification enable
        set lldp-transmission enable
        set role lan
        set snmp-index 1
Note: Since we don’t have a license now, you cannot access the Proxmox web GUI using the HTTPS even though we enabled it on the interface, so until you get a license, you need to rely on http.
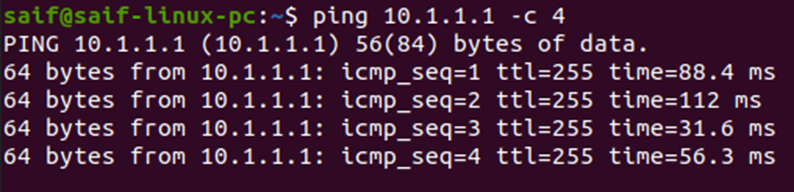
After the configuration, you can ping the IP, as you can see I can now reach the LAN gateway from the management PC.
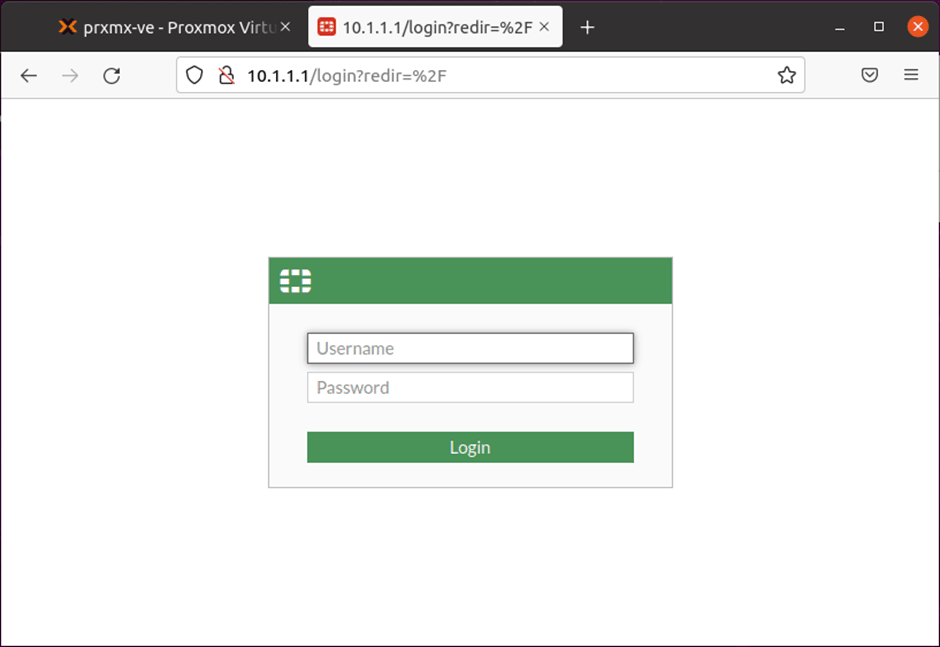
You may try to access the web GUI now, which worked as well. Log in to the GUI with the username admin and the password you set during the initial setup.

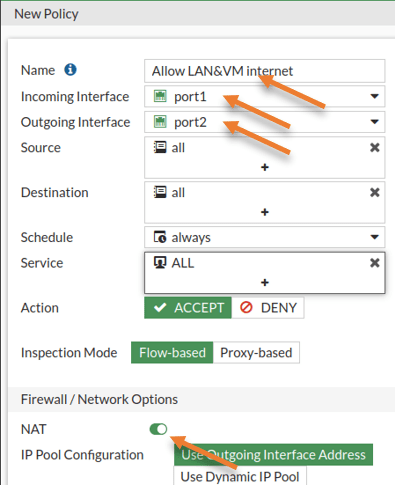
Configure the rule to allow internet traffic.
By default, the FortiGate firewall will block any traffic destined for the internet. We need to create a new rule to allow internet access for LAN users.
Policy & Objects-> Firewall Policy->Create new.
Name: Enter a name.
Incoming interface: Your LAN interface.
Outgoing interface: WAN interface.
Source: All
Destination: All
Check the NAT option, and in the IP pool configuration chose to Use the outgoing interface address.

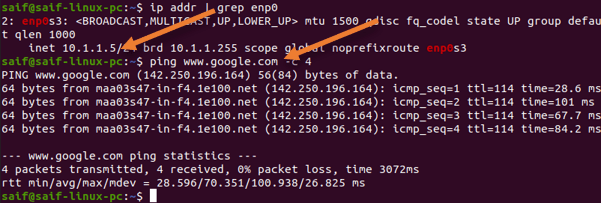
Test the network from the physical LAN.
As I already have an IP address configured manually and the default gateway pointed to the FortiGate firewall, I should now be able to access the internet just fine from the management PC on the LAN, as you can see below.

Configure DHCP on the LAN side.
We now have to configure the LAN interface with DHCP. After that, all the LAN and the virtual machines will start to get an IP address from the DHCP scope.
Network-> Interfaces-> Double click on Port1.
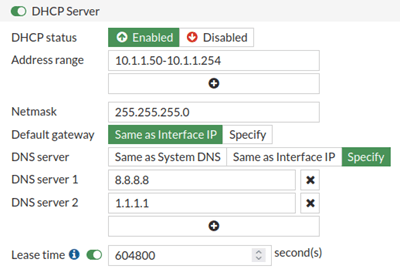
Scroll down and enable the DHCP server.
Ensure to adjust the address range as per your network.
I have configured the address range from 10.1.1.50 to 10.1.1.254. I could reserve the first 50 IP addresses for static assignment.

Test the network from a virtual LAN.
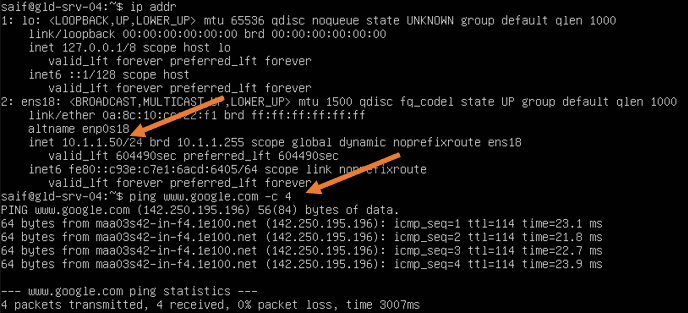
When you make the virtual machine DHCP, your FortiGate firewall will start handing over the IP address using the DHCP service.
As you can see, I got the first IP address from the DHCP lease 10.1.1.50, and the virtual machine can now access the internet securely.

If you connect a Wi-Fi router to any other port on the switch on VLAN 40 as an access port and configure it as an access point, everyone on the Wi-Fi network will become part of the FortiGate LAN and should get the Ip address from FortiGate LAN.
Conclusion.
We have successfully installed the FortiGate firewall in the Proxmox server, and you can now replace the old router in your network with the FortiGate firewall. The LAN and the VM traffic is going through the FortiGate firewall. You can still access the Proxmox server when the FortiGate firewall goes down.
Alan
Saturday 2nd of December 2023
Hi, how about the license? Can we by pass the license? Thanks