
When you deploy a virtual machine in KVM, you connect the virtual machine to the default virtual network, acting as a NAT interface.
As a result, your VM will be able to go out to the internet and get the updates, also the host machine can talk to the VM and vice versa.
Later, when you try to connect to the VM using SSH or other means from your host’s local area network, it will not let you connect. As the default NAT network is not available in your local area network.
In this blog, we will look at how you can bring the virtual machines deployed in the KVM to the Local area network and allow communications to all the devices in the LAN network.
Why should I allow communication from VM to the Host network?
The default NAT interface will work perfectly fine if you want to use your virtual machine just for basic tasks, such as browsing the internet and accessing email, and so on.
When the VM wants to go out to the internet, it translates its IP address into the host machine IP and goes out.
And from the LAN perspective, if you were to sniff the traffic, you would see the traffic coming from the host machine itself rather than the VM.
But the problem with this type of network is that though you can connect to the VM from your host machine, you cannot connect to your virtual machine from your LAN devices.
Sometimes, you would require RDP or ssh into the virtual machine from another machine on your LAN network, and you cannot do that with the default NAT interface.
or maybe you have a web server installed in KVM, and if you want to allow external access, no one can talk to the virtual machine because inbound access is not allowed.
So what is the solution?
We need to use something called a bridge interface for the Local network hosts to connect to the virtual machine.
What is a bridge interface in KVM?
The bridge interface is like a virtual layer2 switch, where packets/frames are transmitted using MAC addresses.
You can create multiple bridge interfaces. After you create a bridge interface in the Linux machine, you need to map that bridge interface to a physical interface of the host machine.
Then the bridge interface will become part of that particular host machine interface network. Which ideally is a LAN network.
Suppose your laptop has been installed with Linux KVM, and you want to access the VM from your local area network.
You create a bridge interface by connecting to your laptop’s physical LAN or Wifi adapter. After the bridge interface creation, you attach the interface to a VM.
If your VM is configured with the DHCP, it will get the Ip address from your LAN DHCP server.
And afterward, your host machine and the devices in the local network should be able to talk to the virtual machine because they both are in the same network.
Let’s look at how you can achieve that in Linux KVM machines, especially Ubuntu KVM. If you are using Centos/Redhat Linux, you may check out the article here on how you can do that.
Note: Before you continue, you need to keep in mind that not all the wifi and wired NIC support bridging, so if you follow this guide and you can’t make the communication between the VM and the host, it is most likely you have an unsupported Network interface.
You need to have a machine with Linux KVM installed. Any distribution will work; however, the way you configure the network in Ubuntu, and the Redhat/Centos/Fedora distro is a bit different, we will look at both options.
Enter the command below to install the KVM on Linux machines.
Ubuntu.
sudo apt install qemu-kvm virt-manager libosinfo-bin -yCentos/Redhat.
yum install qemu-kvm libvirt virt-install virt-manager virt-install -yFedora.
sudo dnf -y install bridge-utils libvirt virt-install qemu-kvmKali Linux.
sudo apt install qemu-kvm libvirt-clients libvirt-daemon-system bridge-utilsLinux mint.
sudo apt install qemu-kvm bridge-utils virt-manager libosinfo-bin -yInstall the bridge utility.
In most KVM installations, you must have already installed the bridge utility package in your machine. To check if you already have bridge utility installed, you may enter the command brctl show.
If you have not installed it, you may run the below command to install the bridge utility on a Linux machine.
On Ubuntu.
sudo apt-get install bridge-utils -yConfigure the bridge interface in Ubuntu KVM.
As I mentioned, we are going to work on an Ubuntu host, and for those who use Centos /Redhat, you may check the article here to learn more about the bridge creation in Redhat using nmcli.
Unlike Redhat, the network configuration on Ubuntu uses a utility called Netplan. I have covered an extensive article regards to the netplan configuration here.
1. Find the physical interface name.
We are going to create a bridge interface and attach it to the physical interface. You can connect to either the ethernet interface or to the wifi. Type ip addr and get the physical interface name.
As you can see, I got an IP address configured on my ethernet adapter, which is ens18.

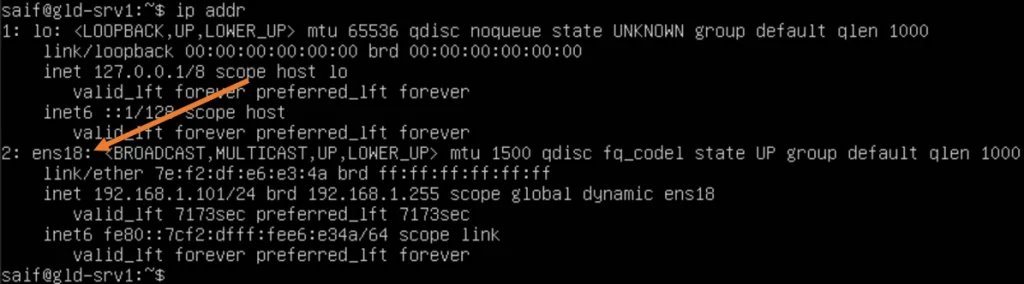
Note: The same steps followed here will work for the wifi adapter as well.
Since most of you will have a Ubuntu server or a Desktop version of it, I will show the network configuration from both versions.
Configure the bridge interface using netplan network.
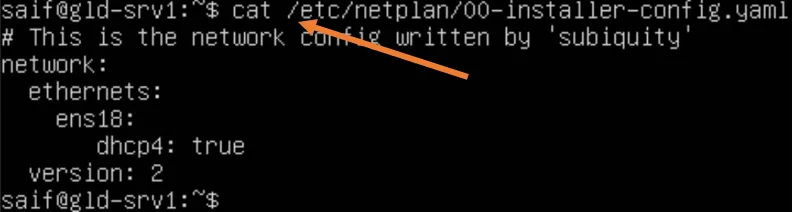
- Goto netplan folder, /etc/netplan
When you look at the netplan configuration, you won’t find anything. It is currently empty.
On Ubuntu Server.

On Ubuntu Desktop.


2. Take the backup of netplan configuration.
- Take a backup of your existing configuration, using the copy command.
Ubuntu Server.


Ubuntu Desktop.


3. Update the netplan configuration for the bridge interface.
Modify the netplan configuration to add the bridge interface with the IP address. Since I am going to show the example from both versions, I will configure IP address 192.168.1.101 for the Ubuntu server and 192.168.1.100 for Ubuntu Desktop.
Edit the netplan configurations in the /etc/netplan folder using the nano or vim utility.
Below is my configuration;
- where ethernet is configured with no IP address.
- In the bridge interface, I would use the same IP address we had on the ethernet interface, so after we apply the configuration, the ethernet interface IP will move to the bridge interface.
- You need to ensure that you choose the right physical adapter while configuring the netplan.
For Ubuntu Servers.
network:
  version: 2
  ethernets:
      ens18:
        dhcp4: false
  bridges:
      br0:
        addresses: [192.168.0.101/24]
        gateway4: 192.168.0.1
        nameservers:
           search: [Local]
           addresses: [8.8.8.8, 4.2.2.2]
        interfaces:
           - ens18
If you are using Ubuntu Desktop.
network:
  version: 2
  renderer: NetworkManager
  ethernets:
      ens18:
        dhcp4: no
  bridges:
      br0:
        addresses: [192.168.0.100/24]
        gateway4: 192.168.0.1
        nameservers:
           search: [Local]
           addresses: [8.8.8.8, 4.2.2.2]
        interfaces:
           - ens18
Most of the time, people in a hurry copy-paste the configuration and complain it is not working.
Later, they realize that their network interface and the subnet are different from what they copied. So please make sure you adjust the configuration according to your environment.
Note: If you have ssh into the machine and if you have misconfigured anything, you will lose connectivity to the machine.
Apply the configuration using sudo netplan apply.
Verify the bridge network adapter.
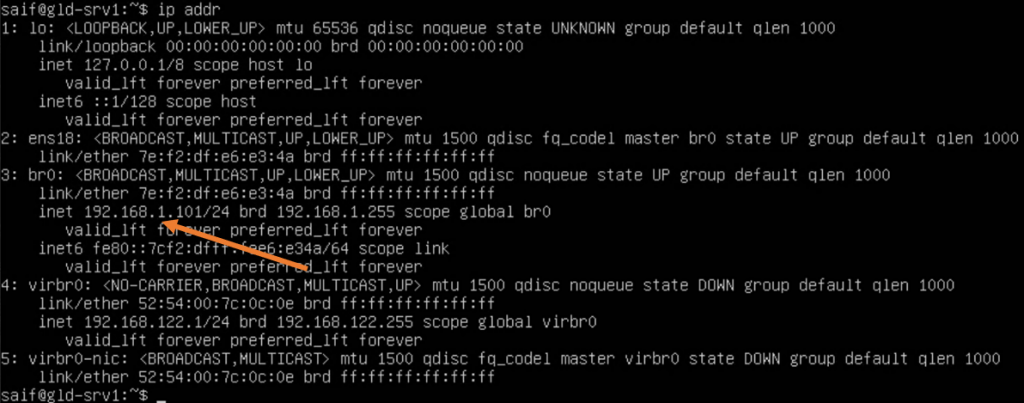
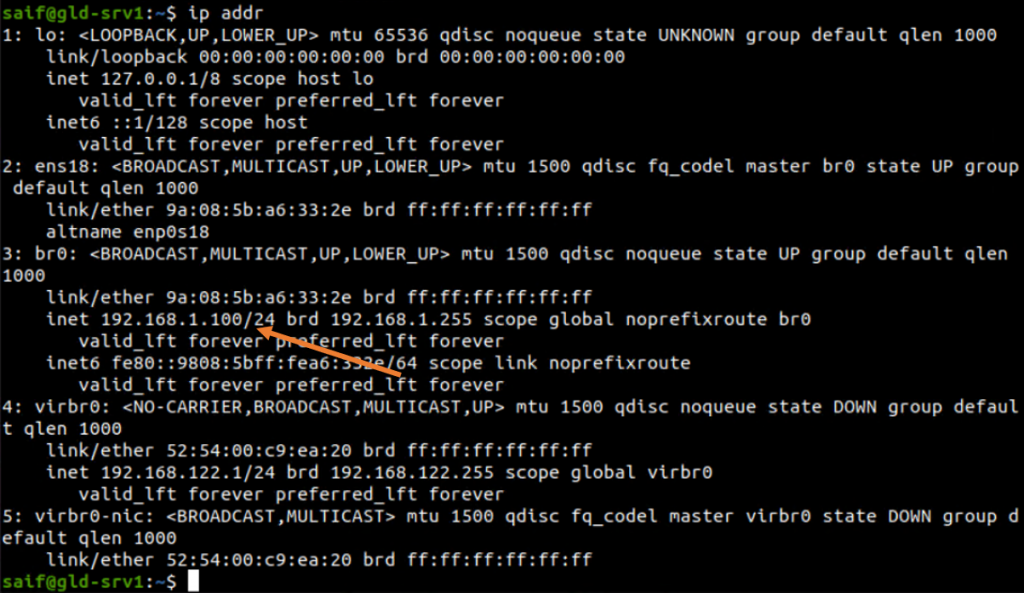
1. Check the IP address of the bridge interface.
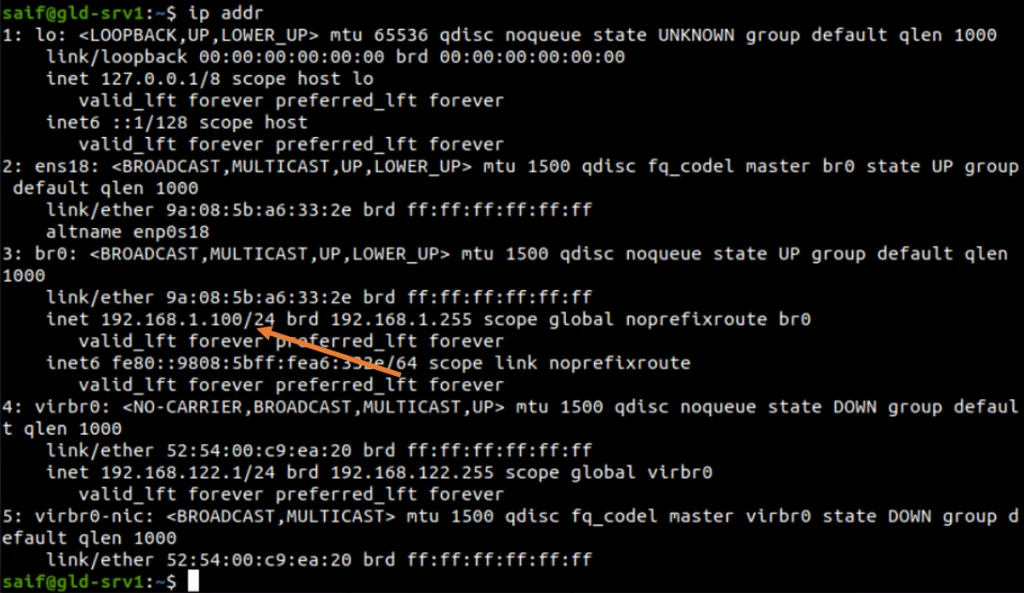
After the netplan configuration has been applied, you can check the IP address configuration with the ip addr command.
As you can see, the IP address is now configured on the bridge interface br0
Ubuntu server.

Ubuntu Desktop.
2. Verify the physical interface attached to the bridge interface.
Issue the command brctl show to see the bridge interface status and see whether the physical interface mapped correctly to the bridge interface.
As you can infer from below, the br0 is connected to the physical interface ens18.
Ubuntu server


Ubuntu Desktop.


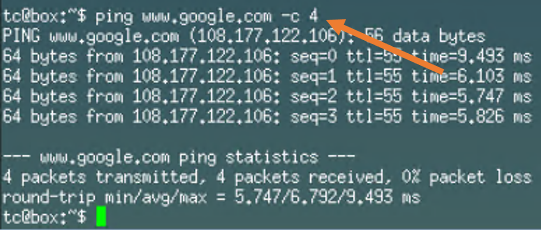
3. Ensure your host can reach the internet.
I tested from both the Ubuntu server and the desktop and I can reach the internet just fine, below is the output from the server,
saif@gld-srv1:/etc/netplan$ ping www.google.com -c 4
PING www.google.com (142.250.67.36) 56(84) bytes of data.
64 bytes from maa05s12-in-f4.1e100.net (142.250.67.36): icmp_seq=1 ttl=116 time=17.9 ms
64 bytes from maa05s12-in-f4.1e100.net (142.250.67.36): icmp_seq=2 ttl=116 time=17.7 ms
64 bytes from maa05s12-in-f4.1e100.net (142.250.67.36): icmp_seq=3 ttl=116 time=17.2 ms
64 bytes from maa05s12-in-f4.1e100.net (142.250.67.36): icmp_seq=4 ttl=116 time=17.8 ms

--- www.google.com ping statistics ---
4 packets transmitted, 4 received, 0% packet loss, time 3004ms
rtt min/avg/max/mdev = 17.207/17.651/17.925/0.271 ms
saif@gld-srv1:/etc/netplan$
Connect the Virtual machine to the new bridge interface.
I already have a Linux VM running inside the KVM. Let me switch the network for the virtual machine.
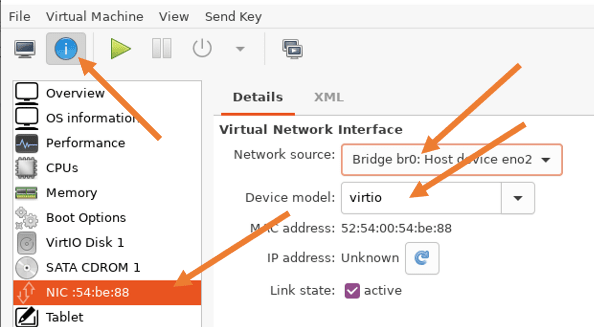
- Open the virtualization manager by typing virt-manager in the terminal.
- The virtualization manager window opens, and you will see the list of VMs available. Double-click on the virtual machine you would like to make changes.
- Click on the virtual machine hardware details icon (Exclamation mark)
- In the virtual machine properties windows, click on the NIC, under details choose the newly created bridge interface, Device model as virtio, and click on Save.

Test the connectivity.
Power on the virtual machine.
If you have configured everything correctly at this point, your virtual machine will get an IP address from your local DHCP server.
If you don’t have a DHCP server, you may manually configure the IP address on your VM from the same local area network subnet pool.
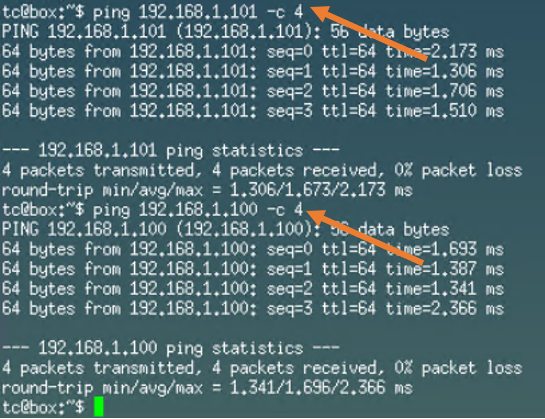
1. Ping the host machine.
I have the virtual machine running on the Ubuntu server, and it got an Ip address 192.168.1.60, as you can see, I can reach the Ubuntu server IP(192.168.1.101) just fine, also to our secondary virtual machine Ubuntu Desktop where we configured the bridge interface (192.168.1.100) working fine as well.
2. Validate Internet access.

3. Check the inbound access.
The whole idea of the creation of the bridge interface is to allow both inbound and outbound communication, we just verified that the outbound accessing working by ping the LAN IP address as well as the internet IP.
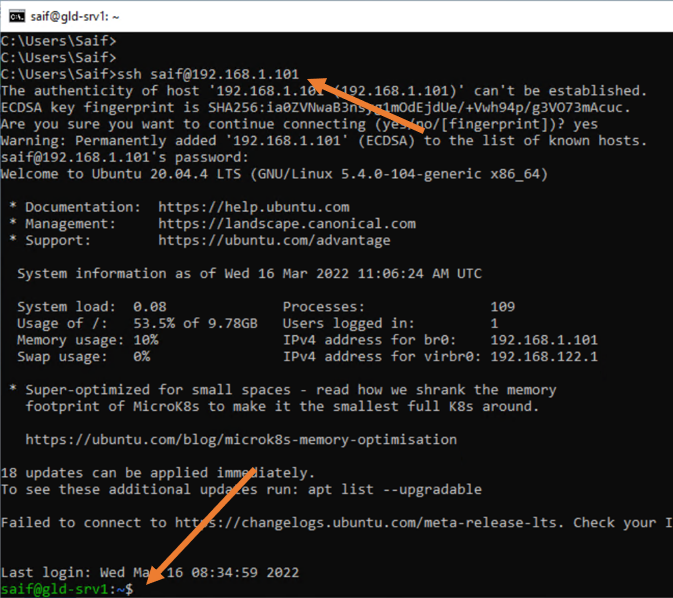
To test the inbound access, you may ssh into the server 192.168.0.101, and it should work fine.
From a Windows host in my LAN network, I tried to SSH into the Ubuntu server vm in the KVM, and as you can see it worked fine.
Alex
Friday 4th of July 2025
Hello. There is a situation when the provider allocated one external address. How to install pfsense in this case?