
In our last blog post, we covered how you can install a FortiGate firewall on a VMware workstation, and we were able to build a lab around it successfully. In this blog, we will take a look at how you can install the FortiGate firewall on GNS3. After the installation, we will build a small lab to test our environment in our next blog.
Can the FortiGate firewall be installed on GNS3?
The gns3 is a network emulation software; There are hundreds of network devices that gns3 supports for you to build the lab. The FortiGate firewall is among them.
You could install the FortiGate firewall in gns3 either by using the existing VMware virtual machine that we deployed in the previous lab or get the KVM image from the FortiGate website and install it directly on the gns3vm or GNS3 remote server.
For better performance, it is highly recommended that you install the FortiGate firewall on a remote server instead of gns3vm.
The problem with gns3vm is that it does nested virtualization, meaning virtualization on top of virtualization. This will degrade the performance of your firewall.
If you are not concerned about the performance, you could proceed with the FortiGate VM installation on GNS3VM itself. We will go through that as well.
I have covered how you can install GNS3 on a remote server here, and you may check out the article here to learn more.
If you don’t have gns3 installed as a remote server and want to use the VMware option, you may check the article here to learn more about how you can integrate different types of virtual machines into the GNS3.
Steps to install FortiGate firewall in GNS3.
1. Download the FortiGate KVM image.
One of the great things about FortiGate is that, unlike other vendors, its software size is about 73MB, I am not sure how they add tons of features to a small software package. Moreover, you don’t need to have a service agreement to download the software image, which is really good.
To download the FortiGate image,
- Goto the link here.
- Sign in to the page, and if you don’t have the account, you may sign up for one and go back to the link I mentioned above and sign in.
- After you sign in, you will get multiple options to download the FortiGate software, click on VM images.
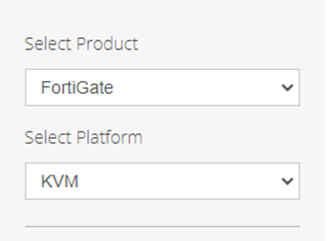
- You may choose the product as Fortigate on the left side and KVM as the platform.

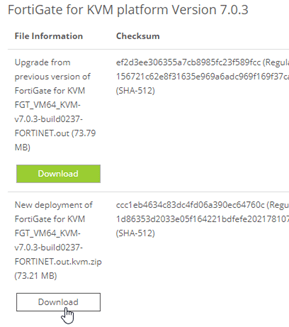
- At the time of this writing, 7.0.3 is the latest version. Click on download on the new deployment option between the two download options, Upgrade and New deployment.

2. Download the empty hard disk file.
You can download the empty virtual hard disk file from here; you can also create the empty hard disk file within GNS3, which will be another topic for discussion.
With both the FortiGate image and the virtual hard disk file download, you can install the FortiGate Virtual machine on gns3.
3. Install the FortiGate on the GNS3.
Open GNS3 on your machine. Here I am using GNS3 with a remote server, I will also show you where you need to choose GNS3VM, in case if that’s what you are using.
- Click on Browse security devices on the left side.
- Under security devices, click on New template.
- In the New template wizard,
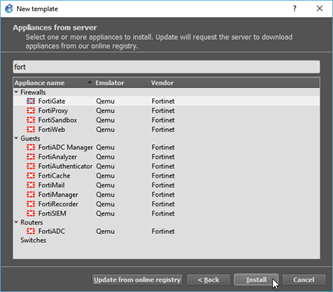
- Choose Install an appliance from the GNS3 server and click on Next.
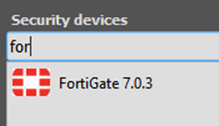
- In the appliance from the server window, you could search for FortiGate.
- When you start typing FortiGate, you will see the FortiGate appliance under the firewall, choose that and click on install.

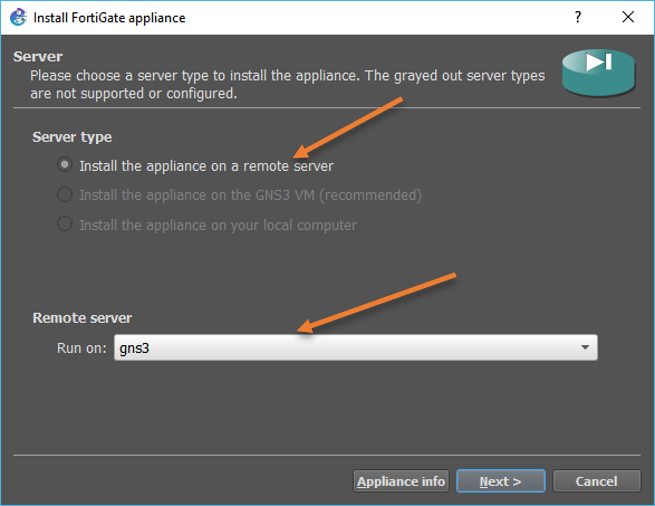
- In Server type, choose to install the appliance on a remote server, select your remote server, and click on Next.
Note: In case if you are using gns3VM, you may choose the install the appliance on the gns3 VM instead. That’s the only difference if you use GNS3VM.

- Choose default qemu binary and click on next.
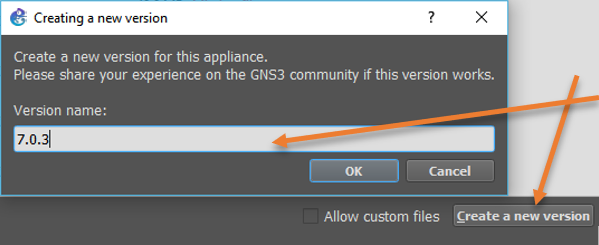
- You will be asked to choose the version of your choice.
In this lab, we will install version 7.0.3, and I don’t see that version list here. Hence click on Create new version
Type the version number in the new version pop-up and click on ok.

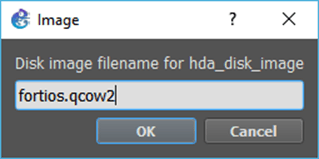
You will get another prompt to name the FortiGate primary virtual hard disk name.
When you downloaded and extracted the file, the file name was fortios.qcow2. So, In the disk file name, type fortios.qcow2 and click on Ok.

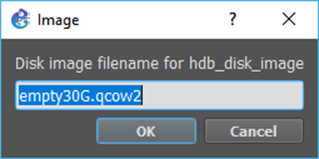
On the second virtual hard disk, leave default disk name ’empty30G.qcow2′ and click on Ok.

You can see there are two files required for the FortiGate image to work.
Both of them we already downloaded.


Select each of them and click on import. Once it is imported, you are ready to install the software. Choose the version and click on install.


- In the prompt, Would you like to install FortiGate version 7.0.3? Choose yes and click on Finish.
- You will get the confirmation that the installation is now finished, and you can find the images under security devices.

4. Set the password for the fortigate.
That’s it we have successfully installed the FortiGate firewall on gns3, you may create a new project and drag and drop the FortiGate firewall to the topology.
Right-click on the FortiGate VM and click on start.


Double click on the FortiGate firewall to get into the CLI.
You will be asked to enter the credentials, enter the username as admin.
Leave the password blank, and you will be prompted to set a new password for your firewall.
Enter the new password and confirm the password and hit enter.
FortiGate-VM64-KVM login: admin
Password:
You are forced to change your password. Please input a new password.
New Password:
Confirm Password:
Welcome!
That’s it you have successfully changed the password for the VM.
Each time you drag and drop a new FortiGate firewall to the topology, it will spin up a brand new VM without any configuration, so you will have to reset the password every time you want to set up a lab.
5. Get the interface and IP details.
You can validate the installation went successfully by going into the configurations.
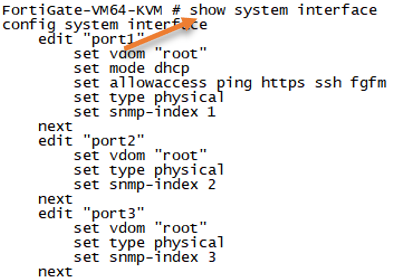
To get the interface configuration details by typing, show system interface
As you can see, port1 is enabled with management access such as HTTPS and ssh. As you don’t have the FortiGate VM license, you cannot access the FortiGate GUI using HTTPS, so we need to keep in mind to add http to allow access on the management interface.

Unlike other vendors, if you want to see the IP address of your FortiGate firewall, you will have to type the command diagnose IP address list. As you can see, no IP is configured now, and if you have plugged in the port1 to a dhcp service, you would have got an IP address, and you could see the IP address details here.


Next, we will see how to spin up a small lab using FortiGate in GNS3 here.