The Opnsense is a free, open-source firewall that you could use on your home or small enterprise networks. It does the job really well; unlike pfSense, Opnsense is entirely open-source. When you want to test this opnsense firewall, the best option is to build a lab with it or replace it with your home router.
In the last article, we covered how you can install Opnsense on VirtualBox. In this one, we will look at how you can install an Opnsense firewall on a VMware workstation.
Please don’t make the same mistake I did, which is playing with the home network. I was using the pfSense firewall as my primary router, and one day, I decided to replace it with Opnsense. Later, I changed it back to pfSense, did a lot more testing, and again went back to Opnense. I have to tell you that your family members will hate you for this 🙂 because you are breaking the home network while trying to test different network firewalls.
You should be good if you have a high availability configuration or spare machine with which you can test. Based on my experience, it is better to virtualize the firewalls on your machine before going ahead with the migration. You can even spin up a small firewall lab in your VMware virtualization environment. That is what we will do in this tutorial. We will be installing an opnsense firewall in the Vmware workstation.
Objective.
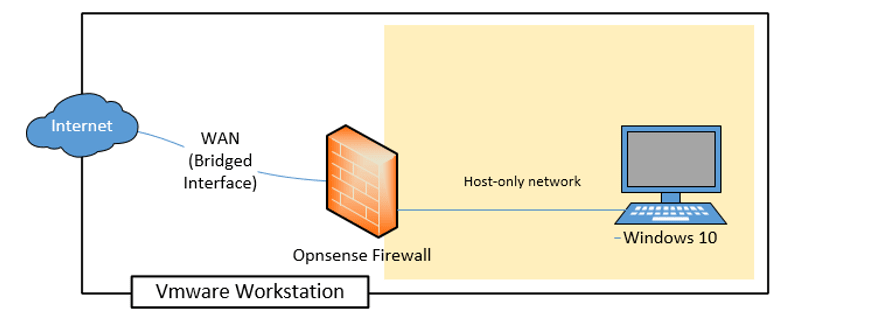
We will install the Opnsense firewall in the VMWare workstation pro by connecting the Windows 10 VM to the LAN side and ensuring that the DHCP service is working. The virtual machine can go out to the internet using the Opnsense firewall NAT configuration.
Below is the topology that we are going to use.

Prerequisite.
- You need to have a VMware workstation pro, which you can download from here. I am using the Vmware workstation pro 16; regardless of the version, the installation should work just fine.
- Opnsense firewall iso image.
During the download, choose the system architecture as amd64 and image type as DVD.
Steps to install opnsense on VMware.
- Create OPNsense virtual machine.
- Choose the OPNsense installer disk image file.
- Name the OPNsense VM and choose the location.
- Configure the processor and Memory.
- Setup the network interface.
- Choose the IO controller and Disk file.
- Configure the hard disk.
- Add the second network interface.
- Install the opnsense firewall.
- Change LAN side IP and DHCP configuration.
- Access the firewall GUI.
- Configure the initial setup wizard.
- Install opnsense VMware tools
- Browse the internet and check the DHCP lease.
1. Create OPNsense virtual machine.
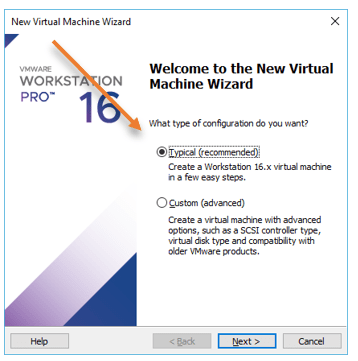
Open the Vmware workstation and click on the file to create a new virtual machine; you can also press CTRL+N to create a new VM.
In the new pop up click on Custom.

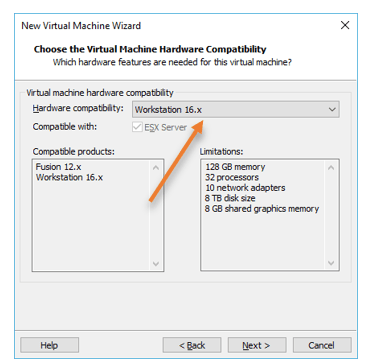
In the virtual hardware compatibility, choose the default option that you have and click on Next.

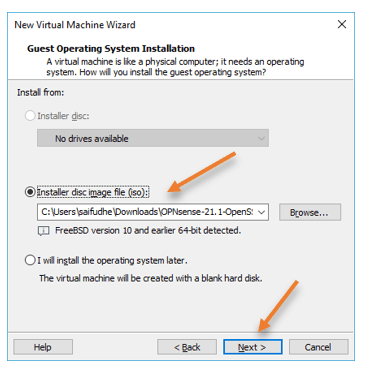
2. Choose the OPNsense installer disk image file.
We have already downloaded the Opnsense firewall iso image on our computer; we will attach the image here. By default, the image would be in bz2 format. You will have to extract the image using any of the extraction software such as 7zip, Winrar.
Choose the installer disk image file (iso), click on Browse, and select the iso image you have downloaded.
One cool part about the VMware workstation is that it will automatically detect the operating system and the version after you attach the image. As you can see, it has detected FreeBSD as the operating system and version 10 64bit.
Once you selected the images, you may click on next.

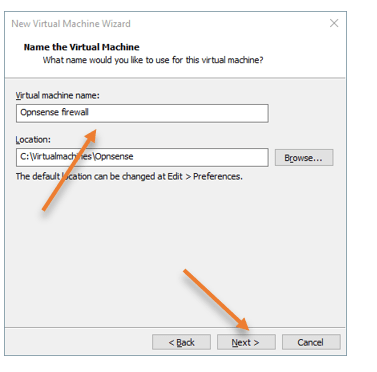
3. Name the OPNsense VM and choose the location.
You may enter a user-friendly name for the Virtual machine and specify the location where you want to store the VM virtual hard disk file. And click on Next.
I have created a subfolder in my virtual machine folder.
Click on next.

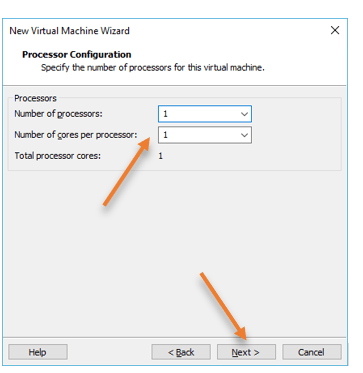
4. Configure the processor and Memory.
Based on your requirement, you can add more processors; however, the Opnsense firewall will work fine with just 1 CPU, and click on next.

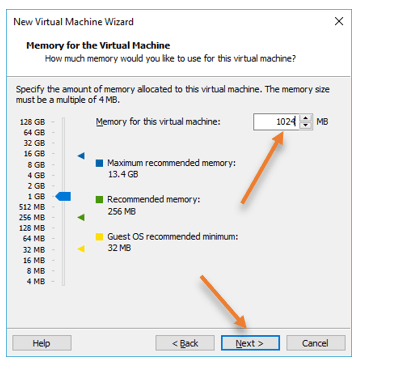
Add the memory.
We now have to choose the RAM for the Virtual machine. By default, it picked up with 256, and I will give 1GB for my VM and click on Next.
Note: Again, if you feel you need more memory, you can add them here, but you can come back later to change it as in when required.

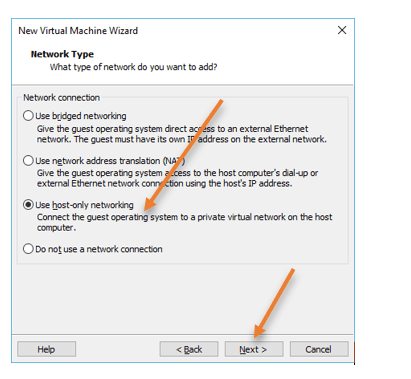
5. Setup the network interface.
The Opnsense firewall requires two interfaces, one is for the LAN, and the other is for the WAN. The first interface you choose will be for the LAN1, and the second interface will be for the WAN. We will use a host-only network for the LAN side where all the VM’s are going to connect to, and for the WAN, we will use the bridged network.

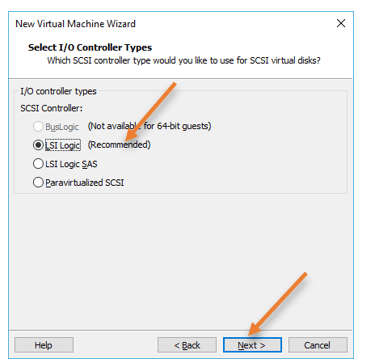
6. Choose the IO controller and Disk file.
In the IO controller type, choose the default recommended one and click on next.

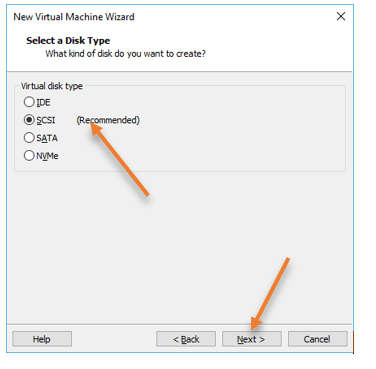
And choose SCSI as the disk file.

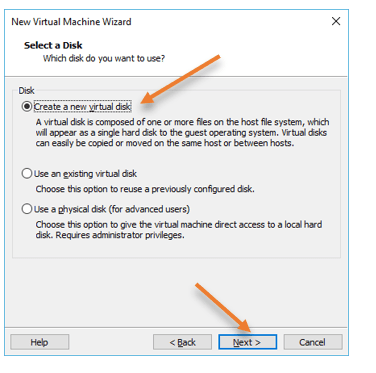
7. Configure the hard disk.
We will now configure the virtual hard disk for the VM, Select the Create a new virtual disk option and click on next.

If you want to spin up the VM and understand its features, you can choose the default options and click on next. If you plan to use this firewall for heavy testing and expect more logs on the VM, you can increase it based on your requirement. I will be using the default option for now, which is 20GB of storage, and choose Split virtual disk into multiple files and click on Next.

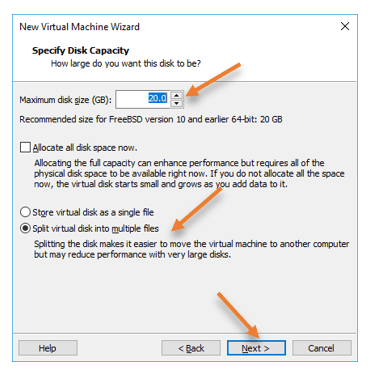
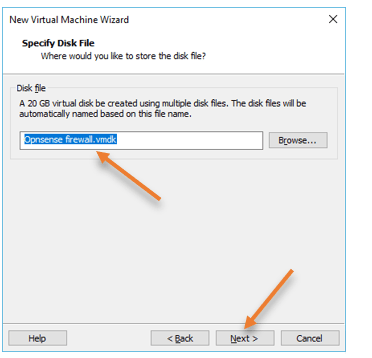
You will get an option to specify the disk file, leave the default option, and click next.

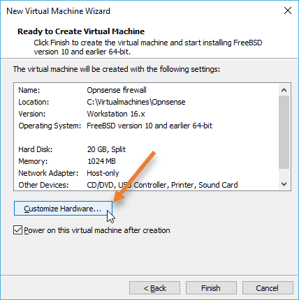
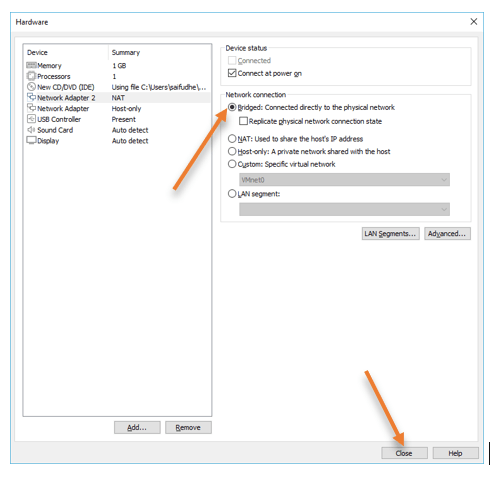
8. Add the second network interface.
Remember, while configuring the network interface, we could connect only one interface for the LAN and Opnsense firewall requiring one more interface for the WAN connectivity. On the virtual machine, the properties window, click on the customize hardware.

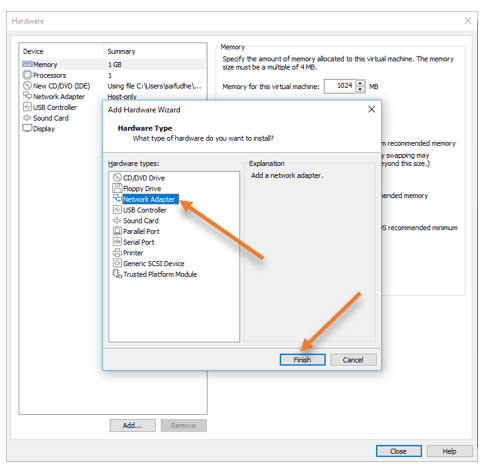
In the hardware window, click on add on the bottom to add the new virtual hardware.
Choose Network Adapter from the list and click on Finish.

Change the interface type to bridged:
It will connect the WAN interface of the firewall to your local network and get the IP address from it.
You can close the window now.

Click on Finish on the second window.

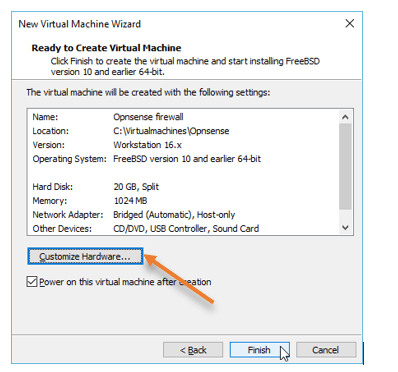
As soon as you click on Finish, the VM will boot up, and if you have configured everything correctly. You will get the IP address assigned automatically from your local network, most likely from the class C subnet.
As you can see, I got an IP address from my local network for the WAN interface, which is 192.168.0.195.

What to do when I don’t get an IP address on opnsense WAN side?
You can follow the troubleshooting steps I mentioned here; In the meantime, the workaround is to use the NAT interface.
9. Install the opnsense firewall.
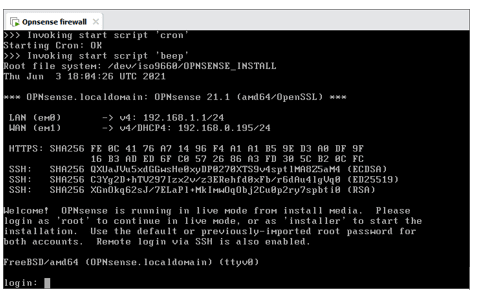
Alright, if you look into the screen, you can see that we have not yet installed the Opnsense firewall in the VMware workstation yet; it is a live environment, you can use this VM as a firewall now; however, the changes which you make will automatically delete as soon as you reboot the machine.
We are now going to install the Opnsense firewall on the VMware workstation now.
You cannot install the software with the default credentials, which is
Username: root
Password: opnsense
To install the Opnsense firewall, use the below creds.
Username: installer
Password: opnsense
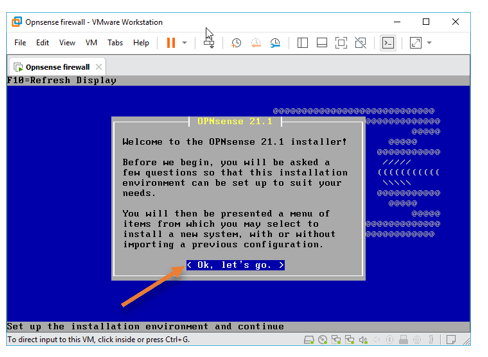
After you entered the installation credentials, you will get a prompt for opnsense installer; Click on Ok, let’s go.

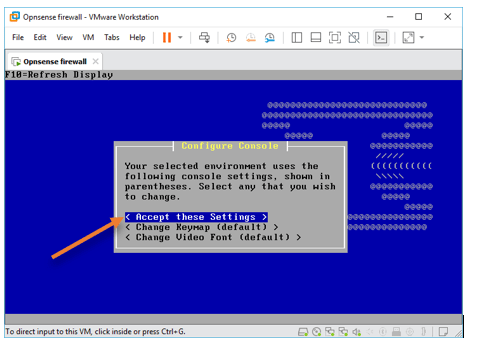
Let us not change the console settings unless you want to change the keyboard language, which is the second option.
I chose the default option, hence clicking on Accept these settings.

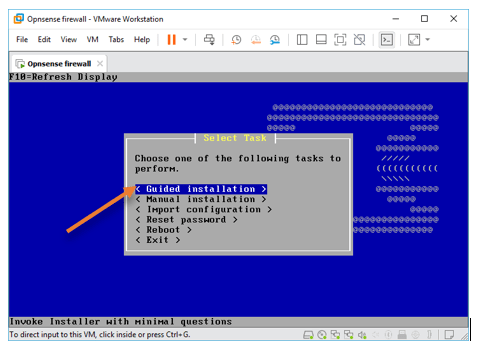
Choose the guided installation, and Press enter.

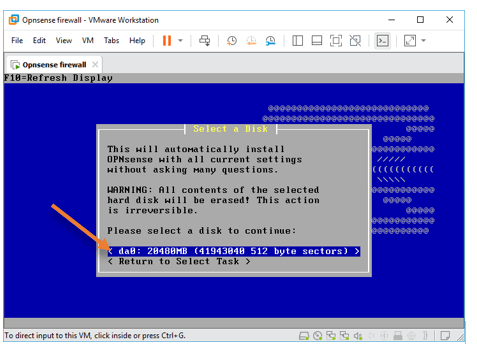
You need to select the virtual hard disk that we had defined earlier, and you may choose the disk and press enter.

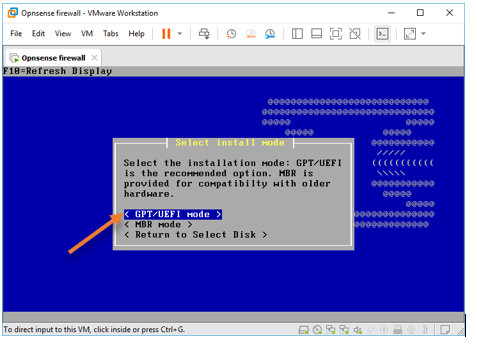
Choose the GPT/UEFI as the installation mode.

The installation will now begin.
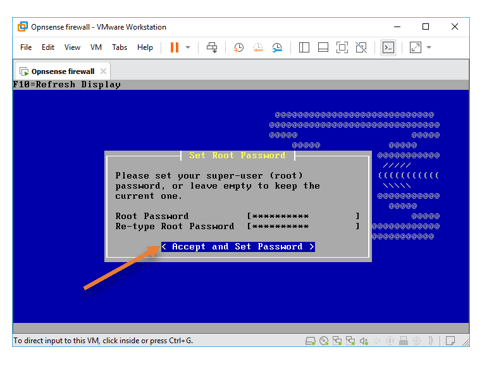
Once the installation gets completed, it will prompt you to set the new password for the Opnsense firewall. Enter the new root password, confirm the password, choose Accept and set password, and Press enter.

You can now go ahead and reboot the machine.


The Opnsense firewall is now installed successfully on the VMware workstation pro. There are some more configurations and testing that we need to perform.
10. Change LAN side IP and DHCP configuration.
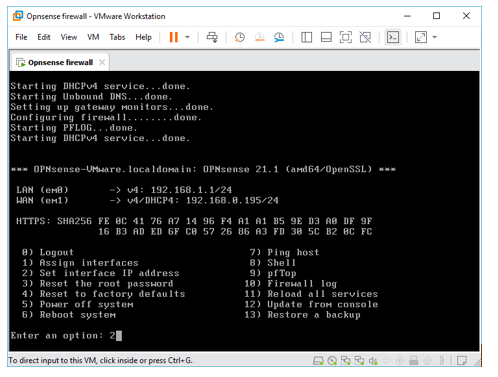
As you can see, though both the LAN and the WAN subnets are different, they both look identical; hence we need to re-ip the WAN side of the network. You can do it either via CLI or GUI, and here, we will do it in the CLI, which will make our life way much easier for the next steps.


Log in to the firewall using the username as “root” and the password you had set during the installation.
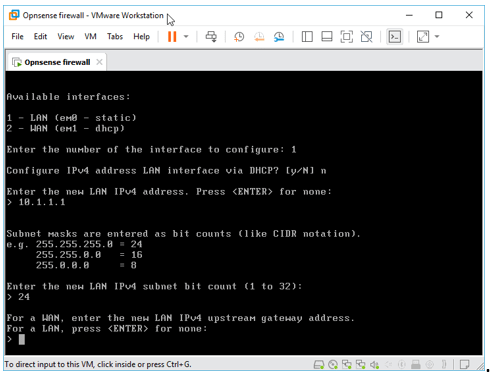
Opensense CLI options will be shown now, and you will have to choose option 2 to set the IP address on the interfaces. Type the number 2 and Press enter.


11. Access the firewall GUI.
You will need another VM connected to the same network as the firewall LAN side to access the web GUI.
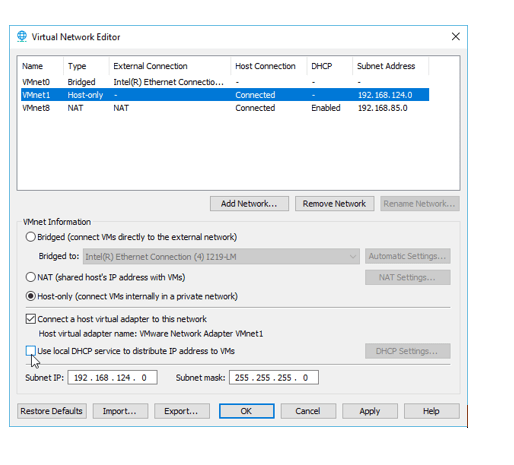
I already have a Windows 10 machine in the VMware workstation and modified its network to talk to the host-only network. It will make the VM interface and the LAN side of the firewall on the same network. We need to disable the VMware workstation DHCP service on the host-only interface; before starting the VM. It will start allocating the IP address on its own instead of the Opnsense firewall.
In the VMware workstation, click Edit–> virtual network editor.
The VMware workstation use VMnet1 for the host-only network, so select that and uncheck the option that says Use local DHCP service to distribute IP address to VM’s. And click on Ok.

Verify the LAN side connectivity.
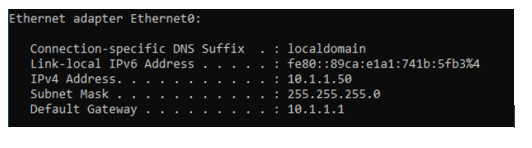
You may start the LAN side Virtual machine now, and if you have set up everything correctly, you should get an IP address from the range 10.1.1.0/24.
I have the IP address 10.1.1.50 from the firewall DHCP server.

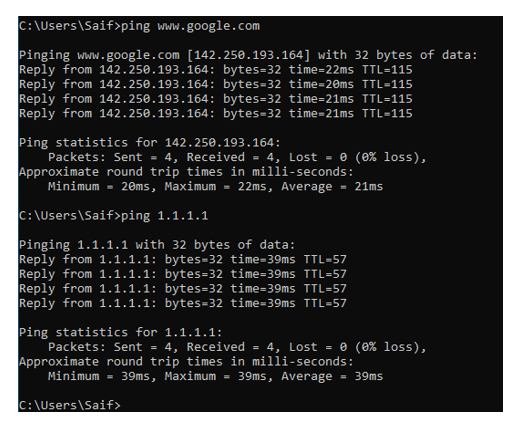
As the opnsense firewall already has the NAT configured by default, the machine should access the internet. You can test it by pinging google or public IP address.
In the below output, I can ping both google and the Cloudflare public IP; awesome!

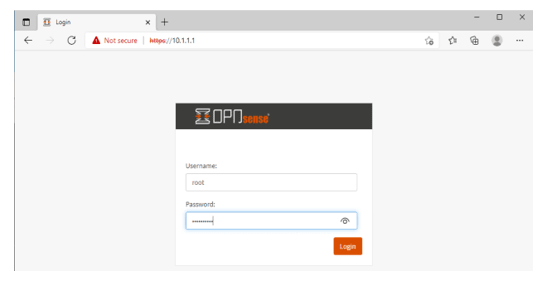
Let’s go ahead and access the web GUI now.
Type the URL as https://10.1.1.1 on your Virtual machine browser address bar and Press enter.
You will get a security prompt, just ignore that and click on continue. You will get a login prompt for the opnsense firewall login screen. Enter the username as root and the password you set up during the installation and click on login.

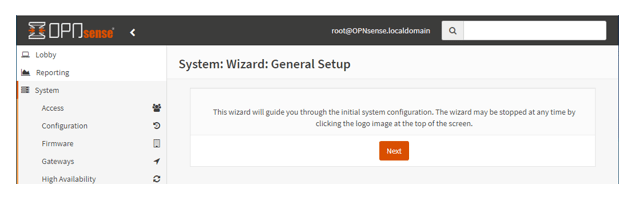
12. Configure the initial setup wizard.
As soon as you log in, it will present the initial setup wizard.
Click on Next.

On the next screen, you can change the basic settings such as hostname DNS and so on; you may change it if needed and click on Next.

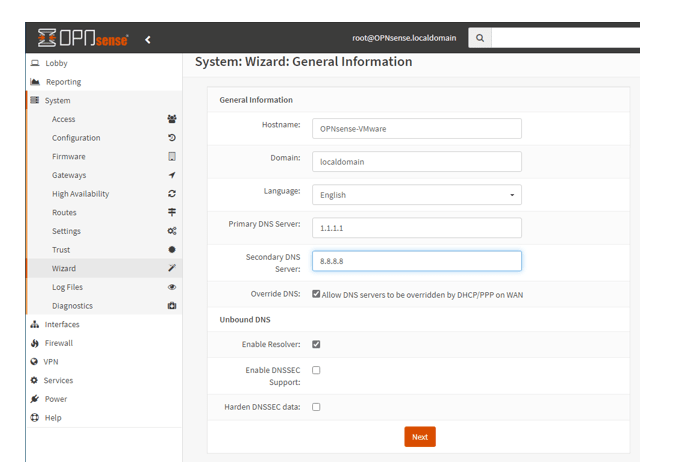
Select the timezone which I have changed according to my timezone and clicked on Next.
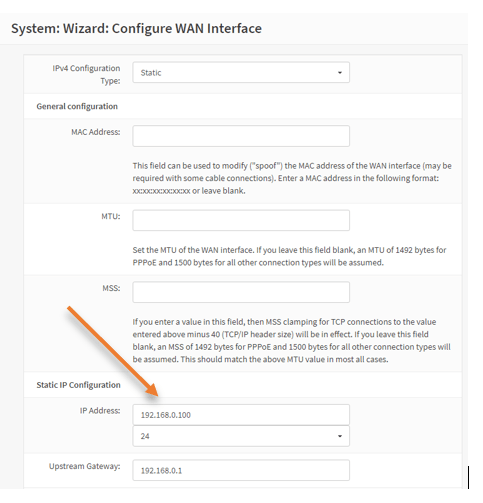
Configure the WAN interface.
I have some random IP assigned by my local DHCP server. Now I will change it to static IP, 192.168.0.100/24, which I have not used on my home LAN network yet.
Change the IPv4 configuration type to Static and Upstream gateway is your local network gateway.

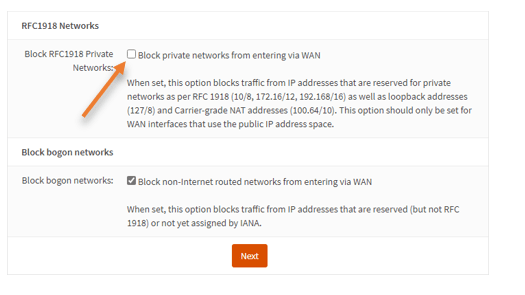
Unblock RFC1918 addresses.
Although changing the WAN IP address to static is optional, it is important that you allow Private IP addresses via WAN interface. Because we are running the whole LAB using the private IP address reange.
Under RFC1918 Networks, we use a private IP address on the WAN side; you need to uncheck the option that says Block private networks from entering via WAN and click on Next.

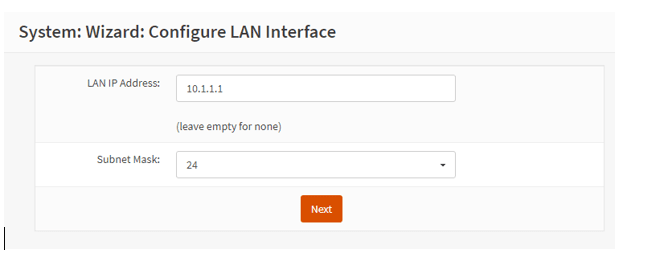
We already changed the LAN side IP address via CLI, leaving the default and clicking on Next.

Set the password.
If you need to change the password for the firewall, you may enter them on the next screen, else leave blank and click on Next.
At last, reload the configuration.
You will get a message that says, Finished initial configuration.
13. Install opnsense VMware tools
You will get good performance when you install VMware tools on the opnsense VM.
To install the VMware tools on opnsense, click on System>Firmware>Status>and Click on Plugins.
In the search field type, os-vmware.
You will see the VMware tools plugins in the list. Click on the plus icon on the right to install the plugin to the firewall.
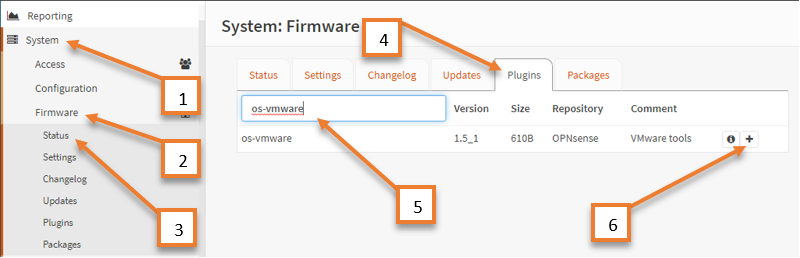

After few seconds, the VMware tools will be installed.
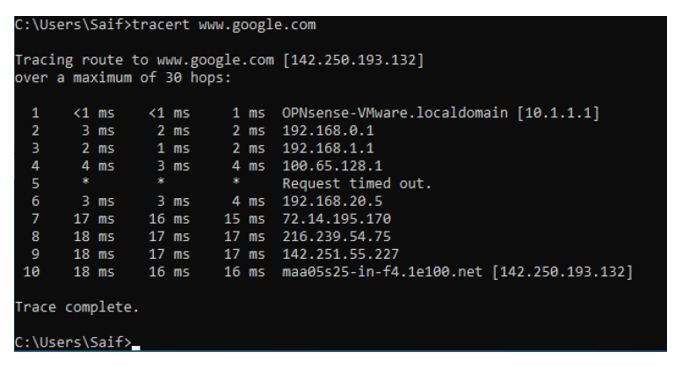
14. Browse the internet and check the DHCP lease.
The final test would be to browse the internet, open the browser, and access some websites.
We can access the internet, and as you can see in the traceroute, the internet traffic is going via the pfSense firewall.


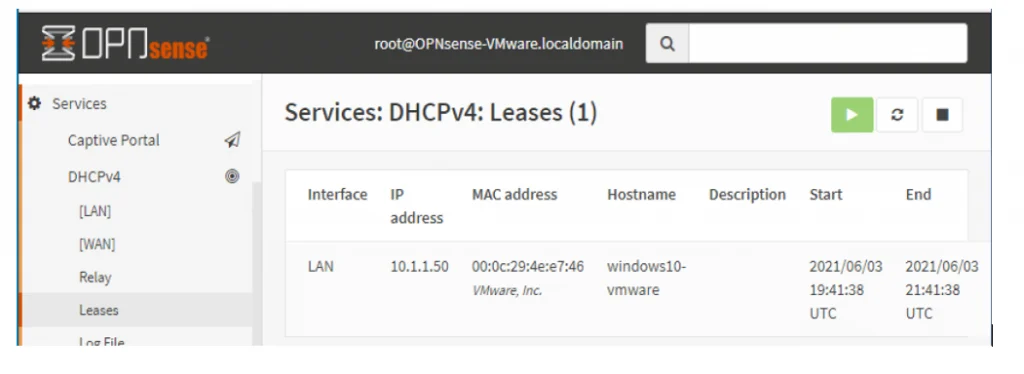
You can go to the Services–> DHCPv4–> Leases
And you should see the windows 10 machine got the IP address 10.1.1.50 from the Opnsense firewall.