
OPNsense is one of the popular open-source firewalls out there, and it is almost identical to the pfsense firewall. You could replace your home router with an OPNsense firewall. Either get the physical hardware from the OPNsense. If you cannot afford that, another option is to use any old PC and turn them into an OPNsense firewall. Even that’s not possible, the final choice will be to virtualize them. We have virtualized the OPNsense in different hypervisors. You can check out those articles if you are interested.
In this blog post, we will install the OPNsense firewall in the Proxmox hypervisor. After the installation, we will check the network connectivity from all the virtual machines and see if it can go out to the internet.
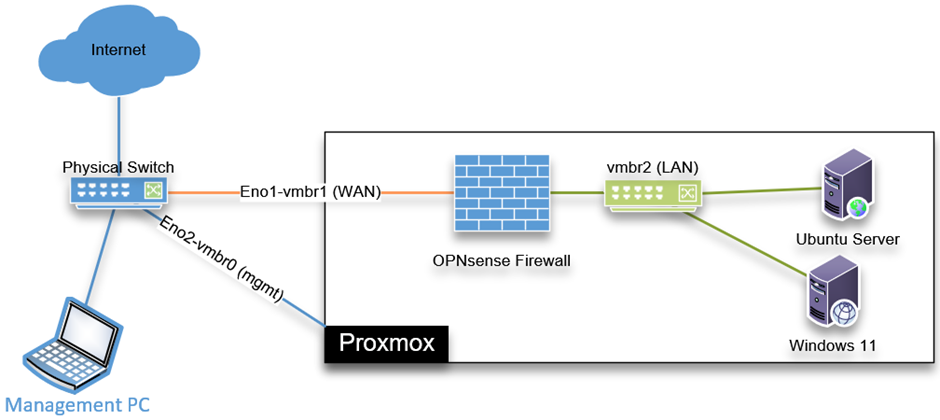
Below is the topology that we are going to build.
We have a Proxmox server already running and connected to a layer3 switch that provides IP connectivity, meaning the gateways. There are two interfaces connected to the Proxmox server, Eno1 is for the VM traffic, and Eno2 is for the management traffic. I can access the Proxmox web GUI and manage the hypervisor through the management interface.
We will install the OPNsense firewall in the Proxmox, and its wan interface will get connected to the VM network, which has internet access. We will create another bridge interface called vmbr2 for the LAN interface, which will not be mapped to any physical interface but connected to all the virtual machines serving its traffic.

Before you begin, you need to have;
- Proxmox server installed and up and running. You can check out the article here to learn more about the installation of Proxmox on a server using a USB drive.
- OPNsense firewall – You can download that from here. Choose amd64 as the architecture and DVD as the image type.
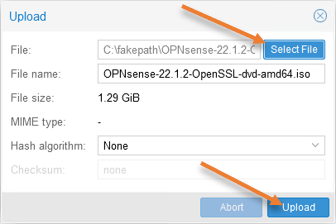
1. Upload the OPNsense iso file.
We have already downloaded the OPNsense firewall, and we have to upload the file to the Proxmox server.
Expand on the Proxmox server where you would like to install the OPNsense firewall.
Choose the Local storage->ISO images
You can download the iso image directly using a URL or upload it.
Since the OPNsense iso image is an archive, you cannot download the iso directly; hence choose the upload option.
In the upload prompt, choose the iso file by clicking the select file.
The name will auto-populate, and click on Upload.

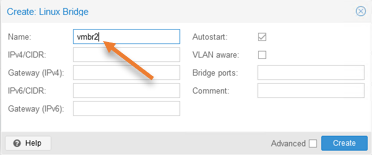
2. Create LAN bridge interface.
As per our diagram, we are going to connect Lan interface to the vmbr2 bridge interface, for that we need to create the vmbr2 interface first.
Click on the promox node-> System->Network-> Create-> Linux Bridge.
In the name, enter the virtual bridge name – vmbr2 and click on Create.
3. Create the OPNsense VM in Proxmox.
Click on Create VM in the Proxmox server. You will get a pop-up to set up a new virtual machine.
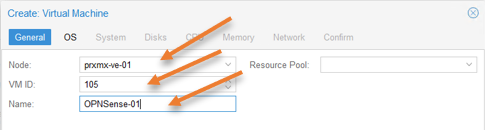
General configuration.
Node: Choose the node where you would like to install the OPNsense firewall.
VM ID: Each VM you create in Proxmox will have a unique id starting from 100.
Name: Provide a meaningful name for the VM.
Click on Next.

OS configuration.
We have to attach the iso file that we uploaded to our storage earlier.
Choose Use CD/DVD disk image file,
Storage: Local
ISO image: Point to the OPNsense iso image file.
Guest OS Type: Other.
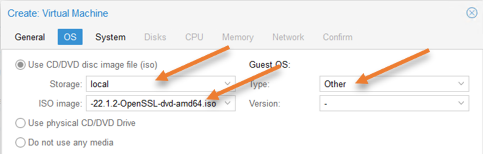

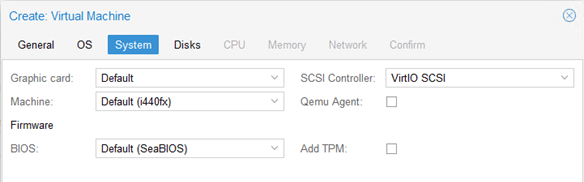
Leave the system configuration default and click on next.

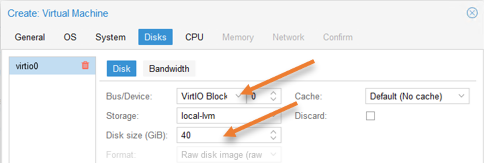
OPNsense virtual Disks configuration.
Change the Bus/Device to VirtIO Block.
By default, Proxmox would assign 32GB of storage for the Proxmox. If you are planning to collect every log from the firewall, you might require more storage, so you can increase or decrease the storage based on your requirement.
I am choosing 40GB of Disk size and click on Next.

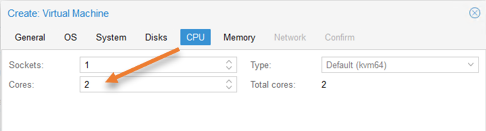
OPNsense CPU configuration.
The Proxmox would assign only a single CPU for the OPNsense VM. That should be enough. Since I am expecting a good performance from the OPNsense VM, I have given an extra one more core, so total 2 Cores.
Click on Next.

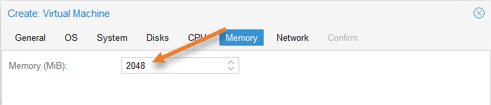
Memory configuration.
The default 1GB of memory should be more than enough for the OPNsense VM, however, I have given 2GB as I have enough memory on the server.

OPNsense Network configuration.
The OPNsense firewall has two interfaces. One is for the WAN that connects to the internet. The second interface is for LAN, where all the VM will talk to because that’s the gateway.
The first interface you add here is the LAN interface, so choose the vmbr2 interface we created.
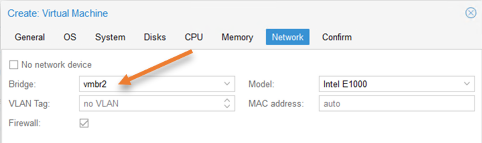

WAN interface we will take care of it next.
Click on next.
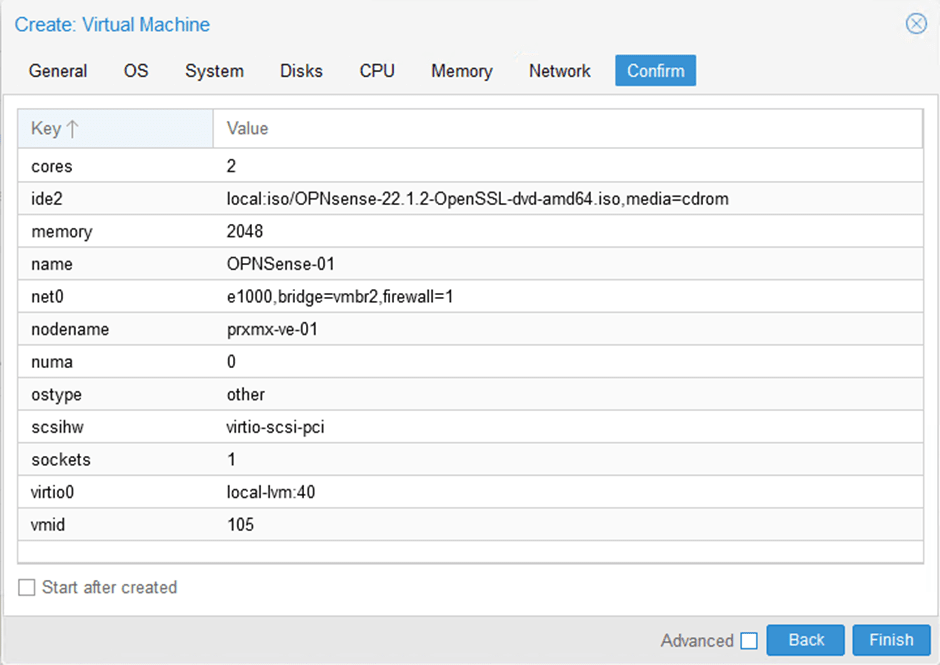
You will get the summary of the configuration click on Finish.

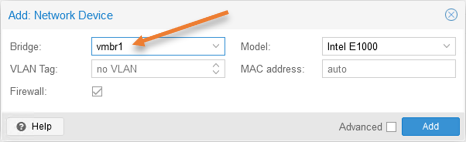
4. Add the OPNsense WAN interface.
You will see the newly created OPNsense virtual machine in Proxmox. We will now add the WAN interface to the OPNsense firewall to let the firewall talk to the internet.
Select the virtual machine and click on Hardware-> Add-> Network device.


Choose the WAN interface that connects to the internet, which is vmbr1 in our case. It may be different in your setup.

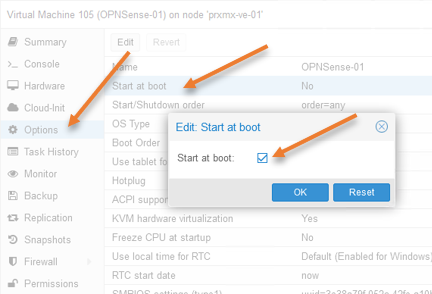
5. Make OPNsense autoboot at the Start.
Whenever you reboot the server, you would want the OPNsense firewall to start automatically, so the network services for the VMs will be up as soon as the server comes online.
To make the OPNsense firewall start at boot, click on Options, double click on Start at boot, select Start at boot option checked, and click on Ok.
6. OPNsense configuration in Proxmox.
We just completed the Proxmox side of the configuration. Let’s now go ahead and proceed with the OPNsense firewall installation.
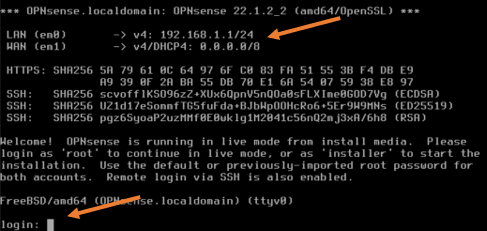
Select the OPNsense firewall, click on the console screen, and click on Start.
After a min or two, you will see the below screen with LAN configured with the default address space, and WAN has IP address 0.0.0.0/0. We don’t have DHCP service running at the WAN side, and we need to configure the Ip address manually.
If you have DHCP service at the WAN side, you should now have an IP address on the WAN side.
In the login screen, enter the below credentials to log in.
Username: root
Password: OPNsense

Set up the WAN IP address.
As you can see, we have logged in, and we are now going to configure the WAN IP address of the OPNsense firewall.
To set the interface IP address, enter number 2.
Note: If you already have an IP address on the WAN side from DHCP, you may skip this step.
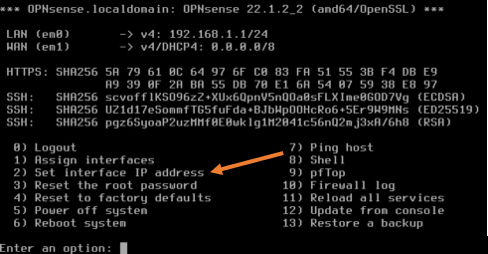
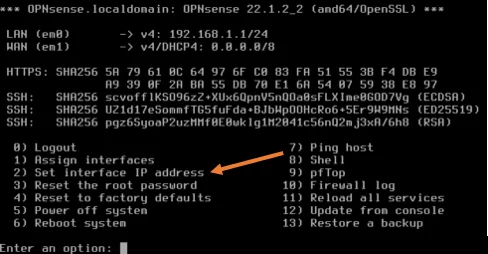
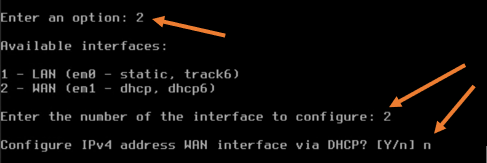
You will get available interfaces.
- Enter the number of the interface to configure: You need to type number 2 here, which represents the WAN interface.
- Configure IPv4 address WAN interface via DHCP: No.

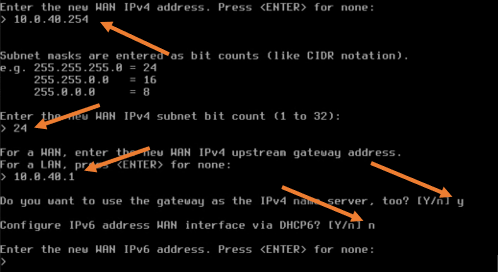
- Enter the new WAN IPv4 address: Enter the IP address here, in my case it is 10.0.40.254
- Subnet masks are entered as bit counts: Enter your subnet mask, which is 24 in my setup.
- For a WAN, enter the new WAN ipv4 upstream gateway address: Enter your WAN gateway, it is 10.0.40.1 for my WAN.
- Do you want to use the gateway as the Ipv4 name server, too? : Yes.
- Configure IPv6 address WAN interface via DHCPv6: I am not using ipv6 in our network; hence I choose no.
- Enter the new WAN IPv6 address: no ipv6; hence press enter.

- Do you want to change the web GUI protocol from https to http? : No.
- Do you want to generate a new self-signed web GUI certificate: It already has a self signed certificate hence choose no.
- Restart web GUI access defaults: no


7. Test the internet connectivity.
We have completed the OPNsense firewall configuration in Proxmox now, let’s go ahead and test whether we can reach the internet or not.
On the Proxmox CLI, press 7 to get into the ping utility.
Enter any public fqdn or IP, and if you have internet access, you should get a response.
As you can see, I am getting a response, which means my internet connectivity is looking good.

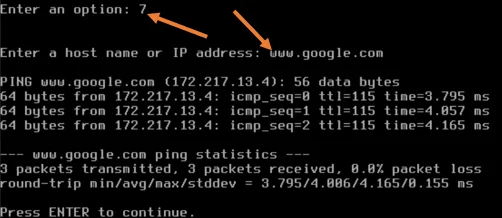
Note: This step is critical to test, because without the internet on the Proxmox, the VMs will not able able to talk to the internet either. If you cannot talk to the internet, make sure all the configuration towards the WAN is right, such as IP address, default gateway, even the VLAN, I am not using the VLAN, but in your network, you might have VLAN configured so you may check that as well.
After you make sure the internet connectivity is good, only then go to the next steps.
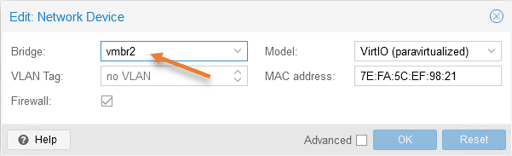
8. Verify the network from the virtual machine.
For the virtual machine to be part of the LAN network of the OPNsense firewall, it has to be connected to the LAN interface, which is vmbr2.
Select the VM, and in the hardware section, edit the network device, choose the right bridge, and click on Ok.

Check the IP address.
Power on the virtual machine, in the VM terminal, type the command ip addr, and as you can see, I have got an IP address 192.168.1.100 from the OPNsense DHCP service on the LAN side, which is good.
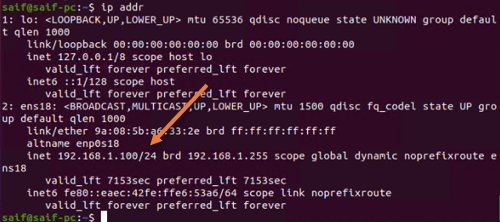
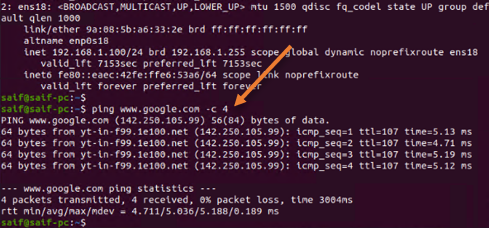
Check the internet connectivity.
To check the internet connectivity, you can ping any public IP, or access any of the websites from the VM browser. You can see below that I can ping the google fqdn.

9. Finish the OPNsense initial setup wizard.
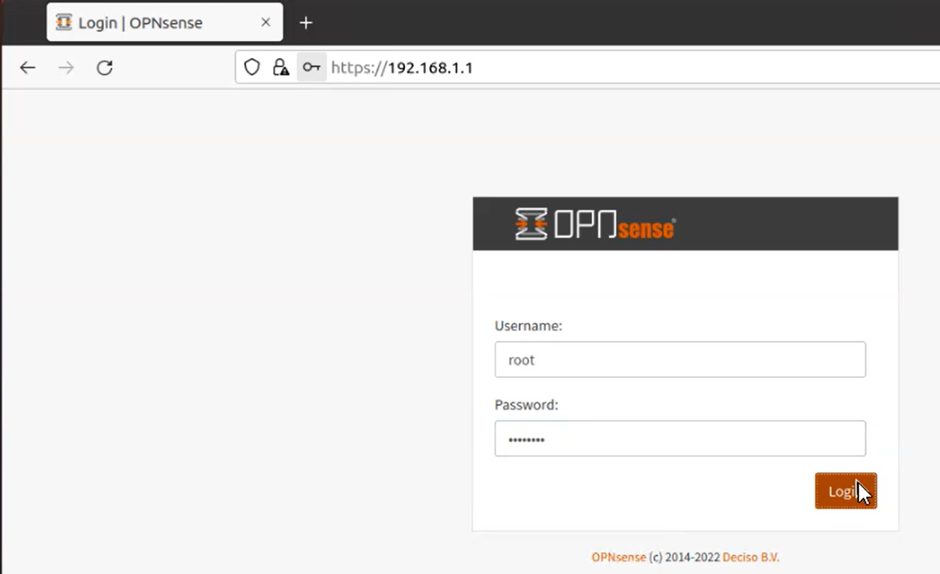
Open your VM internet browser type https://192.168.1.1 in the address bar to access the firewall GUI.
Ignore the security warning. In the login prompt, enter the username as root and the password as OPNsense, the same credentials we used at the CLI login screen.

The initial setup wizard will start in a few seconds. Click on Next to complete the initial setup wizard.
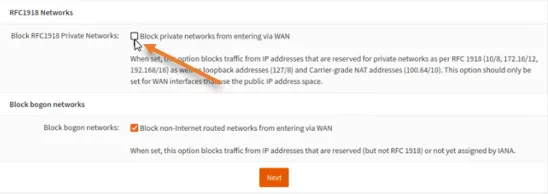
If you would like to make any changes to the configuration during this period, you can do that.


The only two changes that I have to make are allowing RFC1918 networks on the WAN side.
I am using a private IP address on the WAN side of the OPNsense firewall, and it doesn’t make sense to block the private network from entering the WAN, so uncheck this option.
If you extend the public address space to the WAN interface, you can leave this option checked.

And finally, change the default root password from OPNsense to something strong one. And click on
Reload, and we are all set.
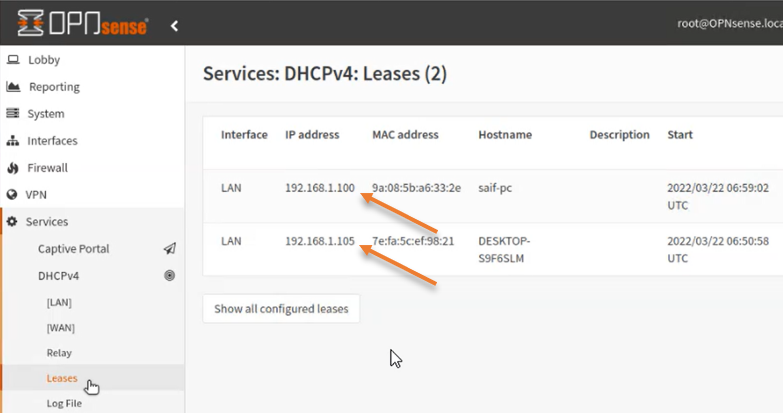
10. Check the DHCP lease.
You can verify the IP address you got for the virtual machine from the OPNsense DHCP service by going to services-> DHCPv4-> Leases.
As you can see, it has assigned IP addresses to two of our virtual machines.

Mladen
Wednesday 4th of June 2025
Hello, Saifudheen! Thank you for this article. It was very informative and helpful... But I was confused in some places, mainly because you mixed Proxmox and opnsense names. For example: ...By default, Proxmox would assign 32GB of storage for the Proxmox... ...On the Proxmox CLI, press 7 to get into the ping utility...