There are multiple ways to connect your inter offices using WAN. You can get MPLS, a Dedicated link. Those are the expensive ones, and there is SD-WAN. However, the cheapest and most popular method of connecting two different branch networks is using an IPsec site to site a VPN tunnel. If you have ASA on the edge of your network and planning to connect to another vendor network, you can use IPsec VPN. The only issue with the IPsec VPN is that it is always point to point and doesn’t support full-mesh connectivity.
So if you are planning to build an IPsec connectivity to multiple branches, you need to design the network in a hub and spoke topology. There is more advanced full mesh technology leveraging SD-WAN; however, we are not focusing on that, nor DMVPN.
In this blog article, we will build an IPsec tunnel between two sites using an ASA firewall. After the tunnel is built, we will test the connectivity from both sides and make sure the connectivity looks perfect.
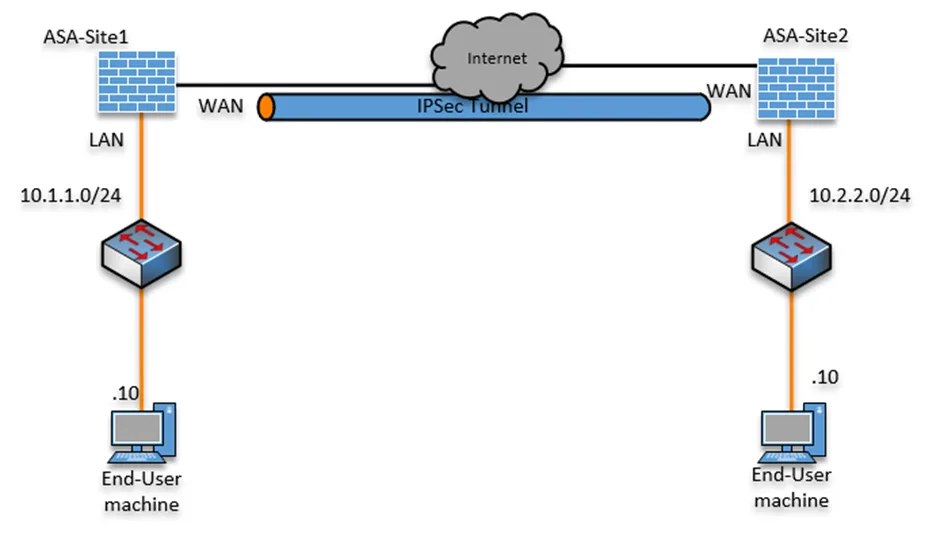
Below is the topology that we will work on, I have two sites with an ASA firewall on edge, which is connected to the internet. We will deploy IPsec between the two sites.

As you can see, From Site1 I tried to ping Site2, and I am not getting any response, which means there is no connectivity between them.

We will be using IPsec IKE version 2 in this tutorial.
Read also,
How to Set Up IPsec Site-to-Site VPN between FortiGate and ASA?
How to Set Up IPsec Site to Site VPN Between ASA and Paloalto?
How to Configure IPsec Site to Site VPN Between PfSense and ASA?
How to Deploy Cisco ASAv in AWS? | Step by Step Guide.
ASA-Site1 IPsec configuration.
1. Enable IKEv2 on the outside interface of ASA.
For IPsec to function on ASA, you have to enable the IKEv2 services on the outside interface of the ASA firewall. By default, all traffic from the outside zone to the inside will be denied, so after enabling IKE service on the external interface, it will listen on port 500 for IPsec connectivity.
configure terminal
crypto ikev2 enable outside
2. Configure the Phase1 policy on ASA.
The IPsec consists of two phases, phase1, and phase2. Phase1 tunnel is the first tunnel created for IPsec through which the IKE key will be created, encrypted, and exchanged between the two different sites. And on the phase2 tunnel, the actual data traffic between the sites will be encrypted.
Configure the IKEv2 policy to define the phase1 parameters.
crypto ikev2 policy 10
 encryption aes-192
 integrity sha
 group 2
 lifetime seconds 28800
 exit
!
3. Configure Phase2 on ASA.
Here, you need to know the remote gateway’s public routable address, create the tunnel group, and specify the phase2 parameters. We are using a pre-shared key for phase2 authentication, and the key that we will use is getlabsdone123. You may choose a different key. However, all the parameters must match on both sides, except, of course, the public IP address of each end, which will be different.
tunnel-group 2.2.2.2 type ipsec-l2l
crypto ipsec ikev2 ipsec-proposal S1pro
 protocol esp encryption aes
 protocol esp integrity sha-1
 exit
!
tunnel-group 2.2.2.2 ipsec-attributes
 ikev2 remote-authentication pre-shared-key gelabsdone123
 ikev2 local-authentication pre-shared-key getlabsdone123
 exit
!
4. Define the interesting traffic.
To send the traffic through the ASA tunnel, we need to define the interesting traffic with the help of an access list. So you need to create an Access list that permits the source IP address of site 1, which is 10.1.1.0/24, and the destination Ip address of site 2, which is 10.2.2.0/24.
access-list 101 extended permit ip 10.1.1.0 255.255.255.0 10.2.2.0 255.255.255.05. Define the crypto map.
We will create a crypto map by calling all the parameters we mentioned above for the IPsec tunnels.
As you can see, the proposal, access-list 101 we defined above and applying the crypto map to the outside interface of the ASA firewall.
crypto map mymap 10 set peer 2.2.2.2
crypto map mymap 10 set ikev2 ipsec-proposal S1pro
crypto map mymap 10 match address 101
crypto map mymap interface outside
exit
Site 2 ASA IPsec configuration.
Now that we configured the site1 ASA with the IPsec parameters, it’s time for us to create the IPsec on site2.
The configuration is below, and we will paste this into the second ASA. All the parameters on the second ASA are the same except the following.
- While the first ASA had the peer IP of 2.2.2.2, on the second ASA, the peer IP would be 1.1.1.1.
- The Accesslist will be the right opposite, meaning the source IP address of the site1 ASA will become site 2 ASA destination IP. Similarly, the destination subnet of Site1 will become the source IP address of Site2.
configure terminal
crypto ikev2 enable outside
crypto ikev2 policy 10
 encryption aes-192
 integrity sha
 group 2
 lifetime seconds 28800
 exit
!
tunnel-group 1.1.1.1 type ipsec-l2l
crypto ipsec ikev2 ipsec-proposal Site2prpsl
 protocol esp encryption aes
 protocol esp integrity sha-1
 exit
!
tunnel-group 1.1.1.1 ipsec-attributes
 ikev2 remote-authentication pre-shared-key getlabsdone123
 ikev2 local-authentication pre-shared-key getlabsdone123
 exit
!
access-list 101 extended permit ip 10.2.2.0 255.255.255.0 10.1.1.0 255.255.255.0
!
crypto map site2map 10 set peer 1.1.1.1
crypto map site2map 10 set ikev2 ipsec-proposal Site2prpsl
crypto map site2map 10 match address 101
crypto map site2map interface outside
exit
Test the network.
On the end-user machine, you can start initiating the traffic, and if you have followed everything to this point, you should get a response from the remote site.
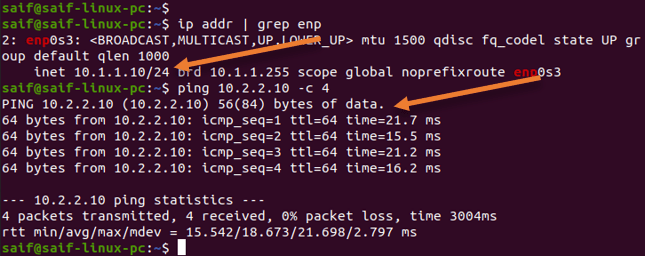
As you can see, the Ubuntu machine connected to Site1 (10.1.1.10), can reach IP 10.2.2.10.

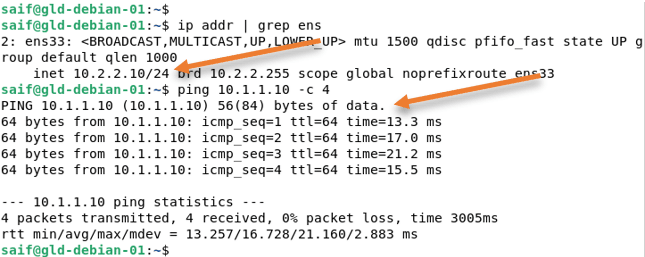
Similarly, the Debian host connected to site2 (10.2.2.10) can also talk to site 1.

Validate the IPsec connectivity.
We can validate the IPsec connectivity by looking at the phase1 and phase2 status. Sometimes you build the IPsec tunnel, where only phase1 always comes up but not phase2. So below command will come in handy when you are troubleshooting.
To see the phase1 IPsec status, you may issue the command, show iskamp sa.
ASA1 Phase 1 status.
ciscoasa# show isakmp sa

There are no IKEv1 SAs

IKEv2 SAs:

Session-id:7, Status:UP-ACTIVE, IKE count:1, CHILD count:1

Tunnel-id Local          Remote        Status   Role
 15072173 1.1.1.1/500    2.2.2.2/500   READY    INITIATOR
      Encr: AES-CBC, keysize: 192, Hash: SHA96, DH Grp:2, Auth sign: PSK, Auth verify: PSK
      Life/Active Time: 28800/262 sec
Child sa: local selector  10.1.1.0/0 - 10.1.1.255/65535
          remote selector 10.2.2.0/0 - 10.2.2.255/65535
          ESP spi in/out: 0x30fc7cd7/0x3dd6957f
ciscoasa#
ASA 2 Phase 1 status.
iscoasa# show isakmp sa

There are no IKEv1 SAs

IKEv2 SAs:

Session-id:7, Status:UP-ACTIVE, IKE count:1, CHILD count:1

Tunnel-id Local                                               Remote                                                  Status         Role
 17330927 2.2.2.2/500                                         1.1.1.1/500                                              READY    RESPONDER
      Encr: AES-CBC, keysize: 192, Hash: SHA96, DH Grp:2, Auth sign: PSK, Auth verify: PSK
      Life/Active Time: 28800/348 sec
Child sa: local selector  10.2.2.0/0 - 10.2.2.255/65535
          remote selector 10.1.1.0/0 - 10.1.1.255/65535
          ESP spi in/out: 0x3dd6957f/0x30fc7cd7
ciscoasa#
Similarly to see the phase2 status, you can enter the command show ipsec sa
ASA1 phase2 status.
ASA1 phase2 status.
ciscoasa# show ipsec sa
interface: outside
    Crypto map tag: site1map, seq num: 10, local addr: 1.1.1.1

      access-list 101 extended permit ip 10.1.1.0 255.255.255.0 10.2.2.0 255.255.255.0
      local ident (addr/mask/prot/port): (10.1.1.0/255.255.255.0/0/0)
      remote ident (addr/mask/prot/port): (10.2.2.0/255.255.255.0/0/0)
      current_peer: 2.2.2.2
ASA 2 phase2 status.
ciscoasa# show ipsec sa
interface: outside
    Crypto map tag: site2map, seq num: 10, local addr: 2.2.2.2

      access-list 101 extended permit ip 10.2.2.0 255.255.255.0 10.1.1.0 255.255.255.0
      local ident (addr/mask/prot/port): (10.2.2.0/255.255.255.0/0/0)
      remote ident (addr/mask/prot/port): (10.1.1.0/255.255.255.0/0/0)
      current_peer: 1.1.1.1