
Asa is one of the popular firewall offerings from cisco, used by many on-prem enterprise networks. Many users are now using the ASAv on the AWS cloud; it sits at the edge of the cloud network protecting your AWS resources.
You can also take advantage of this setup and configure end-user VPNs such as Any connect. So users can connect to the VPN remotely. If any 3rd party users wanted to connect to your network, you could build an IPsec tunnel to extend the network easily.
We have looked at how to set up IPsec VPN on ASA to different vendors in our blog post. You may check them out if you are interested.
We will install the ASA firewall in the AWS EC2 cloud in this blog post. Since it is virtualized instance, it is called ASAv or vASA.
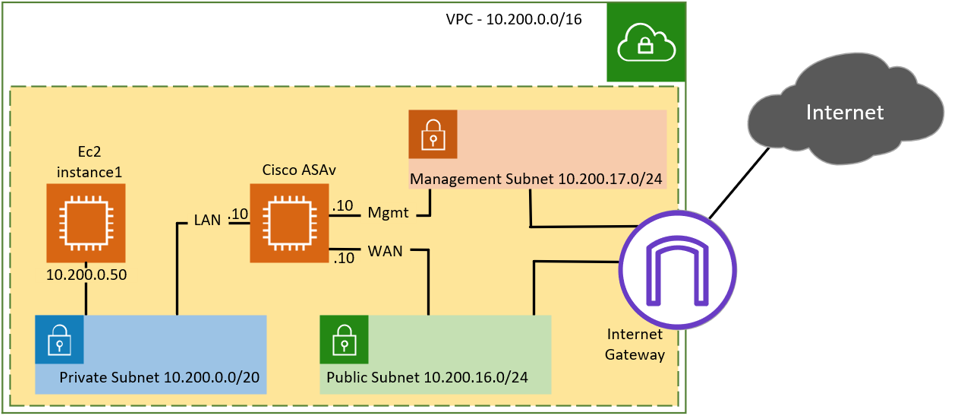
There are different ways we can architect or design the network. Below is the topology that we are going to use.
We have a VPC with the subnet 10.200.0.0/16, which is split into different subnets, such as Private, Public, and management. We have an EC2 instance running in the private subnet at the moment, it can only talk to the other hosts in the private subnet, not to the internet. We will build a Cisco ASAv where the inside interface is connected to the private subnet and the outside interface is connected to the public subnet. After the deployment, the private host can talk to the internet through the ASA firewall.

Before you begin, You need to have an AWS account. And it is expected to incur costs doing this lab.
Create subnets in the AWS cloud.
We have already covered the creation of private and public subnets over here, and you may follow the step-by-step guide to proceed with the subnet configuration. The only difference is that in that instead of using the subnet 10.100.0.0/16 we have used 10.200.0.0/16, with only one octet difference.
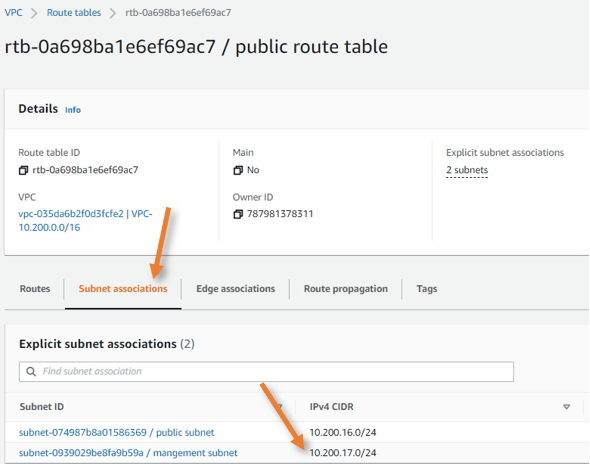
Apart from that private and public subnet, we need to configure management subnet 10.200.17.0/24 mapped to the public route table.


We also added a management subnet in the subnet associations in the public route table.

I have also deployed the Amazon EC2 Linux AMI image in the private subnet.
Create a security group.
You can think of a security group as a stateful firewall, though it’s not a firewall. We can configure the policies in the security group and control how the traffic flows through the AWS cloud.
We call it stateful because you don’t need to define an outbound rule when you define an inbound rule. The return traffic always checks the state table and comes in.
You should not get confused with the NACL here, which is not stateful; hence, you would need to define both sides’ policies. We are not going to touch NACL here.
There is three security group that needs to be defined in the AWS. The first one is for the inside/LAN interface to which the AWS private instance connects. And the second one is for the outside/Wan interface, which connects to the public internet. The third and final one is for the management interface where we ssh and HTTPS.
You also need to remember that the security group is AZ-specific, so you need to create the security group on the AZ where you will deploy the Cisco ASAv.
Configure the security group for LAN.
Log in to AWS, Open VPC service.
Under security, select security group-> Click on Create Security group.
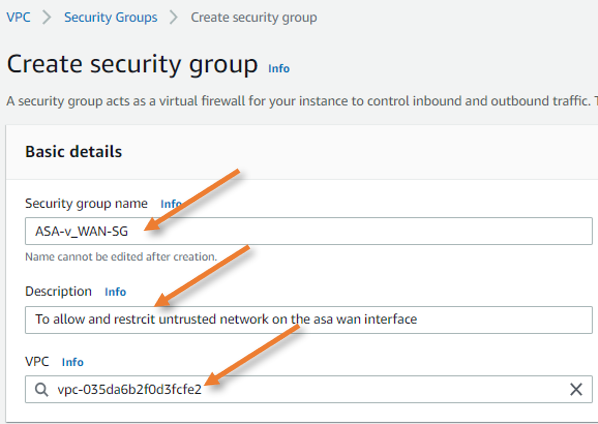
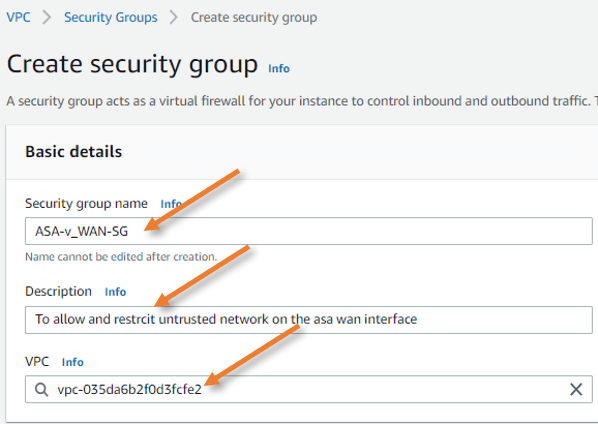
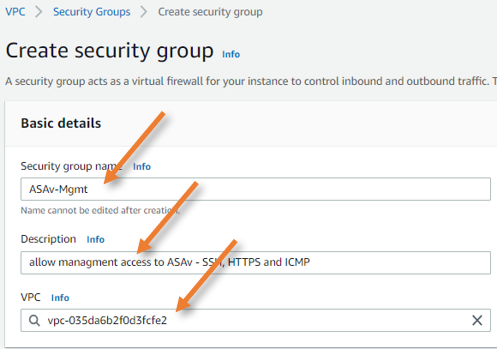
In the Create security group window, add the following;
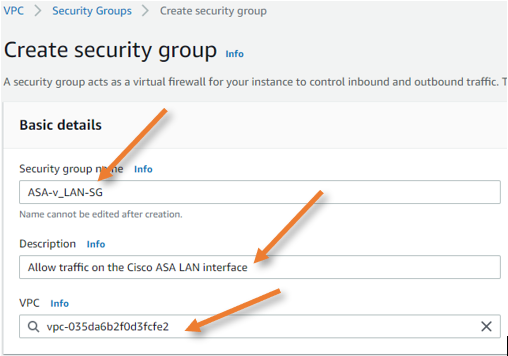
Basic details.
Security group name: Provide a name for the Security Group.
Description: Enter some description.
VPC: This will be predefined. Make sure you choose the right VPC here.

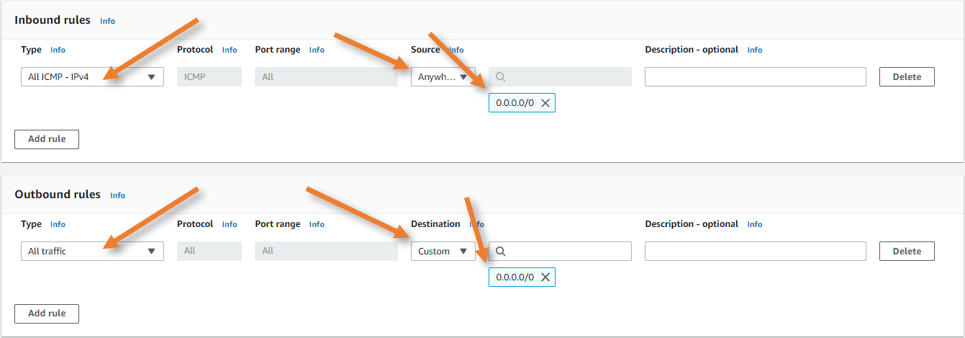
Inbound rules.
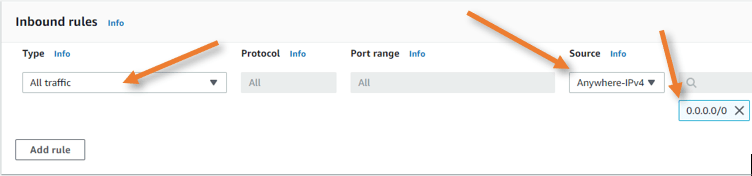
We are deploying a firewall here, and we don’t want AWS to control the EC2 instance traffic with AWS security, hence allowing all inbound traffic.
Type: All traffic
Source: Anywhere-IPv4
Enter the subnet as 0.0.0.0/0 to allow all the traffic.

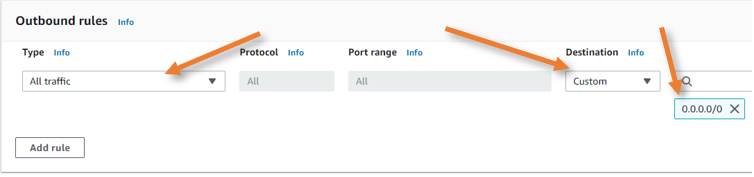
Outbound rules.
Define outbound rules similar to the inbound rules where all the traffics are allowed.

Click on Create a new security group.
Configure the security group for WAN.
Go back to the security group and click on New security group.
Provide a name and a description.
Choose the correct VPC.
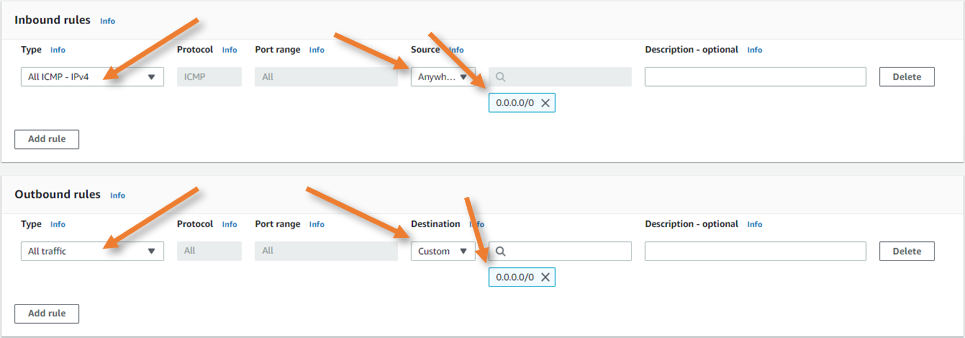
Inbound rules.
In the inbound rule, you need to specify what needs to be allowed outside.
The following services are pretty common in Cisco ASA, so if you plan to use it allow that service.
- Any connect – 443 – This port will allow external users to connect to the VPN on the ASA instance on AWS.
- IPsec VPN – 500 and 4500 – To connect 3rd party networks.
- ICMP – I am allowing all. Depending on your network, you may restrict or allow ICMP.
In my setup, I am only allowing ICMP. The rest of the services I will add when I need them.
Outbound rules.
Here you don’t need to restrict any traffic, it should allow all, so the users inside the cloud, connected to the ASA LAN side should be able to go out.
Click on Create security group.
Management security group.
The sole purpose of management interface is to access the firewall by using SSH or https using ASDM. So we are allowing ssh and https access to my public IP, and ICMP traffic to all.
You should be carefull when you are allowing the ssh access to the public, you should never open ssh or HTTPS access to all, which will put the firewall to risk. It is common to have static IP address in your enterprise network, that case restrict access to the static IP so only the users under that static IP will be able to access the management side of the ASA.
Go ahead and create another security group.
Provide Name and description for the security group and also choose the right VPC.

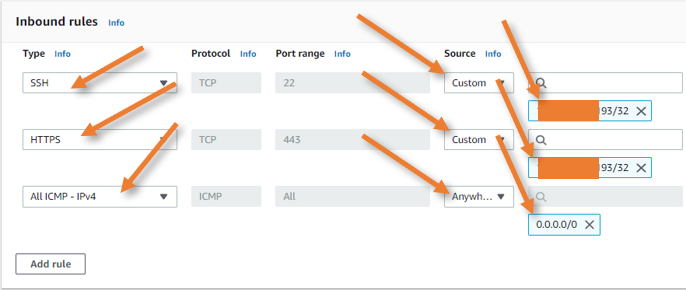
Inbound rules.
Under inbound rules;
Type: SSH
Source: Custom
And I am adding my static IP.
Similarly, for HTTPS, and for ICMP, I am allowing for all.

Create Elastic IP.
The elastic IP is like a static Ip that you get from your internet service provider, which will never change. We require elastic IP that needs to be attached to the cisco ASAv WAN side and management interface.
In the same Virtual Private cloud menu on the left, choose Elastic IPs.
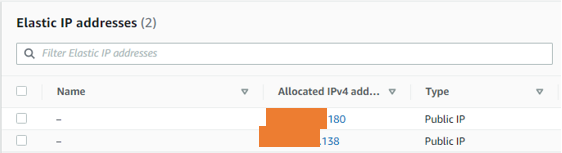
Click on Allocate Elastic IP address.
Choose the network border group. In the public IPv4 address pool, choose Amazon’s pool of IPv4 addresses and click on Allocate.
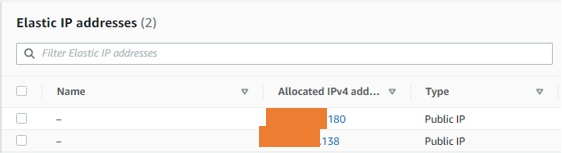
Create another Elastic IP address. After this, you will have two newly created public IP addresses.
Create network interfaces.
In ASAv, you require three interfaces, one is for the LAN, the second is for the WAN, and the final one is for the management.
The first interface that ASAv creates during the deployment will have a management interface auto created. We will now have to create LAN and the WAN interfaces.
Create ASA LAN interface.
Network & security-> Network interfaces-> Create network interface.
Description: Provide a description.
Subnet: Choose the private subnet.
Private IPv4 address: As per our topology, we need to define 10.100.0.10 for our LAN interface, so under private IPv4 address, choose custom and enter the IP address of your choice.

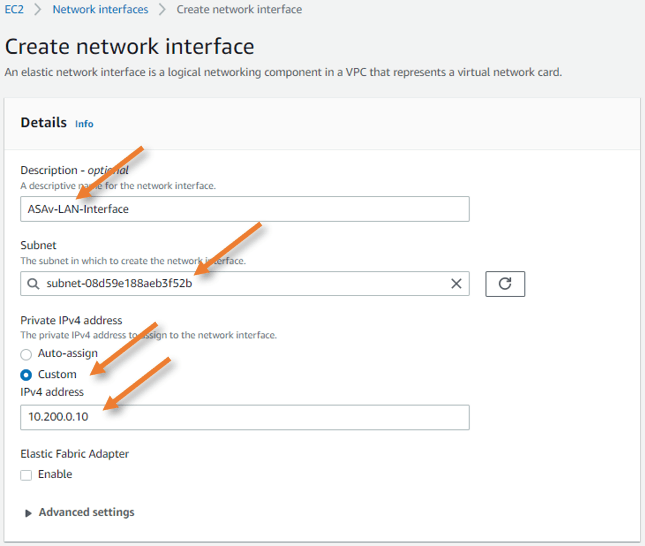
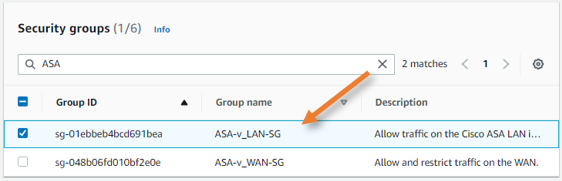
Security group.
Remember, we have defined a security group initially for the LAN interface, choose that here.
Click on Create network interface.

Create ASA WAN interface.
Create another interface in the creation wizard.
Description: Provide a description for the WAN interface.
Subnet: Choose the public subnet here.
Private IPv4 address:
Choose custom and enter the IP address we reserved for WAN manually.
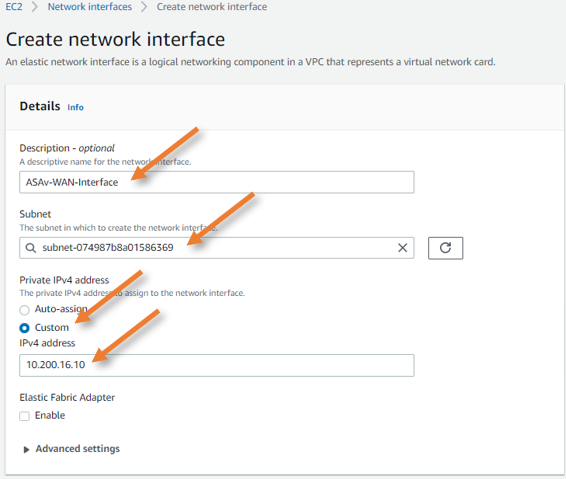
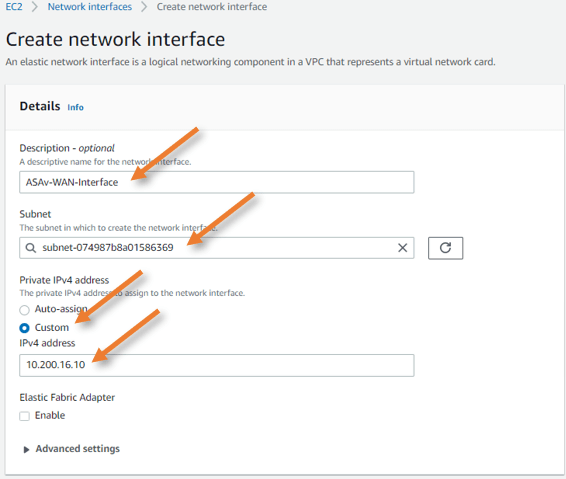
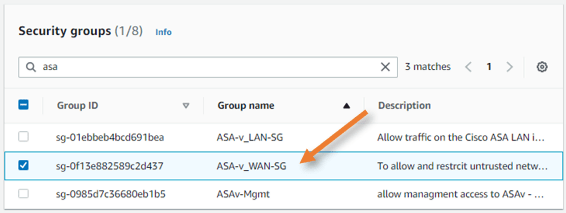
In the security group selection choose the security group we defined for the WAN interface.

Deploy the Cisco ASAv in AWS.
Now that we have defined all the pre-requisites to deploy the ASA firewall, lets go ahead and deploy the ASA firewall in the AWS.
Goto EC2 service-> Launch instance.
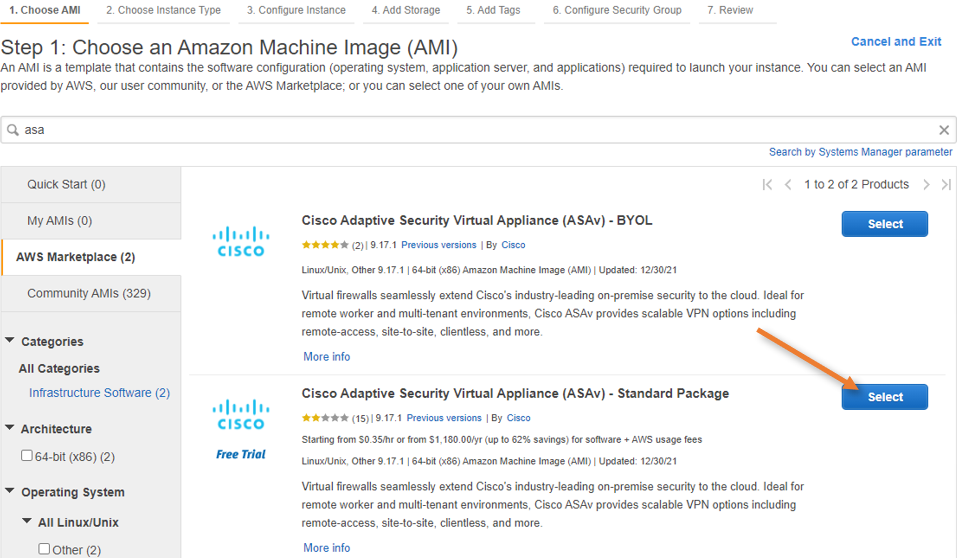
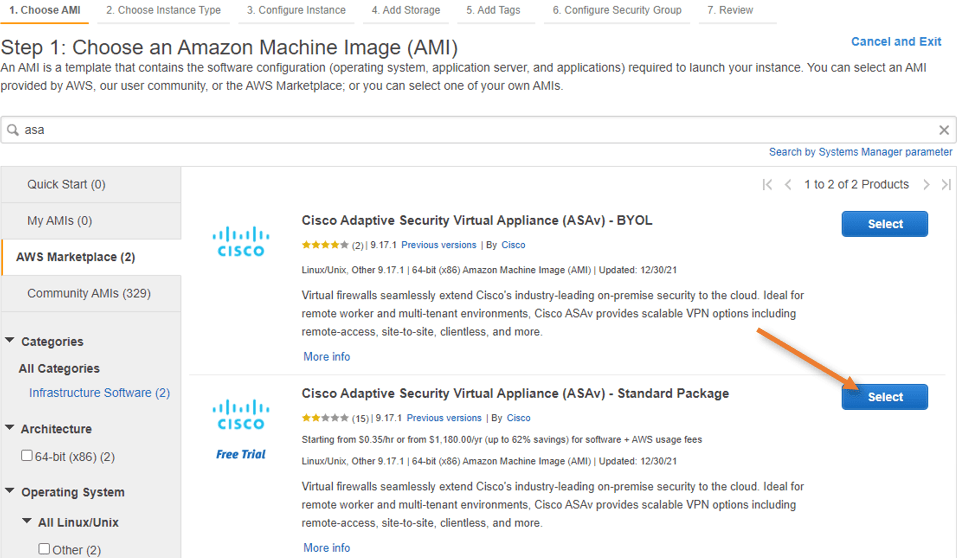
Choose the ASA Image.
In the launch instance wizard, click on AWS Marketplace and search for ASA.
You will see two types of installation.
If you have an ASAv license, you can choose bring your own license model(BYOL). However, there will be charges on the type of instance that you run on the AWS.
I am choosing the standard package, which would give me 30 days trial before I move on to production, enough time to test things out.
Choose the version by clicking select.
You will get the properties, including the type and the price of the instance you are going to deploy. Click on Continue.
Choose the instance type.
Since this will be a tutorial lab, I don’t want to choose a higher instance type. The lower tier would do. So depending on your setup, you may select the instance type.
I am choosing c4.large and clicking on Next: Configure instance details.
Note: C4.large support only four interfaces, so in your setup, if you require more network interfaces, you will have to choose a different one.


Configure instance details.
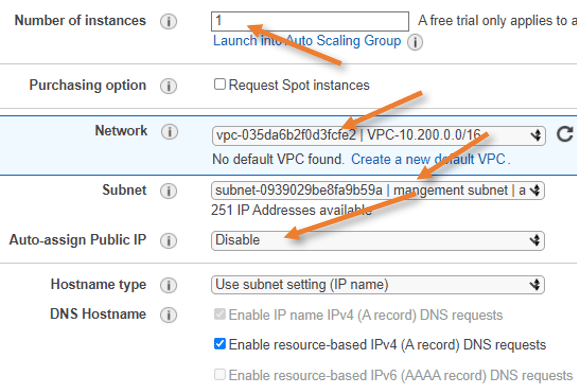
Number of instances- 1
Network – Choose your VPC.
Subnet – Choose the public Subnet>
Auto-assign public IP- Disable – because we already have an elastic public IP which we will assign to the outside interface.

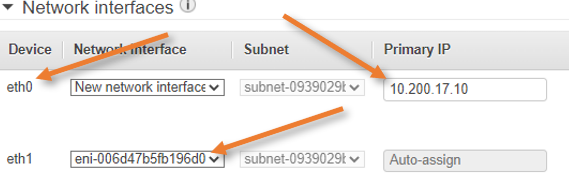
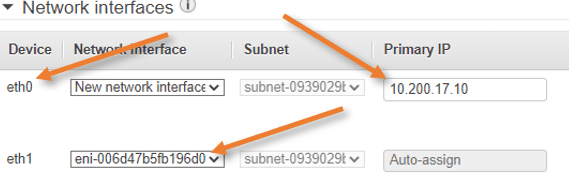
Configure the network interfaces.
We already have a network interface added, which will act as a WAN link for the ASAv.
On Eth0, enter the primary IP 10.200.17.10 as per our topology this will act as management IP.
Click on Add device to add a new network interface eth1.
In Eth1, choose the elastic interface that we created, and the primary IP will auto-assign as we have already defined the private IP address to the elastic interface.
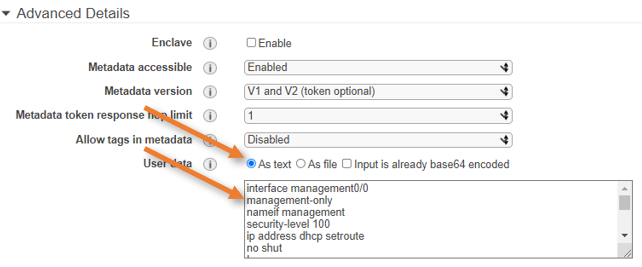
Add the ASA config using user data.
We want to configure the ASA upfront using 0 day configuration.
The management plane and data plane will become separate with the below configuration. The management interface will get the IP address with DHCP with the default gateway.
We can also configure the network services such as DNS and NTP.
Make the Management interface as the SSH source and so on.
Change the config according to your environment. After the changes have been done, you may copy and paste this config under user data As a Text.
Note: You may face some challenges if you don’t add the 0-day configuration. For example, the entire ASA firewall will have a default route pointed to the management interface, and if you try to point the default route to other interfaces, you will lose the connectivity. If you have console access, then it should be OK; however, in AWS, we don’t have console access for ASA. We have to rely on SSH and ASDM. So it is best to add the 0-day configuration upfront. It will definitely save some time for you.
interface management0/0
management-only
nameif management
security-level 100
ip address dhcp setroute
no shut
!
name-server 1.1.1.1
!
ntp server 1.pool.ntp.org
ntp server 2.pool.ntp.org
ntp server 3.pool.ntp.org
!
same-security-traffic permit intra-interface
!
crypto key generate rsa modulus 2048
ssh 0 0 management
ssh timeout 30
username admin nopassword privilege 15
username admin attributes
service-type admin

Click on Next: Add storage.
In the storage, I am leaving the default. If you require more storage, you can do that here.
Next : Add tags.
Add tags is optional. If not required, you may not add tags.
Click on Add tag. I am giving Name as the key, and value to the Cisco ASAv firewall.
Next: Configure the security group.
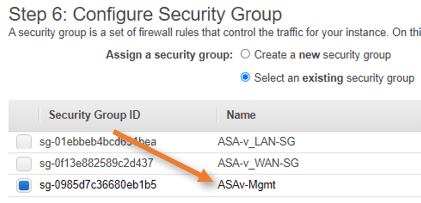
Chose the security group.
Choose the security group that we already defined for the ASA.
The security group that you choose here will be applied to the primary interface of the ASA firewall. Since the primary interface is the management interface, choose the security group we defined for the management interface – ASAv-Mgmt.

Review and Launch
You will get the summary of the configuration that you made thus far, confirm everything looks good and click on Launch.
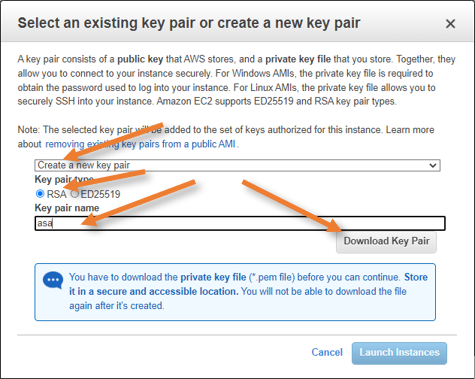
Choose the Key pair.
You will get a pop-up to choose the existing key pair or create a new key pair.
As I require new key pair for this ASA install, choose Create new key pair.
Key pair type: RSA.
Key Pair name: asa
click on Download Key pair and launch instance.

The instance will load. As it is a brand new installation, it is most likely take a few seconds to complete.
Once done, you may click on view instances to see the ASA instance we just deployed.


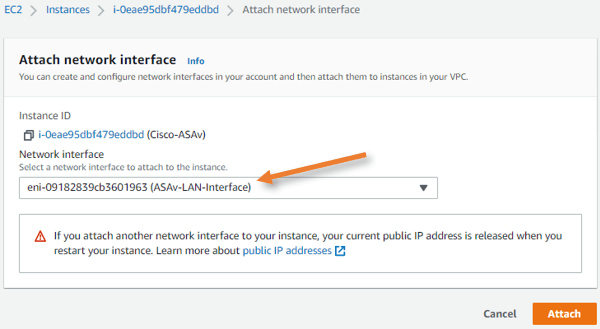
Add the third interface.
We have added the management interface and the WAN interface. We now have to add the third interface for the LAN side.
Goto EC2 intances, select the fortigate firewall. -> Actions-> Networking-> Attach network interface.
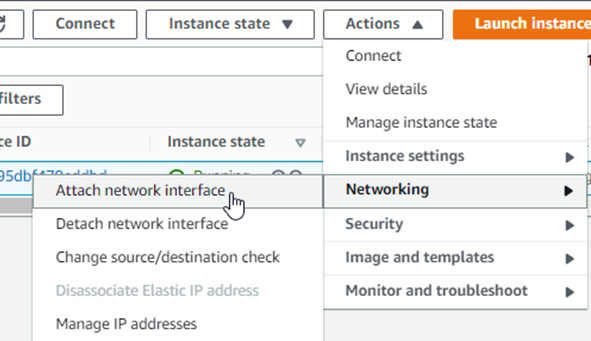
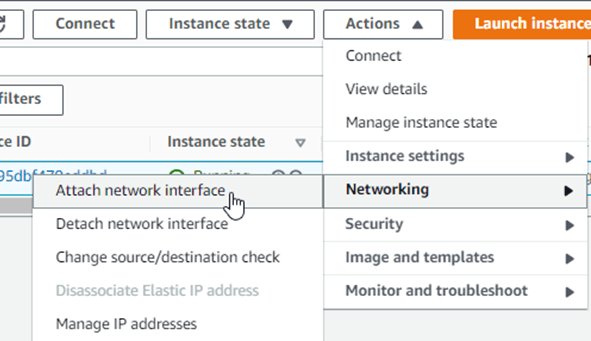
In the Attach network interface pop up, choose the LAN interface we created earlier and click on Attach.

Disable source destination check.
Whenever you install a firewall in AWS, you must disable the source-destination check for the firewall to work properly.

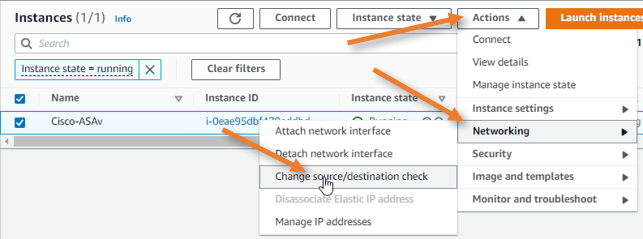
Choose stop.
Configure the Management and outside IP address.
Currently, the ASA firewall doesn’t have any public IP address assigned to it. We will assign the elastic IP’s that we defined in the AWS to the primary interface that acts as a management interface and also to WAN interface, which will be the outside interface.
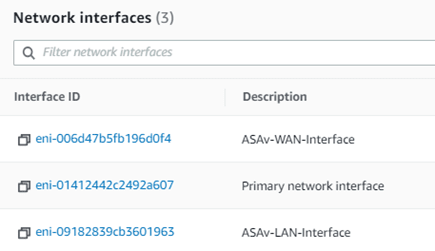
Find the interface-id.
In the AWS instance, click on networking and under network interfaces.
Get the interface ID of Primary and Wan network interfaces.

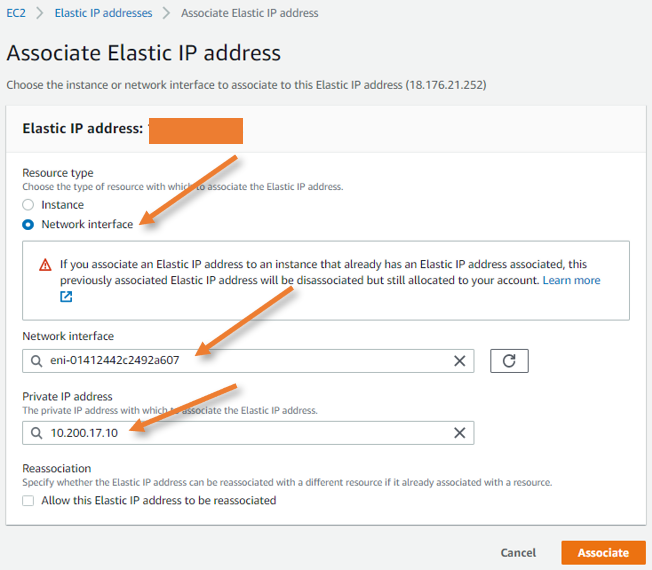
Attach the elastic IP for the management interface.
The management interface will act as to traffic and purely for management purpose, none of the data traffic will ever pass through this.
Goto Network & Security -> Elastic Ips
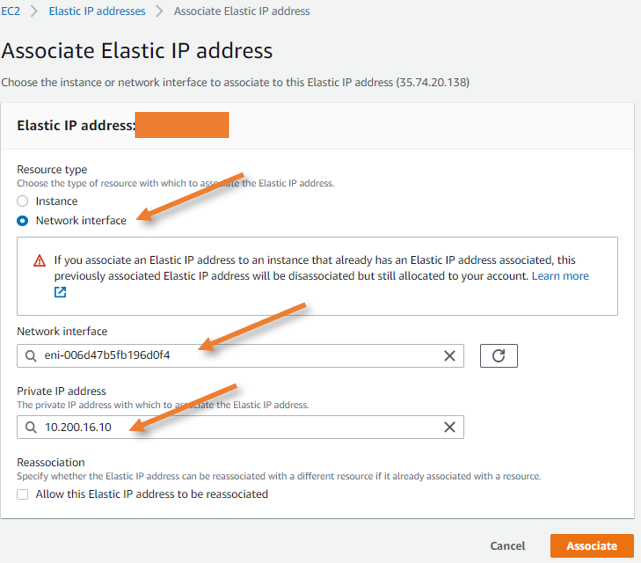
Select the Elastic IP that we allocated earlier, and click on Actions-> Associate elastic IP address.
Resource type: Network interface.
Network interface: Choose the Primary interface we found before.
Private IP address: Click on the address column to auto-populate the private IP. Click on Associate.

Attach elastic IP for Outside WAN interface.
In the same way we did attach the management interface, let’s go ahead and add the public IP address for the WAN interface, which is needed for the through traffic.

Configure the ASA interfaces.
Now that you have reachability to the ASA firewall from outside, you can now ssh into the ASA firewall from your local machine.
Go to the location where you downloaded the key pair.
Open the command prompt from there.
To ssh into the ASA, type the command ssh -i asa.pem admin@<management public IP>
As you can see, you have logged in, and it didn’t ask for the password.
C:\Users\saifudhe\Desktop\AWS>ssh -i asa.pem [email protected]
The authenticity of host 'x.x.x.180 (x.x.x.180)' can't be established.
RSA key fingerprint is SHA256:lDXERUokrF6HzhFAoTwILuqCPiq3jU4o85k7cowSH9E.
Are you sure you want to continue connecting (yes/no/[fingerprint])? yes
Warning: Permanently added 'x.x.x.180' (RSA) to the list of known hosts.
User admin logged in to ciscoasa
Logins over the last 1 days: 1.
Failed logins since the last login: 0.
Type help or '?' for a list of available commands.
ciscoasa>
Type enable and it will ask you to set the enable password.
Enter the password and confirm the same password.
ciscoasa> enable
The enable password is not set. Please set it now.
Enter  Password: **********
Repeat Password: **********
Note: Save your configuration so that the password persists across reboots
("write memory" or "copy running-config startup-config").
ciscoasa# write memory
Cryptochecksum: a8158ffe 7b22087c eeae3494 e4fe903e
10958 bytes copied in 0.340 secs
[OK]
Configure the outside and inside interface.
The ASA is only configured with the management interface. Though we have added the interface and the public Ip address on the inside and outside interface in the AWS, we have not really configured in the ASA.
Enter the command below to activate outside and inside interface with DHCP. Whatever the IP address we configured on the AWS side will be added to the ASA after this.
!
interface GigabitEthernet0/0
 nameif outside
 security-level 0
 ip address dhcp setroute
 no shut
!
interface GigabitEthernet0/1
 nameif inside
 security-level 100
 ip address dhcp
 no shut
!
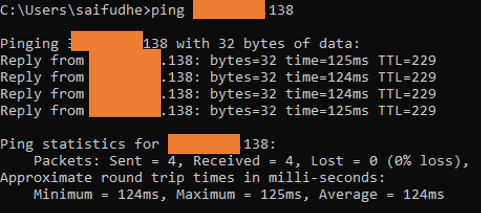
Although you got a private IP address inside the ASA, on the AWS side, there will be 1 to 1 NAT between the private and the public IP that we associated, as a result, you should now be able to ping the outside IP address.
You may ping the Outside interface from your local machine, and you should get a response.

You can confirm the IP address configured on the show interface ip brief
The only interfaces that we need to worry about are management and the g0/0 and g0/1.
We don’t manage the internal-Data0/0.
ciscoasa# show interface ip brief
Interface                  IP-Address      OK? Method Status                Protocol
GigabitEthernet0/0         10.200.16.10    YES DHCP   up                    up
GigabitEthernet0/1         10.200.0.10     YES DHCP   up                    up
Internal-Data0/0           169.254.1.1     YES unset  up                    up
Management0/0              10.200.17.10    YES DHCP   up                    up
ciscoasa#
You can check the routing table, and you should see the default route pointed to the public subnet gateway.
ciscoasa# sho route

Codes: L - local, C - connected, S - static, R - RIP, M - mobile, B - BGP
       D - EIGRP, EX - EIGRP external, O - OSPF, IA - OSPF inter area
       N1 - OSPF NSSA external type 1, N2 - OSPF NSSA external type 2
       E1 - OSPF external type 1, E2 - OSPF external type 2, V - VPN
       i - IS-IS, su - IS-IS summary, L1 - IS-IS level-1, L2 - IS-IS level-2
       ia - IS-IS inter area, * - candidate default, U - per-user static route
       o - ODR, P - periodic downloaded static route, + - replicated route
       SI - Static InterVRF, BI - BGP InterVRF
Gateway of last resort is 10.200.16.1 to network 0.0.0.0

S*       0.0.0.0 0.0.0.0 [1/0] via 10.200.16.1, outside
C        10.200.0.0 255.255.240.0 is directly connected, inside
L        10.200.0.10 255.255.255.255 is directly connected, inside
C        10.200.16.0 255.255.255.0 is directly connected, outside
L        10.200.16.10 255.255.255.255 is directly connected, outside

ciscoasa#
Update the AWS routing table for the private subnet.
For the hosts in the private subnet to talk to the internet, it will have to go via the ASA firewall. So the gateway should be the ASA LAN interface.
Update the private route table with a default route pointing to the firewall LAN interface.
Goto VPC-> Virtual Private Cloud-> Route table-> Private subnet
Click on the route table ID.
Add the default route as below.
Destination: 0.0.0.0/0
Target: Type interface, and you will be able to select the interface ID of the ASA firewall. You need to make a note of the fortigate firewall LAN interface ID.
Click on Save changes.


Configure NAT on the ASA.
We have pointed default routes in AWS private subnet routing table. However, for the firewall to send the traffic out, it has to be natted first because the only interface that can talk to the internet is 10.200.16.10 the outside interface IP of ASA.
We will use NAT overload on ASA also known as dynamic PAT.
Configure terminal
Object network private-sub
subnet 10.200.0.0 255.255.240.0
nat (inside,outside) dynamic interface
end
Configure access list to allow traffic to the internet.
Configure terminal.
access-list to_out extended permit ip any any
access-group to_out in interface outside
end
Test the connectivity.
Login to the private host and test the connectivity to the internet. Since I cannot log in to the private host, I have used another host in the public subnet that acts as a bastion host. With which I can talk to the private subnet hosts. So I jumped from the public subnet host to the host in the private subnet.
You could log in to the private host from the internet by enabling port forwarding or SSH through the ASA firewall inside the interface.
If you connect to IPsec VPN or Any connect on ASA, which we just deployed, you will become part of the ASA LAN network, and you can log in to the private host securely.
As you can see, the VM instance in AWS can now go out to the internet through the ASA firewall.
[ec2-user@ip-10-200-0-50 ~]$ ping www.google.com -c 4
PING www.google.com (172.217.26.228) 56(84) bytes of data.
64 bytes from nrt12s51-in-f4.1e100.net (172.217.26.228): icmp_seq=1 ttl=104 time=2.32 ms
64 bytes from nrt12s51-in-f4.1e100.net (172.217.26.228): icmp_seq=2 ttl=104 time=2.34 ms
64 bytes from nrt12s51-in-f4.1e100.net (172.217.26.228): icmp_seq=3 ttl=104 time=3.10 ms
64 bytes from nrt12s51-in-f4.1e100.net (172.217.26.228): icmp_seq=4 ttl=104 time=2.73 ms

--- www.google.com ping statistics ---
4 packets transmitted, 4 received, 0% packet loss, time 3004ms
rtt min/avg/max/mdev = 2.324/2.627/3.106/0.320 ms
[ec2-user@ip-10-200-0-50 ~]$
You can see the nat and the connection table on the ASA firewall, which shows the traffic is getting natted through the ASA firewall to go out.
ciscoasa# show xlate
3 in use, 64 most used
Flags: D - DNS, e - extended, I - identity, i - dynamic, r - portmap,
       s - static, T - twice, N - net-to-net

ICMP PAT from inside:10.200.0.50/25938 to outside:10.200.16.10/25938 flags ri idle 0:00:03 timeout 0:00:30
UDP PAT from inside:10.200.0.50/57855 to outside:10.200.16.10/57855 flags ri idle 0:01:41 timeout 0:00:30
UDP PAT from inside:10.200.0.50/52875 to outside:10.200.16.10/52875 flags ri idle 0:01:45 timeout 0:00:30
ciscoasa#
ciscoasa# show conn
4 in use, 64 most used

UDP outside  3.114.30.212:123 inside  10.200.0.50:57855, idle 0:01:44, bytes 96, flags -
UDP outside  45.76.211.39:123 inside  10.200.0.50:52875, idle 0:01:48, bytes 96, flags -
ciscoasa#