The Ubuntu version 22.04 LTS iso image for the server recently came out for the public, and I decided to spin it up in the VirtualBox hypervisor. So in this blog article, we will see how we can install Ubuntu 22.04 LTS server in VirtualBox step by step.
After the installation, we will install the virtual box guest additions to the Ubuntu server 22.04 to improve the system performance.
Before you proceed, you need to have;
VirtualBox hypervisor – you can download it from here.
Ubuntu server 22.04 server (Jammy Jellyfish) – click here to download.
Steps to install Ubuntu 22.04 server on VirtualBox.
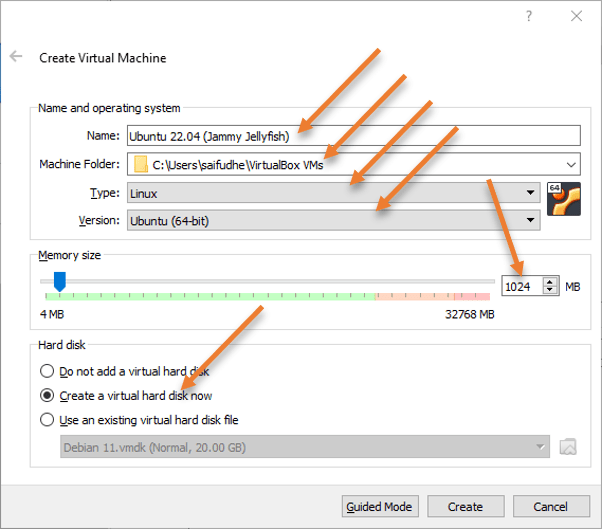
Create Ubuntu 22.04 VM in VirtualBox.
Open VirtualBox and click on Machine-> New Virtual machine.
You will get a pop-up to configure the virtual machine; there are two modes. One being the guided mode and the Expert mode. Click on Expert mode.
Name: Enter the name of your choice.
Machine folder: By default, VirtualBox would choose a location for you. This is where you would save all the virtual machine files. You may select a different location if you would like.
Type: Linux
Version: Ubuntu (64-bit)
Memory Size – Add at least 2Gigs of RAM. If you don’t have that much memory, you can give 1GB.
Hard disk: Create a virtual hard disk now.
Click on Create.

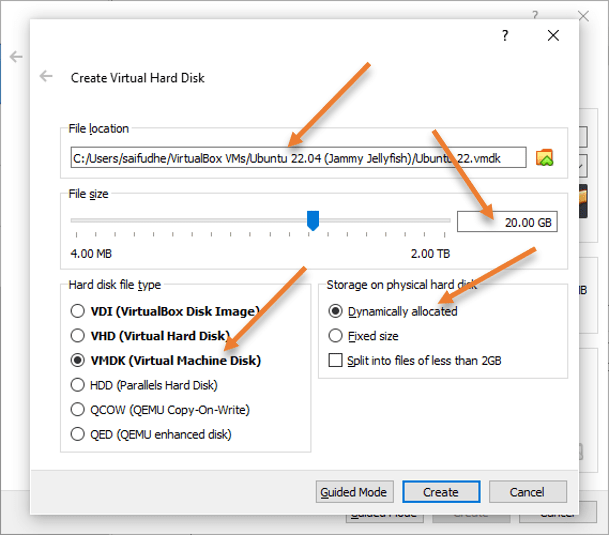
Create Ubuntu 22.04 server virtual hard disk.
Based on the previous selection, you will be required to create a virtual hard disk that needs to be attached to the virtual machine.
In the file location, it will choose the location which we defined before.
File Size: This will be the virtual hard disk storage size. By default, it would pick up 10Gb of storage. Since I require more storage, I have added 20GB. So based on your requirement, you may add more storage.
Hard disk file type: Choose VDI if you will use this virtual machine only in the VirtualBox hypervisor. If you plan to move this virtual machine to any other hypervisor, then you may choose VMDK instead.
Storage on physical hard disk: Dynamically allocated.
Click on Create.

Configure the Virtual machine parameters.
We configured pretty much everything. However, certain changes need to be made for the installation to go smoothly and get good performance out of the virtual machine.
Hence, right-click on the virtual machine that we just created and click on Settings.
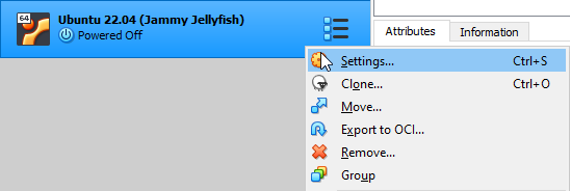

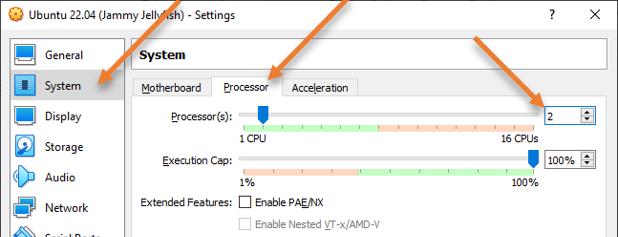
Configure the CPU.
You will get a pop-up to configure the virtual machine settings. To change the CPU configuration, choose System-> Processor.
In that, choose 2 in the processor.
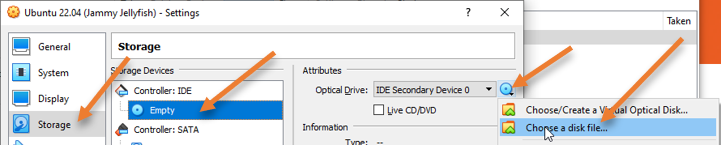
Attach the Ubuntu server 22.04 CDROM to VirtualBox.
To boot into the Ubuntu server and proceed with the installation, we need to attach the Ubuntu server image that we downloaded earlier.
Click on Storage-> Empty-> Choose a disk file.
And attach the ISO image that we have downloaded and click on OK.

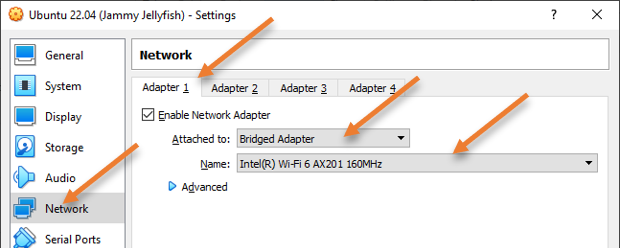
Configure the network.
The default network adapter in VirtualBox for the virtual machine would be NAT. We will have to change it to Bridged mode. In bridged mode, the virtual machine will act as if it is directly connected to your physical LAN network. And all the other devices in the LAN will be able to talk to the VM directly. However, you shouldn’t use the bridged mode if you are in an office network.
In office network, or if the bridge adapter is not working, you should only use the NAT network. That way the virtual machine can go out to the internet using the host IP address.
You can learn more about the VirtualBox network types here.
In NAT, you cannot initiate communication directly to the VM from your host machine and your local area network, for example SSH, unless you configure Virtualbox port forwarding.
After the change, click on OK.

Start the Ubuntu Server 22.04 installation.
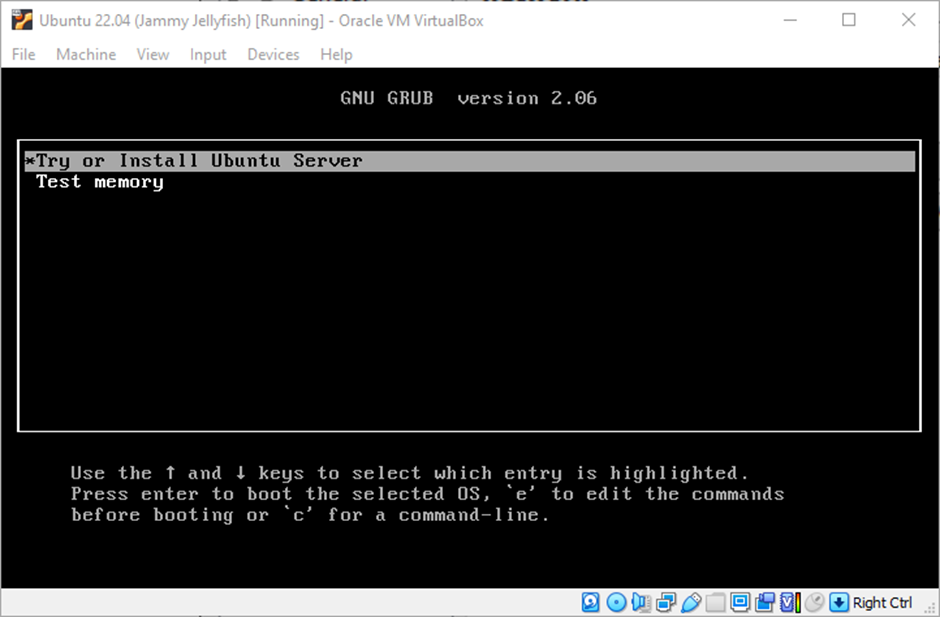
We will proceed with the virtual machine installation, for that right-click on the VM and click on start or double-click on the VM.
The virtual machine will start, and you will get a below screen, Choose to Try or install Ubuntu server.

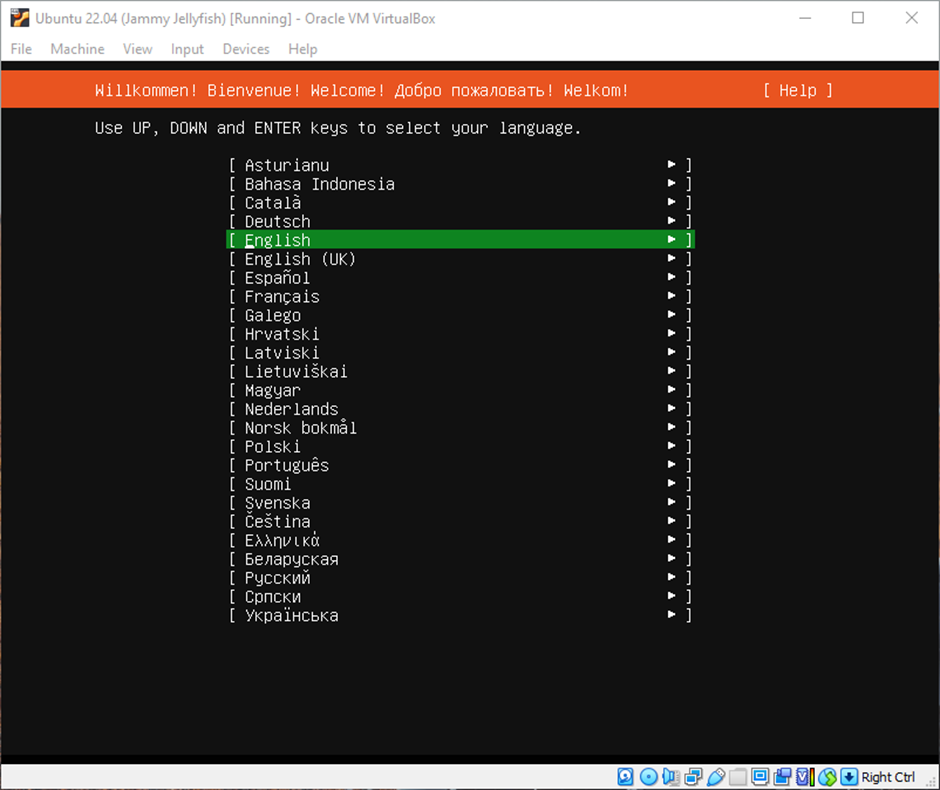
The Ubuntu installation screen will now load.
Choose the Language, region, and keyboard layout.
Choose the type of install.
You will be required to choose the type of Ubuntu server you would want to install, and I am choosing the default one. If you would like to install Ubuntu server with fewer resources, you may select minimized.


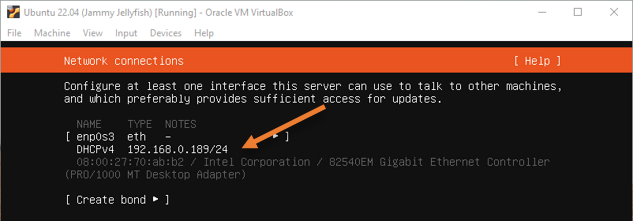
Configure the network.
I have chosen the network as bridged; hence, I got an Ip address from my local router. Even if you have NAT as an adapter, you must have an IP address added automatically.

Configure the proxy and the mirror.
If you use a proxy to get to the internet, you may enter them and click on done. You may leave this field blank if you don’t have a proxy.
In the Ubuntu mirror configuration, based on your location selection, it would choose the mirror near to that location. So you don’t have to make any changes. If you have an alternate mirror, you may choose that here and click on done.
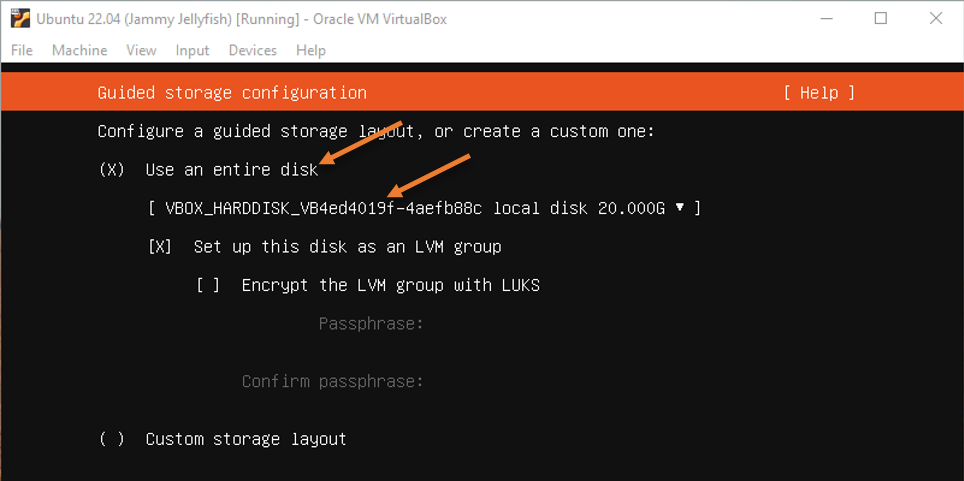
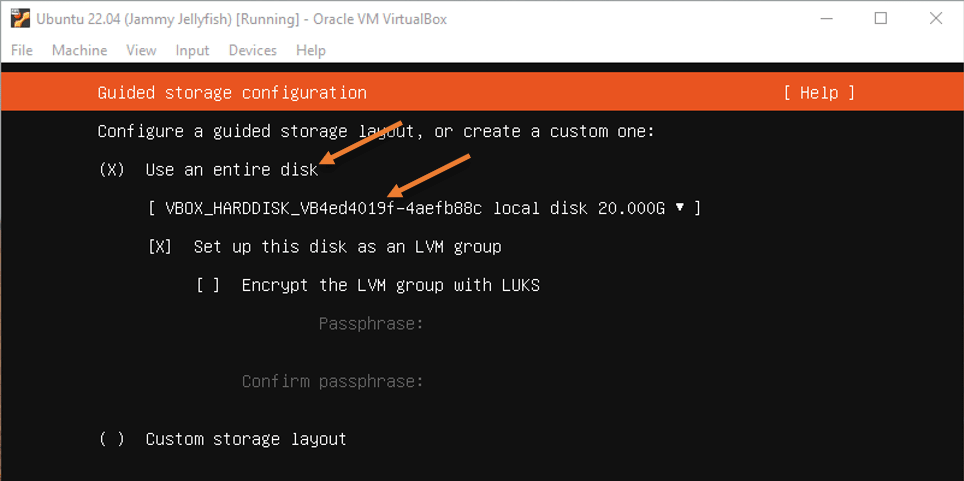
Configure the Storage.
We have defined the 20GB of storage on the VirtualBox side, and we are going to choose the entire disk as the virtual hard disk storage. I am choosing the default option. If you plan to configure hard disk with different partiotions you may select a Custom storage layout.
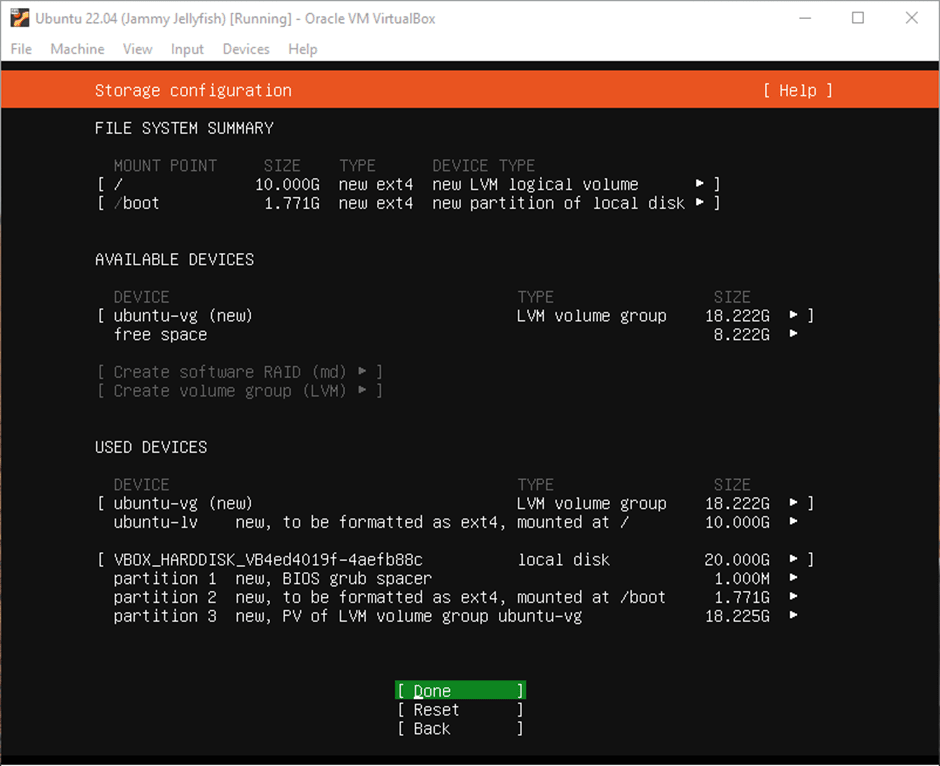
You will get the summary of how the storage is defined in Ubuntu. If you would like to make any changes, you may go back and do that else, click on done.

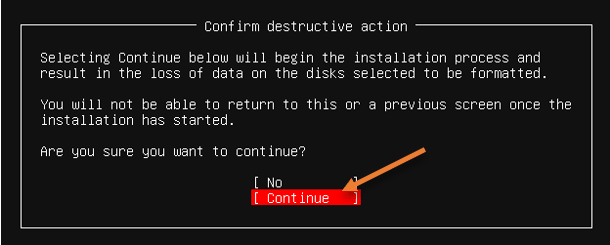
Format the Virtual hard disk.
You will get the warning that the virtual hard disk will be deleted. You may click on continue.

Profile Setup.
Based on your server configuration, you may set up a profile for your server.
This account will be used to log in to the server, and you need to remember the username and password to log in to the server later on.
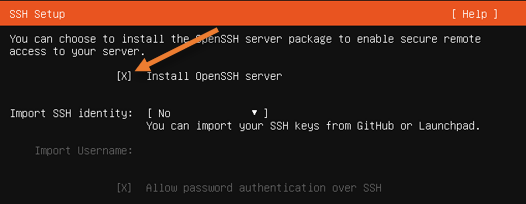
Install the SSH access.
After the installation, you must have SSH access enabled on the Ubuntu server 22.04 to log in remotely.
Select the Install OpenSSH server option selected using the spacebar.

Choose the featured snaps.
By default, you will have featured snaps available to download, so make the selection and done based on the requirement.
I have chosen aws-cli and google-cloud-sdk and and done.


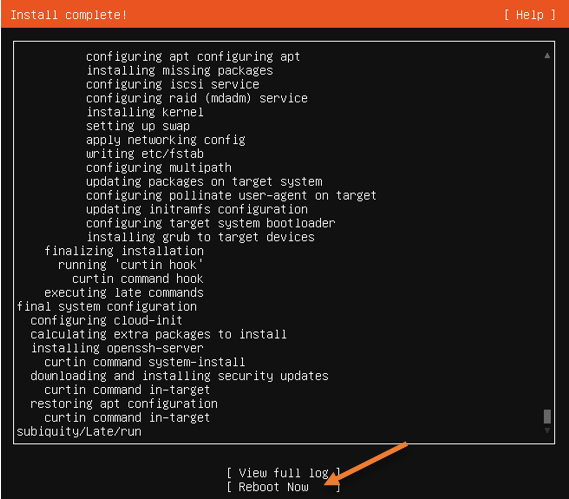
The installation will begin, and it will take some time to finish. Once completed, you may choose reboot now.
During the reboot, you will get an error message that says Failed unmount /cdrom. You may ignore that and hit enter.
I asked you to ignore the message because we don’t need to unmount the CD-Drive as it is the secondary boot device. Since the virtual hard disk is the primary boot device, it will always boot from it, which should be okay.
Login to the server.
After the server comes up, you will be asked to enter the username and password you have setup during the Ubuntu server 22.04 VM installation.
Enter the creds, and you should be able to login.


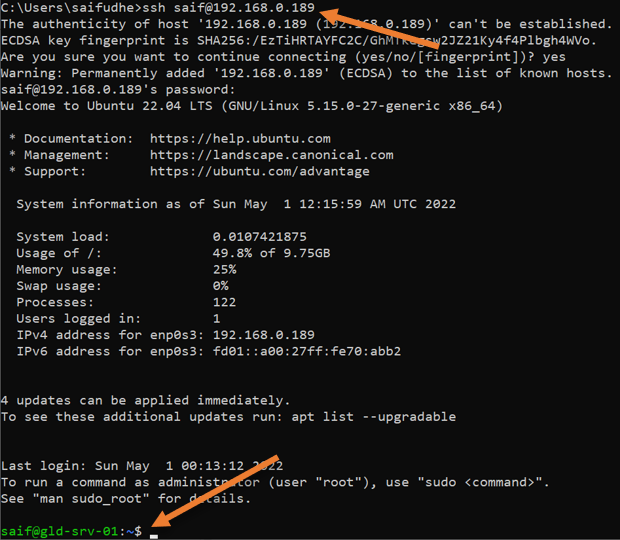
Login to the server using SSH.
As we have the bridge network enabled and the ssh service already installed, let’s confirm if we can remotely log in to the server.
If you have used NAT, you need to configure port forwarding to remotely access the server, as I mentioned earlier.

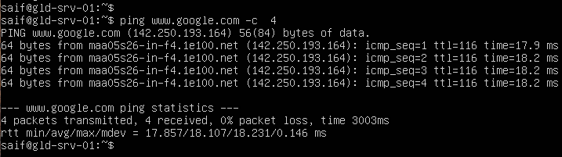
You can also confirm the server can go out to the internet.
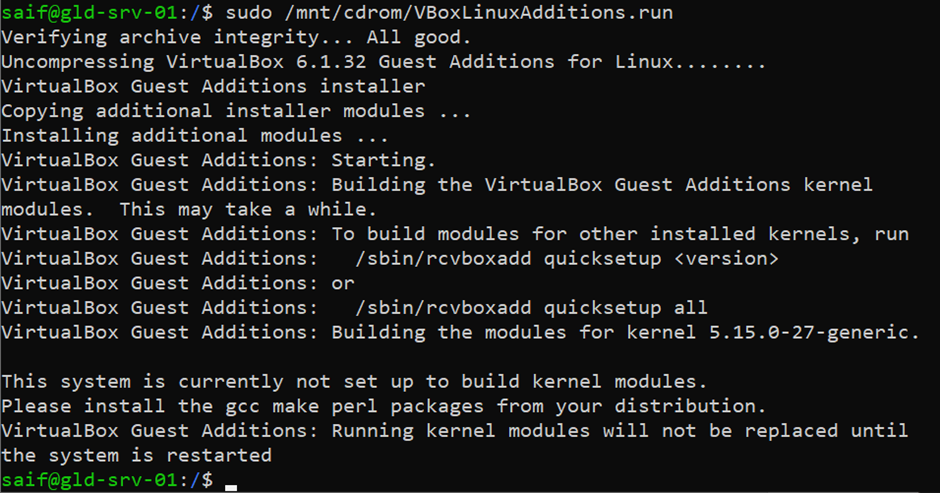
Install VirtualBox guest addtions.
You can follow the steps here to install the VirtualBox guest additions on the Ubuntu server 22.04 on VirtualBox.
After the installation, you may go ahead and reboot the server.
Note: During the VirtualBox guest addition installation, the Ubuntu server was complaining that there is no bzip2 not found error message as below in my setup.
saif@gld-srv-01:/$ sudo /mnt/cdrom/VBoxLinuxAdditions.run
Verifying archive integrity... All good.
Uncompressing VirtualBox 6.1.32 Guest Additions for Linux........
bzip2 not found. Please install: bzip2 tar; and try again.
If you are getting the similar error, you may issue the command sudo apt-get install bzip2 to install the required package and continue with the virtualbox guest additions installation.