
Many of the FortiGate appliances come with enough ports for you to configure the network. There are times you might be running out of ports and want to configure another network on the FortiGate firewall, so how do you deal with that type of situation?
We can configure VLAN on the FortiGate firewall to configure a separate network. And perfom intervlan routing.
FortiGate firewall is capable of running 802.1q tagging on its interfaces, so for example, you wanted to create a secondary ISP link for a dual ISP setup.
Instead of using a separate port on the FortiGate firewall for the second ISP link, you can create a WAN2 network with VLAN 100 tagged to any of the physical ports on the FortiGate firewall and extend that tag to your network switch, that connect to the ISP link.
I know that defeats the whole purpose of having redundancy, but it is just an example, and it is not recomended practice to configure both the ISP’s into single interface.
Let’s take an example here. You have a Fortinet FortiGate firewall configured with LAN WAN and the DMZ networks as shown below.
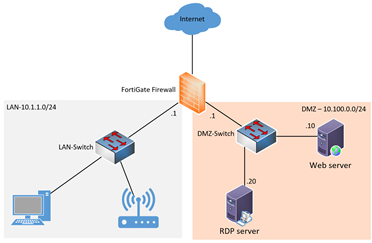
If the LAN network wanted to go out, the devices on the LAN segment would send the packet to the LAN gateway in the FortiGate firewall, and then it will send the packet out to the wan interface and to the internet.
Similarly, any inbound traffic coming to the DMZ from the internet will be first hit on the outside WAN interface and then come to the DMZ. let’s see the same network with VLAN.
How does inter-VLAN Communication happen on the fortigate firewall?
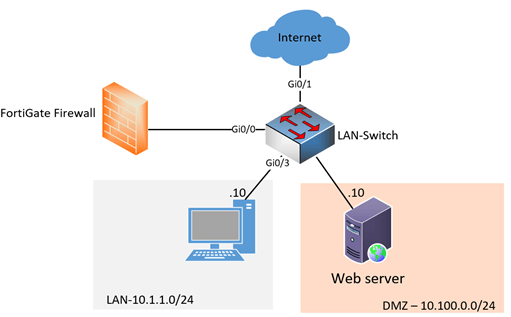
Let’s assume the same scenario, where you are running all those networks with VLAN on a single interface; there would be a slight difference in network connectivity and the packet travels.
As you can see the firewall has only a single interface connected to the switch, which has a VLAN configured for each network.

If the LAN side wanted to talk to the internet, it would follow the below sequence.

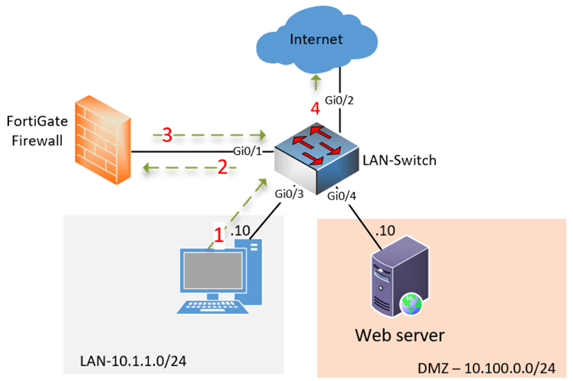
- The LAN host will need to forward the packet to its default gateway, which is configured on the fortigate firewall as a LAN VLAN-tagged sub-interface. Hence, the client first forwards the frame to the switch.
- The switch will recognize that the traffic belongs to the LAN VLAN and it has a mac address for the FortiGate LAN interface, and it will forward the frame to the FortiGate LAN sub interface with VLAN tagged.
- FortiGate analyse the packet, as the traffic is destined to outside and if you are allowing the traffic to outside using security policies, FortiGate will forward the packet to its WAN gateway using its WAN sub interface with VLAN tagged.
- Switch recognizes the packet belongs to WAN VLAN, and it has the internet default gateway mac address in the mac table, and it will send the traffic out.
You usually won’t use all the networks in a single interface with VLAN on a production network, however, in production, you may see the VLAN is used with LACP bonding on fortigate where multiple interfaces are combined as one to get high throughput.
I have also seen scenarios where you want to split your DMZ network into two, that time, the old DMZ stays on the primary interface, and the second DMZ you would create with a VLAN tagged sub interface.
In this blog, let’s go a little extreme where I will use port1 for all the WAN LAN and DMZ traffic and see how each one will behave. We will build the lab from scratch, and by the end of it, you will get an idea of how the inter-VLAN communication happens on the FortiGate firewall.
I will use a cisco switch in this lab, and I will also show you the configuration from the Aruba switch as well so that it will make a lot of sense.
Few things to keep in mind.
While in Cisco switch, we call the interface that connects to the end-user device, such as PC, an access port; however, in Aruba, we call it an untagged port.
To carry multiple VLAN traffic, we make the interface trunk. By default, all the VLANs on the Trunk are allowed in Cisco. In Aruba, however, none of the VLANs are allowed by default, and you need to permit each VLAN manually the Aruba implementation in this case.
People from the Aruba side get confused when we say Trunk because they also call the port-channel (bonding multiple interfaces to one) interface a trunk interface in Aruba. So here, when I say Trunk, it is the interface that carries multiple VLANs.
Assigning the VLAN for the network.
I am going to use 4 ports from the switch for this lab, starting from port 1 to 4.
As you can see,
- Port1 connects to FortiGate firewall.
- The second port connects to the internet.
- LAN side uses the 3rd port.
- For DMZ, we use port4.

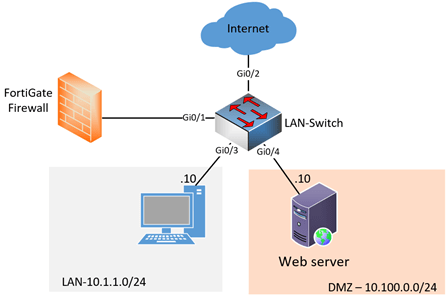
Based on the setup above, below are the VLAN assignment.
| VLAN | Network | IP Address | Access port (Untagged) | Tagged |
| 200 | ISP | x.x.x.x | Gi0/2 | Gi0/1 |
| 300 | LAN | 10.1.1.0/24 | Gi0/3 | Gi0/1 |
| 400 | DMZ | 10.100.0.0/24 | Gi0/4 | Gi0/1 |
- As you can see, only the interface Gi0/1 that is connects to the firewall is a trunk, and all the VLANs are tagged.
- For the ISP, we are using the G0/2 as an access port (untagged port), however, some ISP’s provide internet connectivity with a VLAN tagged. At that time, you will have to make the Gi0/2 as Trunk and permit/tag the ISP VLAN on it.
- LAN side is always an access port, and if you would like to add more LAN devices to the network, you could either create another port to be part of the LAN VLAN 300 as access ports or if you have another switch, you may plugin that switch to the LAN VLAN as trunk and tag VLAN 300. And on the second switch, you will need to configure all the ports as VLAN 300 access ports.
- Most of the DMZ servers will require them to configure on an untagged port. However, some servers configure their ethernet interface with VLAN tagged. At that point, you need to ensure that the interface connects to the server on the switch is a trunk and configure the VLAN as tagged.
Configure the switch for the VLAN traffic.
Based on the VLAN assignment, let’s go ahead and configure the switch and keep it ready for VLAN communication.
Configure the Layer2 VLAN.
Creating a VLAN on both cisco and Aruba switches is identical. You just add the VLAN and add some description to it.
Switch(config)# configure terminal
Switch(config)#vlan 200
Switch(config-vlan)#name ISP
Switch(config-vlan)#vlan 300
Switch(config-vlan)#name LAN
Switch(config-vlan)#vlan 400
Switch(config-vlan)#name DMZ
Switch(config-vlan)#exit
Switch(config)#exit
Switch#
Configure the access port for the VLANs.
Configuring the access port is slightly different for each vendor.
Configure the access port on cisco.
cisco-Switch(config)#interface gigabitEthernet 0/2
cisco-Switch(config-if)#switchport mode access
cisco-Switch(config-if)#switchport access vlan 200
cisco-Switch(config-if)#interface gigabitEthernet 0/3
cisco-Switch(config-if)#switchport mode access
cisco-Switch(config-if)#switchport access vlan 300
cisco-Switch(config-if)#interface gigabitEthernet 0/4
cisco-Switch(config-if)#switchport mode access
cisco-Switch(config-if)#switchport access vlan 400
cisco-Switch(config-if)#exit
Configure Access port on Aruba.
Aruba-switch# configure terminal
Aruba-switch(config)# interface 2
Aruba-switch(eth-2)# untagged vlan 200
Aruba-switch(config)# interface 3
Aruba-switch(eth-3)# untagged vlan 300
Aruba-switch(config)# interface 4
Aruba-switch(eth-4)# untagged vlan 400
Aruba-switch(eth-4)# exit
Aruba-switch(config)# exit
Aruba-switch#
Configure trunk interface with VLAN tagged.
Next, let’s go ahead and configure the trunk interface that connects between the firewall and the switch, which is the first port.
Trunk interface on Cisco switch.
As you can see, since Cisco, by default allow all the VLAN’s on the trunk ports, I had to remove all the VLANs and define the specific ones manually.
Switch(config-if)#interface gigabitEthernet 0/1
Switch(config-if)#switchport mode trunk
Switch(config-if)#switchport trunk allowed vlan none
Switch(config-if)#switchport trunk allowed vlan add 200,300,400
Switch(config-if)#exit
Switch(config)#exit
Switch#
For Aruba VLAN trunk interface.
Pretty straightforward, just tag the interface with the required VLAN’s.
Aruba-switch(config)# interface 1
Aruba-switch(eth-1)# tagged vlan 200,300,400
Aruba-switch(eth-1)# exit
Aruba-switch(config)# exit
Aruba-switch#
We have completed the switch part of the configuration; let’s move to the FortiGate firewall configuration.
Configure the VLAN on the FortiGate firewall.
As I mentioned, I will use port1 for all the services. Let’s log in to the FortiGate firewall console and start configuring each VLAN that represents each network.
Configure the Fortigate LAN interface with VLAN.
As you can see, I have created a virtual interface called LAN, and the parent interface is port1, and it has vlanid set to 300.
Following the below steps will create a VLAN 300 tagged on port1.
edit "LAN"
        set vdom "root"
		set ip 10.1.1.1 255.255.255.0
        set allowaccess ping http https ssh
        set role lan
        set interface "port1"
        set vlanid 300
    next
end
We already configured the 3rd interface as an access port for VLAN 300 to connect the LAN devices.
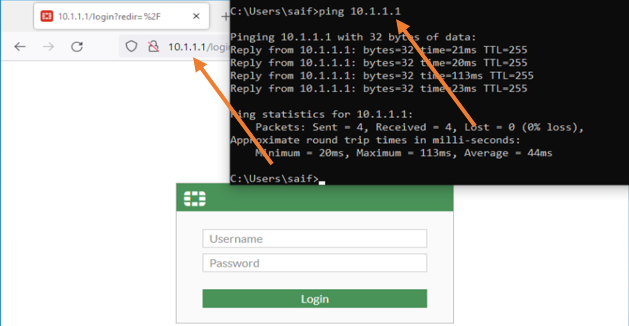
Plugin the PC to the 3rd port. Since we have not configured the DHCP service on the LAN side, you will have to configure the IP address from the 10.1.1.0/24 subnet manually on the host.
I have configured 10.1.1.10/24. After the IP is configured, you can ping the IP address and access the web GUI of the firewall.
You may go ahead and reset the password if you are login for the first time.

Configure the ISP WAN link VLAN.
We configured the LAN side of the firewall with the VLAN 300. Let’s now go ahead and configure the interface that connects to the internet service provider, which is the WAN interface.
You can either create the WAN VLAN using the CLI or GUI, let’s use the CLI itself, and for the DMZ VLAN configuration, we will use the GUI.
Your ISP will have a static or dynamic IP configuration. Since I am using DHCP, I will use the mode as DHCP, and I should automatically get the IP address from my ISP.
If you are using static, you will have to set the mode to static and configure the IP address from the internet service provider.
In case you got Fortigate PPPoE configuration on the WAN side you may check out the article here.
config system interface
 edit "ISP"
        set vdom "root"
        set mode dhcp
        set allowaccess ping
        set role wan
        set interface "port1"
        set vlanid 200
    next
end
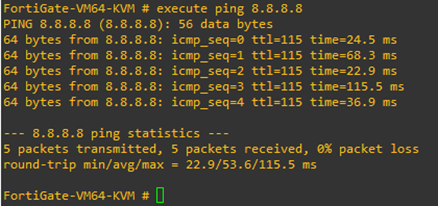
After the configuration, you may run the command, and you should see the IP address automatically configured; since I have ICMP enabled, I should be able to ping the IP address from the internet.

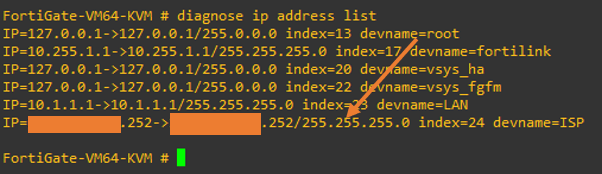
As you can see, I can reach the firewall outside the interface from the internet.

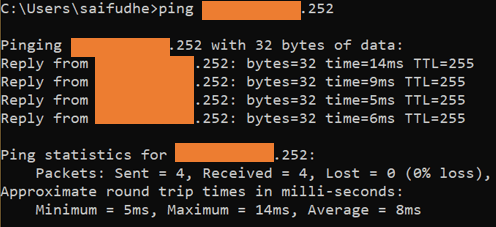
Using the WAN link, I will now be able to talk to the internet.
If you are wondering, how does the ping work for the public IP when we don’t have the default route configured. It is because we are using DHCP on the ISP port. When the WAN link gets the IP address from the ISP, it also provides the default gateway, which will act as the default route.

Configure the LAN internet policy.
Though you can access the internet using the WAN link of the firewall, you cannot go out to the internet from the LAN side, because we have not really configured the security policy and NAT for the traffic to pass.
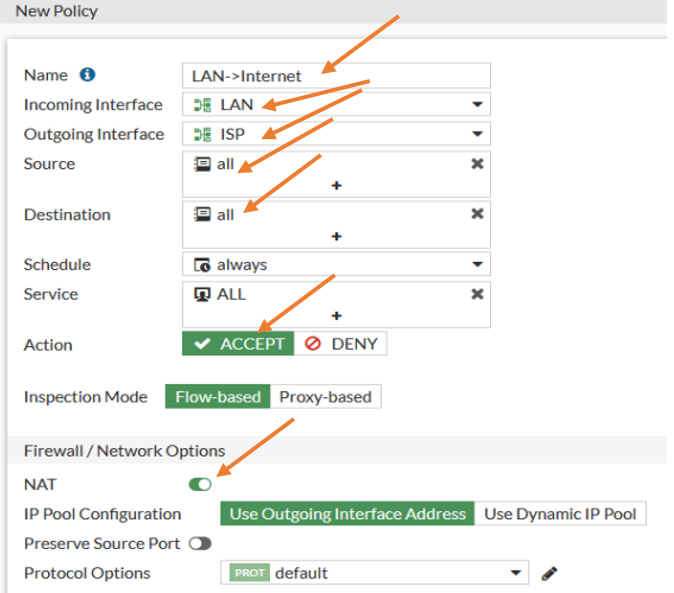
Goto Policies & Object-> Firewall Policy -> Create New.
Name : LAN-> Internet
Incoming interface: LAN – Since the traffic is coming from the LAN and going out choose LAN.
Outgoing interface: ISP
Source: All.
Destination: All.
Service: All.
Action: Accept.
Enable NAT. Otherwise, the LAN private IP cannot talk to the public IP on the internet.
You may log all sessions and click on OK.

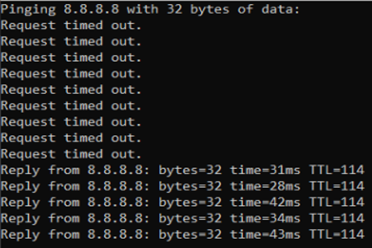
After I made the changes, you can see below that I can reach the internet from the LAN host.
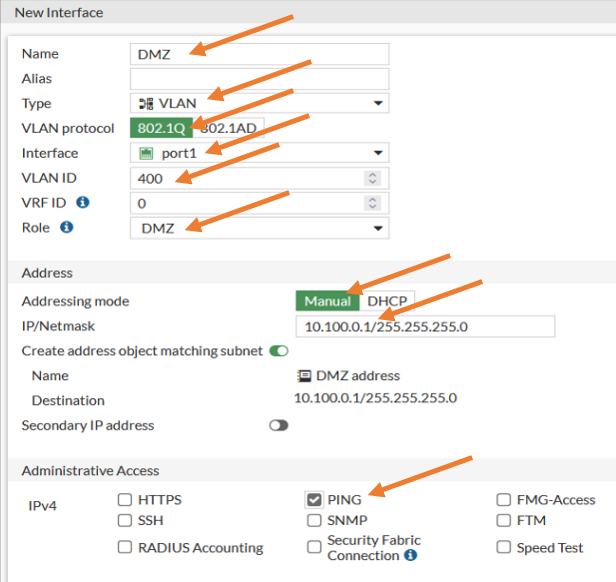
Configure the FortiGate DMZ with VLAN interface.
We have configured the LAN and the WAN with the VLAN interface on the FortiGate firewall, and it is working fine. Let’s go ahead and configure the DMZ interface with the VLAN, and this time we will configure the DMZ VLAN interface using the GUI.
Log back into the firewall GUI.
Network -> Interfaces-> Create New-> Interface
In the new interface creation wizard, configure the interface as below.
Name: DMZ.
Type: VLAN.
VLAN Protocol: 802.1q
interface: Port1.
VLAN ID:400
Role : DMZ.
Address
Addressing Mode: Manual.
IP/Netmask : 10.100.0.1/255.255.255.0
Under Administrative access, you may enable ping for the gateway.
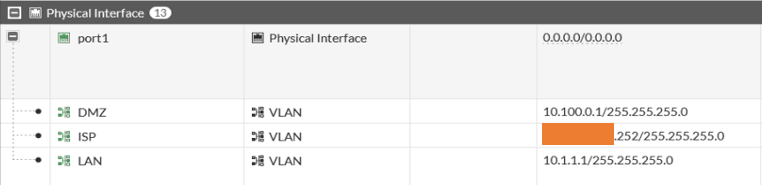
After the configuration, you can see all three interfaces under port1.

Configure the policy to access the DMZ server on VLAN400.
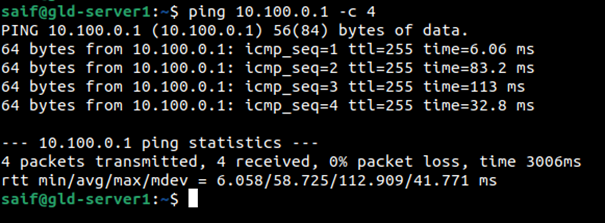
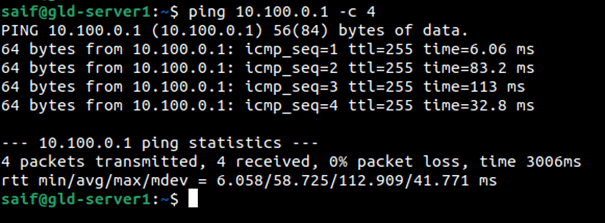
I have plugged in an Ubuntu web server on 4th port of the switch, which is pre-configured with VLAN 400. This server has an IP address 10.100.0.10/24, and I should be able to ping the DMZ gateway now.
Allow inbound policy for DMZ web server.
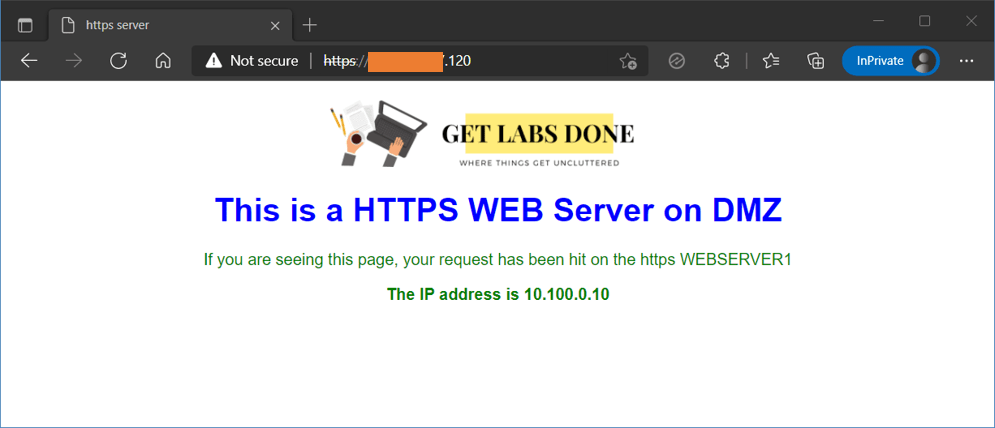
To access the web server from the internet, I will have to configure port forwarding or static NAT.
I have configured the static NAT from one public IP to the server private IP.
As soon as I made the changes, I can access the web server from the internet. If you want to learn more about configuring DMZ on FortiGate, check out the article here.
I have also covered port forwarding on FortiGate as well here.

Conclusion.
Configuring the VLAN on the FortiGate firewall is not so difficult, it relatively easy. You might be thinking VLAN configuration is difficult because you are not getting the VLAN concept right.
When dealing with the VLAN interface on the FortiGate firewall, remember, if you are tagging a VLAN (vlanid), you need to configure the interface that goes out of the firewall as a Trunk. Otherwise, it will be untagged(Accessport.)
You might also have a setup where the WAN side is a tagged port from ISP and the LAN side is untagged. At that time, in Cisco, you will have to configure the port as Trunk, tag the ISP VLAN, and use another VLAN for LAN traffic and configure the LAN interface as Accessport for that VLAN. In Aruba, it is pretty straightforward, you can configure the ISP/WAN VLAN as tagged, LAN link as untagged.