
We have covered many blogs related to fortigate firewalls in our previous articles. However, it was just the LAN interface connected to the internet in most configurations.
But what if you want to add an internet-facing server to your network?
In some scenarios, you would want to add servers to the network and allow access from the internet. If you think you could spin up a server and attach to the LAN side of your fortigate firewall and open the port to the internet, though you can achieve your goal, however, you are putting the firewall at risk.
Because when the Server exposed to the public internet ever gets compromised, your LAN side of the network will be affected, so do not ever expose your LAN side host to the public internet permanently.
Instead of using a LAN network, you could use something called a DMZ.
What is a DMZ network in fortigate?
In a typical local area network, end-users initiate traffic from inside to outside. Because the firewall has a state entry for each traffic that goes out, the firewall will permit the return traffic from outside.
By default on the firewall side, any traffic initiated from the outside untrusted network – internet in this case, to inside will be blocked.
There are times you would want to allow the internet side of the network to inside. For example, you have a web server that is listening on port 443/80, and you would want users on the internet to reach your web server and browse the content.
So you need to allow port 443/80 towards the public internet. Since the traffic is coming from the internet and your Server is exposed to the public side of the network, you should keep the public-facing servers in a separate zone called DMZ.
DMZ is similar to the LAN side, while the LAN network mainly uses outbound access from the LAN to the internet. In the case of DMZ, the traffic will be inbound from the internet towards the DMZ side. Having a separate DMZ network enhances the security and ease of management. When the DMZ server ever gets compromised, it will not impact the LAN network.
You should always keep internet-facing servers on the DMZ. It could be Web servers, mail servers, FTP/SFTP servers, and so on.
Since the traffic is coming from the internet, you would require static public IP’s from your service provider.
There are two ways you could configure the DMZ IP addresses. First, you could directly configure the Public IP address on the Server itself, secondly, you could configure the private IP address on the Server and configure static nat with the public IP, also known as one-to-one NAT.
We will look at the second and safest option here; this will make our lives easier when we allow LAN users access to the DMZ as it has to use only the private IP address. At the same time, any host on the public internet will be able to talk to the DMZ server using the public IP address cos of the Static NAT configuration.
Below is the topology that we are going to use.
We have a simple network where the FortiGate firewall is configured with the LAN and connected to the internet. All the LAN users on the subnet 10.1.1.0/24 have access to the internet through fortigate firewall.


We are going to introduce a DMZ network 10.100.0.0/24 here, as shown below.
I have also used a different switch to separate the DMZ network from the LAN side. If you are on a tighter budget, smaller network, you don’t have to have a separate switch. Instead, you could use the LAN switch for the DMZ. However, you will have to separate the LAN and DMZ traffic using different VLANs.
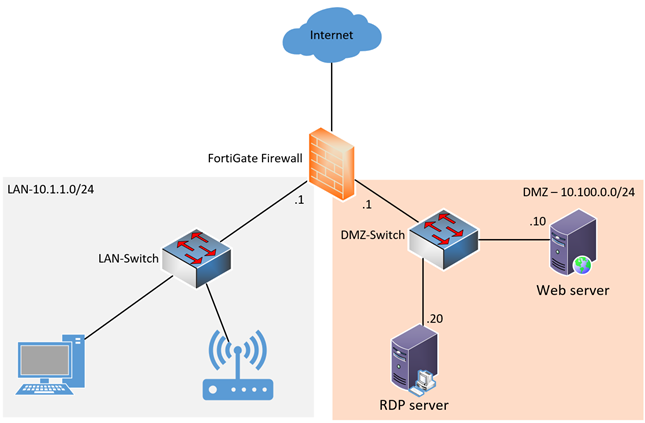

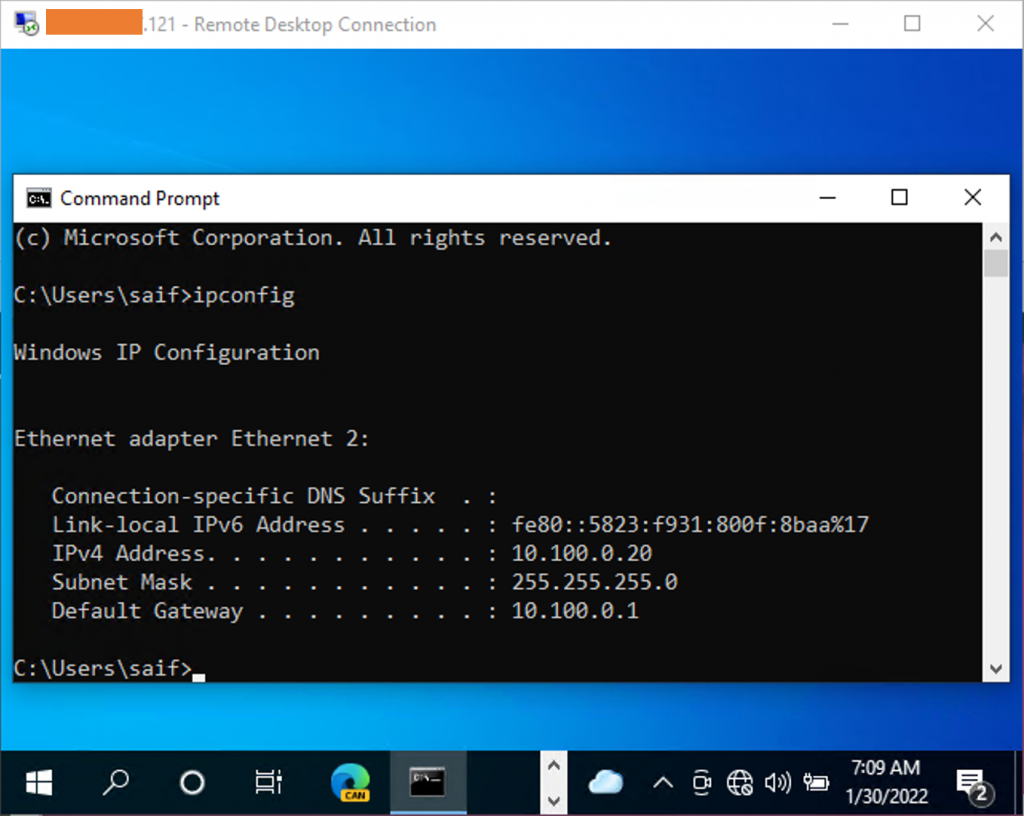
In DMZ, we have two servers, Web server 1 listening on port 443, we also have an RDP server configured with default port number 3389.
All communication should be allowed from the LAN side to the DMZ, and from the internet only port 443 should be allowed towards the webserver on DMZ. However, the RDP server access should be restricted to only the trusted IPs.
So let’s look at how we can configure the DMZ network using FortiGate. This is a sample configuration, and every network is different and requires different needs with respect to DMZ, and it is impossible to create a DMZ lab with every protocol and port out there. Hence, we are using HTTPS and RDP as a baseline, and you could build your network following this article and replace the port and protocols based on your requirements.
Configure the DMZ network.
As I mentioned before, we already have the LAN side configured and serve the end-users traffic. We are now going to configure a DMZ network in fortigate firewall.
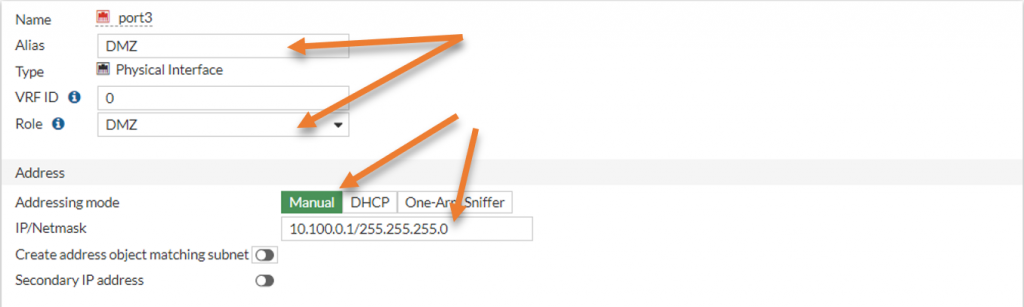
To configure the DMZ network, you will have to define the DMZ interface that will act as the default gateway for the DMZ devices.
I am going to chose the port3 for this purpose, because it is not been used.
Goto Network->Interfaces->port3, right-click and click on Edit.
Alias -> DMZ.
Role – > DMZ
Address
Addressing mode -> Manual
IP/Netmask – >10.100.0.1/255.255.255.0

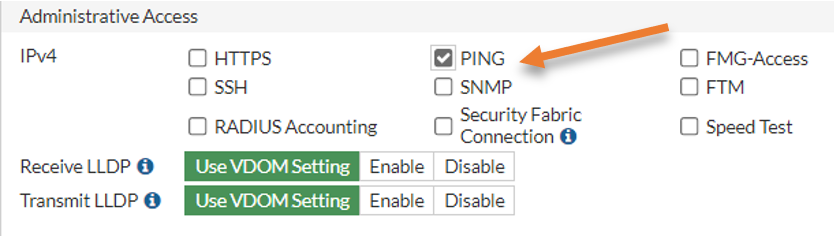
For administrative purposes, I will allow ping traffic on the DMZ interface.
We will not make any other changes, scroll down and click on Ok.
Connect the port3 to your DMZ switch. As soon as you plug in the switch and refresh the interface screen, you will see the interface comes online with the color green.


Add a Web server to the DMZ network.
Any traffic in/out of the DMZ is blocked because we do not have any policies.
Connect the webserver to the switch. After you connect, you will have to configure the IP address manually on the Server. In DMZ, we don’t usually enable the DHCP service.
I am using a Ubuntu web server for this lab; hence I reset my Ubuntu IP address following this article.
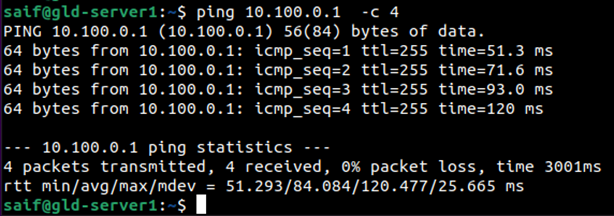
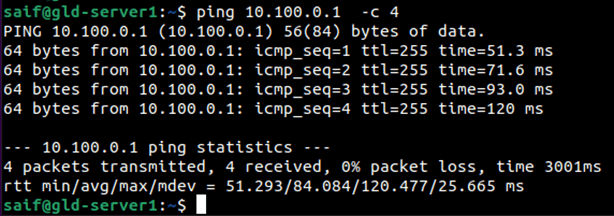
After the IP configuration, I can ping the default gateway in the DMZ network.
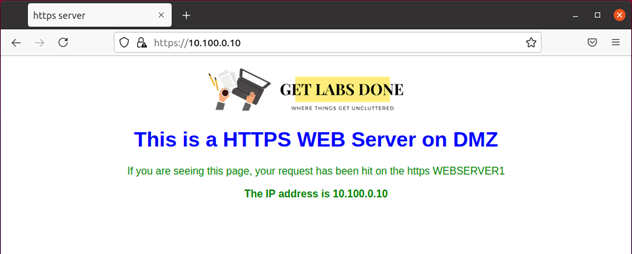
The web server also has the GUI, and I can access the HTTPS service just fine using its private IP address.

Configure the Internet access to DMZ.
In most DMZ networks, you will have internet access restricted to specific hosts. Some hosts are required to go out and get the updates from the internet others are not allowed to go out. So we will allow internet access to this specific host in DMZ.
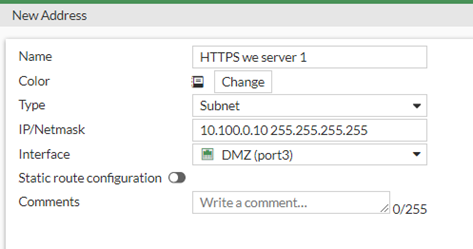
Create an Address object.
Goto Policy&Objects-> Addresses->Create New->Address
Name: HTTPS web server 1
Type: Subnet
IP/Netmask : 10.100.0.10 255.255.255.255
Interface: DMZ.

Under Policy&objects-> Firewall Policy-> Create new
Name: Provide a user-friendly name; I am giving allow internet access to HTTPS host.
Incoming interface: Choose the DMZ because the HTTPS web server is located in DMZ.
Source: Call the webserver address object we created before.
Destination: All.
We are going to allow just the internet access, for that only HTTPS and DNS services should be enough, so if you want to tighten the security, you could create a port group with HTTPS and DNS and call the service here instead. I am going to allow ‘all’ traffic from DMZ to outside.
Service: All.
Check the NAT option, and use the outgoing interface address. This will use the interface IP that is connected to the internet.
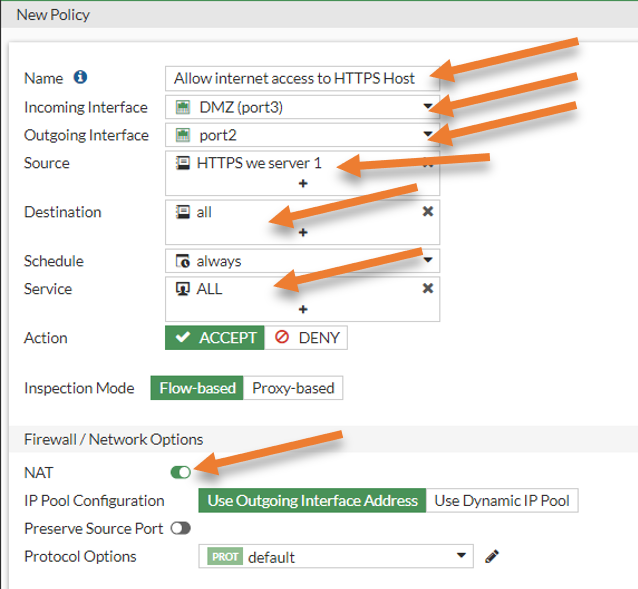
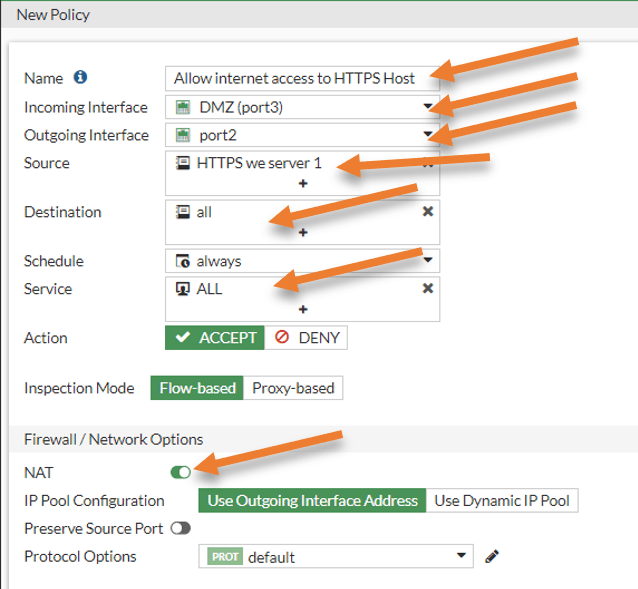
You may choose the required security profiles log all the sessions, and click on Ok.
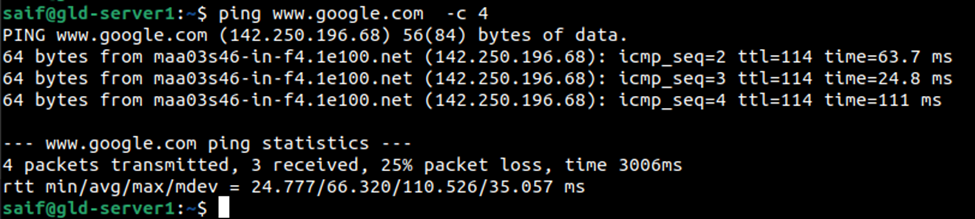
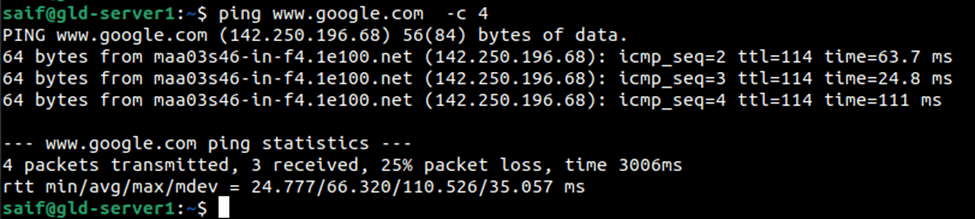
Test the network connectivity from the DMZ host.
After the rule is applied, you may test the internet connectivity from the DMZ host, and you should be able to get to the internet just fine.
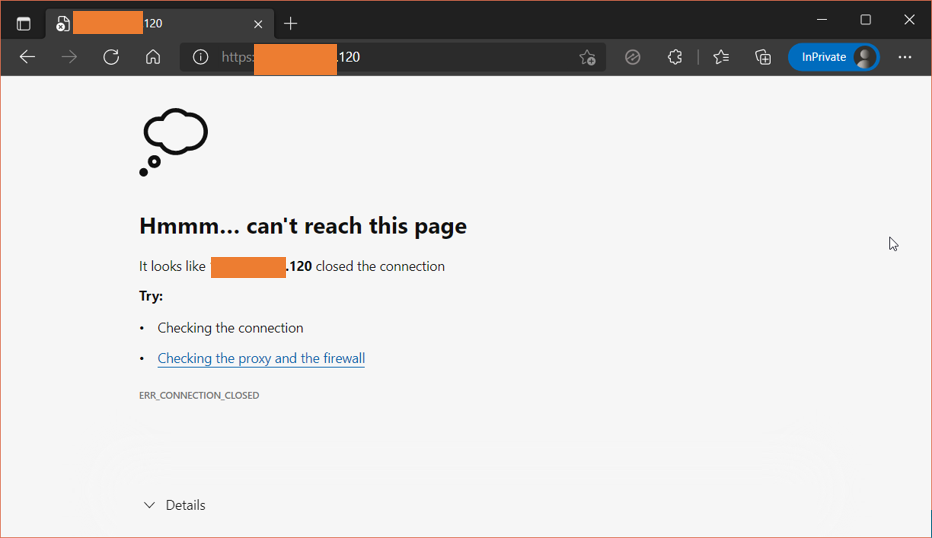
Allow inbound access from outside.
To allow webserver access to your DMZ web server, you need to allow traffic from outside to DMZ on port 443.
But there is a problem: we are using a private IP address in the DMZ. For the communication to happen from outside to inside, you will have to either enable port forwarding using the outside interface IP address of the FortiGate firewall or configure static nat.
We have a couple of public static IPs that we could use, with which we will create static nat towards the DMZ. If you have only a single public IP and want to configure the port forwarding, check out the article here to know how you can do that.
As you can see, I tried to access the web server using one of the public IP, and we cant access the webserver from outside.

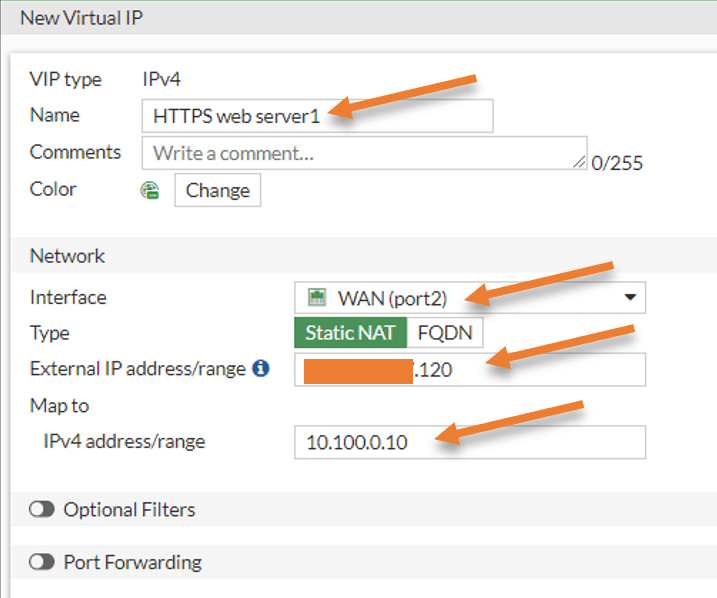
Configure the Virtual IP.
You will have to create a virtual IP in the fortigate firewall to create static NAT. Because of security reasons, I have hidden the first three octets of my public IP.
Goto Policy&Objects->Virtual IP’s->CreateNew-> Virtual IP.
Name: HTTPS web server1.
interface: Choose the WAN interface of the firewall
Type: Static NAT.
External IP: x.x.x.120
This is where we will add one of the static Public IP addresses. So add the public IP address here. You may add your firewall outside interface IP if you don’t have one.
Note: When you add your firewall outside IP, you need to ensure that none of the other services are pointed to the outside IP.
Map to IPv4 address: 10.100.0.10 – Private IP address of your DMZ server.
Click on Ok.
You can also enable port forwarding and restrict the port to only 443, I am not enabling that because I will have to enable ICMP traffic to the Server later, so I can manage the services using the policies instead.

Configure the HTTPS policy.
You have to define the security policy for the HTTPS traffic. That way any traffic destined to our static public IP will be forwarded to our internal IP.
Goto Policy&Objects-> Firewall policy-> Create new.
Name: Allow HTTPS access to DMZ.
Incoming Interface: WAN.
Outgoing interface: DMZ
Source: All – we allow https services to everyone on the internet, hence choosing All.
Destination: Choose the virtual web server object that we created.
Service: Choose HTTPS.
Action: Accept.
Uncheck NAT option
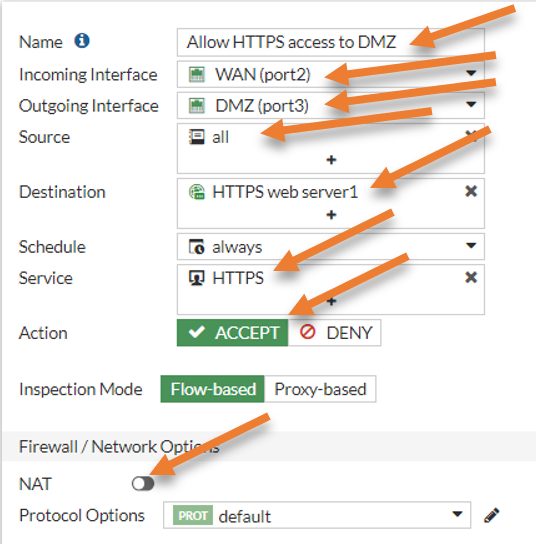

Under logging Options – Check the Log allowed traffic and all sessions and click on Ok.
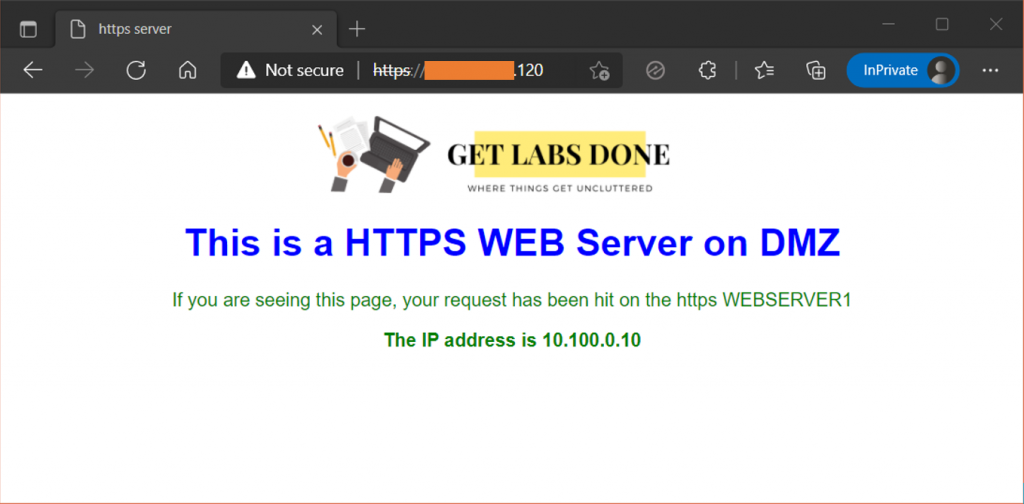
Test the HTTPS traffic to DMZ.
You may try to access the webserver from an outside machine connected to the internet using the public IP x.x.x.120, and it should work fine.
As you can see, I tried to access the webserver from the internet, and I can access it now.

Allow ICMP traffic to the webserver.
In some scenarios, you would want to allow ICMP traffic to the web server. There are two ways you could do that.
You can go back to the same HTTPS policy we just created, and under services, you could add ALL_ICMP. For the temporary testing purpose, that is ok. However, it is a good security practice to keep the rules separately for each service.
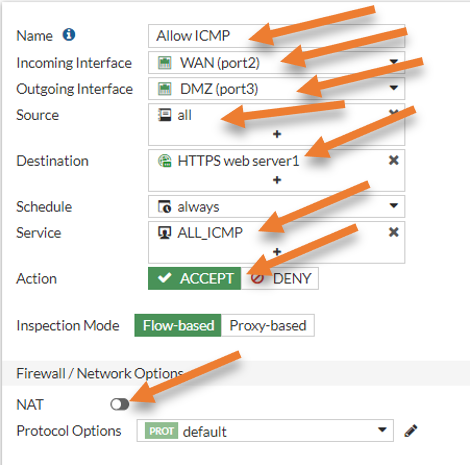
In firewall Policy-> Create New
Name: Allow ICMP.
Incoming traffic: Choose WAN.
Outgoing interface: DMZ.
Source: We are allowing ICMP traffic from everywhere, to secure the environment even more, you may add specific IP as a source address group instead, which we will do on the RDP configuration.
Destination: The web server that we defined.
Service: Choose ALL_ICMP.
Action: Accept.
Uncheck the NAT.

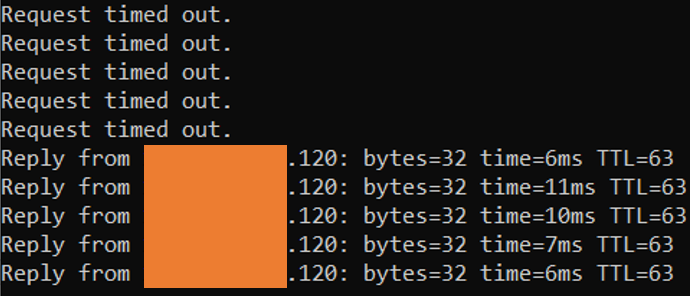
As soon as I made the changes, I could reach the HTTPS server using the ICMP traffic from the internet.

Enable the communication from the LAN to the DMZ.
While the internet users use the public IP address to access the webserver, the LAN users should use a private IP address. And By default, it will be blocked; let’s go ahead and configure the security policy and allow the LAN network to reach the HTTPS server in the DMZ using the Private IP address.
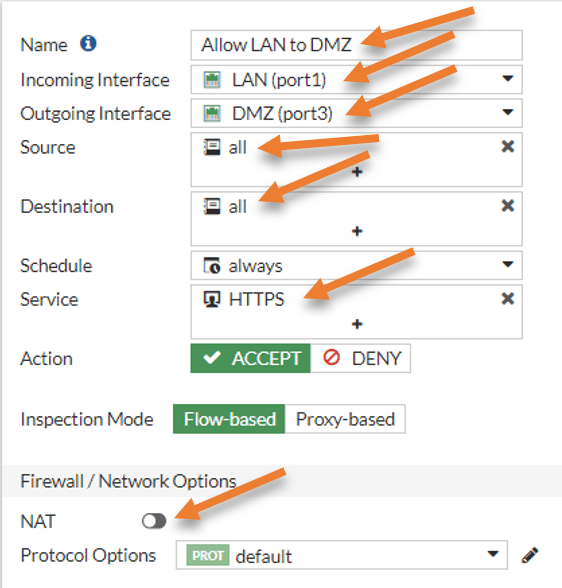
In the firewall Policy, click on Create New.
Name: Allow LAN to DMZ.
Incoming interface: LAN- All the source traffic originage from the LAN.
Source: All.
Destination: All – This would allow LAN users to reach all the servers in the DMZ, however it is also good practice to add a specific server, instead of all. Since this is a lab, I am choosing all.
Service: HTTPS – I am allowing only the https traffic.
Action: Accept.
Uncheck the NAT option.

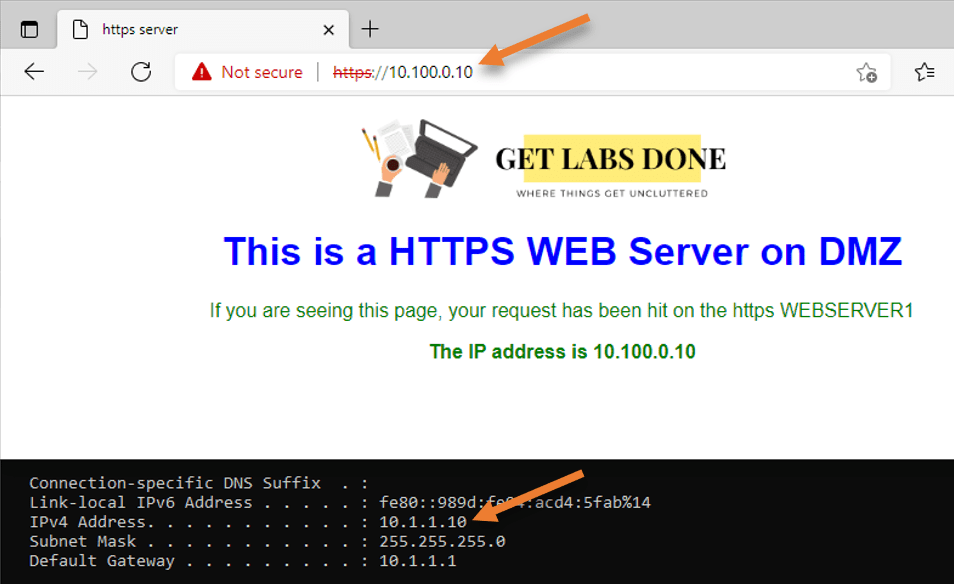
You may try to access the webserver from the LAN, and it should work fine.

RDP server on DMZ.
We have an RDP server with an IP address of 10.100.0.20. It is not recommended to open RDP access to all internet users; hence, we will create a policy to allow RDP traffic to one of the public IPs that we trust.
Configure the RDP access from LAN to DMZ.
Since we already have traffic allowed from LAN to the DMZ over HTTPS, I will add RDP traffic as well to the policy, after which I should be able to access the RDP traffic.
As you can see, I can’t get to Server from LAN to DMZ now.
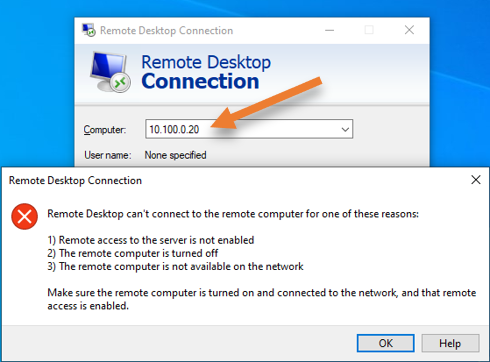

From the log, I can see the traffic is denied.
Note: By default, fortigate won’t show the logs for the Implicit deny rule. You will have to enable logging to see those logs.


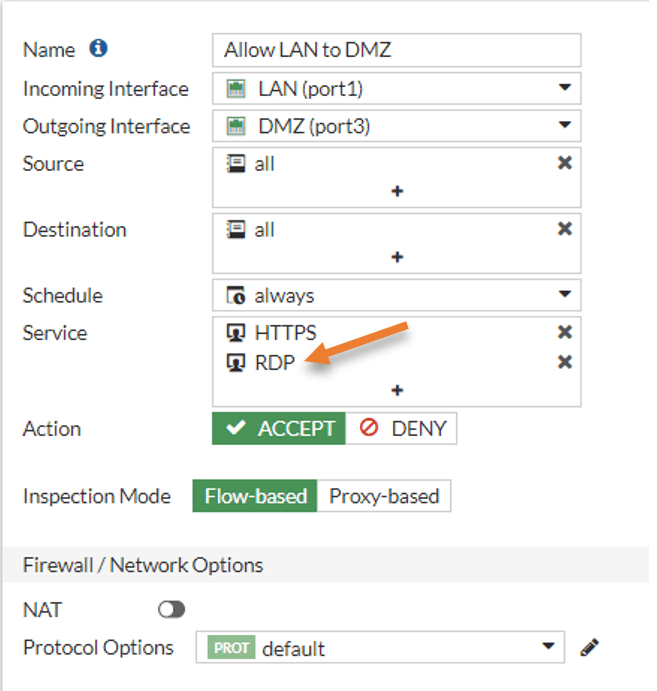
Go back to the firewall and double click on the Allow LAN to DMZ rule.
Click on the plus icon to add the RDP in the service section.
As you can see, I have both the HTTPS and the RDP service added under services.
You may click on Ok and test the connection again.

As you can see, I can RDP into the DMZ host from my LAN.

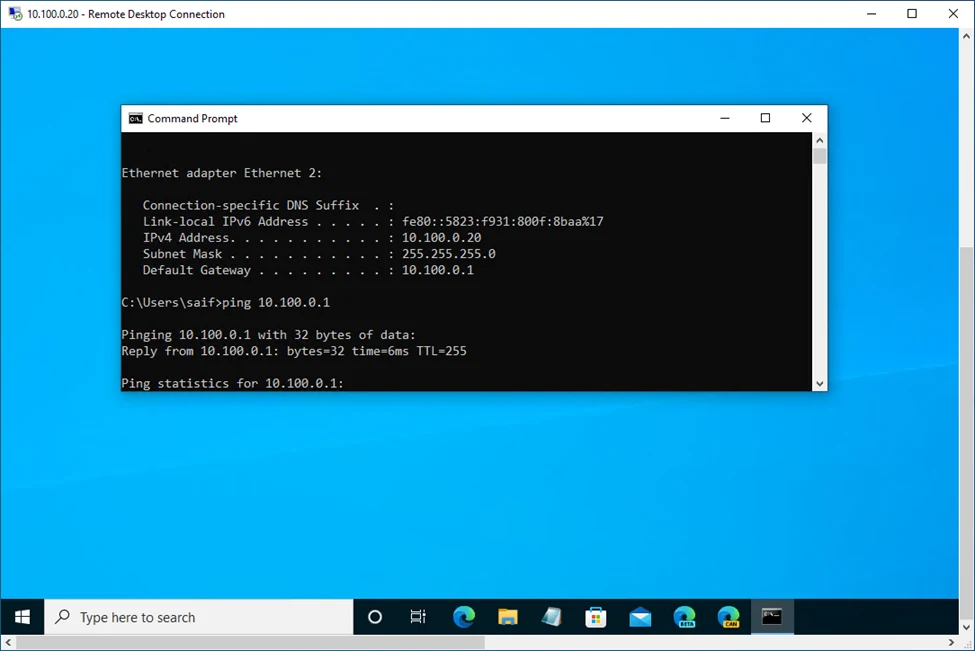
See the logs, that shows the traffic is allowed.


Allow RDP access to internet.
Now that we have allowed access from the LAN side to the DMZ using the RDP, let’s go ahead and configure the RDP access to outside but this time using trusted IP’s.
Note: This is for lab testing and do not open RDP services to the untrusted public network with the source ‘all’. To access the RDP, it is recommended to use VPN instead.
When you want to allow access to services from a specific source, you will have to get the source IP address from the remote user and create an address group.
I will use public source IP x.x.x.1 as the source and public IP x.x.x.121 for the RDP static nat.
Create Source public Address Object.
In Policy & Objects-> Addresses-> Create New-> Address.
Name: Tursted IP1.
Type: Subnet.
IP/Netmask: x.x.x.1 255.255.255.255
Interface: WAN
Click on OK.


Create Virtual IP for the RDP.
In Policy & Object-> Virtual IP’s-> Create New.
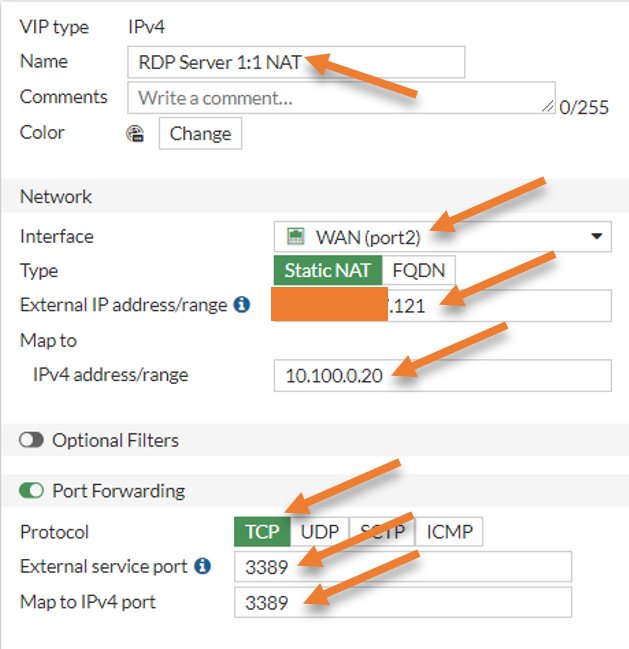
Name: RDP Server1:1 NAT
Network.
Interface: WAN.
Type: Static NAT.
External IP address/range: x.x.x.121
Map to IPv4 address: 10.100.0.20
Check the port forwarding.
Protocol: TCP.
External service port: 3389
Map to IPv4 port: 3389
Click on Ok.

Configure the policy to allow RDP to the internet.
In firewall policy, click on Create new to add new policy.
Name : Allow RDP access to DMZ server1.
Incoming interface: WAN
Outgoing interface: DMZ.
Source: Trusted IP1 – The source IP that we added in the address object.
Destination : RDP Server1:1 NAT – The VIP that we created before.
Service: RDP.
Action : Accept.
Uncheck the NAT, log all sessions and click on Ok.


You may try to access the RDP server from the internet, and it should work fine.
We configured the DMZ network using the fortigate firewall, and we also allowed traffic to the web server, and the RDP servers, and both worked successfully. Any time you want to add any servers exposed to the internet, you must keep them on the DMZ. It is also best to have separate rules for each Server you add.