
I have worked on multiple firewalls; however, the one firewall that stands out from the crowd is the Pfsense firewall. Let’s take a look at what makes the Pfsense different from other firewalls, and then we will also see how you can install a Pfsense firewall on GNS3 software and start building a basic LAB.
What is a Pfsense firewall?
The beauty of a Pfsense firewall is that you can start using it without making many changes out of the box. Just like how a consumer router would work.
The Pfsense firewall is an open-source firewall based on FreeBSD, and it is free for anyone to use. It supports most of the features that are available in the other high-end firewalls as well. Many enterprise users do use this in their production environment.
You can even use it to replace your home router. The result is a more secure network with extra features in your home network than typical consumer routers.
Many wonder that they need to know Linux to start using the Pfsense firewall. Though you have access to the shell, you no need to have prior knowledge of Linux. Most of the heavy lifting will happen on the web GUI. You will understand when we start with the LAB.
So any non-technical person can start using this firewall without needing to have much technical knowledge.
Some advanced features found on the commercial routers are available on the Pfsense firewall, that too for free, and one of the reasons technical users love this product.
There are some technical guys out there who are using the Pfsense firewall on their home network, replacing their consumer router so that they can configure OpenVPN in it. So wherever they want, they can connect to their home network over the internet.
By default, when you install the Pfsense firewall for the first time, you will have the below configured out of the box.
- If you wanted to access the internet, you have a default NAT configured, so you don’t have to configure another. A default route pointed to the WAN side, so basically, LAN users should access the internet from day one.
- The wan side of the Pfsense firewall is configured to use DHCP, so if the ISP is providing the dynamic IP address to your WAN side, you don’t have to touch the WAN network either. Of course, you can change these settings to static if you want to.
- By default, the Pfsense firewall is configured with the LAN IP address 192.168.1.1 as the LAN users’ default gateway. DHCP is also configured for the LAN users.
Read also,
How to Install Palo Alto in GNS3?
Gns3 Common Errors And How To Fix Them.?
How to Integrate VMware, VirtualBox, Qemu Vm’s in GNS3 ?
How I have setup my GNS3 | 10 Easy steps.
How To Install Checkpoint Firewall In Gns3?
How To Connect GNS3 Devices To The Local Machine?
Easy way to connect GNS3 to the internet on Windows host.
Can I install pfsense in gns3?
The better way to learn about the Pfsense firewall is to virtualize them in your lab environment before you put them into the real network.
The pfsense firewall can be installed in Gns3. Most of the features work just fine within GNS3. Though you can install pfsense in VMware workstation and integrate with Gns3, the recommended method is to use the gns3 remote server.
In this blog, let’s look at how you can install Pfsense firewalls on your gns3 software.
We will install Pfsense on a remote server, which gives good performance and is easy to manage. I have covered in detail how I have set up my GNS3 here.
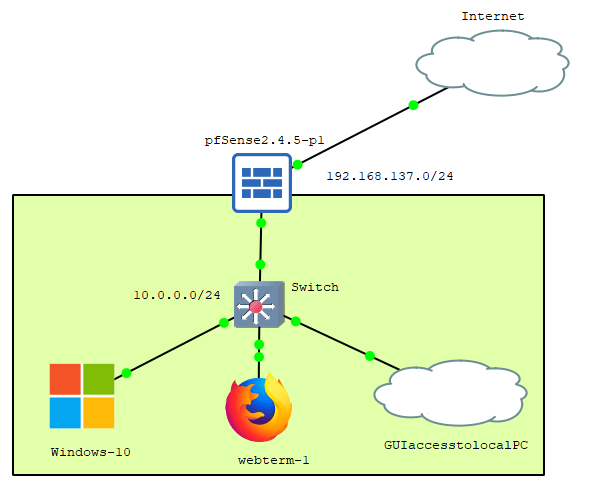
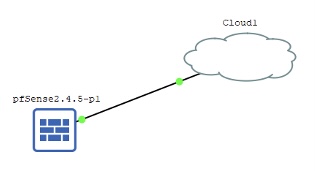
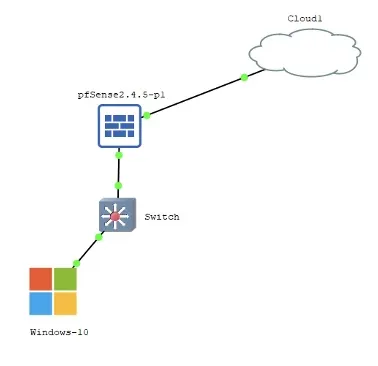
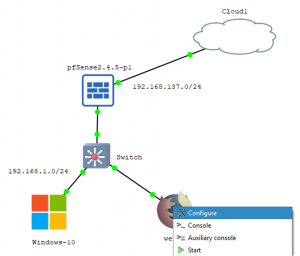
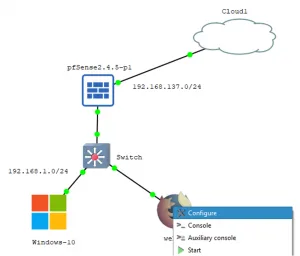
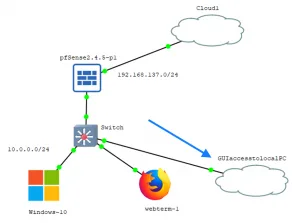
Below is the lab topology that we are going to build.
- A Pfsense firewall connected the internet on a Subnet 192.168.137.0/24.
- And there are three hosts connected to the LAN side of the firewall.
- We will test the internet connectivity from the LAN side, also access the firewall GUI.
Note: Initially, we will configure the firewall with the 192.168.1.0/24 LAN subnet, then later we will change it to 10.0.0.0/24

Prerequisite for Pfsense gns3 lab
- Download the latest Pfsense firewall here.
Note : You should select the AMD Architecture and ISO installer. - Download empty1000GB qcow2 – Virtual hard disk image for GNS3 here.
- Internet access on the lab – if you wanted to test the internet access from the LAN side.
Steps to install Pfsense on GNS3.
- Add Pfsense to gns3.
- Create a new Pfsense lab project in Gns3.
- Install the Pfsense firewall in GNS3.
- Connect the end-user machine to access the internet as well as the Pfsense web GUI.
- Pfsense basic configuration.
- Access Pfsense firewall from your local machine.
The lab I am going to use is a GNS3 as a remote server.
Make sure that your GNS3 client can talk to the GNS Server by looking into the Server Summary.
Mine is working fine, as you can see below.


1.Add Pfsense to gns3.
The first step is to add the Pfsense firewall to the GNS3
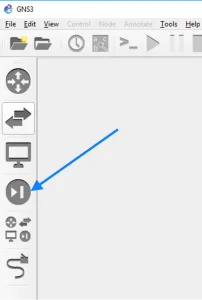
Open GNS3 and click on the firewall icon on the left.

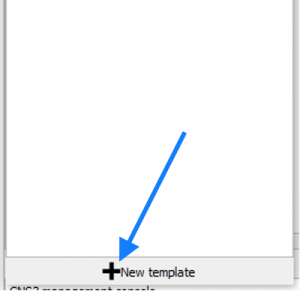
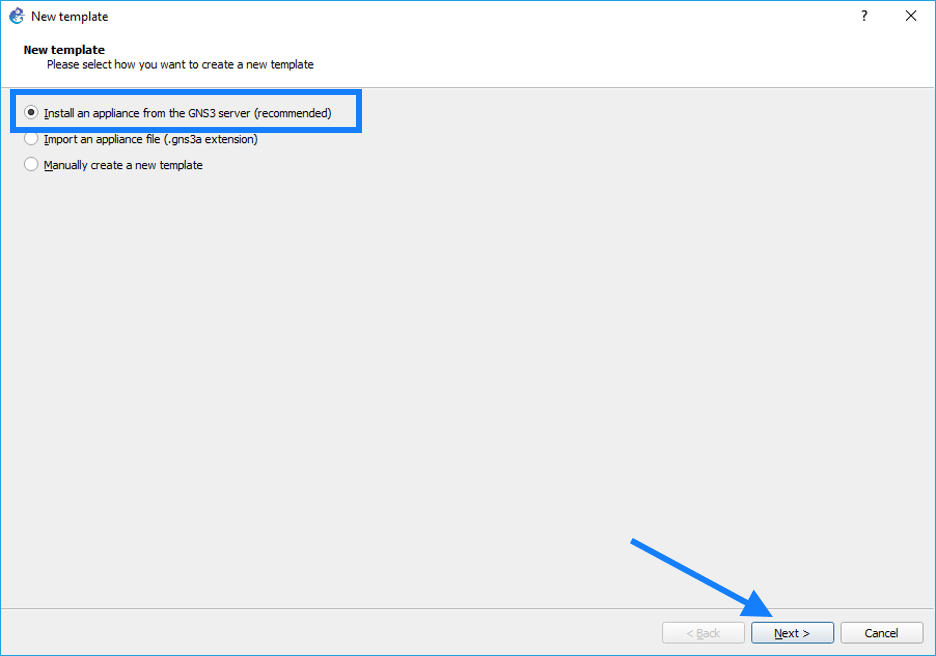
To install the Pfsense firewall, you have to click on the New template.
It will open up a window in which you can configure the Pfsense firewall, choose the option which says Install an appliance from the GNS3 server, select that and then click on Next.

You will now be able to see the list of available devices on the GNS3 to install, expand the firewall list, and scroll down and select Pfsense firewall from the list and click on install.
This wizard will help you add Pfsense to gns3.
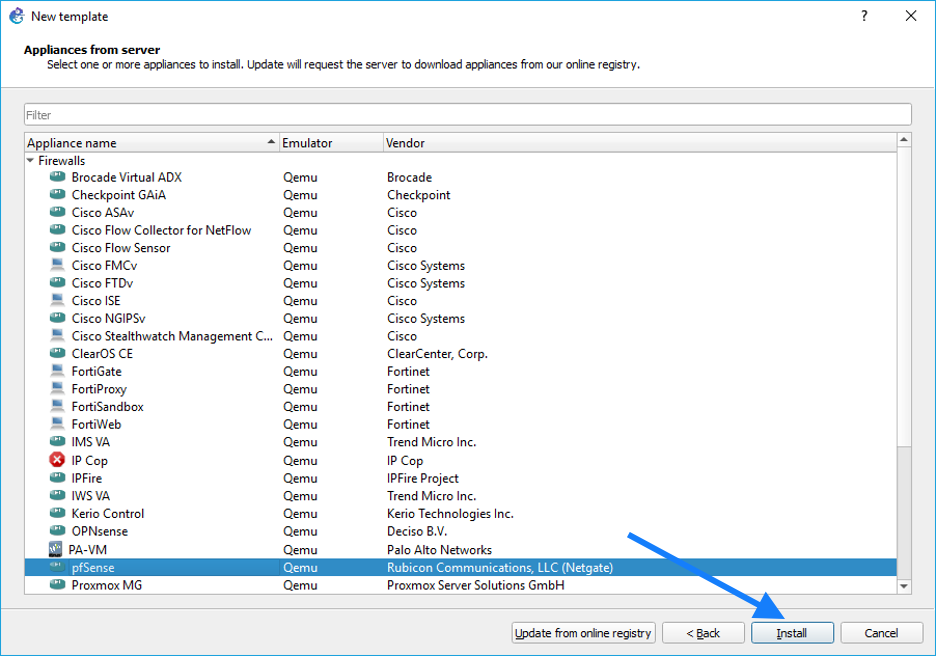

You now should be able to see the list of Pfsense firewall versions that can be installed in GNS3. At the time of the writing, the latest version is 2.4.5.
I chose the latest version and then expanded it.
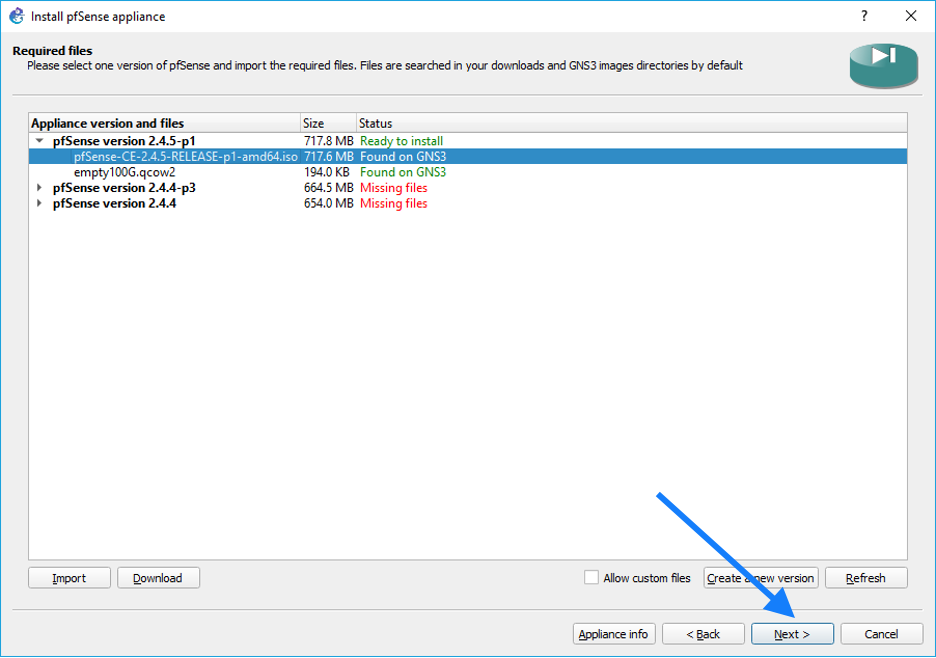
You should now be able to see the Pfsense firewall and its harddisks.
Select the Pfsense firewall and import the iso file that we have downloaded in the beginning.
Also, the hard disk file, empty100g.qcow2 as well and click on next.

You should now see the window that says Pfsense is installed, and it is under the firewall category and shows the credentials. Click on Finish.

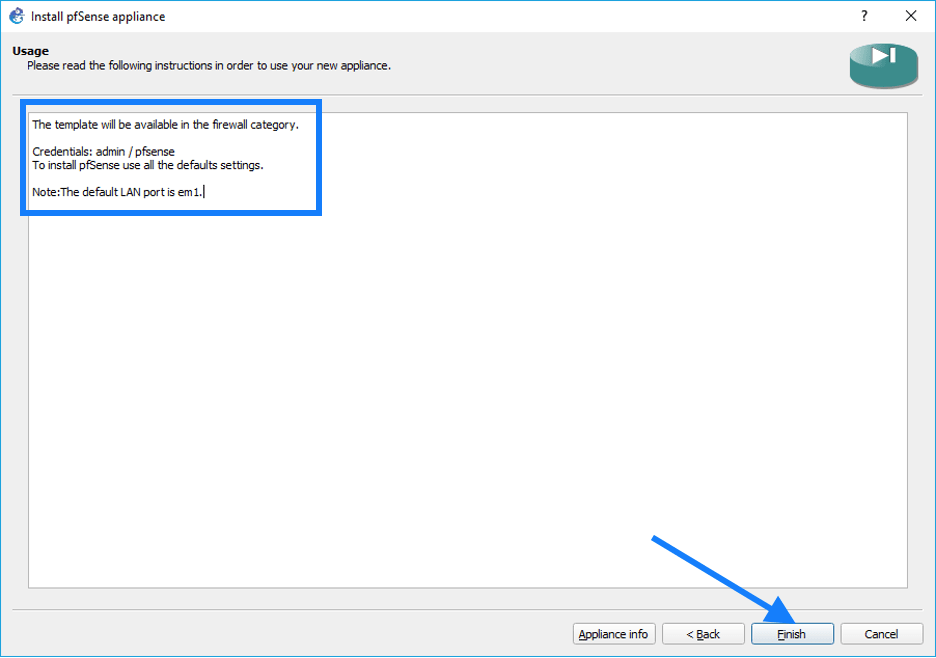
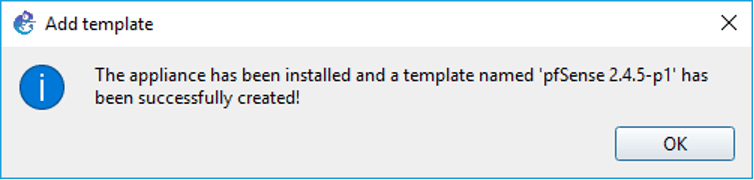
You should get a message that says, the Pfsense firewall installed successfully, click on OK now.

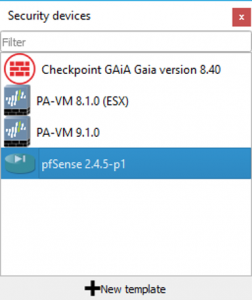
You should now be able to see the Pfsense firewall under the firewall directory of the GNS3.
As you can see below, I have the Pfsense firewall installed successfully apart from the Checkpoint and Palo alto firewall which I have installed in the past.
2.Create a new Pfsense lab project in Gns3.
Next, we are going to create a project with a Pfsense firewall.
Create a project called “Pfsense gns3 lab” in the GNS3.
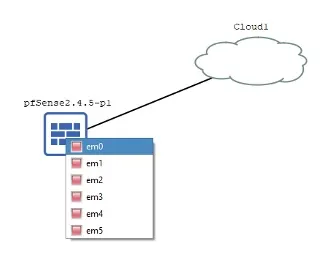
Add the firewall into the topology, as well as the cloud.
We are using the cloud to share internet access from my machine.
On the cloud end, I am using VMnet2, I have also shared the internet access to the VMnet2 from my local machine physical adapter. Which now acts as a DHCP server and starting giving IP address from 192.168.137.0/24 range.
And on the Pfsense interface side, I am choosing em0, which is our WAN network.

3.Install the Pfsense firewall in GNS3.
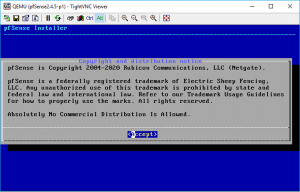
Power on the Pfsense firewall and double click to open the console.

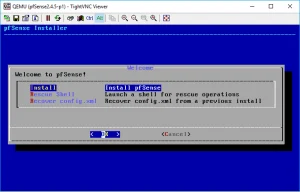
After a few seconds, you should see the VNC console screen with the Pfsense installation wizard and click on Accept.
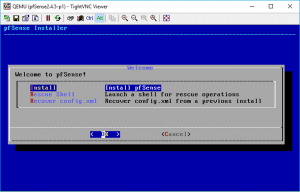
On the next screen, you may click on install.
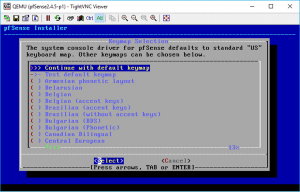
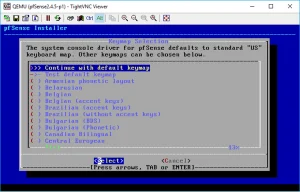
You may choose the keymap based on your region and click on Select.
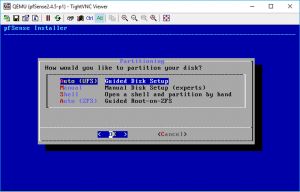
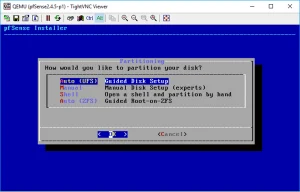
We are not doing much on the partitioning side, hence click on Auto and click on OK.
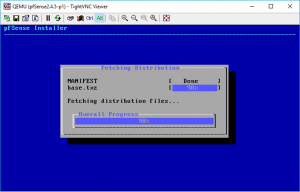
The installation now begins, and it will take a few seconds to finish the installation on your GNS3 server.

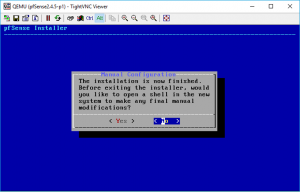
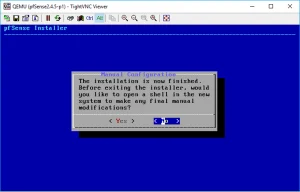
Once completed, you will get the below prompt for the manual configuration.
If you want to make any changes to the system via shell, you can click on Yes.
We are not going to perform that now so click on No.
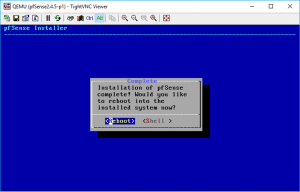
Alright, the installation now completes. You may go ahead and reboot the Pfsense firewall now.
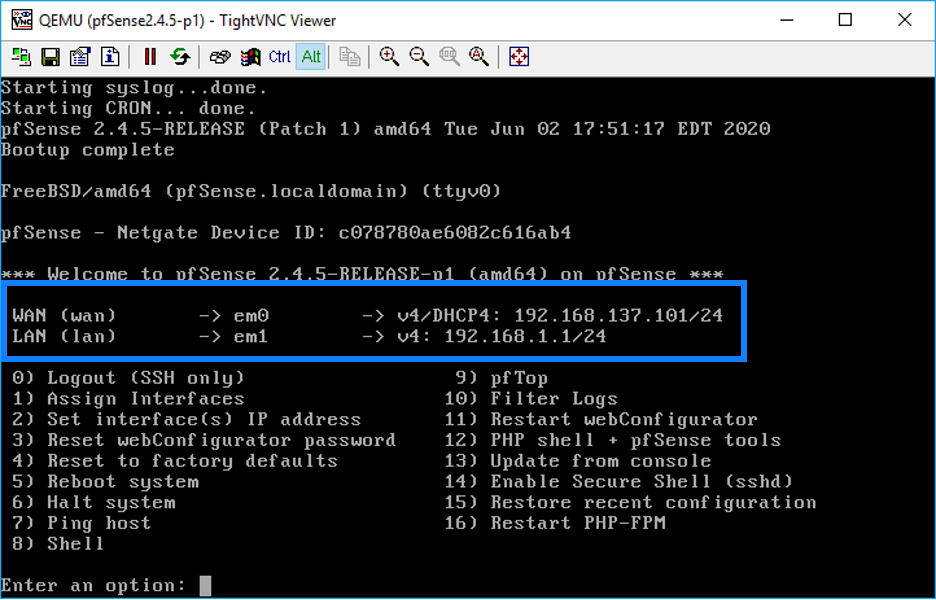
Once the Pfsense is installed and rebooted, you will be presented with the below screen with Pfsense configuration options.
As you can see below, I have got the WAN IP address from the DHCP server 192.168.137.101/24 from the cloud VMnet2.
I also have the LAN IP, which is 192.168.1.1/24. I should now be able to access the Pfsense firewall web GUI with the address https://192.168.1.1

4.Connect end user machine to access the internet as well as the Pfsense web GUI.
To access the web GUI as well as to check the internet access, you need to have a machine connected to the firewall’s LAN side.
- First, let’s add a switch to the topology, the uplink port of the switch connects to the LAN side of the firewall interface, which is em1.
- I already have a windows 10 client configured in my GNS3 server. Let me connect it to the switch.

The Windows client is configured to use the DHCP by default, so as soon as the system boots up, you should get an IP address from the range 192.168.1.0/24 network.
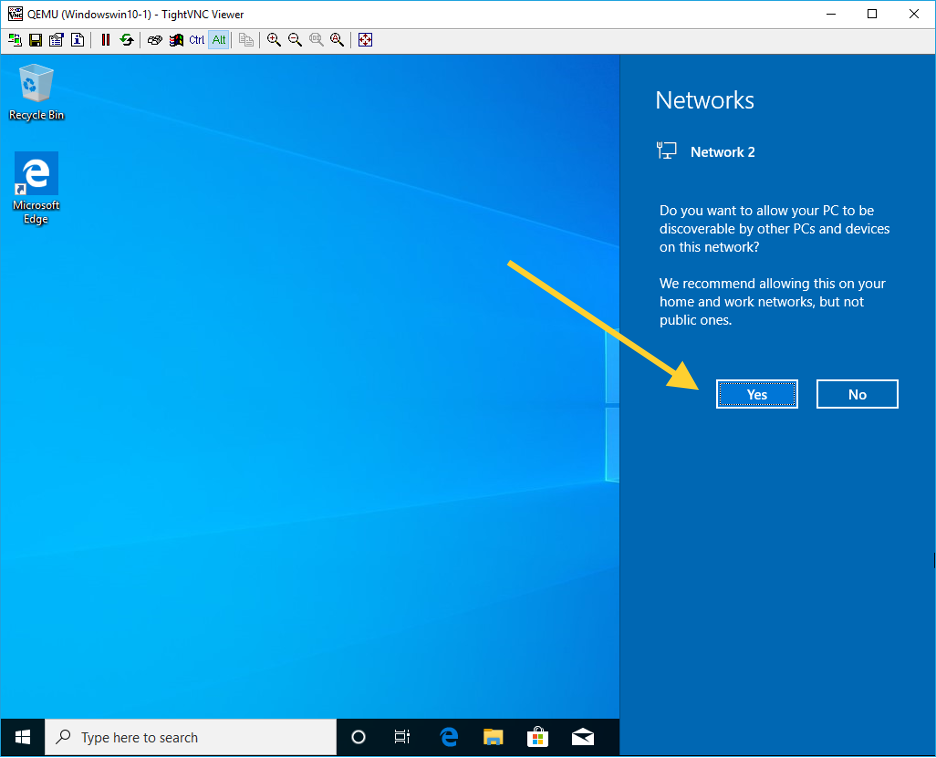
I double-clicked on the windows machine. As soon as it comes up, you can see network connected notification popped up on the right, and I clicked on Yes.

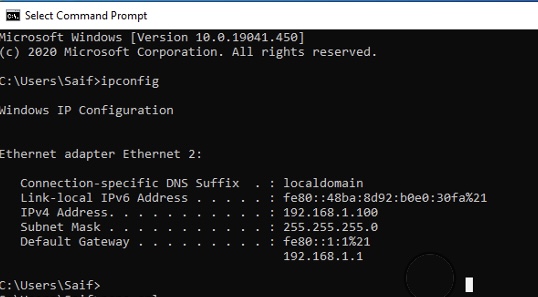
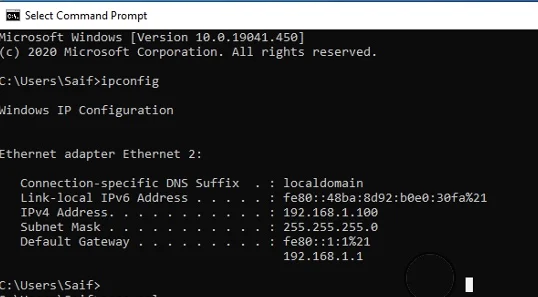
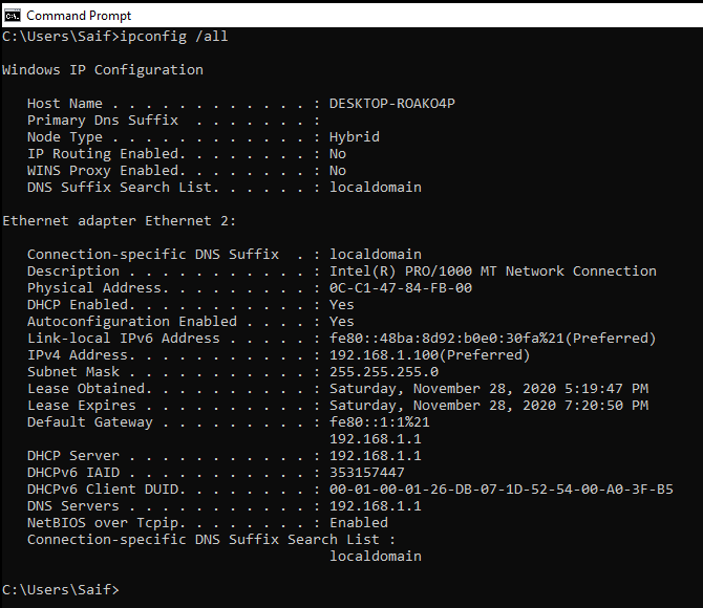
I now need to identify the IP that I received from the Pfsense firewall, so let’s open CMD and type ipconfig. As you can see, I got the IP address 192.168.1.100 from the Pfsense DHCP server.
Verify internet access.
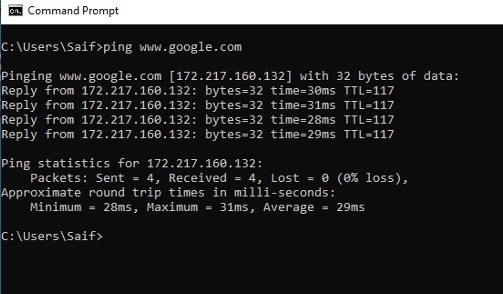
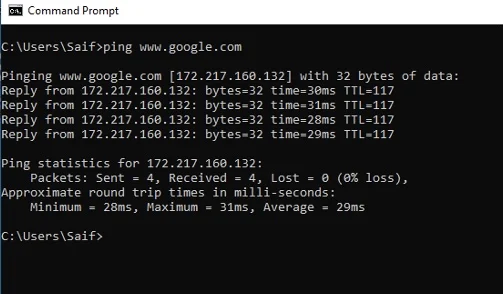
Let me start pinging www.google.com. As you can see, I can ping the host from the public internet, which clarifies that the default route and the NAT are configured for the LAN users to reach the internet. And the DNS is also working fine.
Let me also access the internet from the host.
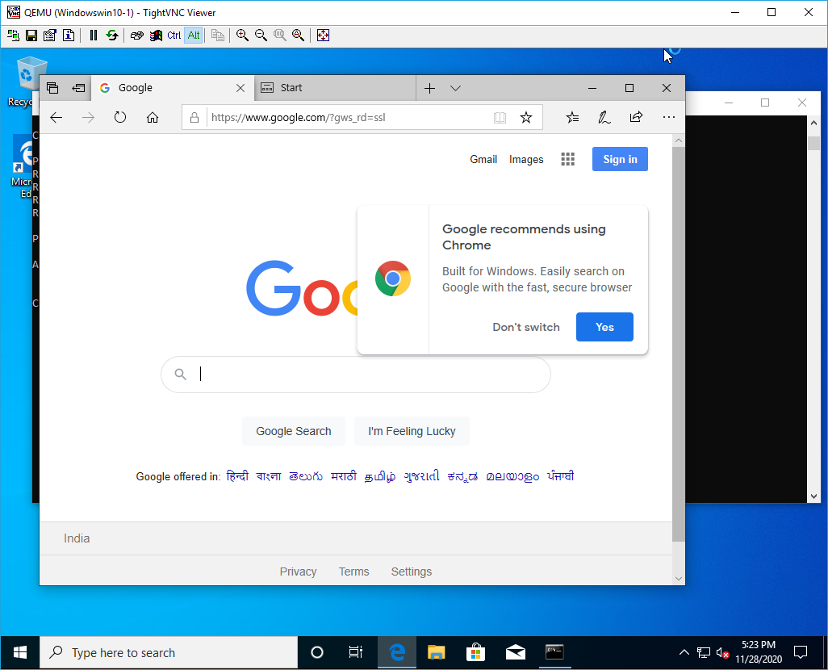

Here is my IP configuration from the windows machine. Which also works fine with no issues.

Add another host to the LAN side to test the connectivity.
This time, I will add a web term container to the LAN side, which I will configure to use the DHCP network.
Right-click on the webterm client and click on configure.
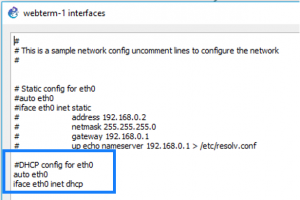
Click on Edit network configuration.
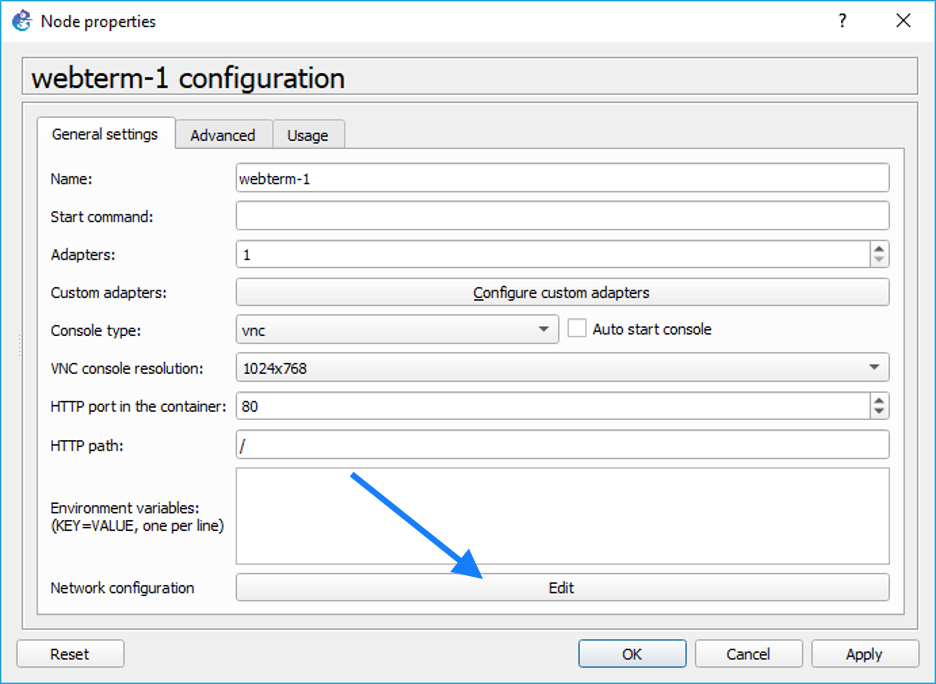

Change the Values to start using the DHCP network and click on Save.

If you are unsure how to configure webterm container in the GNS3, you may follow the article here.
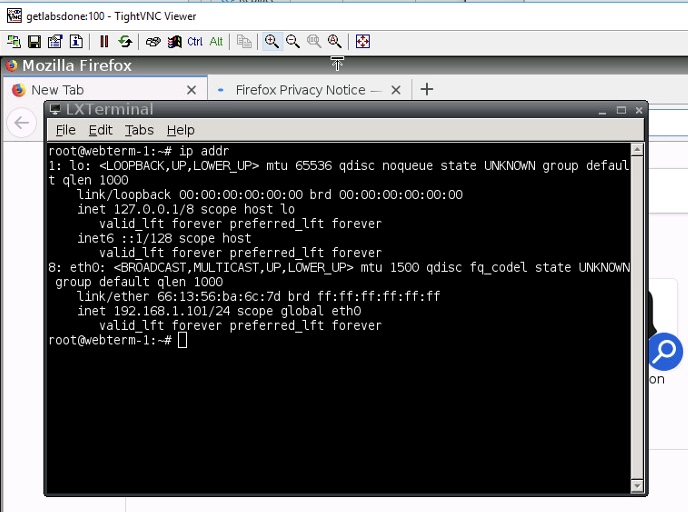
Once the webterm comes up, you can double click on it. By default, it will open up with the firefox, so before we start browsing the internet, let’s take a look at the system’s IP configuration.
You can click on the icon that says JWM on the bottom left corner and click on Terminal.
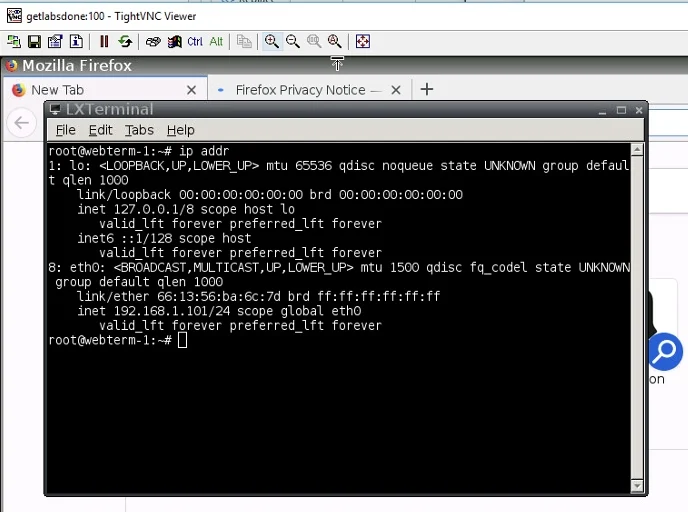
In the terminal window, type ip addr. It will show you the IP address configuration on your host.
Right now, I have the IP address 192.168.1.101, which is good.
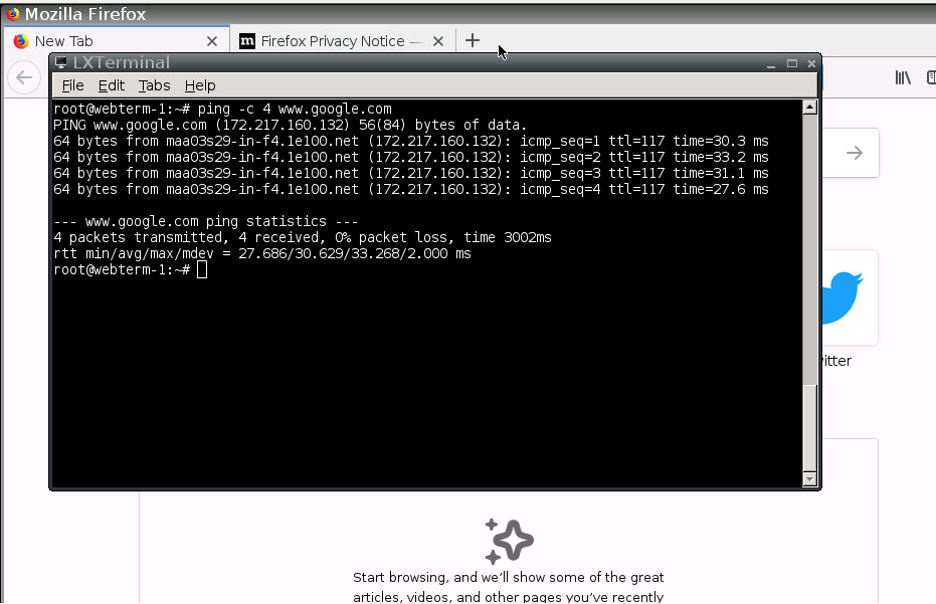
Like how we have checked the internet reachability, let’s try to ping google.com with the below command.
Ping -c 4 www.google.com
As you can see, I am getting a response from this host as well.
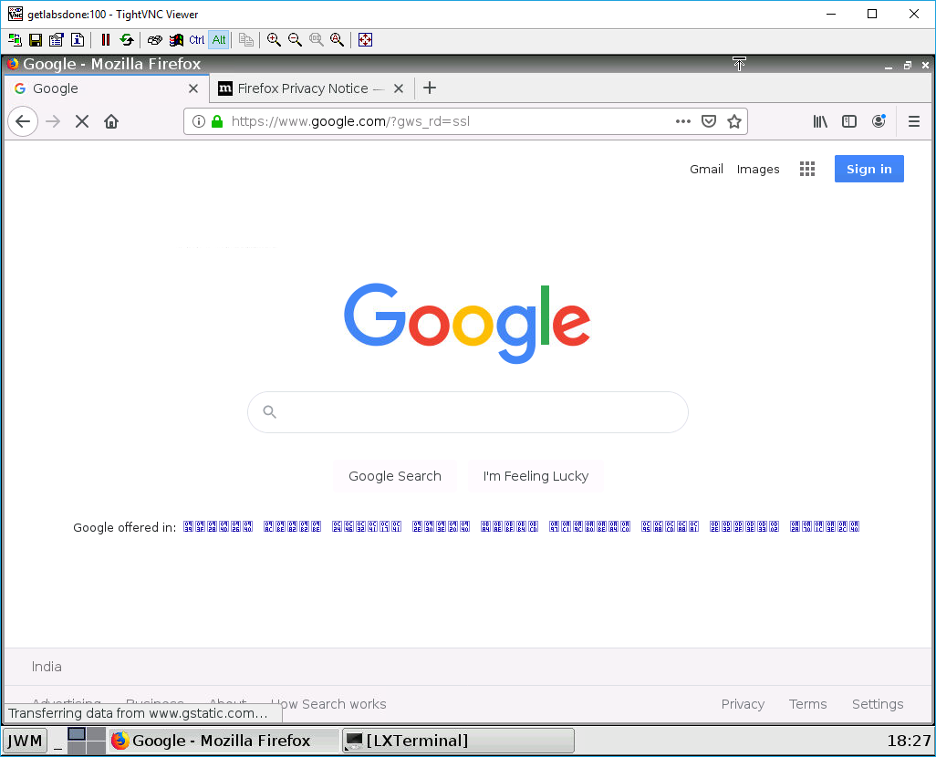
Let me browse the internet.
As expected, internet access is also working fine.

Access the Pfsense web GUI in GNS3.
After we have the LAN hosts configured, we will now access the Pfsense firewall web GUI in it.
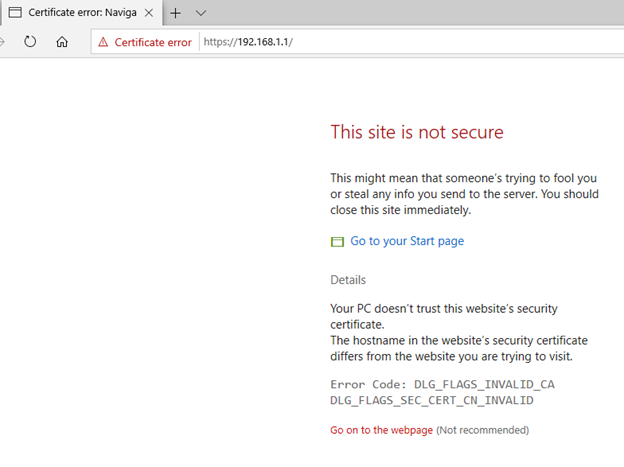
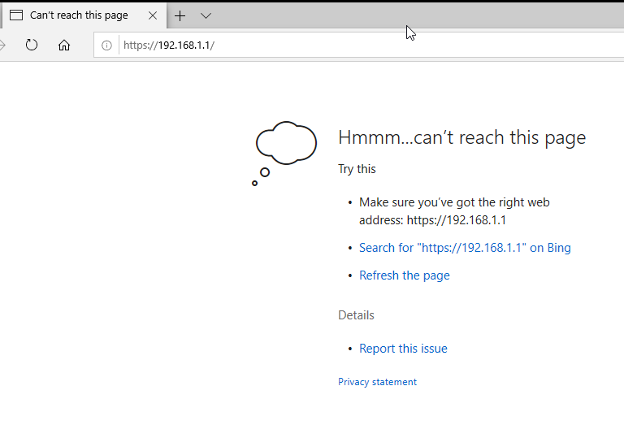
To access the web GUI, type https://192.168.1.1 in the browser.
You will get a certificate error on the screen. You may ignore and click proceed.
5.Pfsense basic configuration.
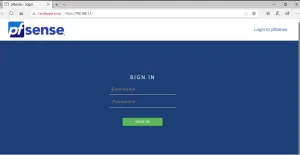
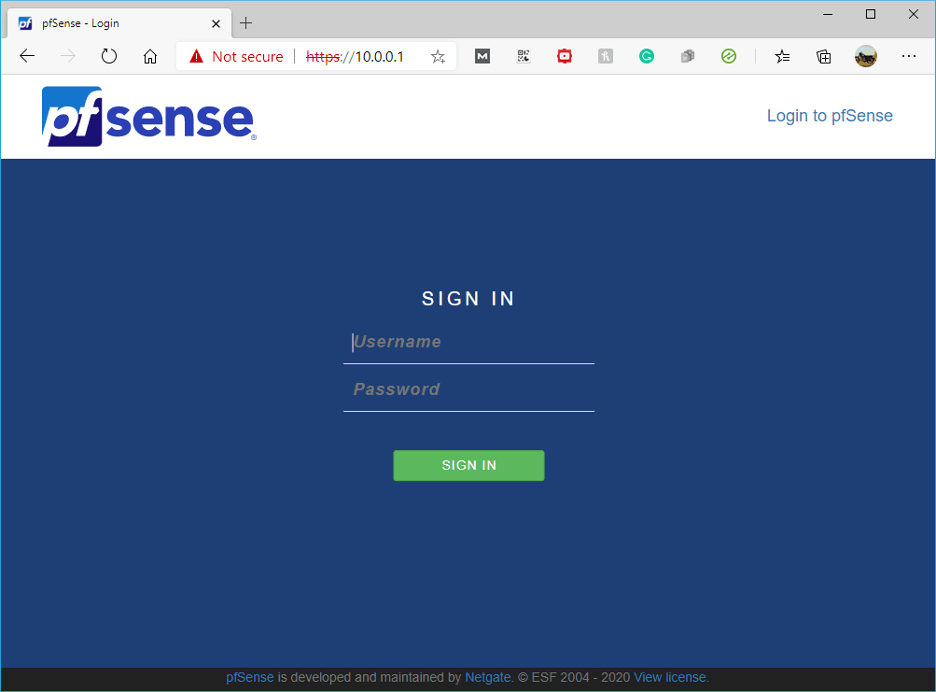
You will now be presented with a Pfsense logon screen.
What credentials should I use for the Pfsense to login?
You can use the below creds to login to the Pfsense web GUI.
Username: admin Password: pfsense

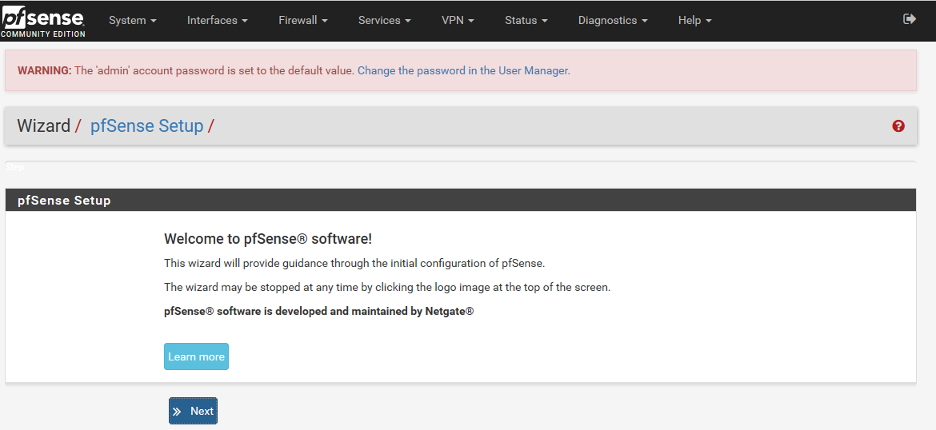
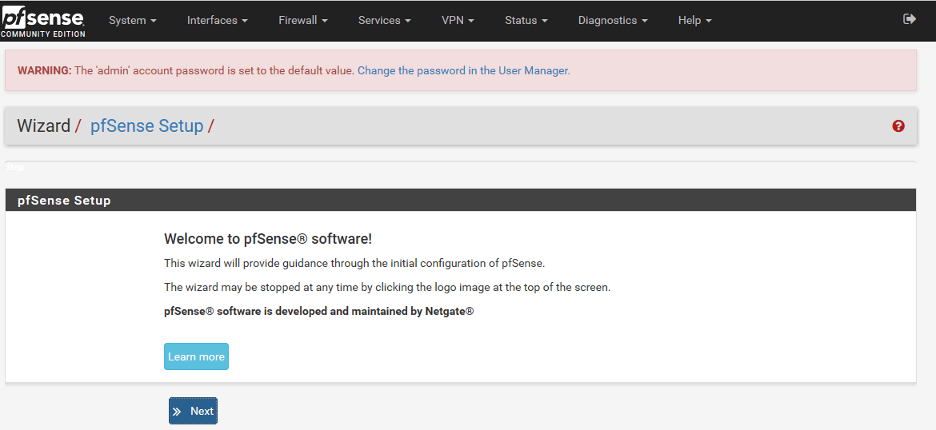
You are now logged in, and you will be presented with the below screen. You can click on Next.
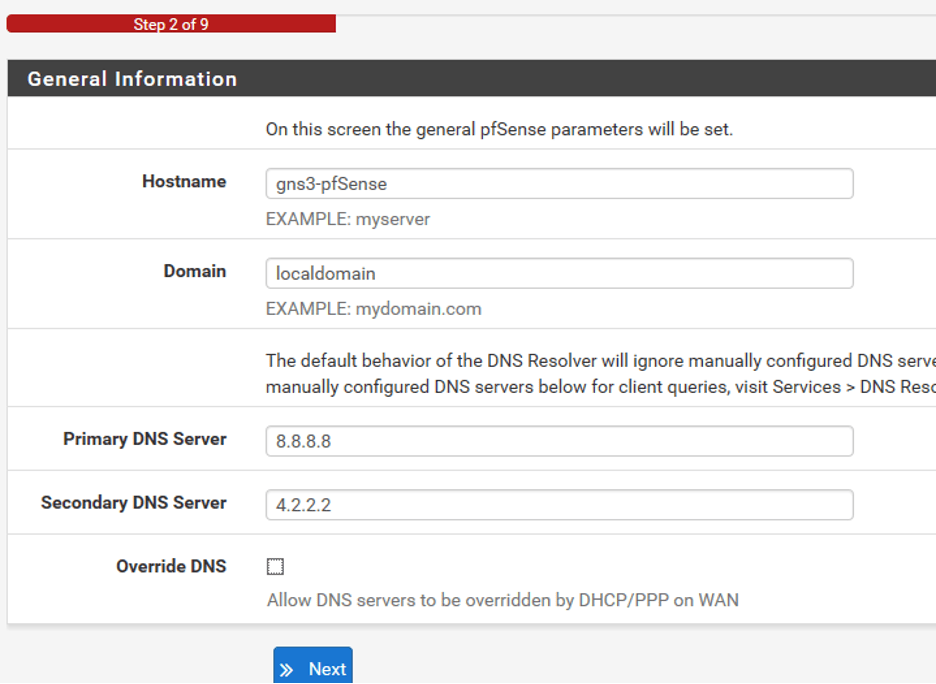
In the following steps, you can configure the hostname and the DNS information. Below is what I have configured, and I also unchecked the option which says Override DNS and clicks on Next.

You would also get an option to configure the NTP. You may modify it or leave the default value, I am choosing the default value, and I will click on Next.
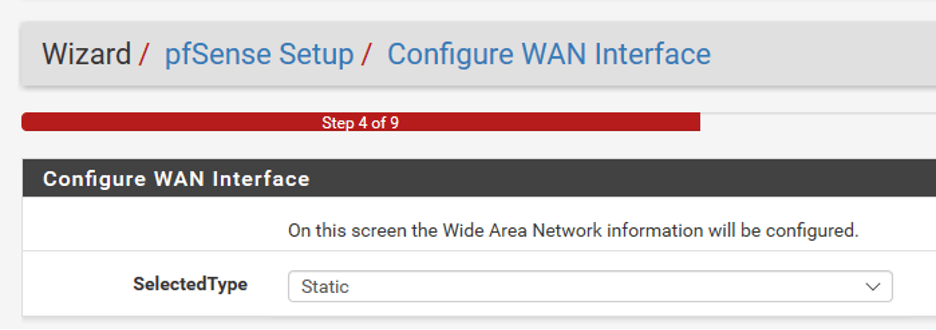
In the configure WAN interface options, the DHCP as the default option, let me change it to static.

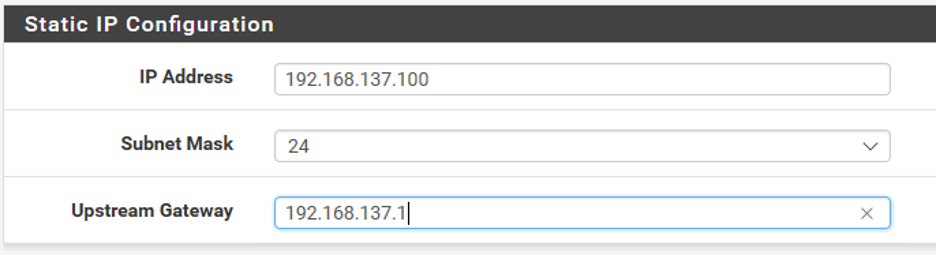
I will go ahead and configure the static IP address as follows.
IP address# 192.168.137.100
Subnet mask #24
Upstream Gateway#192.168.137.1

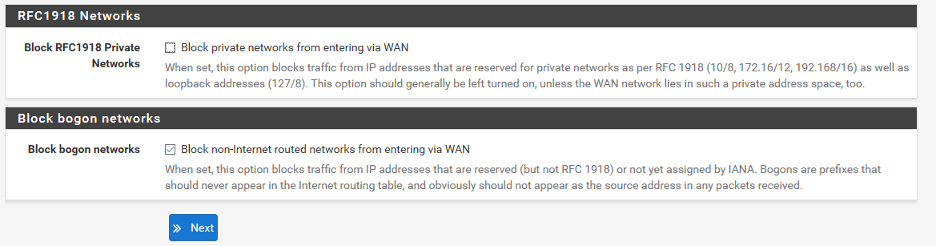
Since I am using a private IP address even on the WAN side, I should uncheck the option which says Block private networks from entering via WAN.
Note: In the production network, you should block the private range.
Click on next.

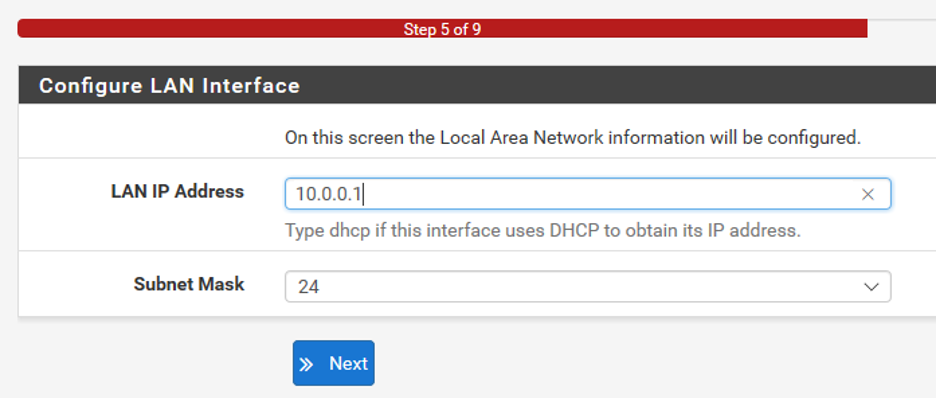
You would also get an option to change the LAN side IP address. You may change it if you want to, I am changing to use the 10.0.0.0/24 network as per our design.

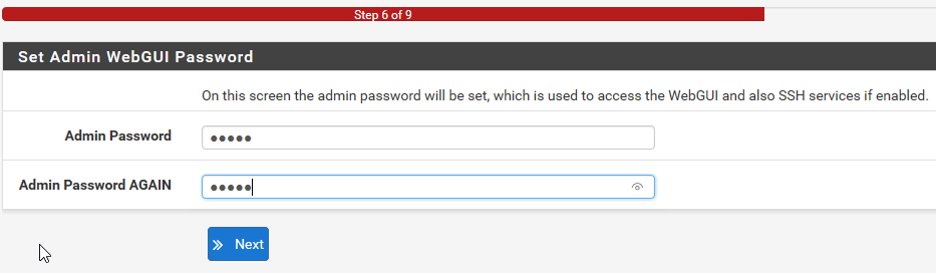
You need to also modify the admin credentials in Step6.

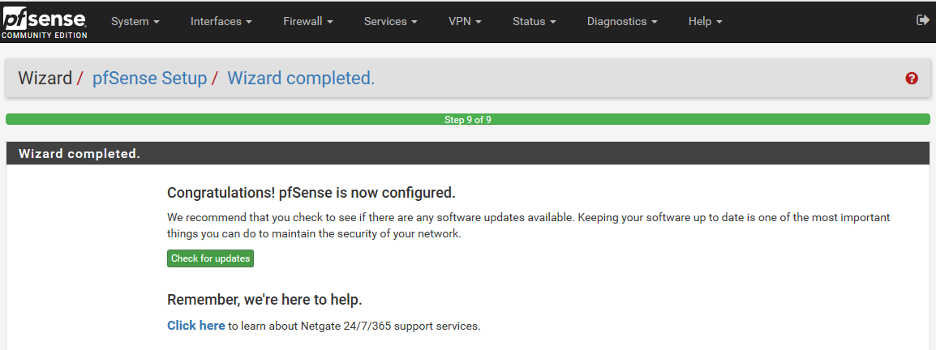
After everything is completed, you may now click on Reload.
Once the Pfsense firewall is reloaded, you should get a message which says Pfsense firewall is configured successfully.

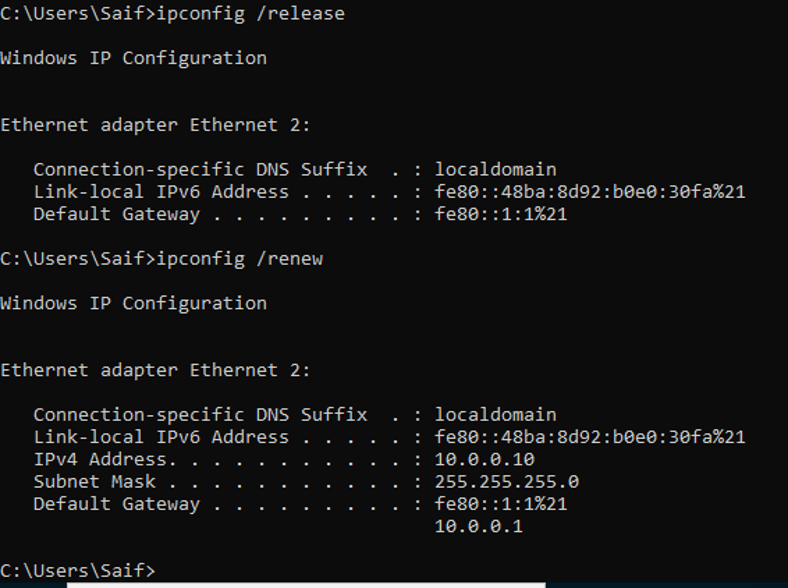
If you try to reload the firewall page now, you cannot access them. Do you know why?

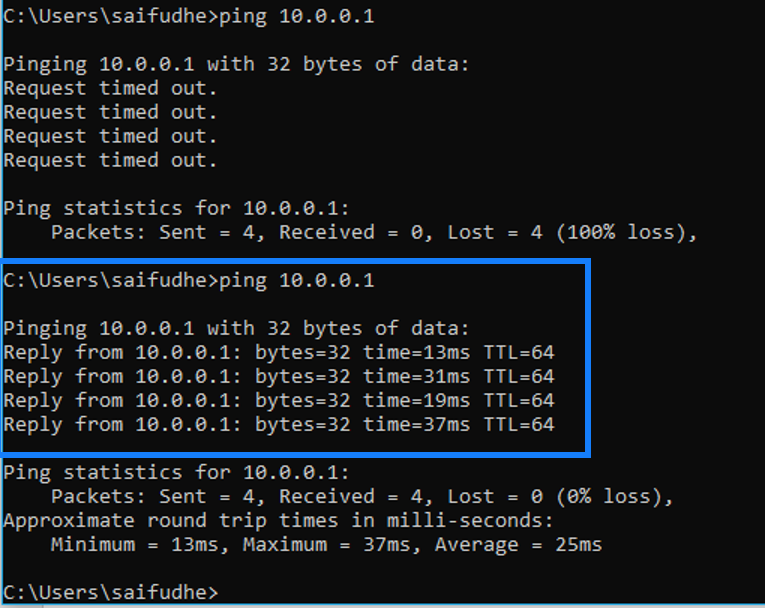
It’s because we have changed the IP address from 192.168.1.1 to 10.0.0.1 on the LAN gateway of the firewall.
So the LAN host, which is windows 10 in our case, is still using the old IP address 192.168.1.100. So to refresh the DHCP IP address, you can type the command below.
Ipconfig/release – This would release the current IP address.
Ipconfig/renew – This would renew the New IP address from the scope.
After we did that, we got the IP address 10.0.0.10 from the DHCP scope.

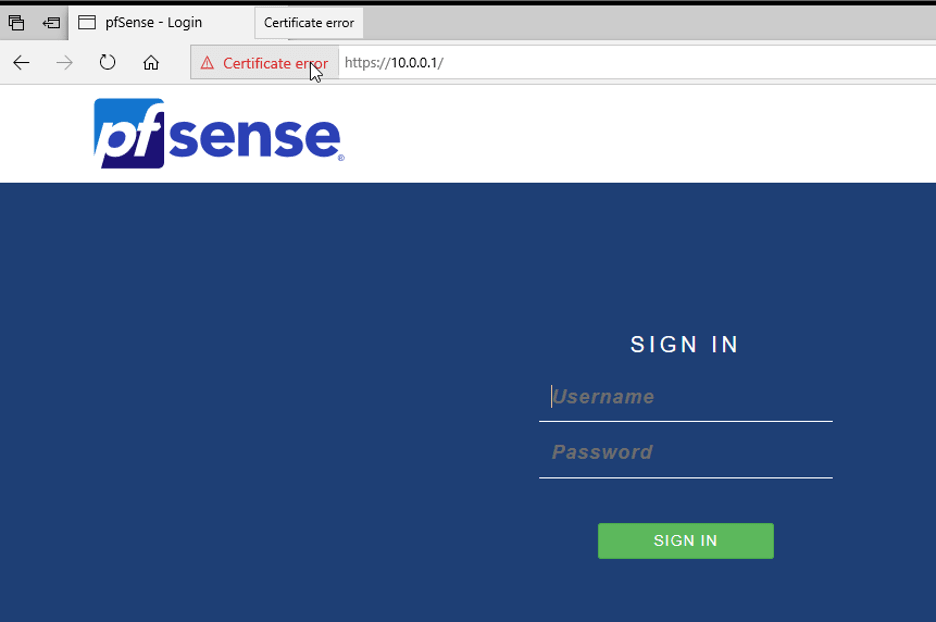
Let’s try to access the web GUI with URL https://10.0.0.1, and you should now be able to access the firewall GUI with no issues.
As you can see, we can access the firewall with the new IP address.

6.Access Pfsense firewall from your local machine.
How to access the Pfsense firewall installed in GNS3 from your local machine?
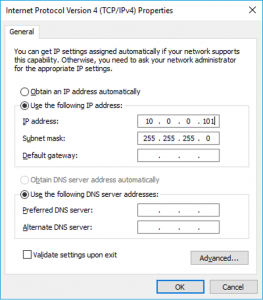
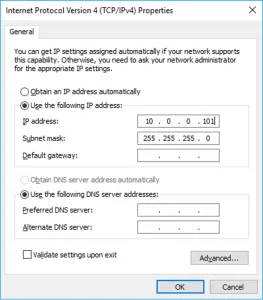
Sometimes, you may want to access the Pfsense firewall GUI from your local machine, so follow the steps here and configure the VMNET2 adapter on the network 10.0.0.0/24 network.
Add a cloud to the topology.
Connect the cloud interface to the switch.
Here is my VMnet IP configuration.

After I connected the cloud to the switch, I can ping the default gateway on my LAN side from my physical PC.

Let’s try to access the GUI from our local machine.
Well, we can access the Ponfsense firewall from my local PC as well, which is good.

We have now configured the Pfsense firewall successfully in the GNS3 software. You can now start practicing the lab with it. I have also covered how I have set up an IPsec tunnel using Pfsense in GNS3 here, you may check them out if you are interested.