

PfSense is an open-source firewall that you can deploy in practically any network you have. There is a community version of the software, which is completely free, and there is also paid hardware you can acquire from Netgate. Compared to other firewalls, it doesn’t cost as much.
In addition, you have another router called MikroTik, which is significantly cheaper than its alternatives and also provides some basic firewall functionality, including the IPsec site-to-site VPN.
If you’re curious about how to set up an IPsec VPN between a PfSense firewall and the MikroTik router, this blog post is for you.
In case, if youa re planning to setup IPsec vpn between two mikrotik router, you can follow the article that I written here.
Is setting up IPsec vpn between pfsense and MikroTik difficult?
When you first start working with a MikroTik router, feeling overwhelmed by the unique layout of its configurations is completely normal, especially in comparison to its counterparts.
This can be particularly true if you’re new to the MikroTik hardware, and believe me, I’ve found myself in the exact same predicament. You may question whether setting up an IPsec site-to-site VPN between pfSense and MikroTik is a formidable task.
However, contrary to this assumption, it’s actually relatively straightforward. I have successfully configured IPsec with multiple subnets on MikroTik on numerous occasions. In this blog post, we’re going to delve into exactly that.
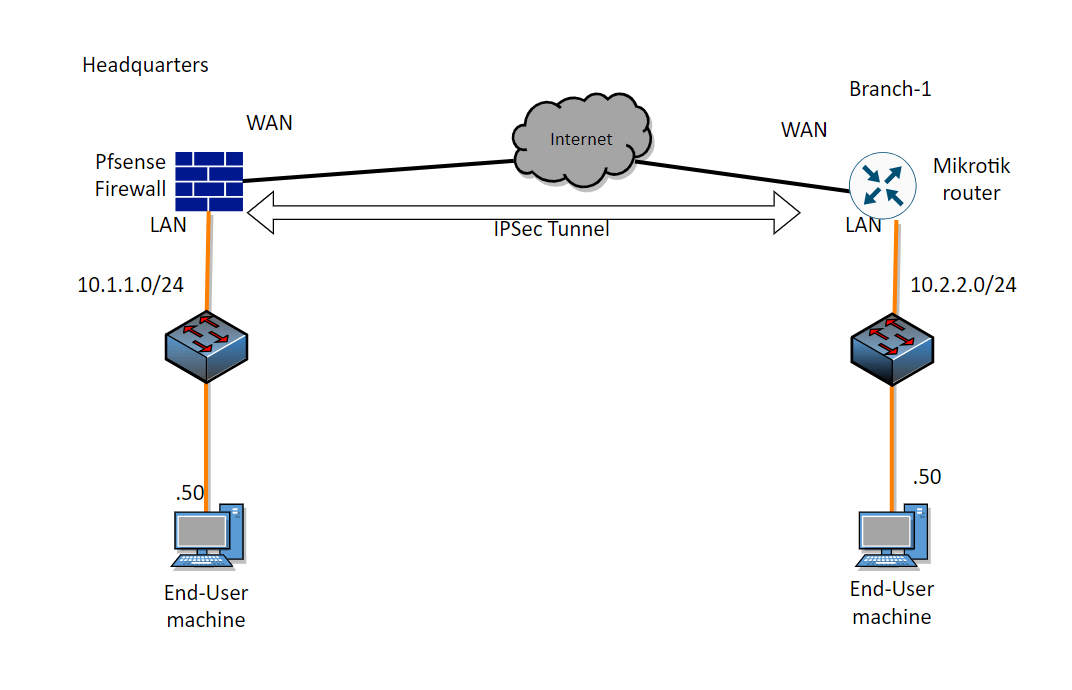
Here is the network setup we have:
We have a PfSense firewall on the left, connected to the internet, with a private IP address subnet of 10.1.1.0/24. Similarly, the MikroTik router is connected to the internet and it has a LAN subnet of 10.2.2.0/24.

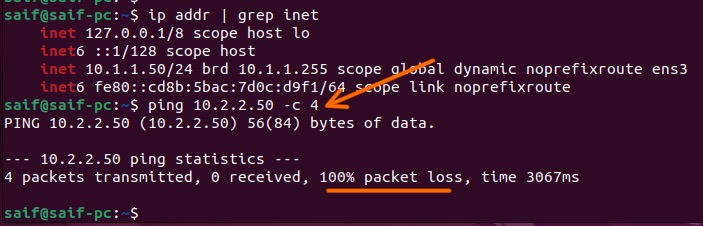
Both sections of the LAN network are capable of accessing the internet; however, they’re unable to communicate with each other directly. For instance, if I log into a machine connected to the pfSense LAN segment, I’m unable to ping the machine on the MikroTik LAN side.
So our goal here is to build an IPsec tunnel, which will enable the communication between the two LAN sides.

For those who like to watch the step by step guide, here is the step by step video.
Configure the IPsec VPN on Pfsense firewall.
Let’s start the configuration IPsec site to site VPN configuration at the pfsense side and then we will proceed with the MikroTik router side. Once we’ve got everything set up, we’ll test the connectivity.
Pfsense Phase1 configuration.
We are going to start IPsec tunnel configuration with phase1 and then we’ll go ahead with phase2.
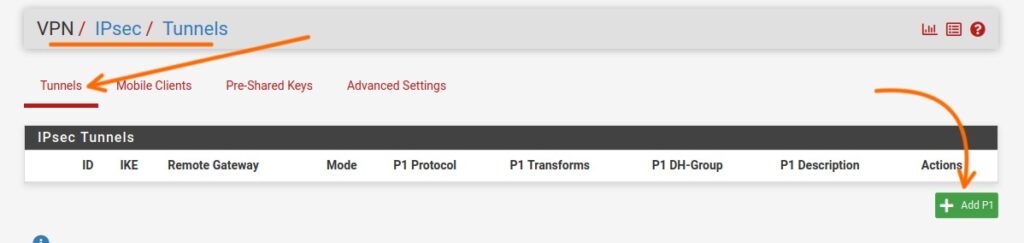
To configure the IPsec Phase1, navigate to VPN -> IPsec. Under the ‘Tunnels‘ tab, click on ‘Add‘ to create a new tunnel.

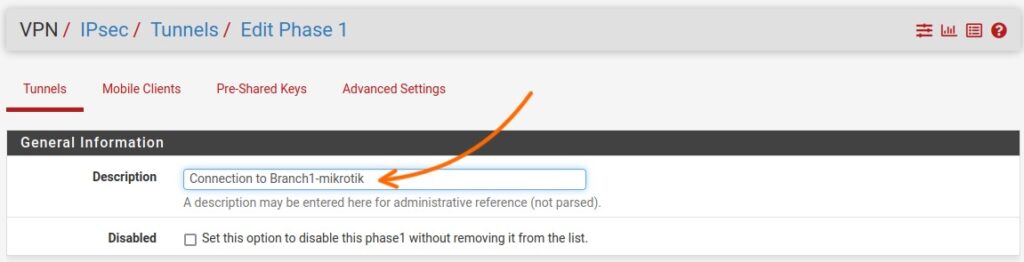
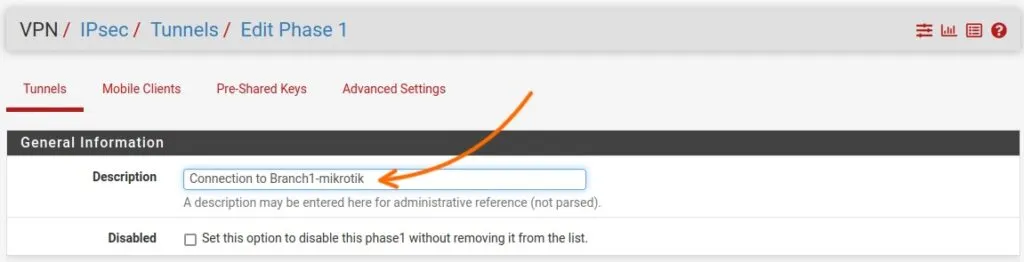
General Information.
For the ‘Description‘, enter a distinct name that you can use to identify the tunnel we’re about to create.
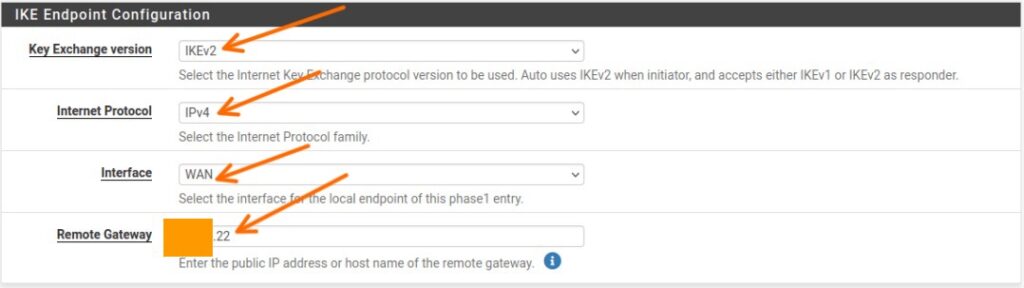
IKE Endpoint configuration.
In the IKE Endpoint configuration, add the following.
Key Exchange version: IKEv2.
Internet Protocol: IPv4
Interface: WAN
Remote Gateway: Enter the public IP address of the MikroTik router.

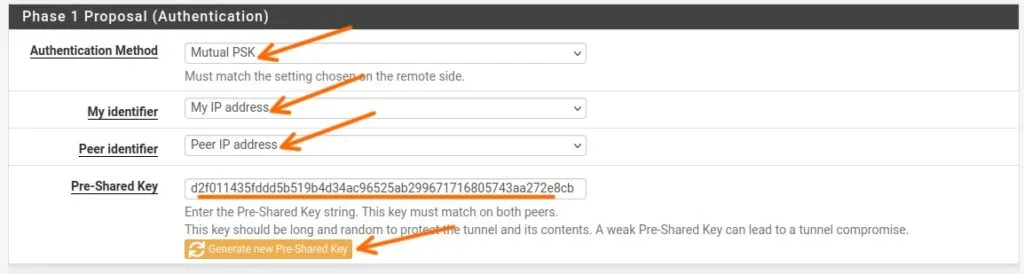
Phase1 Proposal (Authentication)
Authentication Method: Mutual PSK – This is a pre-shared key that we are going to use at both side and it is important that it should match.
Pre-Shared Key: You can either add your own pre-shared key or generate a new one by clicking on ‘Generate pre-shared key’. Remember to make a note of the pre-shared key you’ve generated; we’ll need it for the MikroTik side too.

Phase1 proposal (Encryption Algorithm)
Encryption Algorithm:
Algorithm: AES
Key length: 256bits
Hash: SHA256
DH Group: 14(2048)


Leave everything default in the expiration and Replacement and click on Ok. And apply configuration.
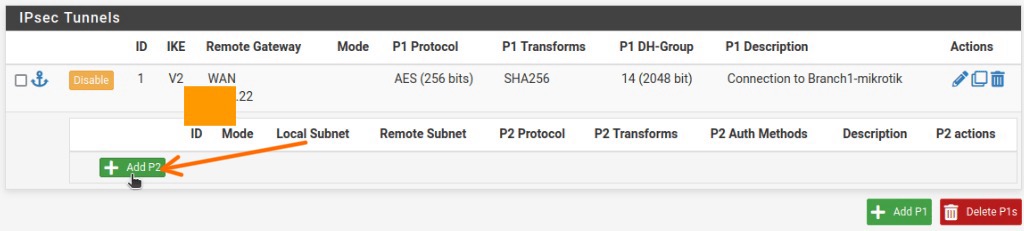
Configure the pfsense phase2 of the tunnel.
We have successfully added the phase1 of the IPsec tunnel, lets now proceed with the phase2 configurations.
In the same IPsec tunnels configuration screen, click on Show phase2 Entries.


Click on Add P2 to add the phase2 parameters.

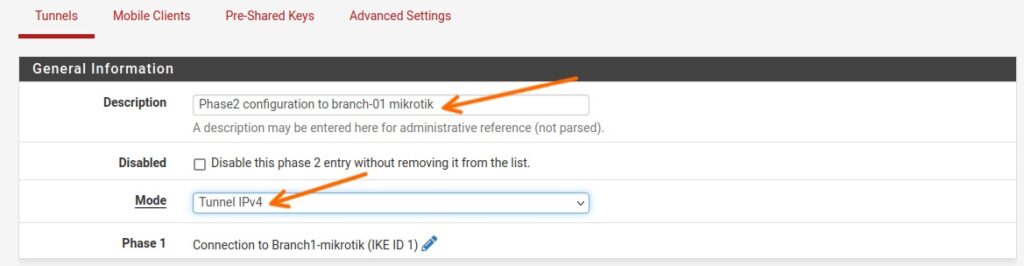
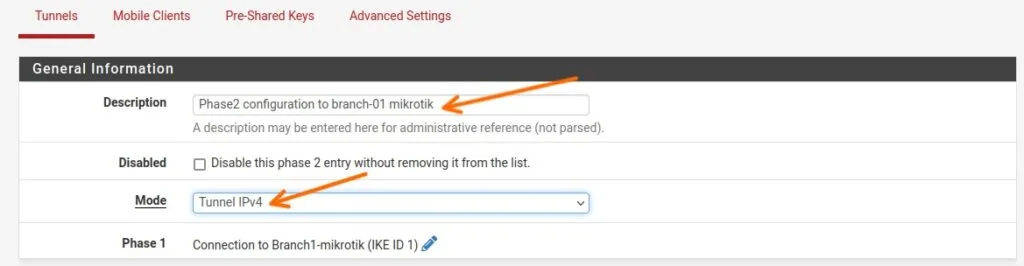
General Information.
Description: Enter the description for the phase2 of the tunnel.
Mode: Choose Tunnel IPv4.
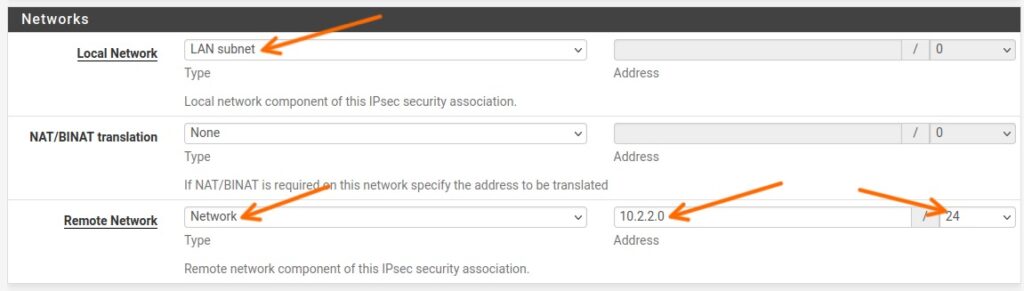
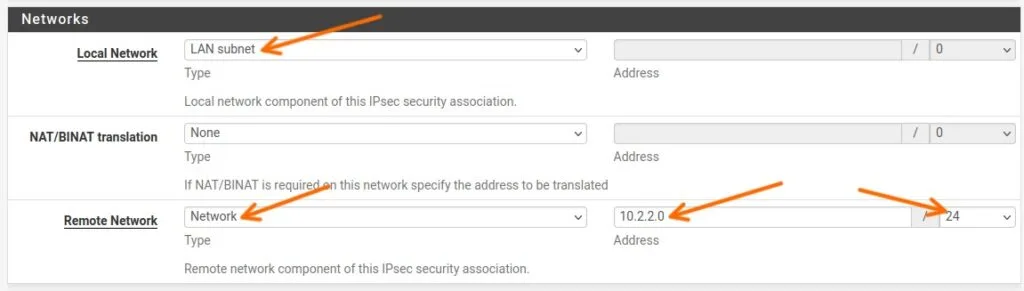
Networks
Local Network: LAN Subnet – This will take care of the whole 10.1.1.0/24 network which is configured on the pfsense lan side.
Remote Network: Choose Network from the drop down and specify the remote address which is 10.2.2.0/24
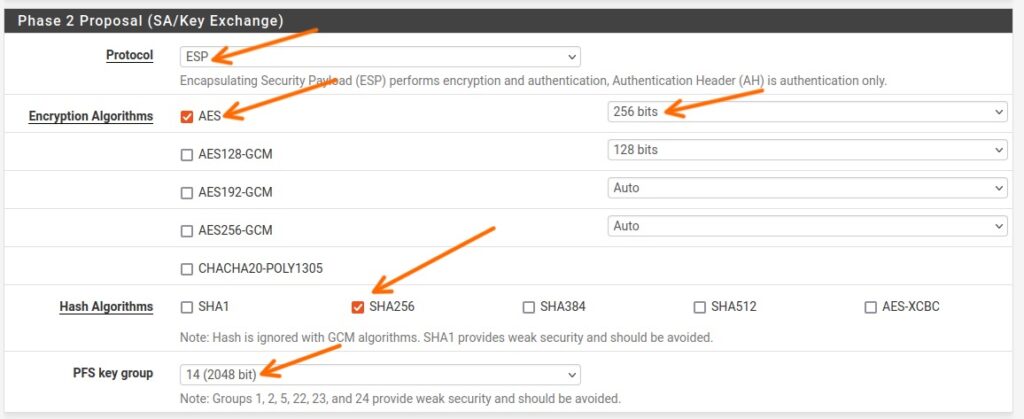
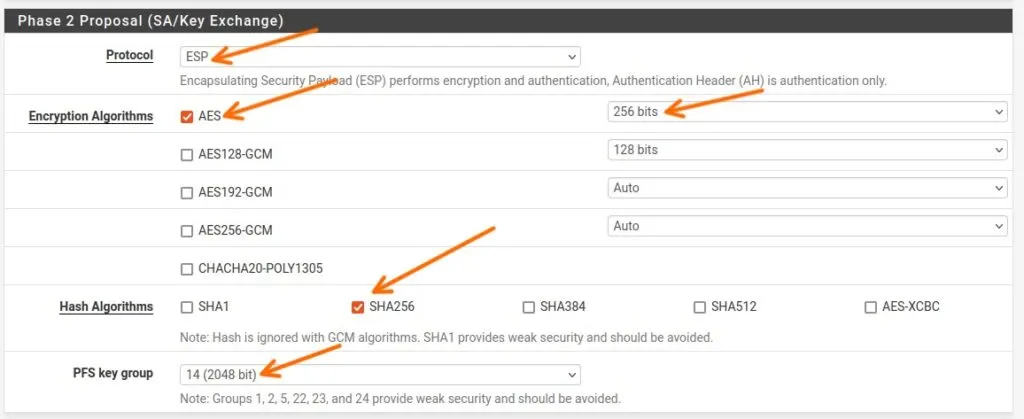
Phase2 Proposal.
Protocol: Leave default ESP protocol.
Encryption Algorithm: AES 256 Bits.
Hash Algorithm: SHA256
PFS Key group: 14
It is not mandatory to stick with the same parameters, depending on the security requirement, you can paly around with the parameters.
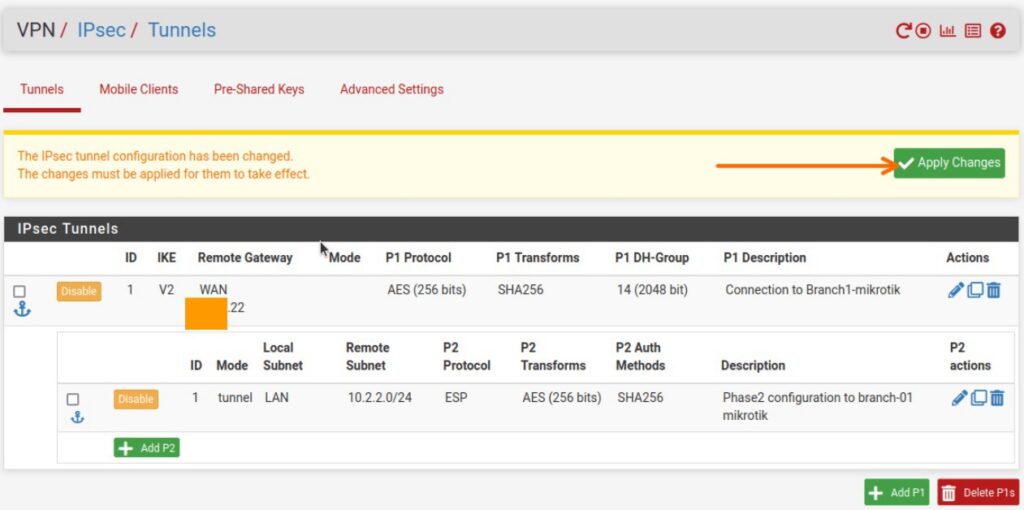
Leave expiration and replacement default, and click on Finish.
You will see the phase2 of the tunnel is now created, you may apply the changes.

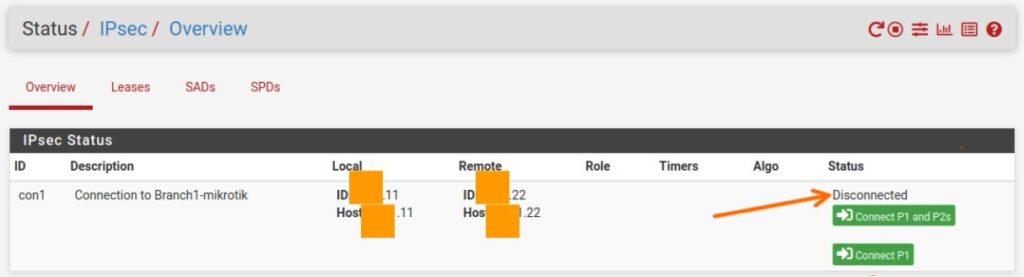
You can check the status of the IPsec tunnel by going into Status-> IPsec
As you can see, we have not configured anything remotely and the tunnel is down at the moment.

Configure the IPsec policy.
We have configured the transport, but in order to allow the traffic through the IPsec transport that we created, we have to configure policies.
We are going to allow the traffic that comes from the remote branch network which is 10.2.2.0/24 network.
Goto -> Firewall-> Rules.
Click on the IPsec tab, and click on Add to add new policy.
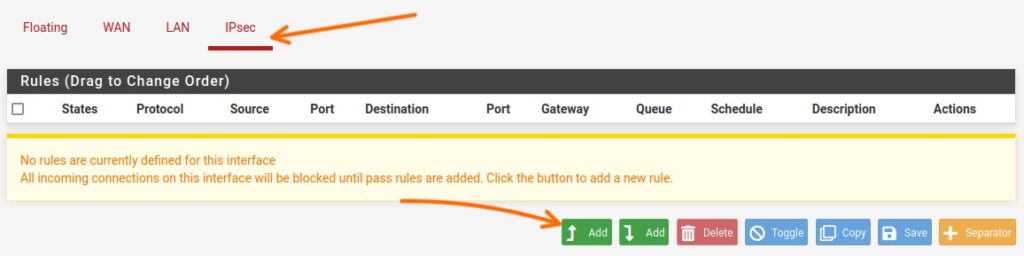

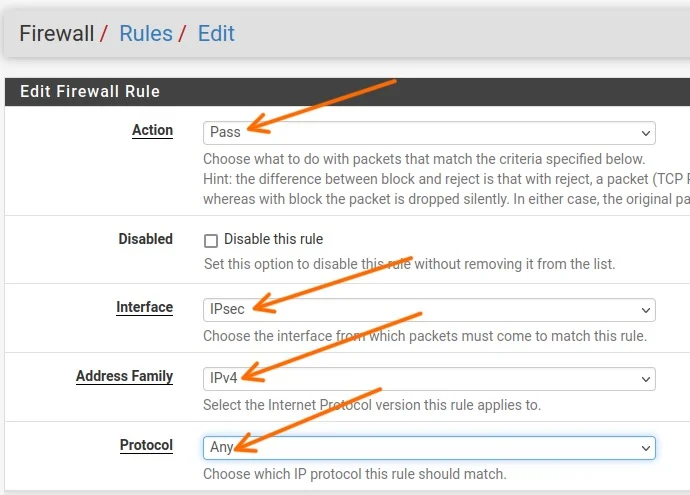
Action: Pass
Protocol: Any – I am not restricting any traffic now, if you would like to specify specific protocol, you can do that here as well.

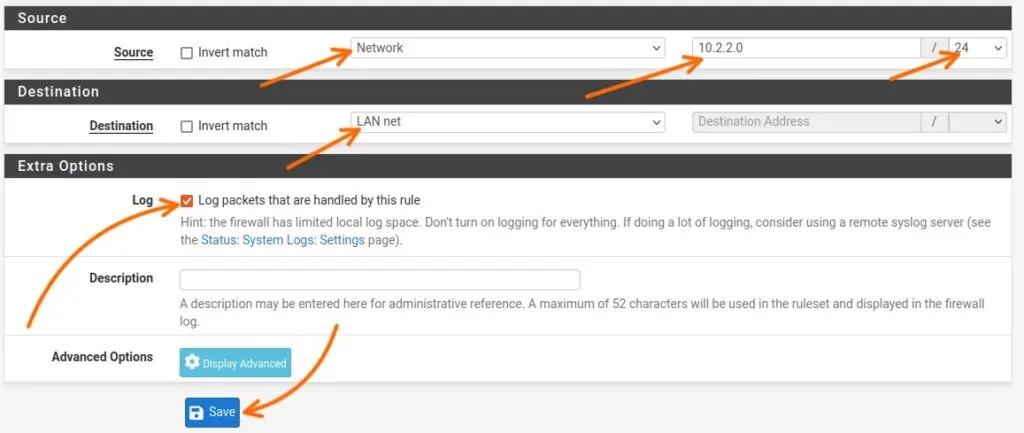
Source: Choose network from the drop down – And mention the MikroTik LAN address – 10.2.2.0/24
Destination: Choose LAN net that will cover the entire pfsense LAN network.
Check the log box and click on Save.

Setup the IPsec tunnel at the MikroTik branch side.
Let’s now proceed with the MikroTik branch side IPsec site to site vpn configuration. So the configuration is almost identical to the pfsense firewall, we will configure phase1 first and then we will proceed with phase2.
MikroTik to Pfsense phase1 configuration.
To configure the phase1 profile, let’s get into the IPsec configuration window.
Goto IP – > IPsec
A new window will now appear.
Click on the profiles tab.
And click on the plus icon to add a new profile.
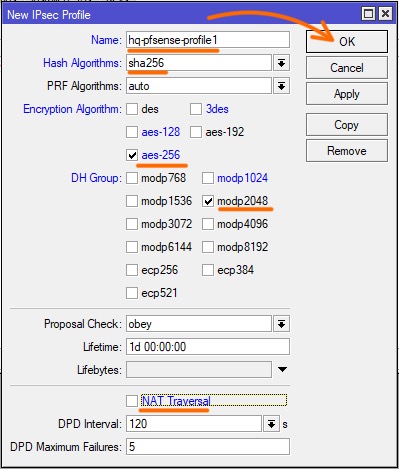
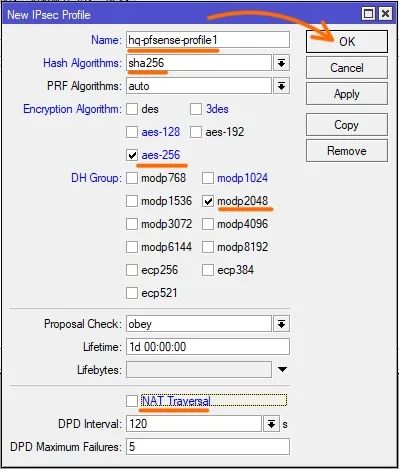
Name: enter meaningful name for the profile.
Hash Algorithms: sha256 – Whatever you select, it has to match on both the ends.
Encryption Algorithm: aes-256
DH Group: modp2048 – which represents dh group 14.
Uncheck the NAT traversal and then click on Ok.
Configure the Peer.
We are now going to define the pfsense as the IPsec peer here.
Click on the peer.
And plus icon to add new peer.
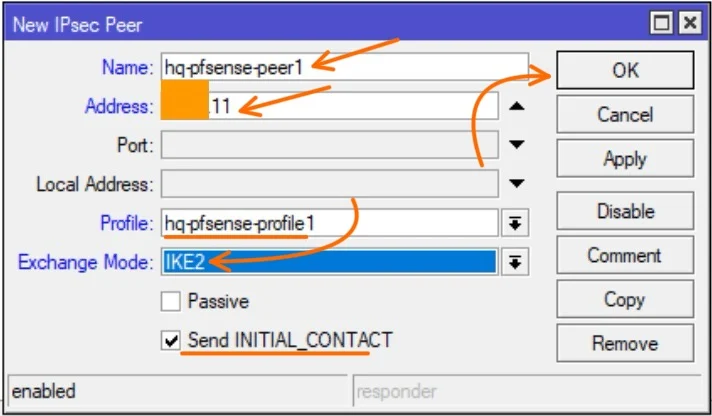
Name: Enter the name of the peer.
Address: enter the public Ip address of the pfsense firewall.
Profile: Choose the profile that you created and then click on Ok.
You can see, Send INITIAL_CONTACT is checked, leave that option checked, which will initiate the connection from the MikroTik side.

Configure the Identity – Pre-shared key.
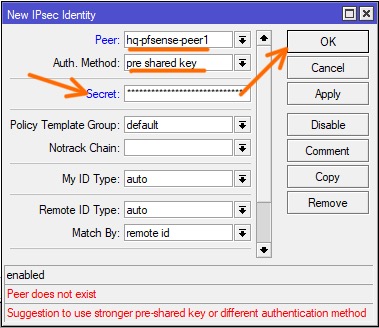
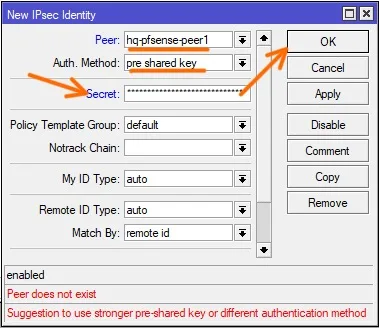
Peer: choose the peer configured.
Auth method: pre shared key.
Secret: As I mentioned earlier, you will have to use the pre-shared key that you generated from the pfsense phase1 configuration. Paste the same key here.
And click on Ok.
MikroTik IPsec Phase2 configuration.
We are done with the phase1 of the configuration, let’s now proceed with the phase2.
IPsec Proposal.
Phase2 configuration starts with the IPsec proposals.
Click on the proposals tab, and click on the plus icon.
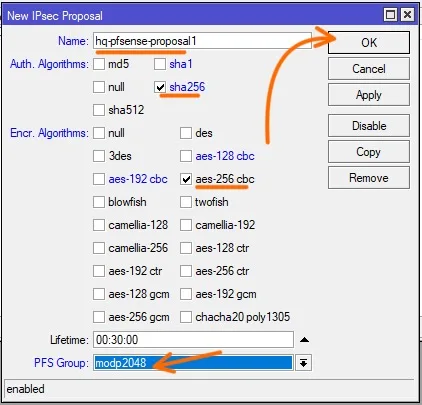
In the new IPsec proposal window.
Name: Enter a meaningful name.
Auth. Algorithms: sha256
Encr.Algorithms: aes256 cbc
PFS Group: modb2048 which is the group 14.
Click on Ok.

Configure the MikroTik Phase2 policies.
Click on the policies tab, and press the plus icon to add new phase2 policies.
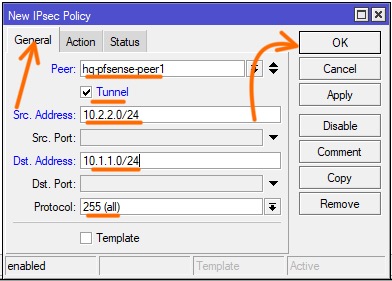
In the new policy window configure as follows.
General:
Peer: choose the pfsense peer that we defined.
Tunnel: Checked.
Src.Address: Enter the MikroTik lan address 10.2.2.0/24
Dst. Address: Enter the pfsense LAN address 10.1.1.0/24, click on the action tab now.

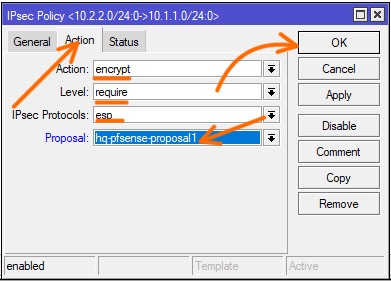
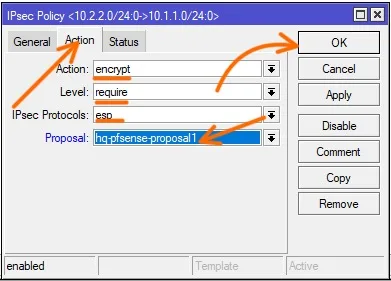
In the action tab, under Action drop down choose encrypt.
Proposal : Select the phase2 proposal that we defined and click on Ok.
MikroTik NAT configuration.
We have completed the whole MikroTik pfsense phase1 and phase2 tunnel configuration. However the traffic will not pass at the moment. Like we configured the security policies in pfsense, we got to do the same thing on the MikroTik side as well.
However, in MikroTik it is not under the firewall filter rules, instead it will be in the NAT rules.
Click on IP-> firewall-> NAT.
Click on the plus icon.
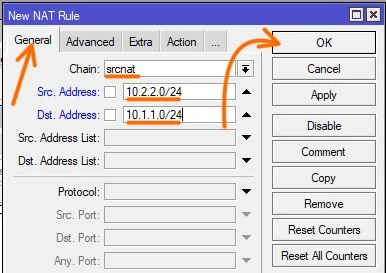
In the new NAT rule window,
General:
Src. Address: 10.2.2.0/24
Dst. Address: 10.1.1.0/24
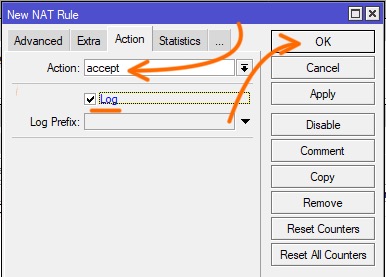
Click on the Action tab
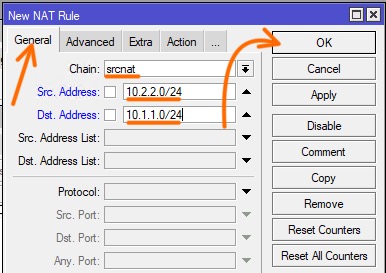
In the action drop down choose accept.
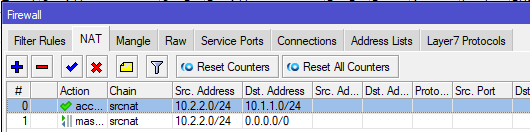
Check the log option and then click on ok.

You will see the newly created NAT policy at the bottom, move the rule all the way to the top.
Verify the IPsec VPN tunnel connectivity between pfsense and MikroTik.
We have set up everything, let’s now check the IPsec status on both the pfsense and MikroTik devices.
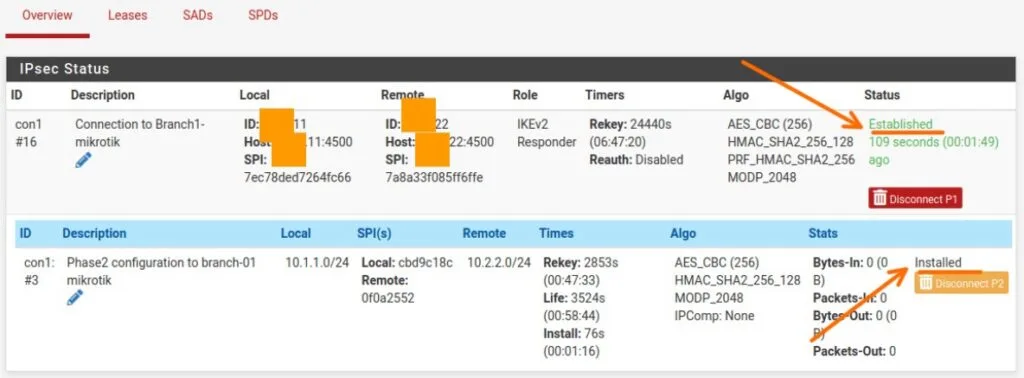
Pfsense IPsec status
To check the pfsense IPsec status goto -> Status-> IPsec
As you can see, both the phase1 and phase2 of the IPsec tunnel is now showing up.

MikroTik IPsec status.
In MikroTik IPsec phase1 and phase2 are in different places.
To see the phase1 of the tunnel , click on Active peers, as you can see the tunnel status shows established.


To see the phase2.
Click on Policies.
You can see the phase2 also now established.


Test connectivity from both the pfsense and mikrotik LAN hosts.
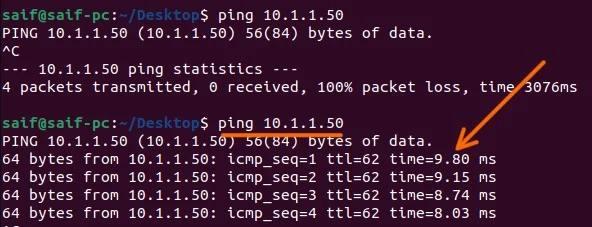
Test the connectivity from the pfSense LAN.
I have logged into the machine at the pfsense LAN side, and I tried to ping the PC at MikroTik side, as you can see the ping was successful.
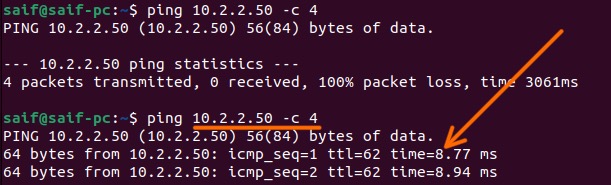

Test the connectivity from the MikroTik LAN side.
The same way I am going to initiate the ping from the MikroTik side, as you can see, the first ping was before we initiated the IPsec tunnel and the second ping afterwards, as you can see we are getting response to the ICMP traffic.

You can see the traffic logs in pfsense, status -> system logs and filter for the source or destination IP.

Alex Jimenez
Wednesday 15th of May 2024
Hello, best regards, I have followed your tutorial to see if I can perform the tunnel, but I have not been successful in it, my problem is that you make the pfsense connection to mikrotik, I don't know if it is the same result when doing it the other way around mikrotik to pfsense, my mikrotik is the one with the public ip and the pfsense located in another network has a private ip in the WAN going out to the internet through the NAT Provided by the ISP, the Mikrotik is just a VPN server with no machine connected
Saifudheen Sidheeq
Wednesday 15th of May 2024
In the phase1 configuration of both the devices, ensure to enable nat traversal, and try.Also, if you got access to ISP router, put the pfsense router as the DMZ host, so all the traffic destined to the ISP public IP will forward to the pfsense firewall, provided you have policy restriction on the pfsense WAN.