


We have set up IPsec in one of our previous articles, and some readers reached out to me and said, yes the tunnel came up and I can initiate communication towards the other side, but what if I have multiple subnets how do I enable the communication to both sides?
So, in this blog article we are going to setup an IPsec vpn tunnel between two pfsense firewalls, and in the headquarters pfsense firewall has 2 subnets and the branch network also has 3.
So after we build the tunnel both sides will be able to talk to each on multiple subnets without any issue.
Below is the topology that we are going to build.

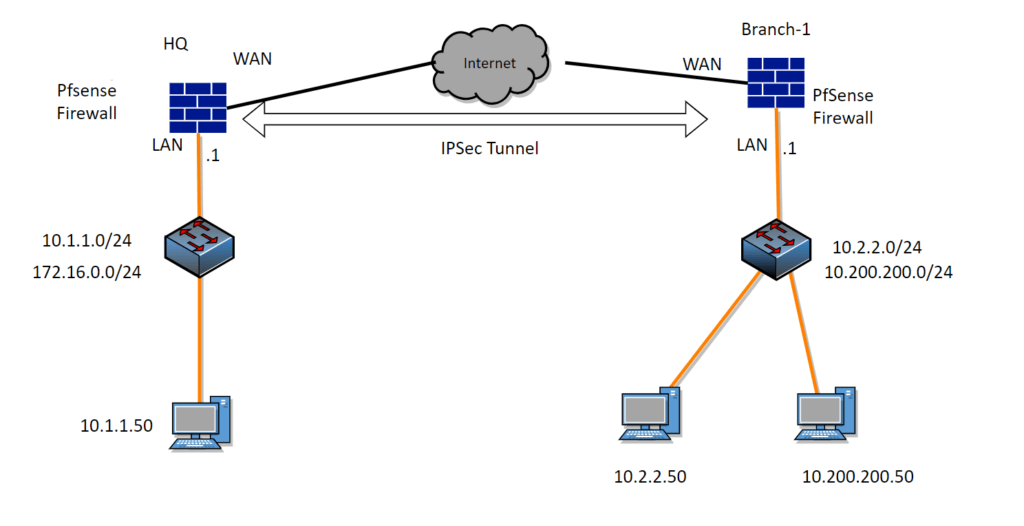
We have headquarters with pfsense that has the subnet of 10.1.1.0/24,and172.1.0.0/16. And the remote branch has the subnet of 10.2.2.0/2 and 10.200.200.0/24.
At the moment, all the devices on both sides can go out to the internet. However both sides cannot talk to each other.
After we will set up an IPsec tunnel, we should be able to initiate communication with each side’s local networks
For testing, in each subnet, I have a host machine with the last octet of 50, for example for the subnet 10.1.1.0/24 I have a host with the ip 10.1.1.50, and we would be testing from those hosts.
Setup IPsec phase1 on the pfsense on Headquarter.
We are going to start he pfsense IPsec configuration with phase1 and in phase2 we will start adding the multiple subnets.
Login to pfsense VPN-> IPsec
Click on Add P1 to add Ipsec phase1 parameters.


You will be taken to the Ipsec configuration wizard in Pfsense.
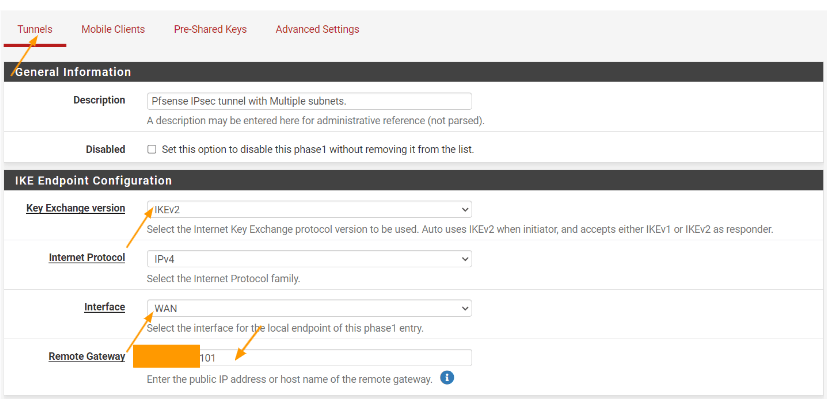
Under Tunnels, fill in the following fields.
General information:
Description: Pfsense IPsec tunnel with multiple subnets.
IKE Endpoint configuration:
Key Exchange version: IKEv2
Interface: WAN
Remote Gateway: Enter the public IP address of the remote gateway.

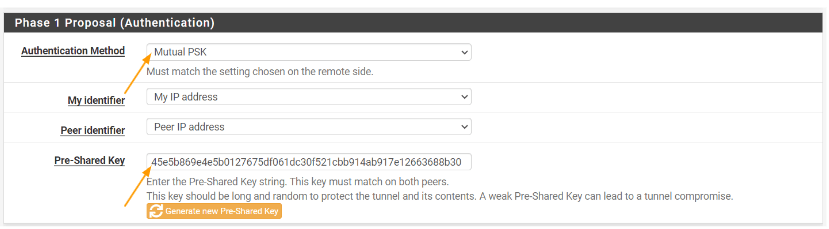
Phase1 proposal – pre-shared key.
Authentication method: Choose Mutual PSK.
Pre-Shared key: I have generated pre-shared key within pfsense, copy the pre-shared key and keep it in a secure location, as we would require this to be copied on the remote branches.

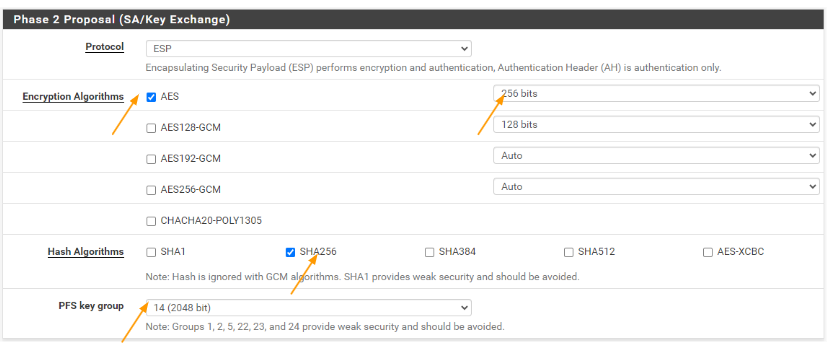
Phase1 proposal (Encryption Algorithm)
Encryption Algorithm:
Algorithm: AES
Key Lenghth: 256bits
Hash: SHA256
DH Group: 14(2048bit)


Leave everything else default and click on Save
Add Pfsense Ipsec multiple subnets.
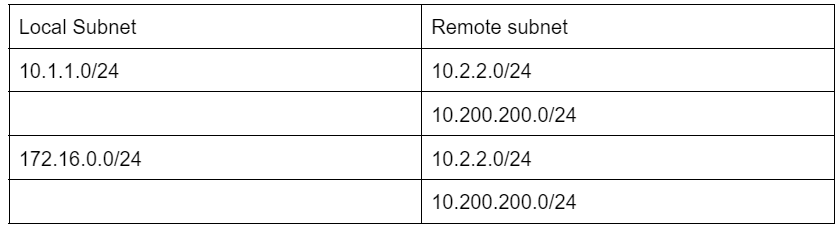
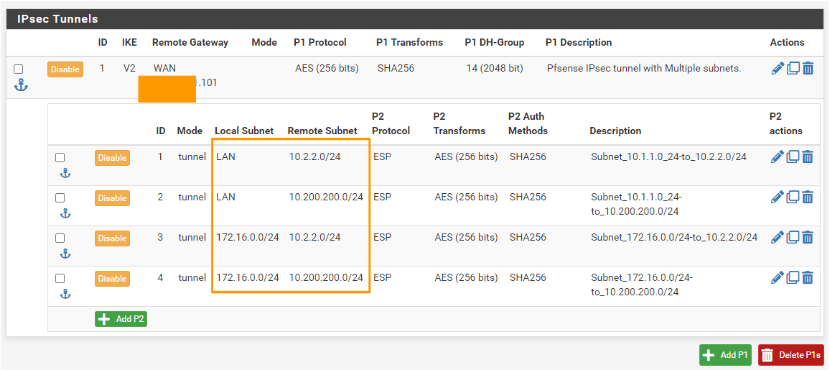
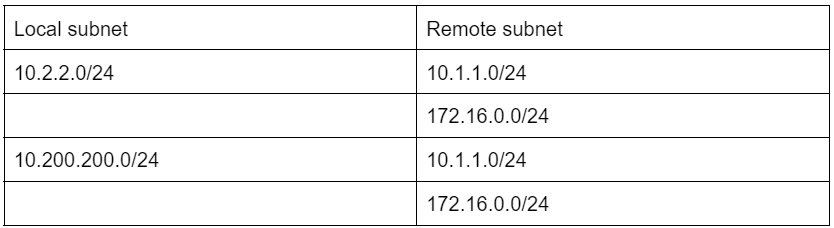
In our scenario, we are going to add 2 local subnets to be able to talk to 2 remote subnets, so we would end up creating 4 phase2 parameters. Lets create a table with local and remote subnets and start configuration from there.

Add the first subnet in phase2.
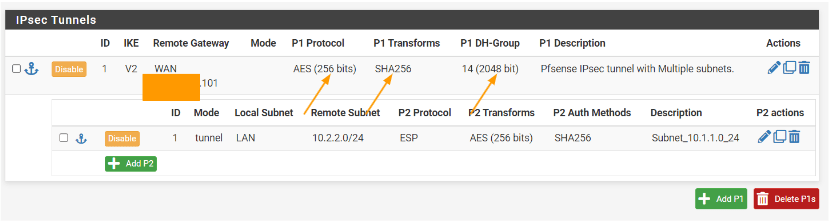
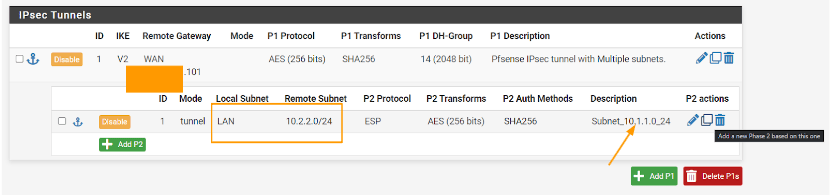
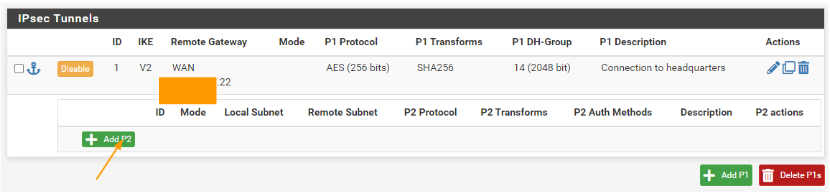
At the moment, you will now see the pfsense IPsec phase1 parameters defined, just below that, you could find Show phase2 entries, just click on that.
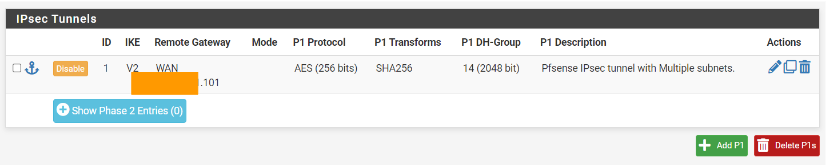
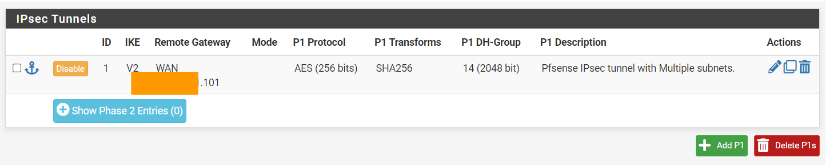
Click on Add P2 to add phase2 parameters.
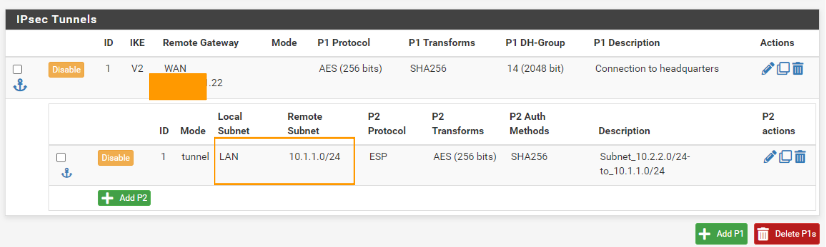
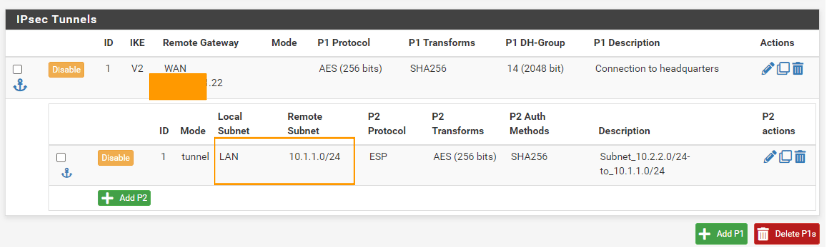
We are going to add the first subnet 10.1.1.0/24 and then we will add the rest of the subnets.
So our first requirement is that 10.1.1.0/24 should be able to talk to both 10.2.2.0/24 and secondly to 10.200.200.0/24 remote subnets.
Which means we need to add two phase2 parameters for the local subnet 10.1.1.0/24.
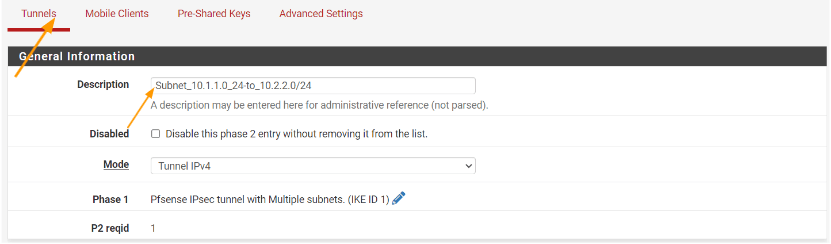
In the tunnel tab, configure the following parameters.
General Information.
Description: Add the name of the first local subnet for eg: Subnet_10.1.1.0_24

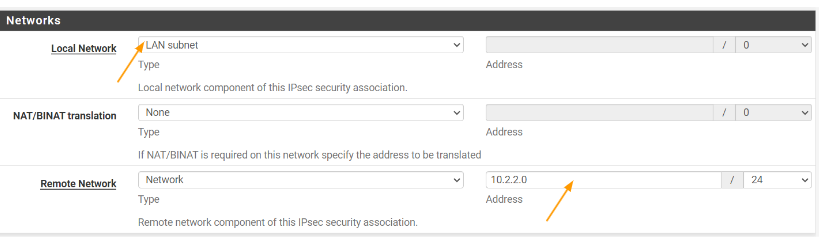
Network:
Local Network: Choose LAN Subnet, because 10.1.1.0/24 configured on the LAN interface with the IP 10.1.1.1/24.
Remote network: 10.2.2.0/24.

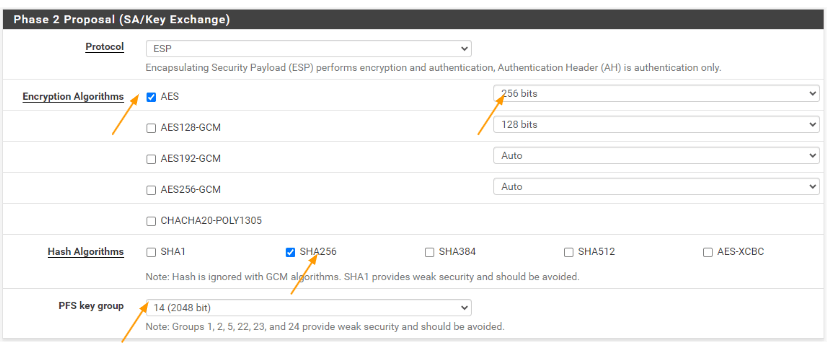
Phase2 Proposal
Protocol: ESP
Encryption Algorithm: AES 256
Hash Algorithm: SHA256
PFS Key group: 14
Leave everything else default and then click on save and apply changes.
You can now see, only the first subnet has been added that can talk to the remote subnet 10.2.2.0/24 lets go ahead and add the second remote subnet.

Add the second remote subnet.
We added the first local and remote subnet, next we want the local subnet 10.1.1.0/24 be able to talk to the 10.200.200.0/24 network.
Clone the Phase2 parameters.
On the same Ipsec screen, click on the copy icon to clone from the existing ipsec phase2 configuration, this will copy the entire phase2 configuration.

You will see the same configuration screen as before.
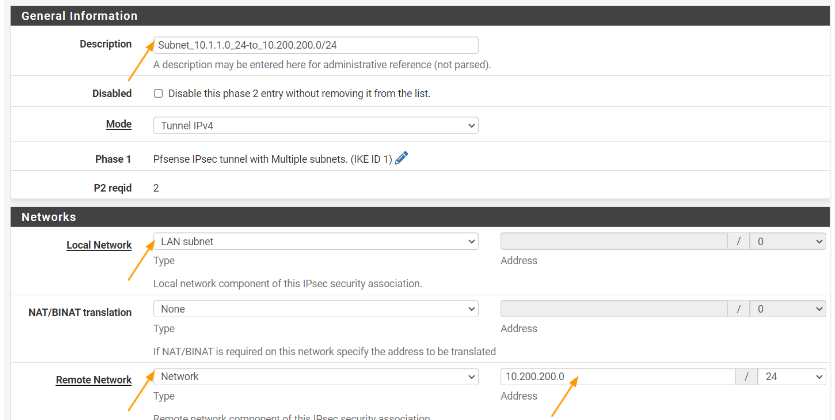
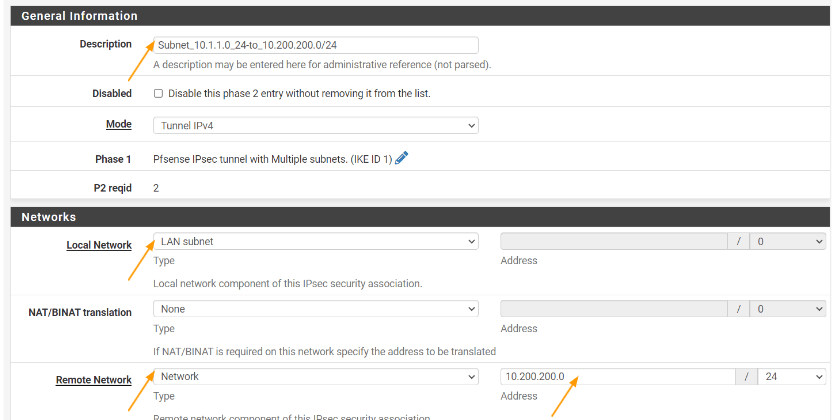
Description: Change to some meaningful description for eg: Subnet 10.1.1.0_24-to_10.200.200.0/24
Networks:
Local Network: Leave the same lan subnet, because this time we want the 10.1.1.0/24 to be able to talk to the 10.200.200.0/24 network.
Remote network:
Type: Network.
Address: 10.200.200.0/24
Leave everything else default and click on Save.
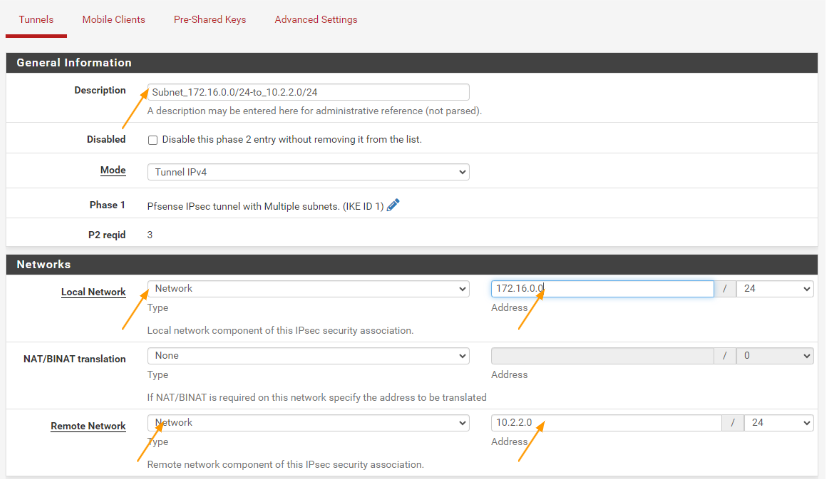
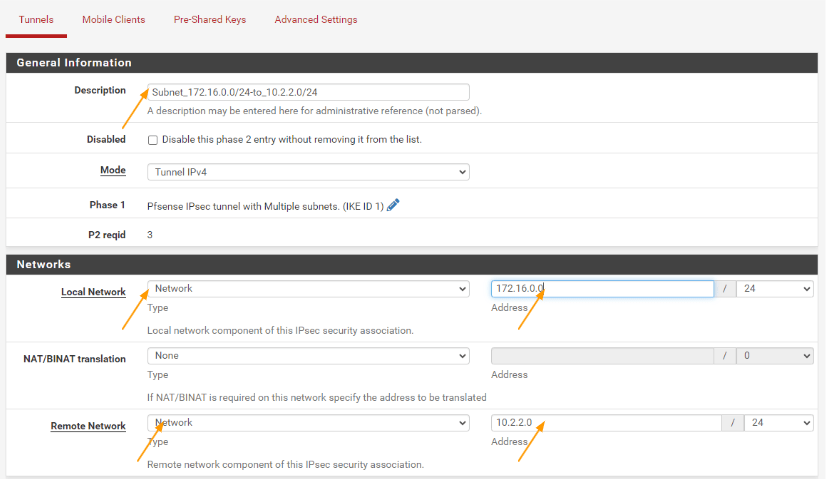
Add the second Local subnet to phase2.
We have completed the primary LAN 10.1.1.0/24 to be able to talk to both the remote subnets(10.2.2.0/24 and 10.200.200.0/24).
Lets now focus on the second LAN network which is 172.16.0.0/24
Click on the clone again by clicking on the copy icon in phase2 of the first subnet.

Tunnel
General information: Change the description according to the phase2 of the tunnel.
Networks:
Local network: This time change it to Network and Address: 172.16.0.0/24
Remote network: Leave the default which is 10.2.2.0/24
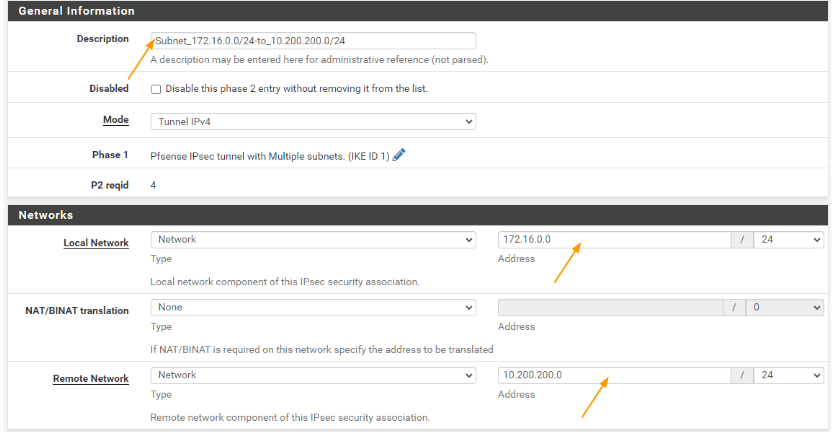
Clone the second phase2 parameters as well.
This time change the description of the tunnel.
Local network to the second local network.
Remote network : leave the default to 10.200.200.0/24

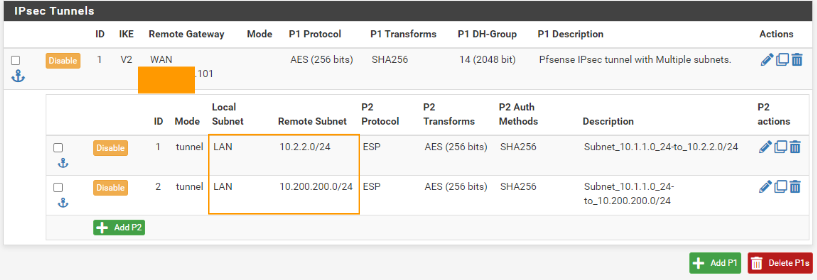
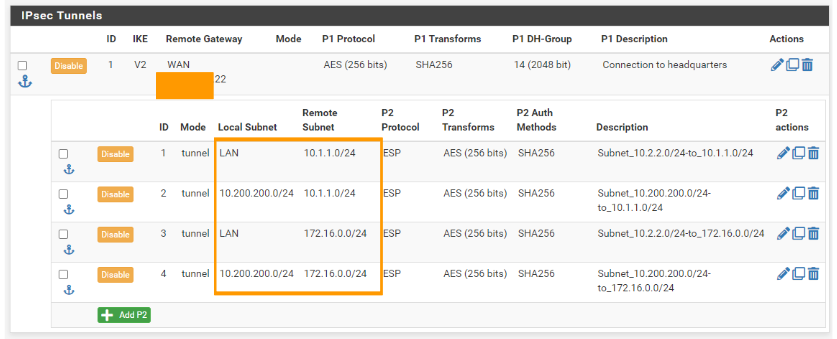
As you can see, we have completed the local branch configuration, and we have a total of 4 phase2 tunnel that consist of multiple subnets as planned.

Configure the headquarter Security policy.
We defined the phase2 parameters that can talk to the remote sites, however when the remote sites try to talk to the local site, the pfsense firewall will block the connection so we required to allow the connection that are coming from both 10.2.2.0/24 and 10.200.200.0/24 networks.
When you define the security policy you need to add multiple subnets into the same policy, for that we have to create something called alias which is nothing but address group.
Add the subnet Address alias.
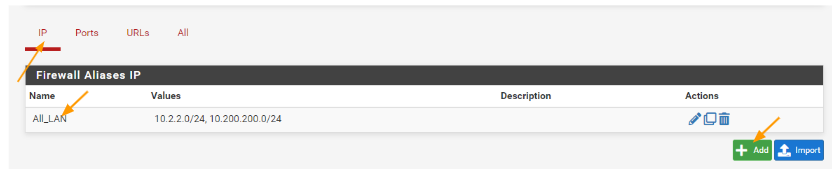
Click on Firewall-> Alias
You can already see, I have an alias called ALL_LAN, where I have captured all the LAN networks that I have.
Click on Add to alias.


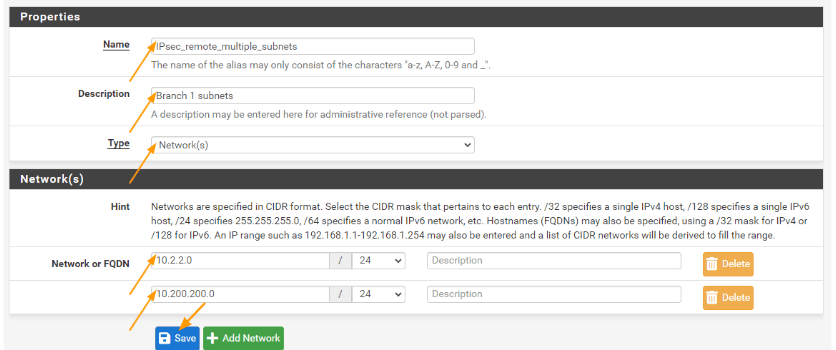
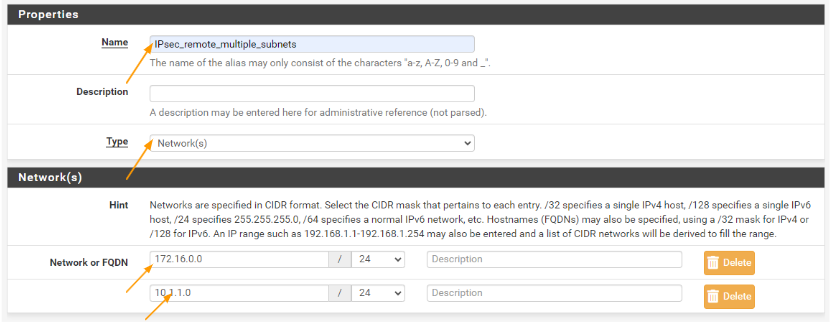
Name: IPsec remote multiple subnet.
Description: Branch1 subnets
Type: Networks.
Networks:
Network or FQDN: add 10.2.2.0/24 and 10.200.200.0/24 network and click on Save.

Configure the policies.
Goto firewall-> Rules.
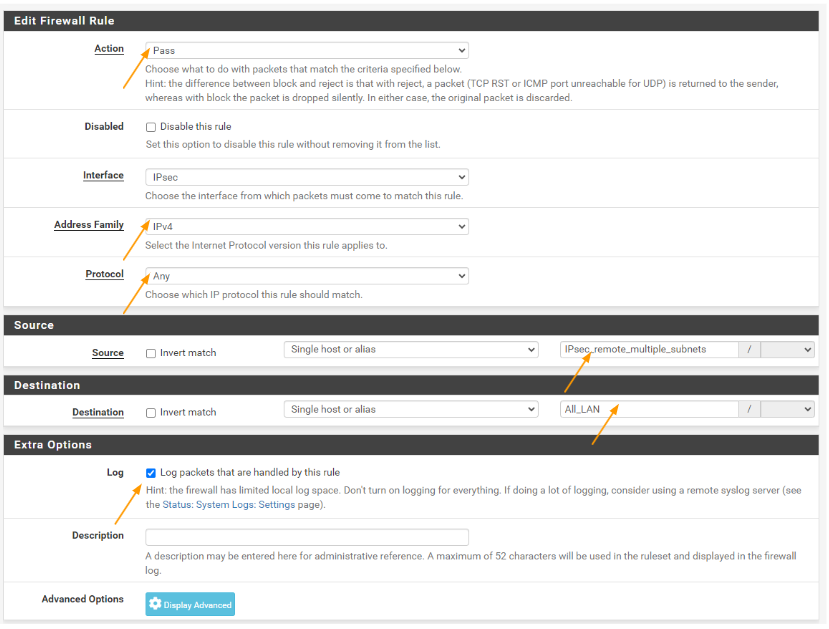
Click on Ipsec tab-> Add rules.
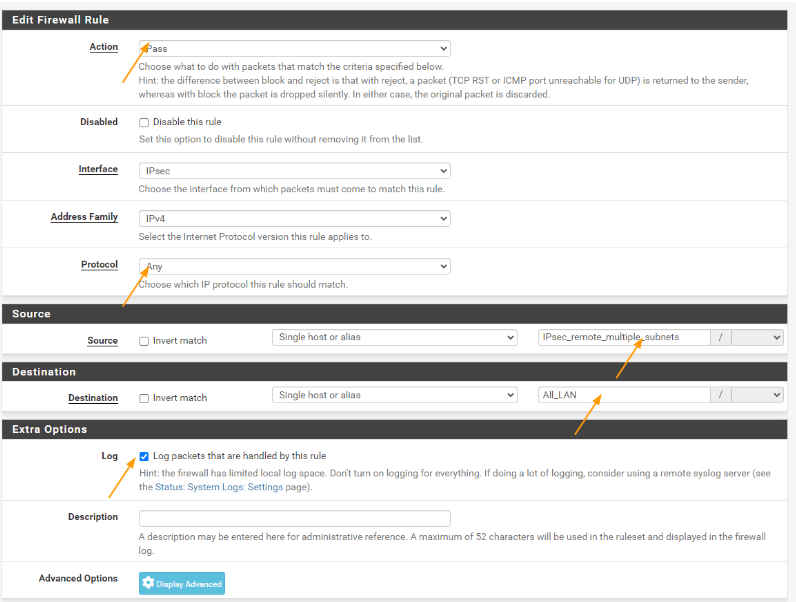
Action: Pass
Protocol: Any
Source: Choose a single host or alias from the drop down and choose the remote alias we just created.
Destination: Single host or alias, choose the All_LAN alias that we had defined earlier.
Log: Check the log packets that are handled by the rule and click con Save and apply the changes.

Lets move on to the branch site configuration.
Configure the Ipsec on the remote branch.
We have just completed phase1 of the ipsec configuration, added multiple subnet using the phase2 configuration, we finished the configuration by allowing the remote subnet with the security policy in the headquarters pfsense firewall. Let’s now move on to the branch1 site.
Configure the remote site ipsec phase 1 in pfsense.
Login to the pfsense firewall, and goto VPN-> IPsec
Add P1.
In the phase1 of the configuration.
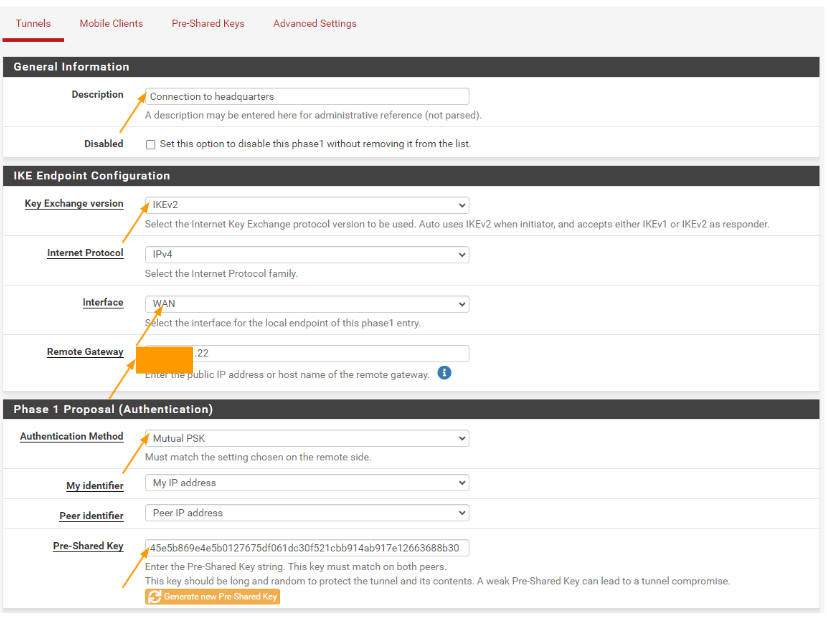
General information.
Description: Connection to headquarters.
IKE Endpoint Configuration:
Key exchange version: IKEv2
Interface: WAN
Remote Gateway: enter the public IP address of the headquarters firewall.
Phase1 proposal(Authentication)
Authentication method: mutual psk.
Pre-shared key: paste the key that we saved from the headquarters firewall.

Phase1 proposal (Encryption Algorithm);
This should be the same as the headquarters firewall.
Encryption Algorithm
Algorithm: AES
Key length: 256bits
Hash: SHa256


DH Group: 14
Leave everything else default and click on Save.


You will see that phase1 of the IPsec configuration is now complete.
Add Phase2 configuration for multiple subnets.
Like before we have to create 4 phase2 parameters as well.

Click on Add P2 to add the phase2 parameters.

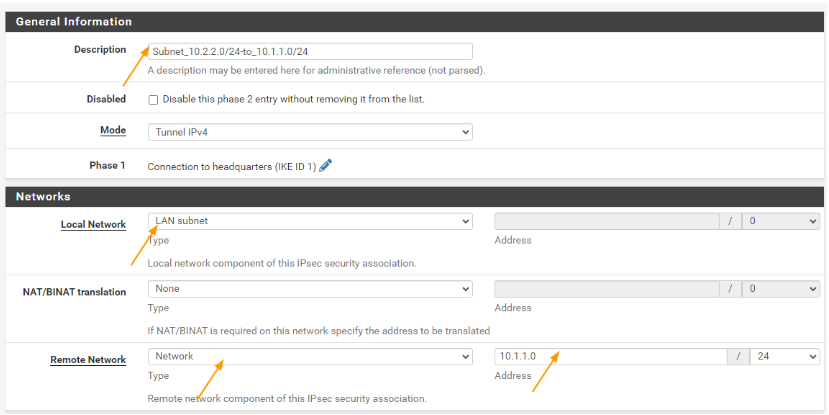
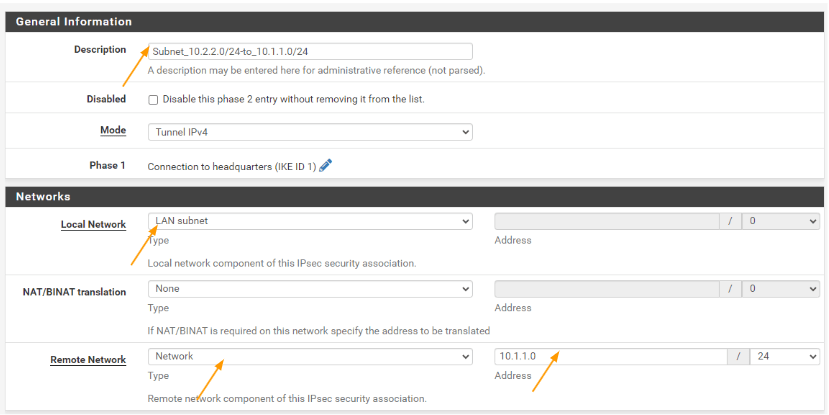
General information:
Description: Enter a meaningful name.
Networks:
Local network: LAN subnet.
Remote network: Type: network.
Address: 10.1.1.0/24
Encryption algorithm: Choose the same as the previous tunnel.
Aes 256
Hash Algorithm: SHA256
PFS key group: 14
Click on Save.
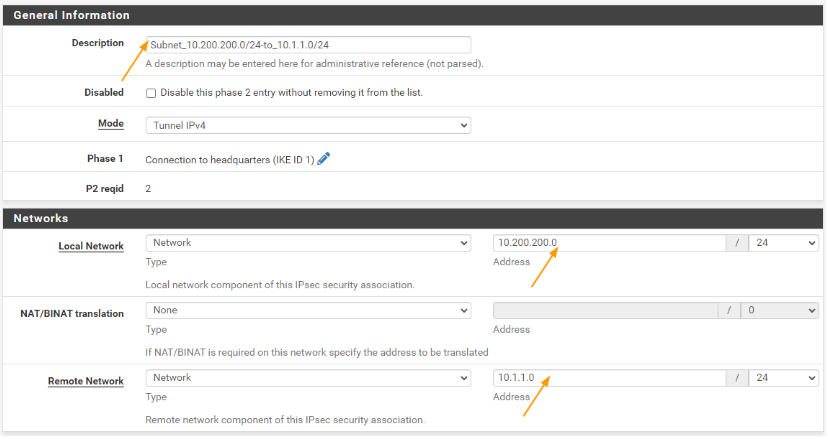
Add the secondary subnet in phase2.
You can now see the phase2 of the tunnel now added underneath phase1, click on the copy button next to the phase2 configuration to add the second subnet to enable the communication.
When you click on the copy icon, it will create the exact clone of the previous policy. Change according to the new subnet.
General information:
Description: Enter the description.
Local network: Change the local network, to Network and the subnet address to 10.200.200.0/24
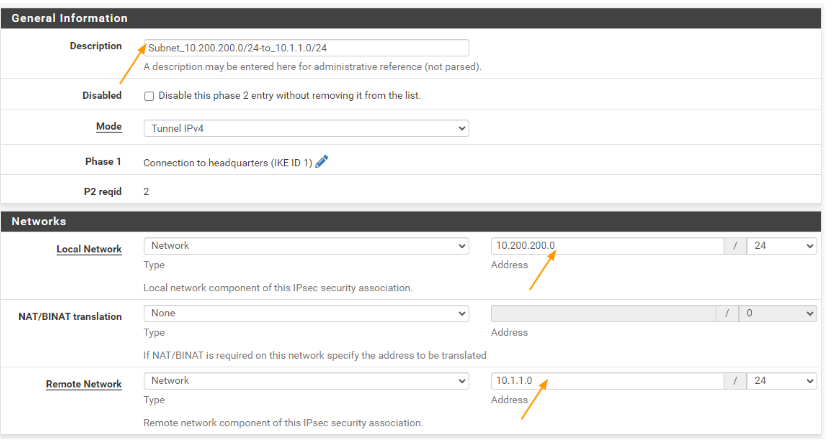
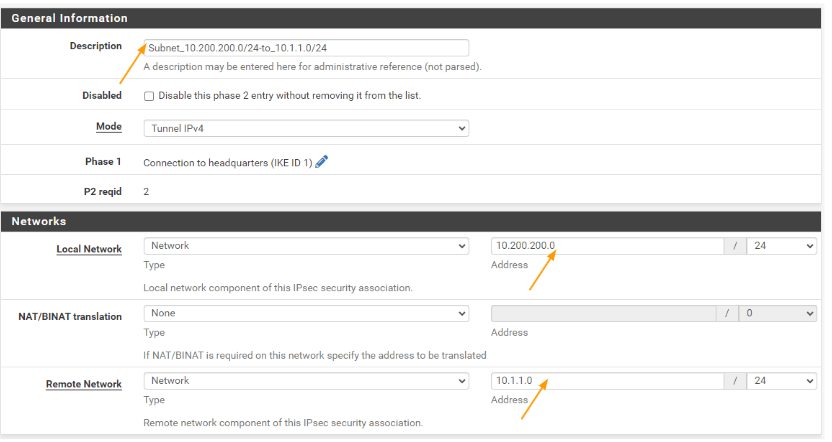
Remote network: this one will remain the same.
Leave everything else default and scroll down and click on save.

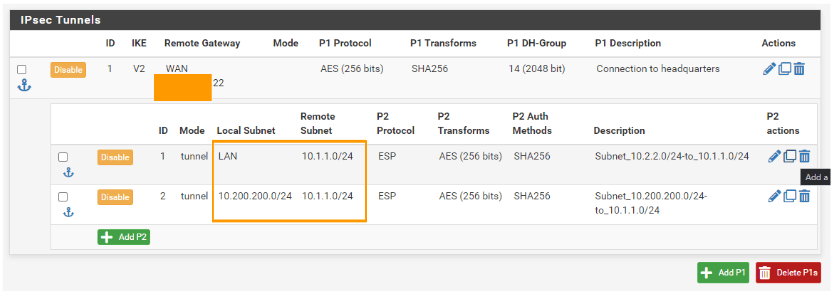
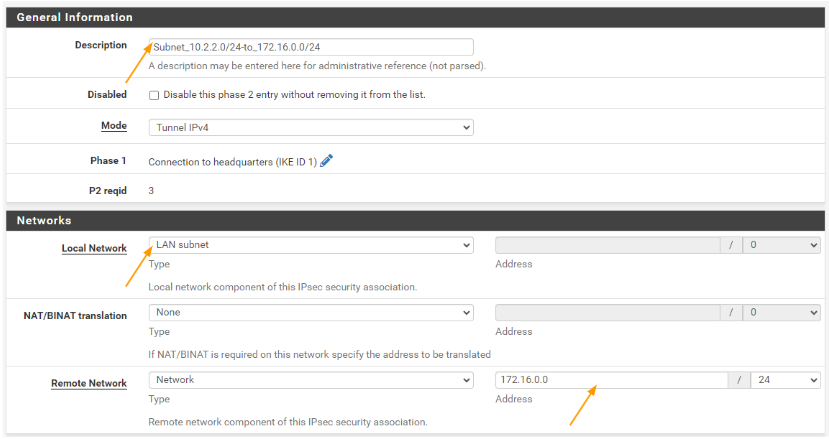
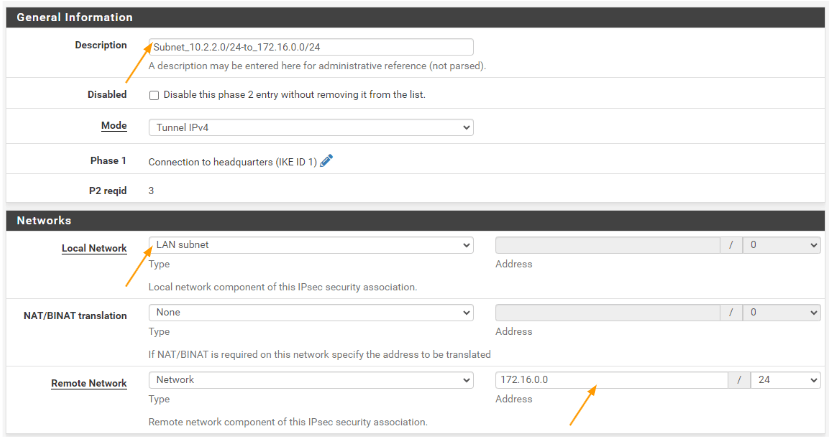
You can see the new subnets are added under phase2, let add the phase2 parameters from 172.16.0.0/24 to 10.2.2.0/24 and 10.200.200.0/24.
In the first policy click on the copy icon.

General information:
Description; change the description according to the new subnet.
Networks:
Local network: leave it default as the previous policy.
Remote network: choose network and address 172.16.0.0/24
Leave everything default and click on save.
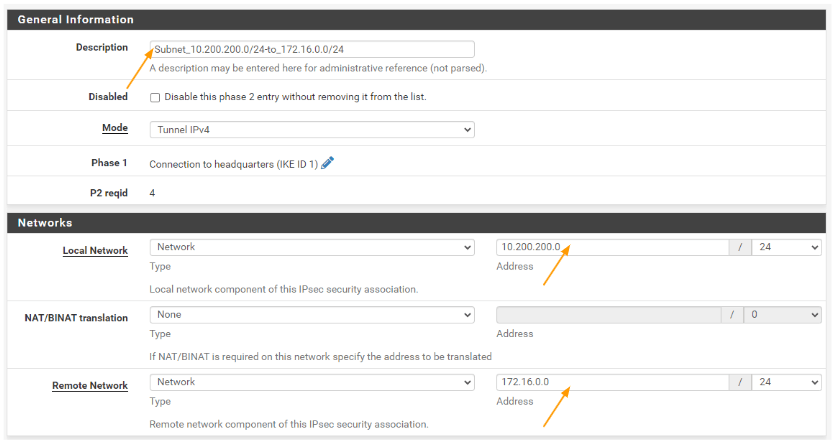
You will see the 3rd phase2 parameters are now added. Lets now add the final one which is to allow the communication between 172.16.0.0/24 to 10.200.200.0/24
Click copy on the second phase2 parameters, this will create the clone of the second policy with the same parameters.

General information:
Description: change the description according to the new subnet.
Local network: Leave the local network to the same.
Remote network: change the remote network from 10.1.1.0/24 to 172.16.0.0/24
Scroll down and click on Save.

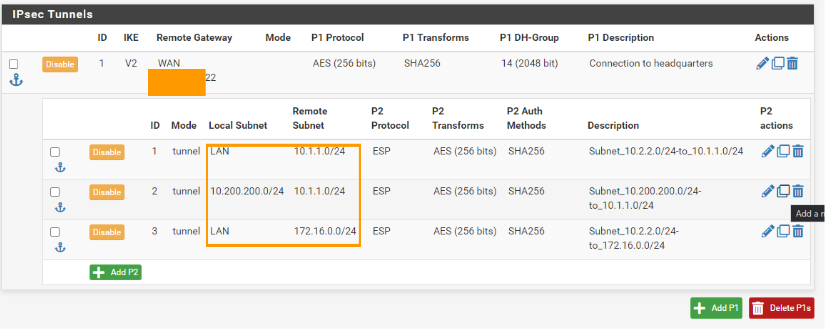
You can now see the IPsec phase2 configuration with multiple subnets.

Configure the security policy.
We enabled the tunnel, however when the traffic coming from the remote side by default will be blocked by the firewall, we need to allow the traffic using the security policy.
As we have to allow multiple subnets in the policy, like we did before, we are going to add an alias.
Add subnet alias.
Click on Firewall-> Alias
You already can see the LAN alias, which consists of both my LAN networks. Click on Add to add new Alias.

Properties:
Name: Enter the name of the IPsec phase2 tunnel.
Type: Choose networks.
Networks:
Add the remote networks as the network.
172.16.0.0/24 and 10.1.1.0/24 click on save.

Configure the policy.
We added the alias for the policy, lets now go ahead and add the policy that would enable the communication from the headquarters to the branch network.
Goto firewall -> rule.
Choose IPsec tab from the top
Click on Add to add new rule.


In the action choose pass.
Address family: IPv4 as we dont run Ipv6 in our network.
Protocol: Any
Source: single host or alias, in this choose the alias that we defined.
Destination: same way choose the single host or alias and choose the alias that we defined, check the option that says Log packets that are handled by this rule and click on save.

Check the IPsec status
We have set up the IPsec on pfsense with multiple subnets in the phase2, and we also configured the policy to allow the traffic from each other. Let’s now verify the IPsec tunnel status on each device and we would also test the traffic from each remote linux machines.
To test the pfsense Ipsec tunnel status, you could go to status-> Ipsec
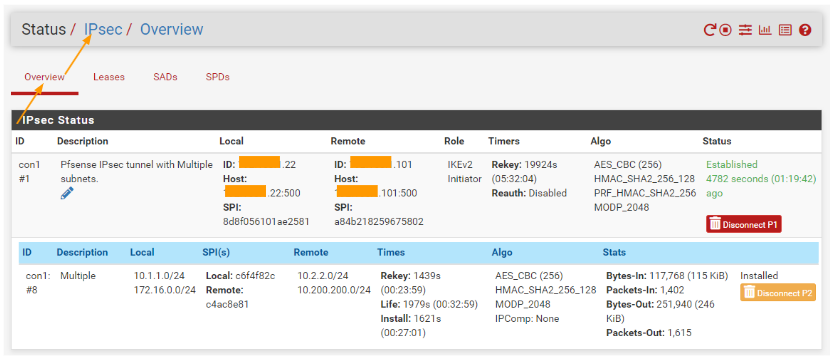
Here you will be able to see the status of both Ipsec phase1 and phase2 tunnels. As you can see both the tunnels are established states, and if you look closely, you will see multiple subnets with both local having 2 subnets and so does the remote.
Headquarters ipsec status
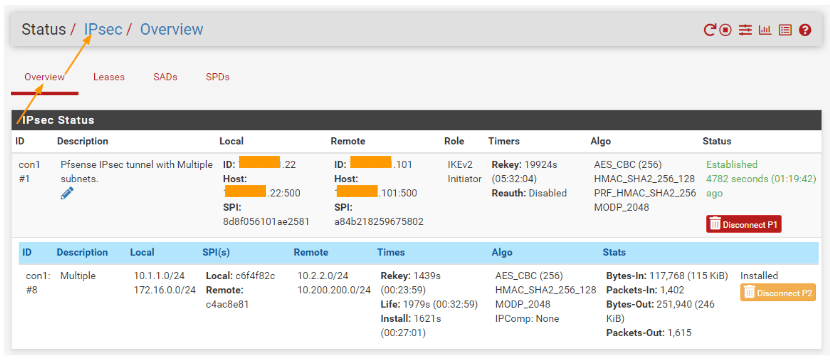
Branch IPsec status.


Test the connectivity front the headquarters to the remote branch
We know that the ipsec connectivity looks good, let’s now connect to the machine that is connected to the headquarters LAN side and see if you are able to communicate with the remote branch.
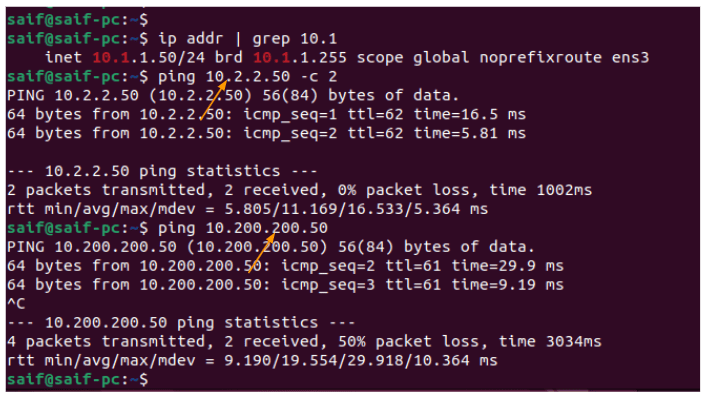
I have logged into the first PC which has the IP address 10.1.1.50, and when I tried to ping both the remote PCs (10.2.2.50,10.200.200.50) we are getting response,

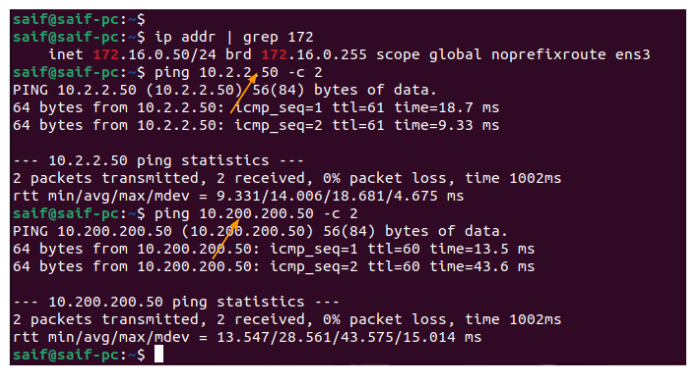
I also logged into the second PC (172.16.0.50 ) in the headquarters and I tried to ping 10.2.2.50 and 10.200.200.50 and I was getting responses to that as well.
which indicates the connection from the headquarters to the branch network is working as expected..

Test the connectivity from the branch site.
Similarly you could login to a device in the branch side, as you can see I have logged into 10.2.2.50 PC, and I was able to ping the headquarters IPs 10.1.1.50 and 172.16.0.50 and the communication was successful
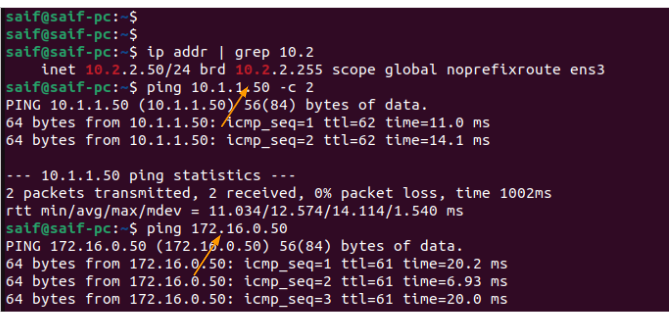
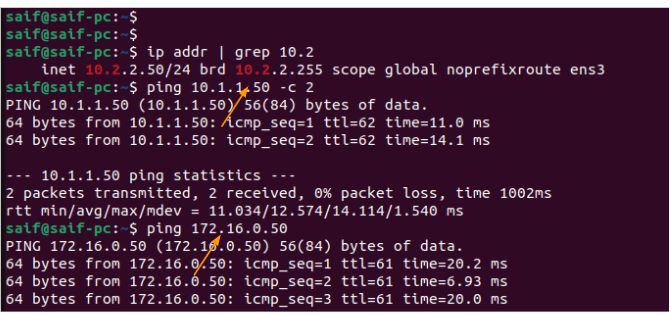
Tried the same thing on the second PC in the branch site, and the communication to 10.1.1.50 and 172.16.0.50 was successful as well.

Bahman
Monday 4th of December 2023
Thanks Man ! you hit my problem & Solved it ! God Bless You !