
We have setup MikroTik in different environments, its time for us to build IPsec tunnel between two sites where we have MikroTik routers.
What is the IPsec tunnel in MikroTik ?
An IPsec tunnel in MikroTik refers to a secure communication channel established between two remote sites or networks using the IPsec (Internet Protocol Security) protocol. With the increasing affordability of internet connectivity, more organisations are utilising the internet to connect their branch offices securely. MikroTik routers provide built-in support for IPsec configuration, making it easy to set up site-to-site VPNs.
IPsec ensures the confidentiality, integrity, and authenticity of data transmitted over the internet by encrypting and authenticating IP packets. By utilising IPsec tunnels, organisations can establish secure connections between their branch sites, enabling them to securely transfer sensitive data and communicate seamlessly.
MikroTik routers offer a user-friendly interface to configure IPsec tunnels, allowing administrators to define IPsec policies, select encryption algorithms, and set up key exchange protocols. The routers authenticate each other using pre-shared keys or digital certificates, establishing a trusted connection. Once the IPsec tunnel is established, all traffic between the sites is encrypted, preventing unauthorised access and ensuring secure communication.
Setting up an IPsec tunnel on MikroTik routers is a cost-effective solution for connecting branch offices securely over the internet. With its built-in IPsec support, MikroTik simplifies the configuration process, making it accessible even to users with limited networking expertise.
Prerequisites:
Before you proceed, you need to have two mikrotik routers both of them are connected with the internet.
Below is the topology that we are going to build.
As you can see, I have two locations: the headquarters and a branch site that we’re planning to deploy.
The headquarters (HQ) has a local network with the IP range of 10.1.1.0/24, while the branch site has the IP range of 10.2.2.0/24.
Currently, both locations have internet connectivity, but they are unable to communicate with each other. Let’s verify this situation.

If you prefer to watch video with the step by step guide, here is the video for the same.
Test the connectivity between MikroTik sites.
Before we proceed with the configuration, let’s first test the connectivity from the site to the remote branch and the internet.
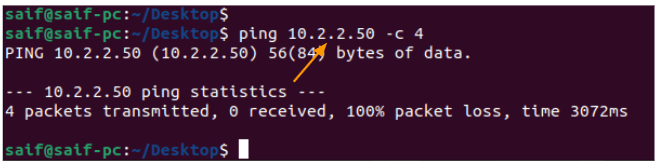
I’ve logged into the HQ machine and I’m currently checking if I can access the internet. It appears that the internet connection is functioning smoothly, as you can see.


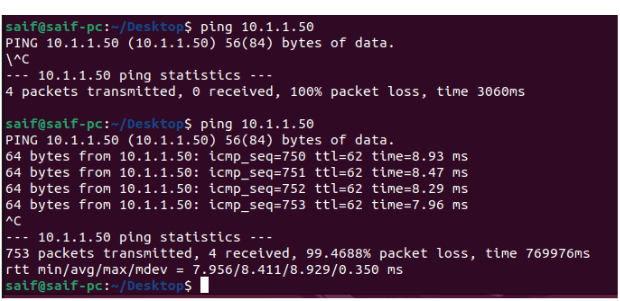
Let me now ping the remote PC with the address 10.2.2.50. As you can see, the ping has failed. However, once we establish the Ipsec site-to-site tunnel between these two locations, you will be able to communicate with each other.
And that’s out end goal.

Step by Step guide to configure IPsec site to site VPN between two MikroTik routers.
Let’s begin by configuring IPsec in the MikroTik router at the headquarters before moving on to the next steps.
Configure Headquarters.
To get started, log in to the Winbox utility and access the HQ router. Once you’re logged in, click on IP -> IPsec.
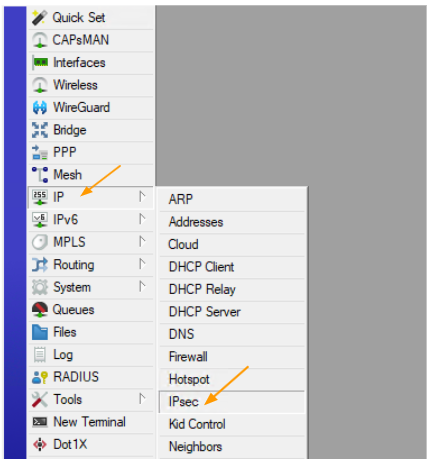

A new window will open, where we will configure the IPsec settings.
When it comes to IPsec, it consists of two phases: phase 1 and phase 2. Let’s begin by configuring phase 1, and then we can move on to phase 2.
MikroTik Phase1 configuration.
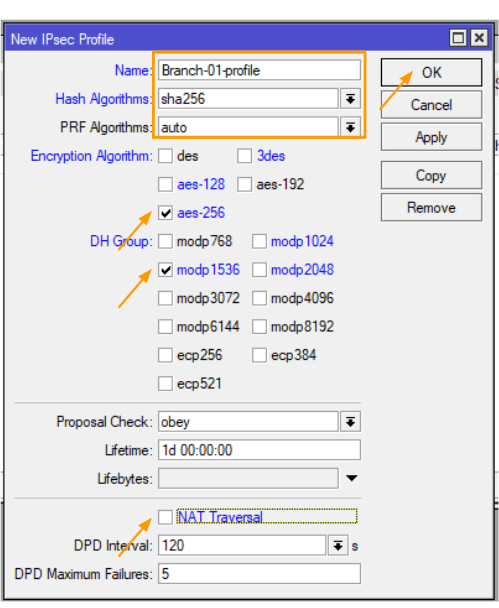
Configure IPsec profile.
Setting up the IPsec profile is the first step in the configuration process.
In the IPsec profile tab, click on the plus icon to create a new profile.
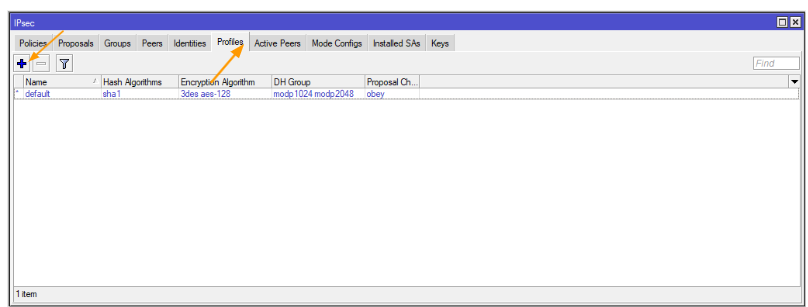

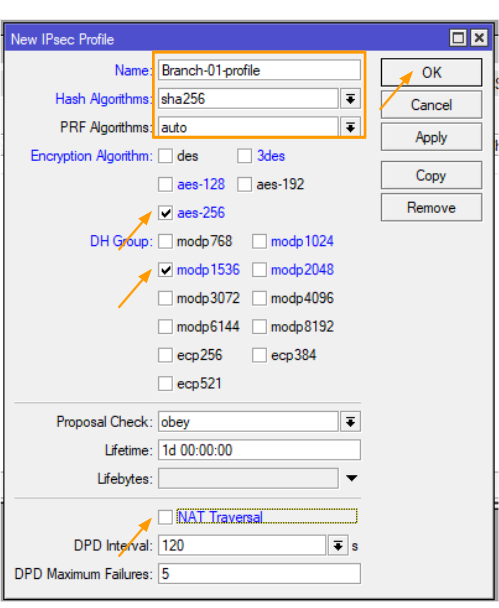
A new window now pop up, where you need to define the profile parameters.
A new window will appear, where you can define the profile parameters.
Fill in the following details:
- Name: Give a name to the profile, such as “Branch-01-profile”.
- Hash Algorithm: Set it to “sha256”.
- Encryption Algorithm: Choose “aes-256”.
- DH Group: Select “modp 1536”.
- NAT Traversal: I am unchecking this option since this MikroTik device is not behind any NAT device. It has direct access to the public internet, and the public IP is configured on the WAN interface.
Once you have entered all the necessary information, click “Ok” to proceed.
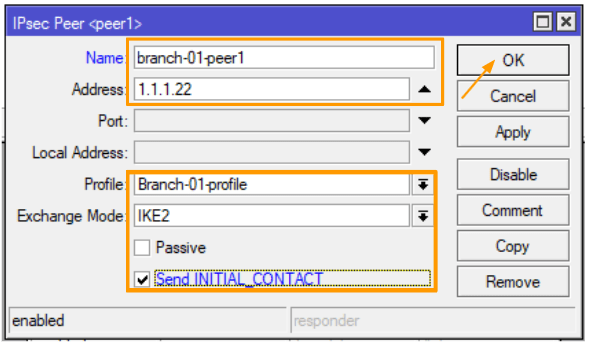
Configure the Peer information.
You can now navigate to the “Peers” tab and click on the plus icon to add a new peer.
Name: Provide a descriptive name for the peer, which will help identify the associated site for this tunnel. For example, you can use “branch-01-peer” as the name.
Address: Enter the public IP address of the remote peer, which corresponds to the public IP address of branch1.
Profile: Select the phase 1 profile that we have recently defined.
Exchange mode: Set the exchange mode to IKE2, which refers to ISAKMP version 2. It is important to ensure that both ends have the same exchange mode.
Make sure that the “Passive” option is unchecked, and enable the “Send Initial_contact” option.
Note: Enabling the “Passive” option means that this particular site will not initiate the IPSec connectivity. Depending on your requirements, you can choose the appropriate configuration.
Click on the “Ok” button to save the changes.

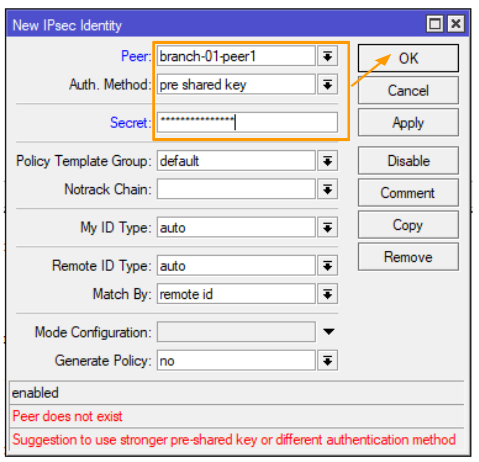
Configure the Pre-shared key.
We’ve already defined our peers. For these peers to authenticate effectively, it’s necessary to set a pre-shared key that’s identical at both ends.
So, go ahead and specify the pre-shared key, and don’t forget to note it down.
Now, navigate to the ‘Identities’ tab, and click on the plus icon to add a new identity.
Peer: Select the peer that we previously defined.
Authentication Method: Choose ‘pre-shared key’
Secret: Input a complex pre-shared key and remember to note it down for future reference.
Configure the phase2 configuration.
We’ve successfully completed Phase 1 of the tunnel configuration. It’s time to progress to Phase 2 configuration.
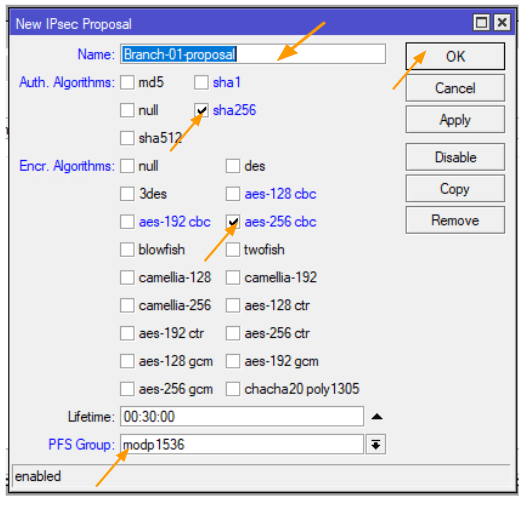
Configure IPsec proposal.
Phase 2 starts off with the IPsec proposal. To get started, locate the proposals tab, and click on the plus icon to create a new proposal.
Setting up the IPsec proposal:
A new window should pop up on your screen.
Name: Here, you’re required to input the name of the proposal.
Authentication Algorithms: input ‘sha256’
Encryption Algorithm: Enter ‘aes 256 cbc’
PFS Group: Key in ‘modp1536’
Once these fields are filled, click ‘OK’ to finalize the settings.

Configure the policies.
We need to specify the traffic that will be sent through the tunnel with encryption enabled.
Having examined the topology, our headquarters’ traffic is on the 10.1.1.0/24 network, while the remote branch operates on the 10.2.2.0/24 subnet.
Our goal is to encrypt this traffic through the tunnel.
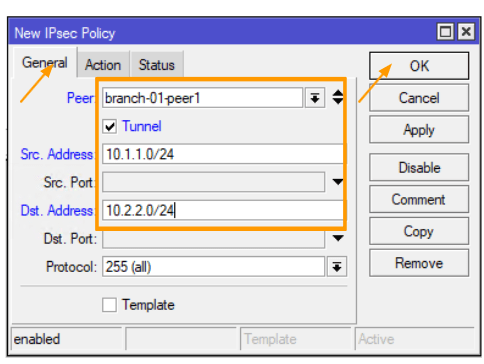
You need to navigate to the policies tab and click on the plus icon.
General settings: –
Peer: Choose the peer that we’ve previously configured from the drop-down menu. – Tunnel: Please make sure to check this box.
Source Address: For this, we are using 10.1.1.0/24.
Destination Address: Here, we are using 10.2.2.0/24.
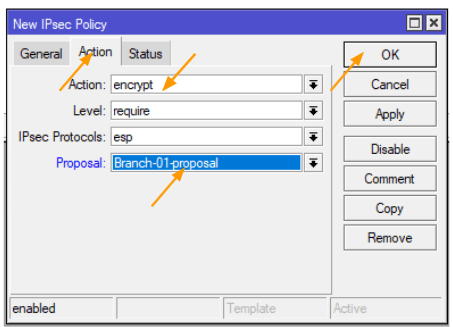
Now, move over to the actions tab.

In the “Actions” tab,
Action: “Encrypt.”
Proposal: Select the encryption we defined.
Retain the default settings for everything else and click “OK.”

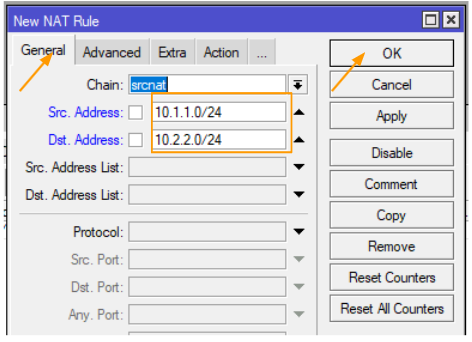
Configure the firewall NAT policy for IPsec.
We’ve successfully configured the IPsec tunnel, and now we’re proceeding to set up the NAT policy to exclusively accept the traffic that’s to be sent through the tunnel.
First, navigate to IP: Firewalls -> NAT.
Here, click on the plus icon to initiate the creation of a new NAT policy.
When the NAT configuration window appears, please input the following under the ‘General’ section:
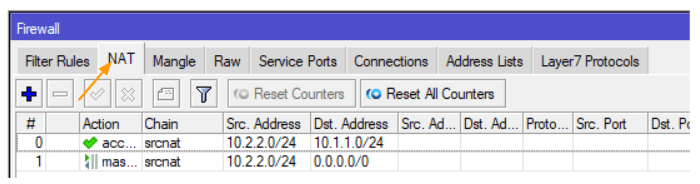
Chain: srcnat
Src. Address: 10.1.1.0/24
Dst. Address: 10.2.2.0/24
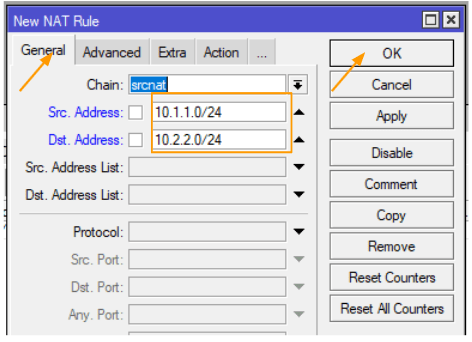
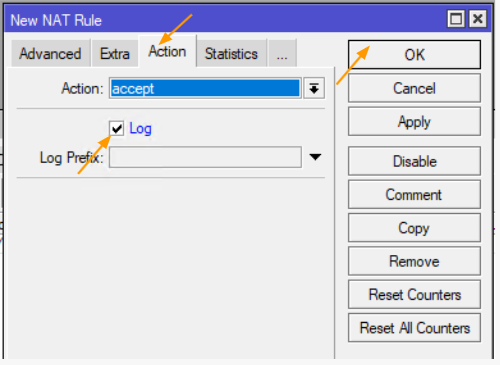
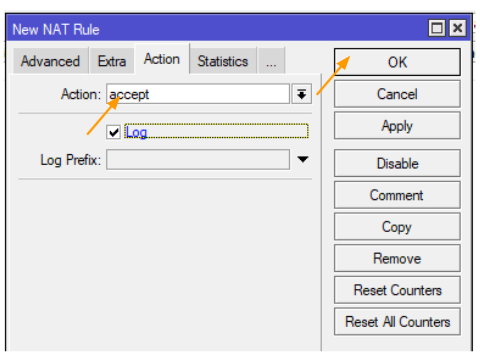
Action: Select “Accept” from the “Actions” dropdown menu.
Next, make sure to check the log box before clicking “Ok”.

You’ll find the newly created policy at the bottom of the NAT. move the NAT policy to the top.
To move the NAT policy to the top drag the newly created policy and move it to the top.


Configure the Branch site.
Just as we configured the headquarters router, we are now moving forward to configure the branch side.
The steps we’ll follow will mirror those we took previously, though the specific values will be just the opposite.
Configure the IPsec profile.
First, log into the branch side using the Winbox GUI.
Next, we’ll configure the MikroTik IPsec profile.
Navigate to -> IP -> IPsec -> Profiles
Once you’re there, click on the plus icon to add the profile.
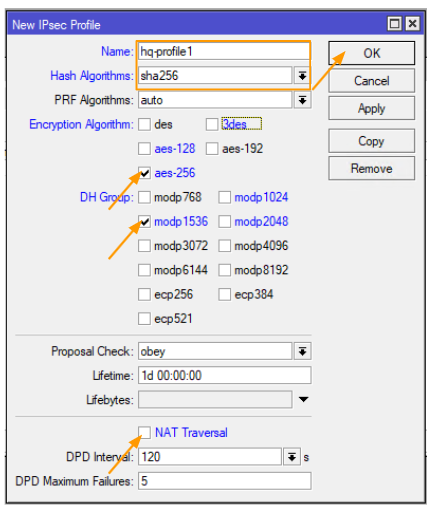
Name, type in ‘hq-profile1’.
Hash Algorithm, select ‘Sha256’.
Encryption Algorithm, choose ‘aes256’.
DH Group, pick ‘modp1536’.
Uncheck the box for NAT traversal. Since the router is directly connected to the internet and not behind the NAT device, this isn’t necessary.
To finish up, click ‘Ok’.
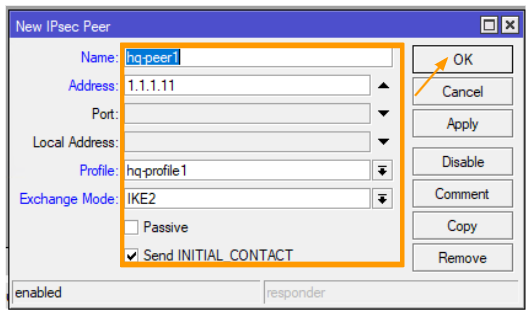
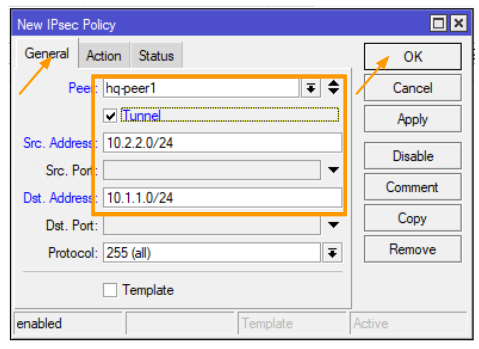
Configure the Peers.
You can now go ahead and click on the ‘Peers’ tab, followed by clicking on the plus icon to add a new peer.
Name: hq-peer1
Address: input the public IP address of the HQ office.
Profile: Select the profile we recently created.
Exchange Mode: IKE2.
Check the box labeled ‘Send INITIAL_CONTACT’.

Configure pre-shared key.
Click on the ‘Identities’ tab and then on the plus icon to add a new identity.
Peer: Here, you’ll need to select the appropriate peer.
Authentication Method: Choose ‘pre-shared-key’.
Secret: Copy and paste the same pre-shared key that you previously used on the headquarters (HQ) remote side.
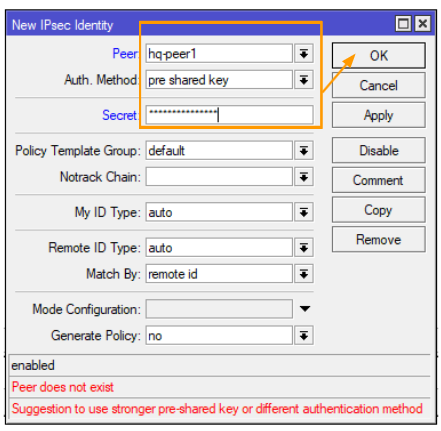

And click on Ok.
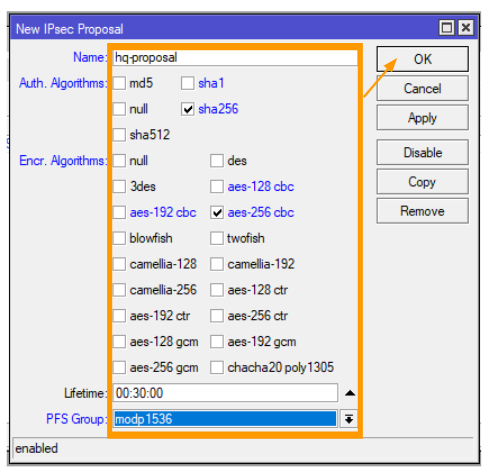
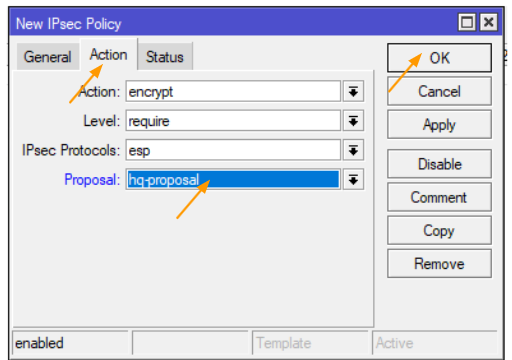
Configure Proposals
In the Proposals tab, click on the plus icon to add new proposals.
Name: HQ Proposal
Auth Algorithms: SHA-256
Encr. Algorithms: AES-256 CBC
PFS Group: MODP1536
Click on OK.
Configure IPsec policy.
In the IPsec policise tab, click on the plus icon to add new policy.
General:
Peer: Choose the peer from the drop down.
Check the box that says Tunnel.
Src.Address: 10.2.2.0/24
Dst.Address: 10.1.1.0/24
Click on Action tab.

In the action drop down choose encrypt.
Proposal : choose the proposal that we defined and click on Ok.

Configure the NAT policy.
Goto IP-> Firewall -> NAT
Click on the plus icon to add new NAT rule.
Chain: srcnat
Src Address: 10.2.2.0/24
Dst Address: 10.1.1.0/24
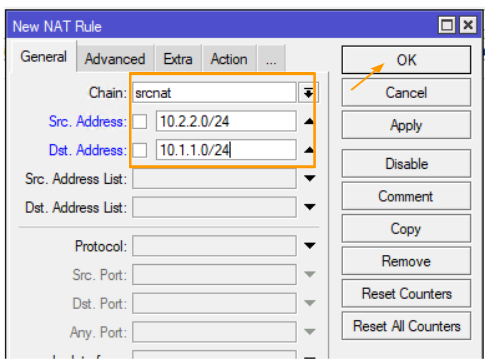
Click on the Action tab.
Action: Choose accept from the drop down and you may also check the log option.
And click on Ok.

Like we did before, move the NAT policy to the top.

Test the MikroTik IPsec connectivity.
Having completed the configuration, let’s now proceed with the testing of Phase 1.
Please navigate to: IP -> IPsec -> Active Peers
If everything has been correctly done up to this point, you should see that the IPsec peering has been successfully established in Phase 1.
As you could see, both the headquarters and branches have IPsec tunnels where Phase 1 has been established.
HQ IPsec status.

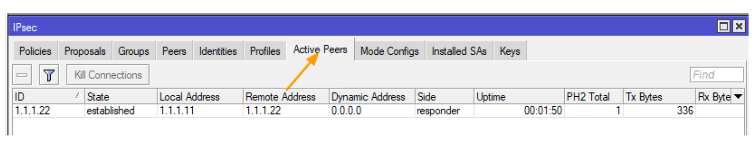
Branch IPsec status.


Check the Connectivity from Each Side
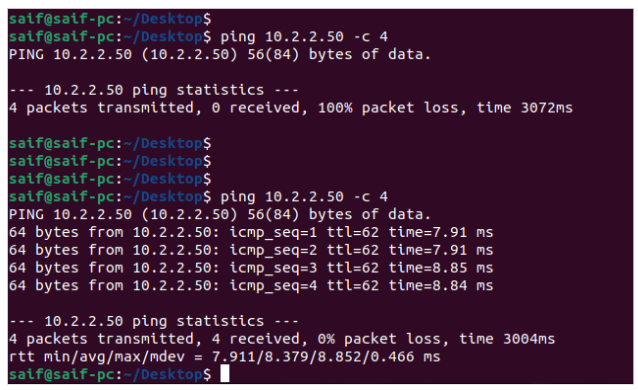
Let’s now log into the HQ machine and attempt to ping the branch machine.
As you can see, we captured the first ping before the IPSec deployment, which was failed,. After deploying IPSec, we ran another ping test. And it is successful.

Let me initiate ping from the other side as well.
As you can see, the other side also worked just fine.

And that is how you can setup an IPsec site to site VPN tunnel using mikrotik router, and it is very easy to configure as well.
Apollos Sadie
Thursday 16th of January 2025
Hello Sidheeq, tank for topic, Please my Mikrotik is behind a starlink box Please with public ip do I use for as public address ?
The one from starlink dhcp or the one check from www.whatismyip.com
Tank you for your answer
bob
Monday 11th of November 2024
In the above example, there's a step missing. If your tunnel is up but are receiving 'no route to host' when trying to ping the remote host, you may need to add a route on each end of the tunnel.
To correct this, on the 'Branch1' router add via the Mikrotik CLI:
/ip route add disabled=no dst-address=10.2.2.0/24 gateway=bridge1
On the 'Branch2' router add via the Mikrotik CLI:
/ip route add disabled=no dst-address=10.1.1.0/24 gateway=bridge1
Hope this helps.
Mike Dwyer
Thursday 8th of August 2024
I have followed this completely between a RB3011UiAS Release 7.15.2 and a hEX S Release 6.49.15 and I cannot get the ping across to the remote site. I see it established but it still will not ping. Can you give me any ideas to look at or do these 2 routers not VPN easily?