
If you wanted to connect two sites over the internet securely, the very popular method is to use the IPsec site to site VPN. By default, the IP alone doesn’t provide security, so we need to wrap the IP packet with IPsec to encrypt the traffic inside the IP. Once the IPsec connection is established between two sites, no one on the internet can see the inside packet.
Does Pfsense support Site to Site VPN using IPsec?
When I first heard about the Pfsense firewall, I asked the same question to myself: Is it possible to set up an IPsec tunnel on a free and open-source firewall? Due to the fact that most of the devices that support IPsec features are expensive.
The answer is yes, You can build multiple site-to-site VPN using IPsec Tunnels on a Pfsense firewall, and it works great just like any other commercial firewall would. So if you are on a tighter budget and wanted to spin up a firewall in the network, Pfsense is the way to go.
If you wanted to set up a Site to Site VPN using Pfsense, it is recommended to first build them on a lab environment before deploying it in the production. Initially, when I wanted to set up an IPsec VPN, I was unsure how the routing would work, so I built the lab and set up a basic IPsec network, and I was ready to deploy it to production.
Below is the topology that we are going to use.
Both the firewalls connected to the internet and the LAN side can go out to the internet, however, the Branch1 subnet 10.1.1.0/24 cannot talk to the 10.2.2.0/24 because there is no connectivity between them.
We will build an IPSec tunnel between the branch1 and branch2 public IP address, after the IPsec tunnel is built, you will be able to initiate the communication from both the LAN sides.

Read also,
How to Setup IPsec Tunnel between Paloalto and PFsense?
How To Configure Palo Alto Site To Site VPN Using IPsec?
How To Configure IPsec VPN Between pfSense And Cisco Router?
How To Configure IPsec Site-to-Site VPN On Cisco Router?
Here is the step by step video that covers the Pfsense IPsec configuration.
Steps to configure the Site to Site VPN in Pfsense.
Below are the IPsec parameters that we are going to use.
| Branch1 | Branch2 | |
| Outside IP | 1.1.1.1 | 2.2.2.2 |
| Peer IP | 2.2.2.2 | 1.1.1.1 |
| Local LAN | 10.1.1.0/24 | 10.2.2.0/24 |
| LAN IP | 10.1.1.1 | 10.2.2.1 |
| Remote LAN | 10.2.2.0/24 | 10.1.1.0/24 |
We will go ahead with the above information and configure Phase 1 of the IPsec tunnel on Branch1 pfsense and Branch2, after that we will move on to phase2.
After we completed both the phases, the tunnel will come up.
So let’s go ahead and set up phase 1 of the tunnel.
Configure Pfsense Phase1 IPsec configuration.
Click on the VPN and then click on IPsec.
Let’s go ahead and add the phase 1 configuration by clicking Add p1.

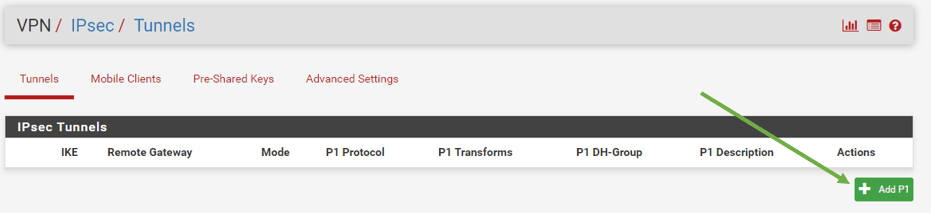
It would open a phase 1 configuration wizard. Let’s look at each item.
General information.
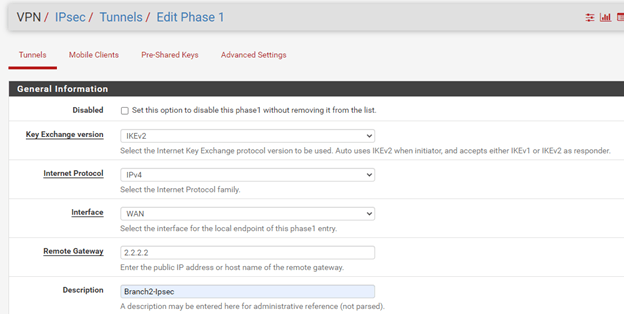
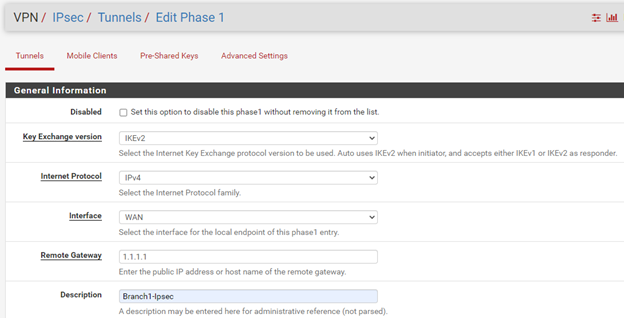
Below is the field that you need to modify under the General information.
On the Branch1.
Select the Key exchange version – IKEv2
Remote Gateway – 2.2.2.2
Description – Branch2-IPsec

On the Branch2.
Select the Key exchange version – IKEv2
Remote Gateway – 1.1.1.1
Description – Branch2-IPsec
Phase1 proposal (Authentication)
We are leaving the default value and just adding the Pre-shared Key.
It is recommended to use a complex pre-shared key in the production. You can even generate a new pre-shared key by clicking the button just below the Pre-shared key.
I clicked on the button which created a Pre-shared Key for me, let me copy and keep the same PSK on both sides.
Branch 1 and 2 configurations are the same here.


Phase 1 Proposal (Encryption Algorithm)
Below is what we will configure for the Encryption Algorithm, and yes, both the Branch1 and 2 configurations are the same.
Algorithm – AES256-GCM
Key Length – 128 bits
Hash – SHA256
DH Group – 14 (2048)


Advanced Options.
There is nothing much on the Advanced Options. You can click on Save here.
Note: In a real network scenario, if you have kept the Firewall behind the NAT, you should check the option NAT Traversal. Since we are not behind the NAT, I am not bothered about it.
Apply the configuration.


Pfsense IPsec phase 2 configurations.
We now have completed the Phase1 of the IPsec tunnels. Lets go ahead and configure Phase2 of the tunnel now.
On the same screen, VPN – IPsec, just below the Phase1 configuration you should see show Phase2 Entries, click on that.


And click on Add P2.


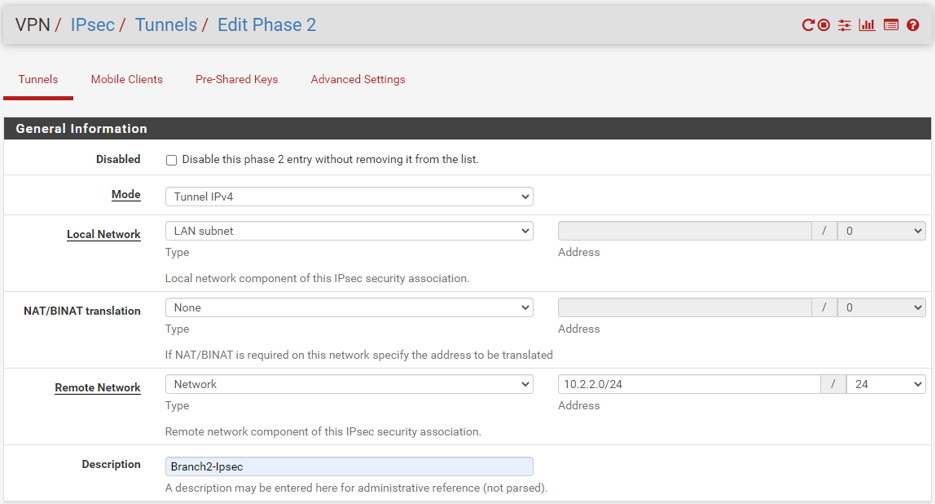
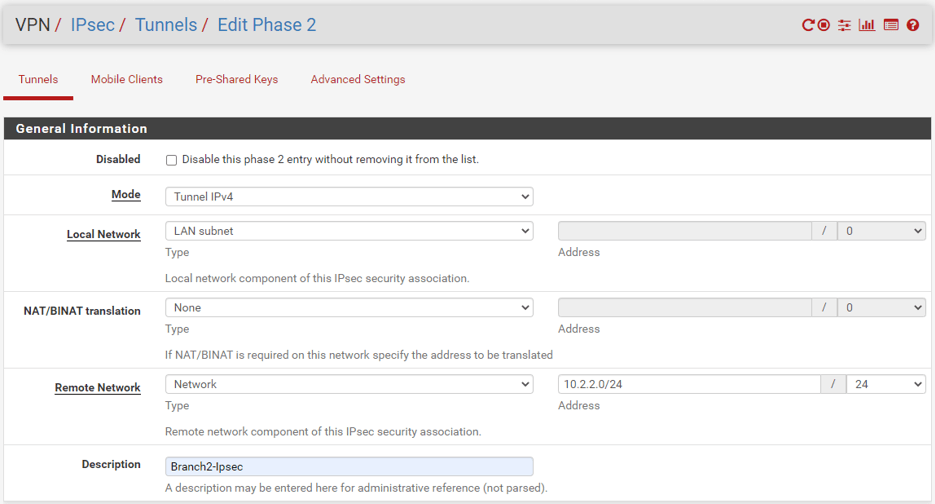
The Phase2 configuration wizard now open. Below is the field that you need to modify.
Branch1.
Remote network – Here, you need to specify the remote network we are trying to reach over IPsec from Branch1. Add 10.2.2.0/24 here.
Description – Branch2-IPsec.
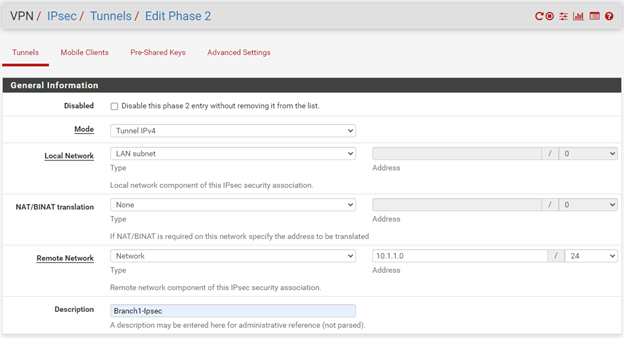
Branch2.
Remote Network 10.1.1.0/24
Description – Branch2-IPsec.

Phase2 Proposal (SA/Key Exchange)
We are choosing
Encryption Algorithms – AES256-GCM
And Hash algorithms – SHA256
PFS Key Group 14 (2048bit)
Both the Branch one and two configurations are the same.
Leave the lifetime Default.


Advanced configuration.
You can add the remote Lan IP address here so that the Firewall should start initiating the tunnel. Reverse traffic is not checked in this case.
Branch1.


Branch2.

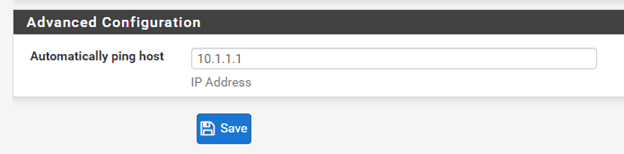
Apply the configuration.
Check IPsec tunnel status in pfSense.
If you have followed the above steps, the tunnel should get established just fine.
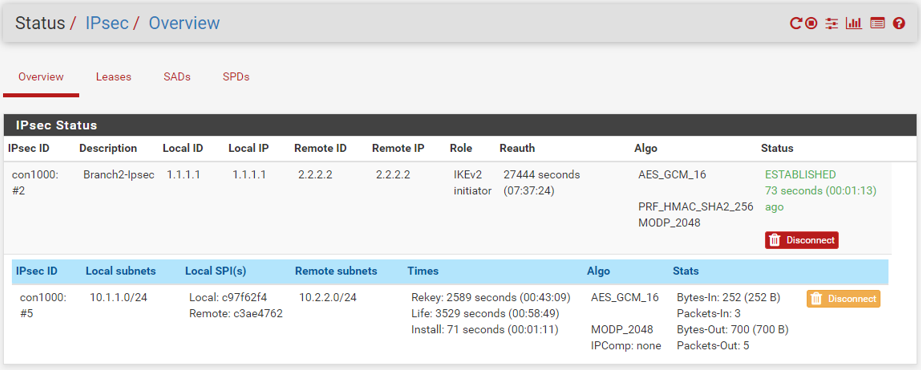
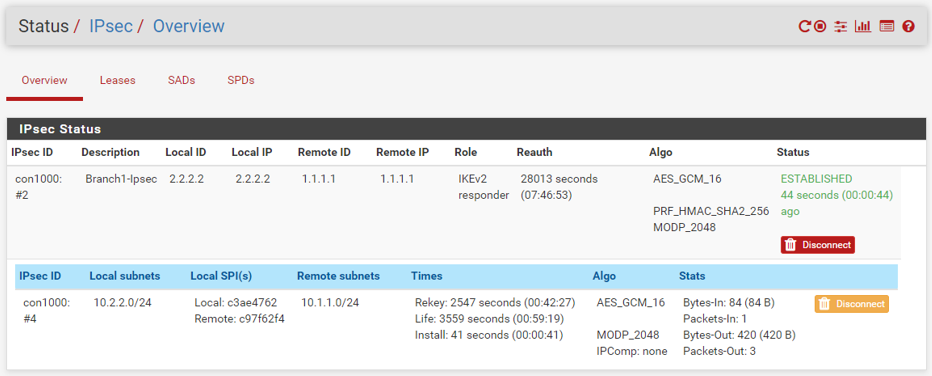
In the Pfsense firewall, you can click the Status button on the top and from the dropdown choose IPsec to see the tunnel status. As you can see, it is in an established state.
The first raw represents Phase1 of the tunnel and the second raw show Phase2 and both are in an established state.
Branch1

Branch2

3. PfSense allow IPsec traffic
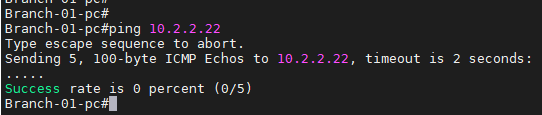
Though the tunnel is up, we cannot communicate to either side yet over ipsec, as we have not allowed the traffic via the rule.
As you can see, I am trying to reach the remote end host 10.2.2.22 from the branch1 localhost, but it is not reachable.

Allow ICMP on Branch2.
Just like how we allowed the WAN connectivity over ICMP using the easy rules, we will do the same steps here as well.
Click on Status and click on System logs.
Click on Firewall and scroll down.
You should be able to see the Deny logs here for our ICMP packets.
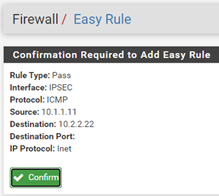
Click on the Plus icon to add the Easy rule.


Click on Confirm. For now, this will create the auto rule.

As soon as I added this rule, I can communicate Branch2 from branch1, as you can see below.

Why am I unable to communicate via other protocols?
If you look into the Protocol under Easy rules, you should see it is allowed just ICMP on IPsec. We need to change that for other protocols to pass. Because in Site to Site IPsec traffic, the hosts should be able to communicate with remote hosts over a different variety of protocols than just ICMP, so we will have to fix that.
Also, did you notice we are allowing just a single host’s communication, not all the hosts in the subnet?
If we don’t modify that either, in the future, if you add any other hosts to the network, you wouldn’t be able to communicate with those hosts. So the simple way to fix is to modify the host address to subnet also allow any protocol.
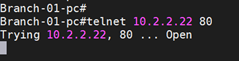
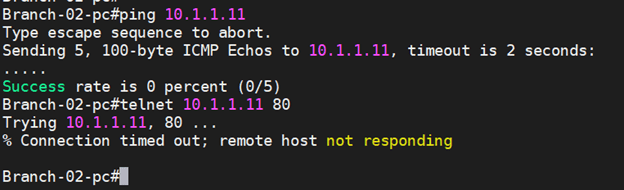
Before enabling the port, let’s check if we can communicate via over http.
We already enabled the http server on the remote end when we configured the end hosts.
On the Branch1 localhost, let’s try to telnet into branch2 local hosts to see if we can communicate over port 80.
As you can see, it didn’t work.


Let’s check the logs. Status- system logs-firewall


As you can see above, the communication is blocked on port 80.
Let’s go ahead and fix this.
There is two way you can fix this.
You can click on the plus icon on the logs to create easy rules, or you can modify the existing ICMP rules to allow required ports.
Since adding the easy rule would create one more rule, let’s allow all the protocol to the branch1 and 2 subnets using the existing rule where we allowed ICMP.
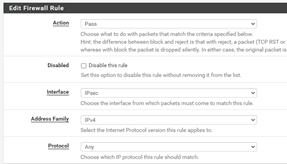
On the Branch2 Firewall, Click on Firewall and Rules, click on Edit rule under IPsec.


And change the protocol to Any.
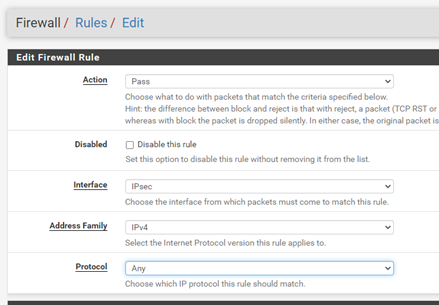

Change the source and destination IP to subnets and click on Save.


Apply the configuration.
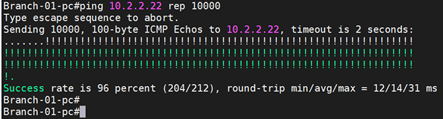
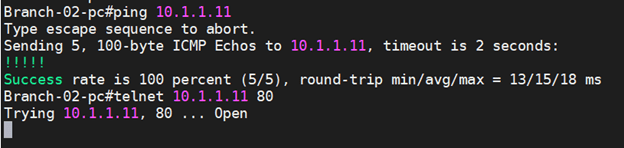
Let’s try to access the branch2 router over port 80. As you can see, it just worked fine.

Excellent!, you just configured the Branch1 to Branch2 IPsec connectivity and allowed traffic from Branch1 to Branch2.
But what about Branch2 to Branch1 connectivity? Will it work?
It doesn’t, as we have not configured any rules for the same, so it would just block by default.
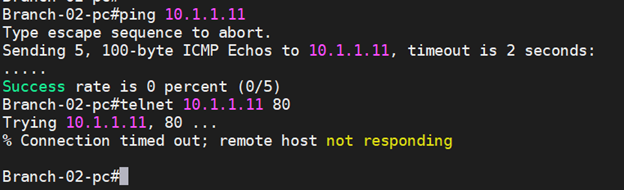
Let’s fix this as well.
Step1. Goto Branch1 firewall, click Firewall, and click on Rules under IPsec.
Step2. Click on Add rules.
Change the protocol to Any.
Step 3. Add the source and destination subnets.


Step 4. Click on Save and Apply configuration.
4. Pfsense IPsec Verification.
As you can, I am now able to ping from Branch2 to Branch 1 and can communicate over port 80.

Alright, we finally configured the IPsec tunnel, and both the LAN sides can talk to each other. And creating the IPsec tunnels on the Pfsense firewall is reasonably straightforward. You will get the hang of it after you build multiple tunnels.
P
Monday 17th of March 2025
Excellent help. been troubling with this tunnel setting for some time. this is an easy way of getting it sorted.
This works with ease and helped me understanding what went wrong.
P.