
Ubuntu Server is one of the popular Linux servers available from Canonical. After Redhat killed centos, its popularity increased even more. People are starting to move from Centos to the Ubuntu server.
We have covered extensive blog articles related to Ubuntu servers in the past. And in this blog, we will take a look at the installation of Ubuntu server 20.04 in Proxmox.
Can Proxmox be installed in Ubuntu?
When you have an Ubuntu server already running with KVM and are wondering, is it possible to switch that host to Proxmox?. The answer to that question would be No. You cannot really install the Proxmox packages in Ubuntu and make Ubuntu the Proxmox server. However, you can turn a Debian machine to become a Proxmox server because the Proxmox server is based on Debian.
We have covered an article here to install the Proxmox service on Debian. So if you have a Debian host and want to install Proxmox in it, you may do so.
If you want to use your windows machine for lab purposes with Proxmox, you can do that by doing Proxmox with windows dual boot. You can even install Proxmox on VirtualBox and perform nested virtualization.
With that out of the way, let’s see if we can install Ubuntu server 20.04 as a virtual machine in Proxmox. After the installation, we will check the connectivity to the internet and ssh into the server.
Before you begin, you need to have.
- Ubuntu server 20.04 – you can download it from here.
- Proxmox server up and running – follow the article here to install Proxmox on a server.
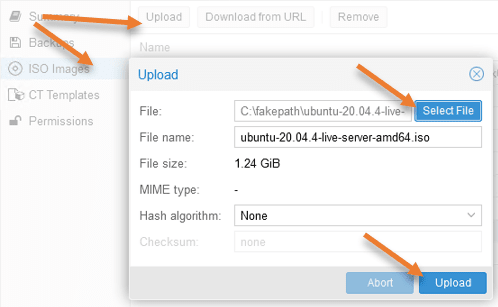
Upload the Ubuntu server 20.04 ISO files to Proxmox.
Login to the Proxmox server, and go to Local storage-> ISO Images.
Click on Upload, and a new window will open up.
Click on the select file to attach the Ubuntu server 20.04 iso file and click on Upload.
The upload will take time depending on the network between the management PC and the Proxmox Server.

Create the Ubuntu Server 20.04 Virtual machine.
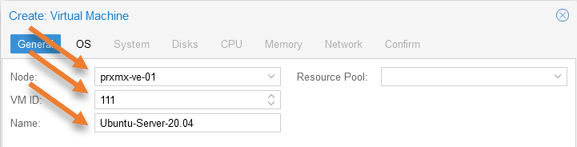
In the Proxmox GUI, on the right top corner, click on create VM to create the virtual machine in Proxmox.
A new wizard will open up.
General configuration.
Node: Select the node where you will install the Ubuntu 20.04 server.
VM ID: It will be auto-created, you may change it if required.
Name: Provide a name for the virtual machine.

OS configuration.
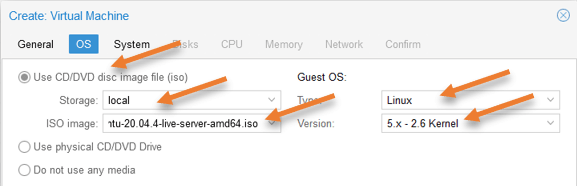
Select Use CD/DVD disk image file
In the storage: choose Local.
ISO image: Choose the ISO image we uploaded in the first step.
Guest OS,
Type: Linux
Version: 5.x-2.6 Kernal and click on Next.

Leave system settings default.
Unless you want to enable TPM and Secure boot, you can leave the system settings to the default configuration.
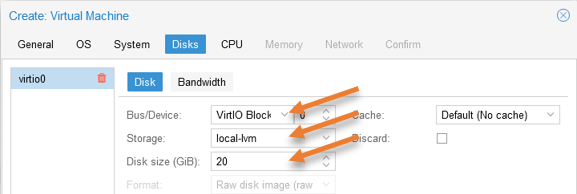
Configure virtual hard disk.
We have to configure the virtual hard disk for the ubuntu server, so after installing the OS, the files will be saved on the virtual hard disk, and Ubuntu will boot from it.
Bus/Device: Choose VirtIO Block.
Storage: Local-lvm
Disk size: 20GB

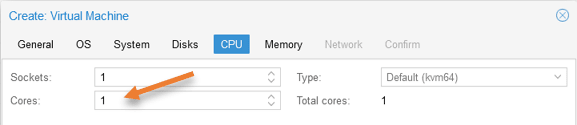
Configure the CPU.
By default, Proxmox would assign a single CPU for the virtual machine. I am leaving the default. However, if you plan to run heavy workloads, you might need to add more Cores.
Depending on your requirement, you may increase the CPU.

Configure the Memory.
The memory for the virtual machine by default is set to 2048, and I left the default here as well.


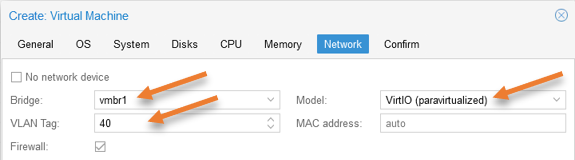
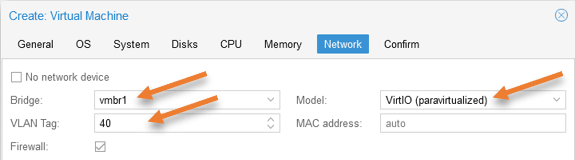
Network configuration.
I have two bridge interfaces in my setup, the first one carries the management traffic, and the second one is for VM traffic. Again that traffic is separated using VLANs. To know how you can set up VLAN tagging on Proxmox, you may click the article here.
Bridge: VMbr1 – this is the bridge interface for the VM traffic.
VLAN tag: enter the VLAN tag for your VM workloads, If you are not using any VLAN, you may leave this blank.
Model: Make sure you choose VirtIO.
You will get a summary of the configuration. Make sure everything looks good. If you want to make any further changes to the existing configuration, you may click on the back button.
Click on Finish.
Initiate the Ubuntu 20.04 server installation.
We have completed the Proxmox side of the configuration, and as soon as you clicked on Finish, the server would start because we had ‘Start after created’ option checked.
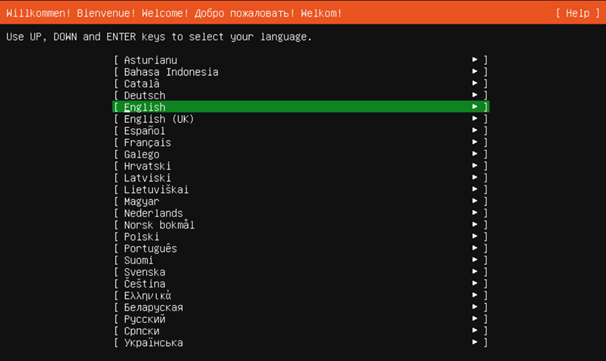
Get back to the Proxmox Console, and you should see the Ubuntu installation screen appear.
Choose the language of your choice and hit enter.

Choose the keyboard layout and variant.
Configure the IP address.
By default Ubuntu server would configure with the DHCP service, and if you are planning to keep the server in DHCP, you may leave the default settings and click on done.
Although I am using the DHCP server in my network, I will not use this server under DHCP.
To change the IP settings to Static, hit enter on the Ubuntu interface, and a sub-menu will pop up.
Chose Edit IPv4 and hit enter.

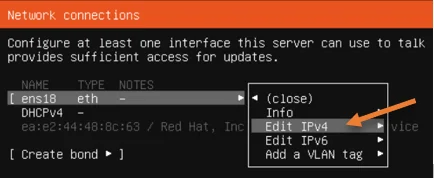
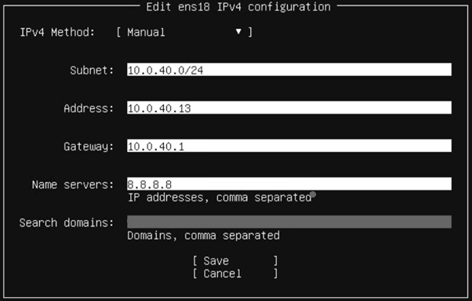
Change the IPv4 method to Manual and fill in the IPv4 information.
Subnet: Enter the subnet you are using for the network. Please note that it is not an IP address but the network subnet.
Address: Enter the IP address of your Ubuntu Server 20.04.
Gateway: Enter the Gateway.
Name Server: if you have an internal DNS server, you may enter them here, else use any of the public available dns server addresses.
Search domain: If you have an internal domain, enter that here.
And save the configuration.
Configure proxy.
If you are using a proxy to get to the internet, you may enter them here else, leave it blank.
Choose the ubuntu mirror.
By default, Ubuntu would configure the Ubuntu archive mirror based on the location preference you made initially. If you have a different mirror, you may change to that else leave it to default.
Set up the storage.
We have configured the virtual hard disk with the storage of 20GB on Proxmox, and you can make the changes to the storage based on your requirement.
I am choosing the default option to use an entire disk and done.
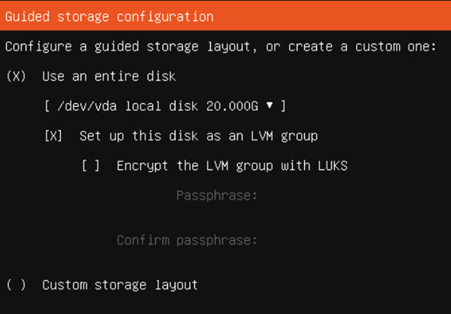

You will get the summary of how the storage will be allocated with each partition. If you would like to make any modifications, you can do that here.
I am okay with the default; hence clicked on Done.
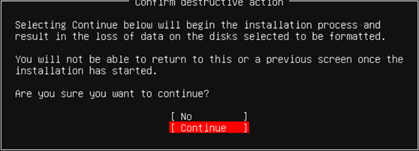
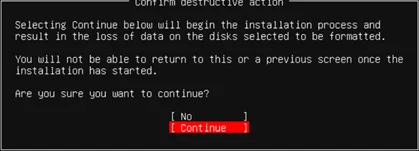
You will get a warning that says whatever the files in the virtual hard disk will be deleted. I know that it’s a brand new virtual hard disk created explicitly for the Ubuntu server 20.04, and there is nothing in it. Hence I can click on Continue.
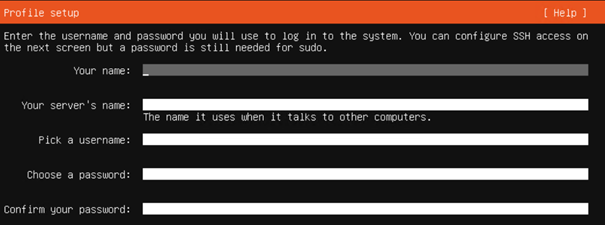
Profile setup.
You can define the profile for the Ubuntu server 20.04, and this profile will be used to log in to the server later on.
Your name: Enter your name here.
Your server’s name: This will be the hostname for your server. You can change this later by going to /etc/hostname.
And set the password.

Enable Ubuntu Advantage.
If you have a Ubuntu advantage token for an existing support contract, you may enter them here. If you are installing this server in the lab, you most likely will not have this, so you can leave this field blank.
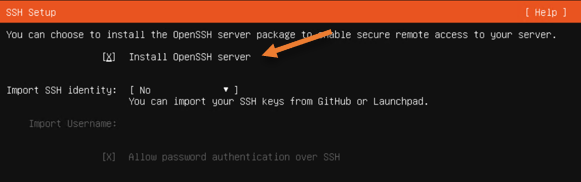
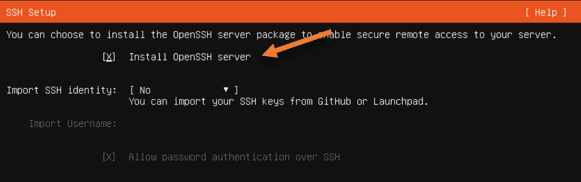
SSH Setup.
The ssh service is required for us to log in to the server remotely, use the spacebar to select the ssh service, and choose done.
Featured server snaps.
You could choose our desired software package for Ubuntu, as I would mostly use this server to connect with AWS cloud hence I have selected aws-cli.
So based on your requirement, you may choose the server snaps.
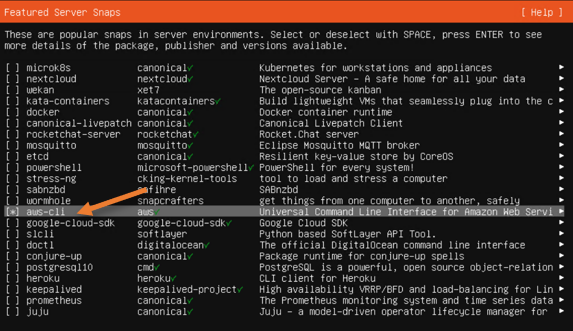
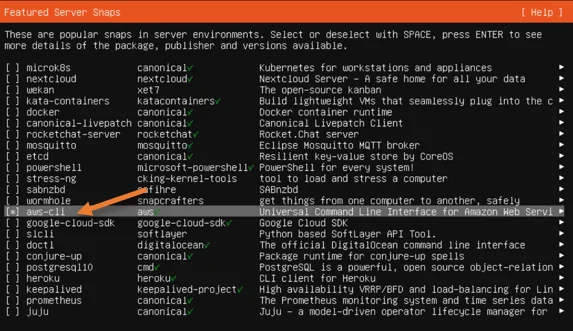
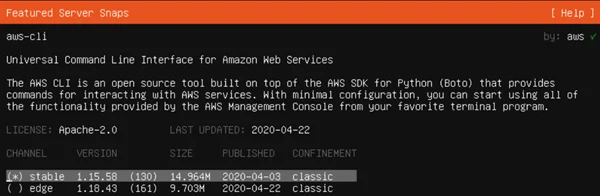
You can further get the software version by hitting enter on each snap.

The installation will now begin. After the installation is complete Ubuntu server will automatically update as it has internet connectivity.
Usually, the update doesn’t take too long, and if it does, then you may choose to cancel the update and reboot.

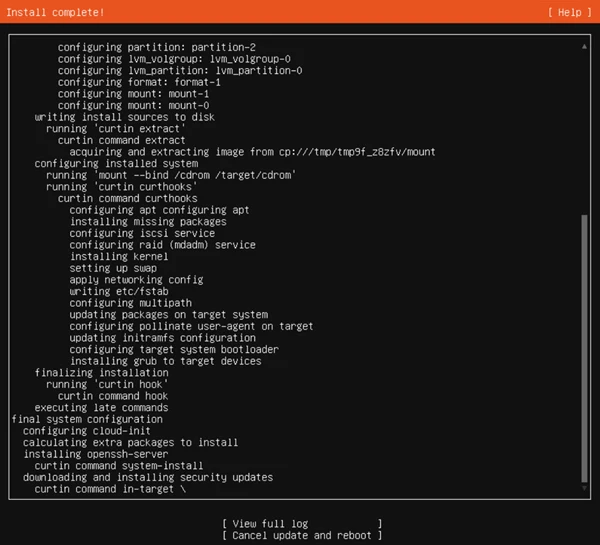
Finish the installation.
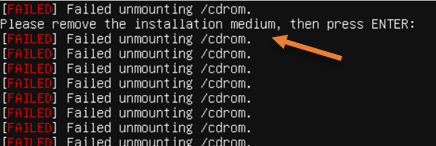
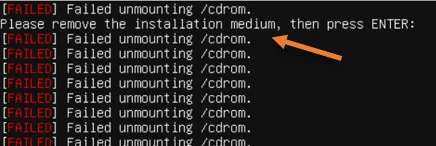
After the installation, you will get an error that says,
Failed unmounting /cdrom
Please remove the installation medium, then press Enter.
When we installed the Ubuntu server 20.04, the main boot device was a virtual hard disk, and the second boot device was the Ubuntu server 20.04 iso image. Since the first hard disk was empty, it went to the second bootable device, the CD.
After the installation, when you reboot, Ubuntu will automatically boot into the virtual hard disk where you have the new Ubuntu server 20.04 operating system.
So you don’t have to remove the CDROM. You may hit enter.
Login to the Ubuntu Server 20.04.
Once you reboot, you will be presented with the login screen of Ubuntu, where it prompts you to enter the credentials.
Enter the credentials you have configured during the profile setup, and it should let you in.
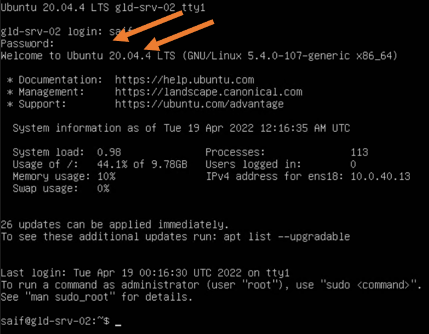

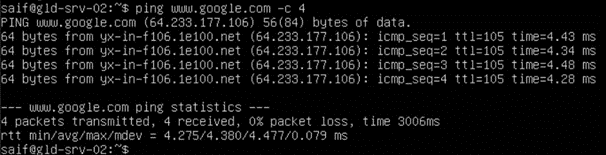
Check the internet connectivity.
You can ping the google FQDN or any public IP address, which proves the internet connectivity looks good.

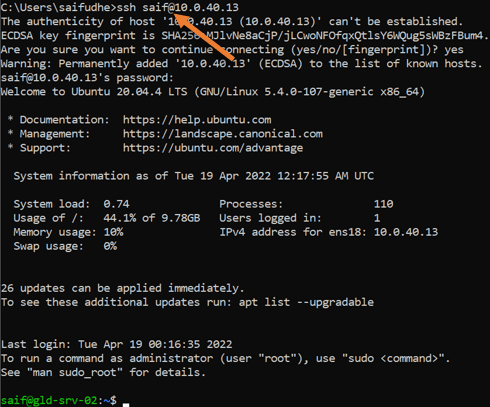
Log in to the server using SSH.
I was able to ssh from my Local machine to the Ubuntu server, and it worked just fine.

We have successfully installed ubuntu server 20.04 on the Proxmox VE server. We made sure it can go out to the internet and were able to ssh into the server successfully.