
Have you ever connected to a VPN and realize that you cannot access some of the network resources that you have at home? Maybe you are not able to access Printer in your local network, or something else.
And other situation is you have a windows machine that is connected to two different networks and you Are not able to access some of the network resources and some of them are working fine.
Then you have a problem with your network routing, in this blog I am going to cover how you can solve those above issues by Reconfiguring the windows routing table.
What is routing?
If you are not familiar with routing then don’t worry, routing is a mechanism to connect two different network Segments to each other.
Suppose you have a network 192.168.1.0/24 and another 10.1.1.0/24. By default, both of those networks cannot talk to each other because both are two different subnets. For both the network to talk to each other, you need to use static routing.
There is something called dynamic routing, which is used by the network devices such as routers, firewall and layer3 switch and even some of the windows server machine.
In this blog, we are focusing on the end host level especially windows static routes.
What is static routing in windows?
A static route is a specific subnet route that is defined by the admins manually to reach a certain destination. You can specify the destination subnet that you want to reach from the host and point to a default gateway. You can add as many static routes as you like.
You can define for example, to reach 192.168.1.0/24 you can go via 10.1.1.1
The static route is usually not needed when you host has only a single interface, the default route will take care of that.
Read also,
Windows 11 on KVM – How to Install Step by Step?
How To Extend Windows Storage in KVM ?
KVM Windows No Sound? – Let’s fix it.
10 Easy Steps To Install Windows Server in Linux KVM
How To Set Static IP On Ubuntu? (GUI and CLI)
What is default route in windows?
If you don’t know the subnet that you want to reach, that’s when you use something called default routes. The default route is mainly configured to reach the internet.
We don’t know the IP addresses that are available on the internet, right?
That means you cannot specify the routes in the routing table, and on the internet, there are millions of IP addresses, and how do I reach those IP address from your local machine?
You can type 0.0.0.0 as the IP subnet and 0.0.0.0 as the mask and point the route to the default gateway. This basically tells the windows host that to reach any subnet apart from the specific subnet you use the default route.
Usually the default route is added to a window hosts or any end hosts for that matter is by configuring the default gateway. If you define a default gateway on the system, that would add a default route pointing to the default gateway.
However, In some situations, it can create a problem, because you may have multiple LAN ports and all are configured with DHCP, as soon as the host receive the IP address via DHCP on all ports, it also add default gateways for all those interfaces. The result is multiple default routes towards multiple gateways. This would create a problem when the end hosts wanted to reach the internet.
how to view the routing table in windows?
Like any network devices, the windows machine also has a local routing table. It can tell you lot of information about the routes that this windows box is aware of.
To view the windows routing table, you can enter the command route print in windows command line prompt. However, that you would display both the IPv4 and IPv6 routing table, and you can also get the route output specific to the IP version.
how do I see ipv4 routes in windows?
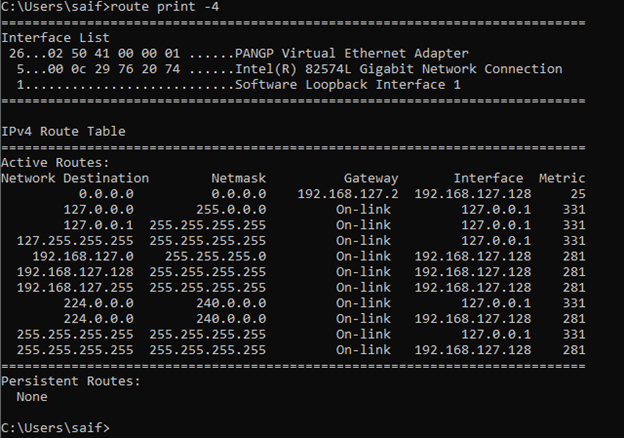
If you wanted to see just the IPv4 routes in windows you can type the command route print -4.

how do I see ipv6 routes in windows?
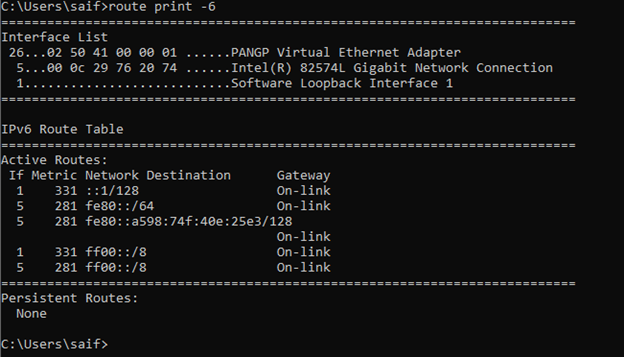
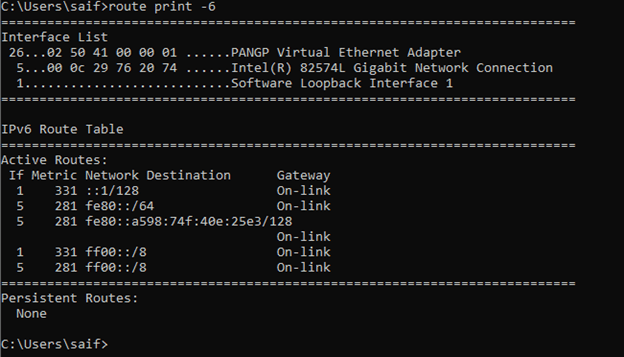
Just like the IPv4 you can also see the IPv6 routes alone in the windows routing table by typing route print -6.
How do you read a Windows routing table?
It’s quite common for anyone to look at the windows routing table and get confused with the information displayed. Let’s go through and explain each one of the items in the windows routing table.
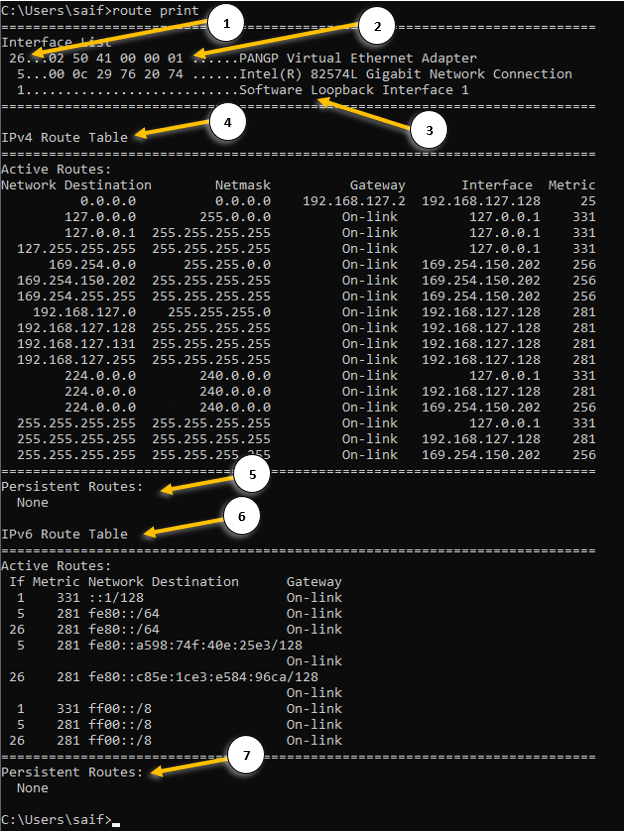

- Interface ID – each interface that you have on your machine will be identified with a unique ID.
- The mac address of the machine – this is the physical address of your network interface card. You can also get the mac address detail by typing ipconfig /all.
- The name of the interface.
- IPv4 routing table – Here you can view the IPv4 routing table.
- Network destination – It shows the destination subnet that this machine can reach currently.
- Netmask – the subnet mask of the network destination IP.
- Gateway – you can see the remote gateway as well as on-link where you are learning this route from.
On-link means, the directly connected routes from its own NIC. - Interface is the place you can see the IP address of each network interface.
- The IP address 127.0.0.1 is the machine’s loopback interface.
- Metric – It is the value that defines the priority of the route, the lower the metric the better.
- Persistent route – This route is defined by the admins and it would never be removed even when you power down the system, read on to learn more about it.
- IPv6 routing table – You can view the IPv6 routing table here.
- IPv6 persistent routes – The same persistent routes available in the Ipv4.
How do I manage multiple gateway in windows?
When you have two interfaces installed on the windows machine, you will have to manage the multiple gateways using static routes. Lets look at how we can configure multiple gateways using the static routes. below are the examples that we are going to configure.
- Validate the internet connectivity.
- Configure primary default gateway for windows 10.
- How to delete the route in windows?
- How to add two default routes in windows?
- How do I add a static route in Windows?
Validate the internet connectivity.
Before we begin, lets validate the internet connectivity on this host.
Open CMD with admin rights.
Click on the start menu, and type CMD. Right-click and Run as administrator. Click yes on the admin prompt.
Or
- Windows key + R
- Type CMD
- Press CTRL+Shift+Enter
Note: To see the routing table, you don’t need to access the CMD with Admin rights, normal access would do.
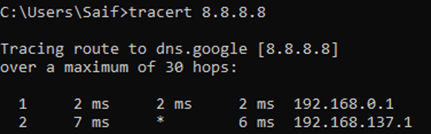
Lets try to ping the internet IP, which is 8.8.8.8.

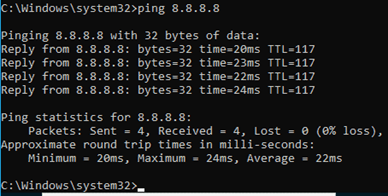
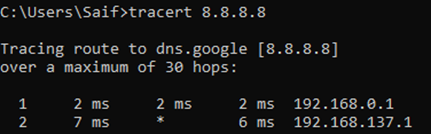
Yes, I can reach the internet and let me check which path it is taking by using a command called tracert
As you can see, it is taking the path 192.168.0.1.
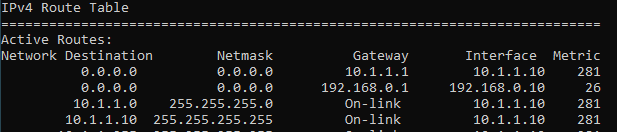
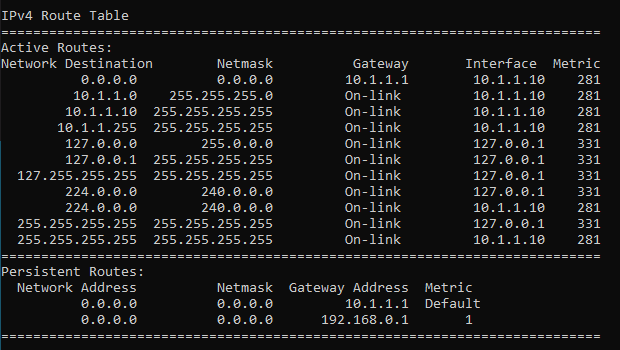
If you look closely at the routing table, you can notice, there are two default routes with same metric. One towards 192.168.0.1 (interface 1)and the other towards 10.1.1.1 (Interface 2) with equal metric.
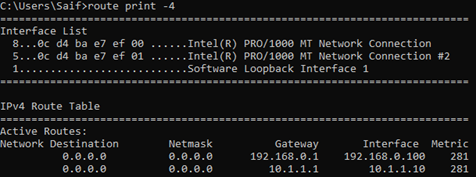
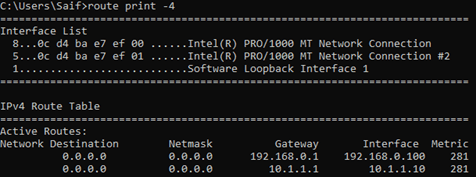
In this setup, for the first time when you try to access the internet, It will send the packet out to both the interfaces. And it elects the default gateway that it needs to use.
Configure primary default gateway for windows 10.
Since we don’t have access to internet via the interface 2 (10.1.1.1), we shouldn’t be using the default route towards it. To resolve multiple default gateways on your network, you got two options.
Change the metric for the windows interface or Delete the default gateway pointed to the interface 2.
We know that the interface which we wanted to use for the internet is interface 1 (192.168.0.1) and when we look at the metric, we can see that both the interface 1 and 2 has the same metric 281.
In normal windows machine you should be able to see the metric starting from 25, and if you are using windows as a VM you can notice its metric is by default 281. However, when you try to change the metric, you will be able to see windows machine by default would take the metric as 25 though you cannot see them.
To make the interface 1 as the priority one for the internet, you need to lower the metric of it.
All you have to do is, add the metric value of 1 for the interface 1., and that would change the windows metric value to 26 (25+1)
1.Get the interface ID.
When you enter the command route print -4, that will show you the interface list on the top.
And for our interface 1, the ID is 21, and interface 2 is it 25.
To validate the interface you can type ipconfig /all and compare the mac address with the interface list ID’s.


2. Change the interface metric.


3. Validate the configuration.
Lets check the routing table now.
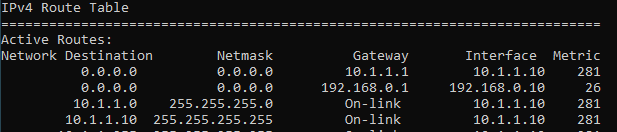
As you can see, the metric changed to 26 for our main interface. From now on, all the internet traffic will go out via the interface 1.
What if the interface 1 goes out?, then by default windows machine will start using the interface2
To simulate the issue, I just unplugged the interface 1 and as you can see, I no longer have the default route towards the interface1.

How to delete the route in windows?
The above scenario will be useful, if you have internet access on both links where the interface 1 has more bandwidth than interface 2.
Since we don’t have internet access at all on interfac2, there is no point in keeping the default route so let’s go ahead plug the interface1 back in and remove the default route connected to the interface2.
- To delete a route in the windows routing table, you can use the command route DELETE.
As we are going to delete the default route pointed to 10.1.1.1, you can use the command below.
route DELETE 0.0.0.0 MASK 0.0.0.0 10.1.1.1


2. Verify the routing table.
We no longer have the default route pointed to 10.1.1.1 gateway.


How to add two default routes in windows?
In our previous scenario where everything was looking good, however when the internet on the interface 1 goes down there is no redundancy in place. So, you decided to add internet over secondary interface.
One of the use cases being, you have internet on interface 1 that has more bandwidth and internet 2 with less bandwidth, in the event of internet 1 goes down, the internet 2 on interface 2 should kick in.
In the routing table, we already have a default route in which we set the metric to 26 previously.


Let’s go ahead and add the second default route with more metric, that way the second default route will be less preferred over the primary link. And when the primary link goes down the secondary one will take care of the internet traffic.
To add the default route you can add the below commands.
route ADD 0.0.0.0 MASK 0.0.0.0 10.1.1.1 -p METRIC 50 -p


The reason I added the metric 50 because, if you add another default route without a metric it would just pick up the default metric that is already used by the other default route.
The newly added route now has the metric of 75 now.


When you have connected to wifi and wired at the same time on your windows 10 PC, you will have two default route with different metric and if you are thinking about prioritising the wifi network over wired, then you check out the article here to know how.
How do I add a static route in Windows?
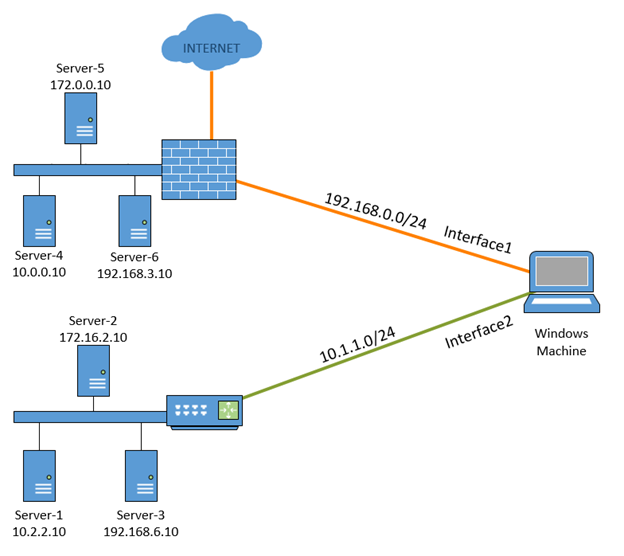
Alright the internet part has been taken care with default route, now lets talk about the specific static routes towards the server from 1 to 6.
In the servers list, to reach server 1-3 you must go via the interface 2 and the server 3-7 should reach via interface 1.
Lets start with the server1, 10.2.2.10 by pinging.
As you can see, we are not able to reach the IP, lets look into the IP table, and I don’t see any IP inside the routing table which is not good.


Currently what’s happening is that, since we do not have a specific route towards 10.2.2.0 it is taking the default route with lower metric on the interface1.
As you can see from the traceroute below.

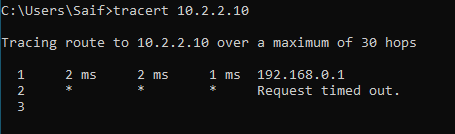
We need to point the 10.2.2.0 towards interface 2.
In CMD add the route as below.
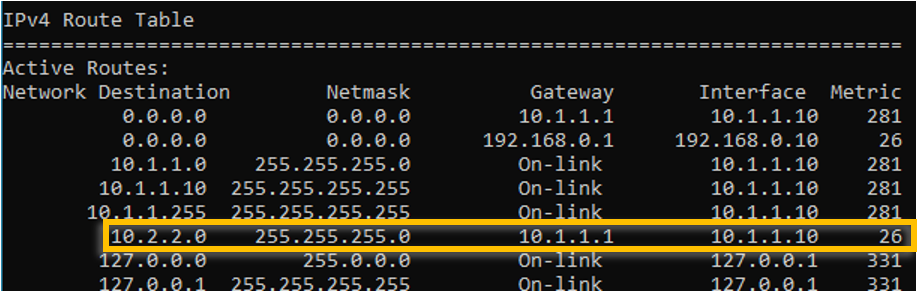
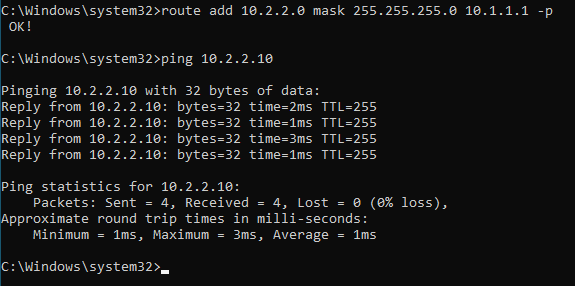
route add 10.2.2.0 mask 255.255.255.0 10.1.1.1
Verify the route table again.

Ping the IP address, as you can see, we are able to reach the iP address via interface 2 now.

How do I add a persistent route in Windows?
We just added a static route in windows and it is working as expected, however what happens if you reboot the machine?
When you reboot the machine, whatever the changes that you made for the routing will be removed. For those routes that are temperoroly it should be fine, but not good for the permanent destination.
To avoid that you can use persistent route in windows. That way the changes that you make on the windows routing table are retained even after you reboot the machine. To add a persistent route, you just have to add -p at the end of the route statement.
route add 10.2.2.0 mask 255.255.255.0 10.1.1.1 -p
From now on all the routes that we are going to add using the persistent command only.
You should be able to see the persistent route on the bottom of the routing table.
Lets add rest of the other IP addresses, before we add the routes, lets verify the reachability.
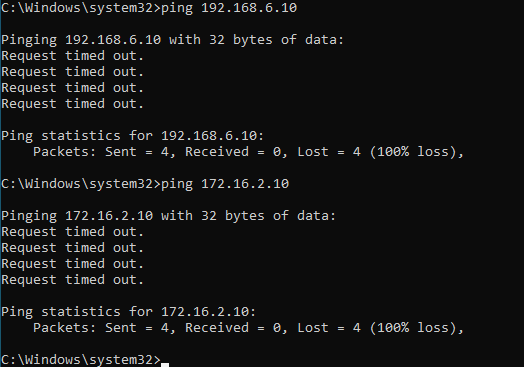

No, both destinations are not reachable now, so lets go ahead and add the routes.
route add 192.168.6.10 mask 255.255.255.0 10.1.1.1 -p
route add 172.16.2.10 mask 255.255.255.0 10.1.1.1 -p
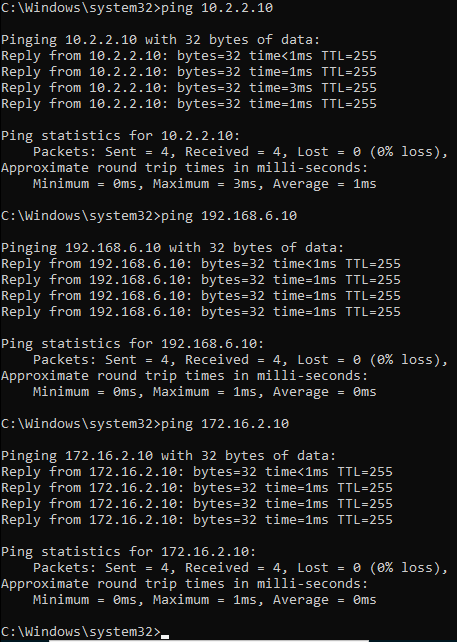
The servers over the interface2 can be reached now, you may test the connectivity using the ping again and it should work just fine.

You can also verify the added routes in the windows routing table.
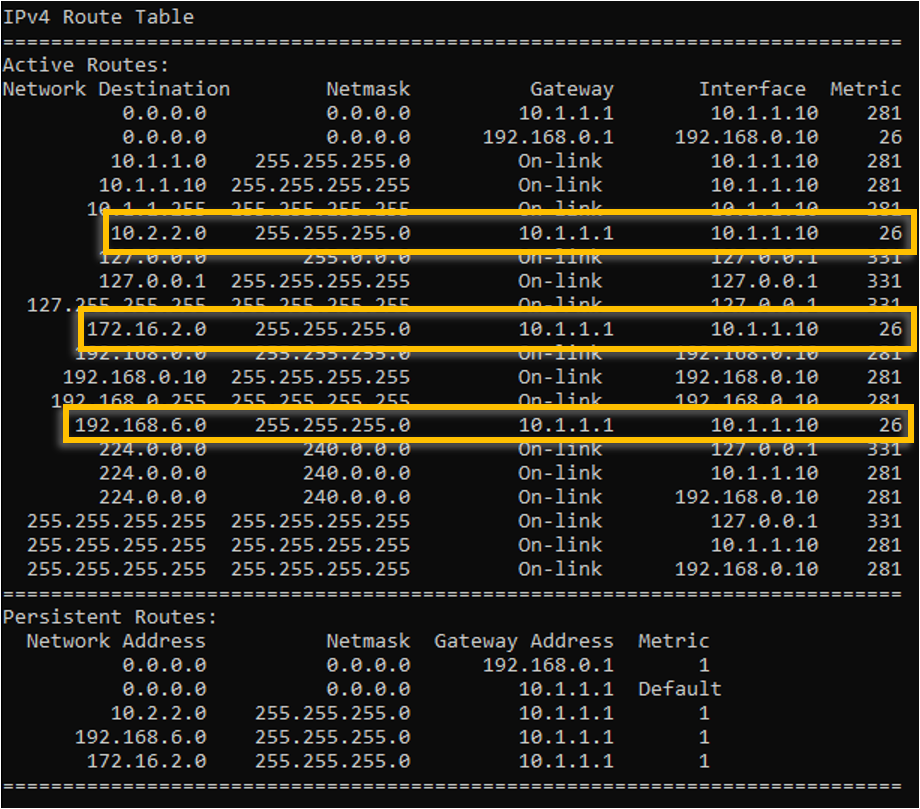

Can we reach the servers 4-6 in interface1 now? As you know we don’t have specific routes for it. If you said the answer is Yes, then you are right!.
let’s send ping to server 4,5 and 6.

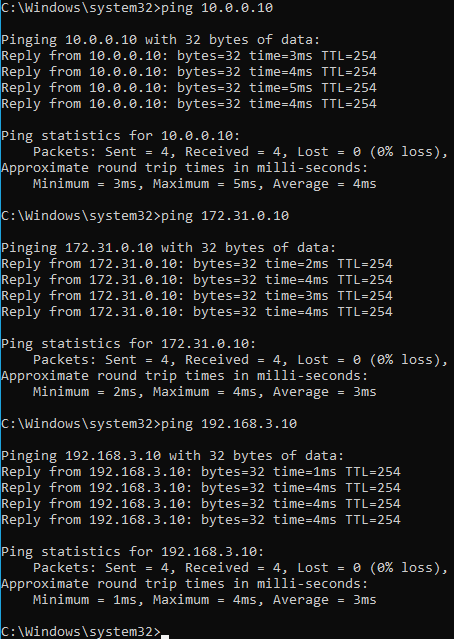
As you can see, I am able to reach all three servers just fine, how come we are able to reach those servers even though we don’t have a specific static route for the same.
Its because, it is using the same default route on the interface1, so the PC would send the route to the default gateway, and because the gateway knows about the connected route 10.0.0.0/24, 198.168.3.0/24 and 172.0.0.0/24 the windows PC can reach all the servers on the interface1.
This is working great, right?
Yes but no, let me explain.
It is working fine now, but what if you decided to remove the default route on the interface 1, then it will be a problem. Those servers 4-6 going via interface 1 over the default route cannot get to the remote anymore.
It is recommended to add specific static routes that we added for the interface 2 and it should take care of everything. So even if you decide to remove the internet on the interface 1, you can peacefully remove the default route and specific routes will take care of the server reachability.
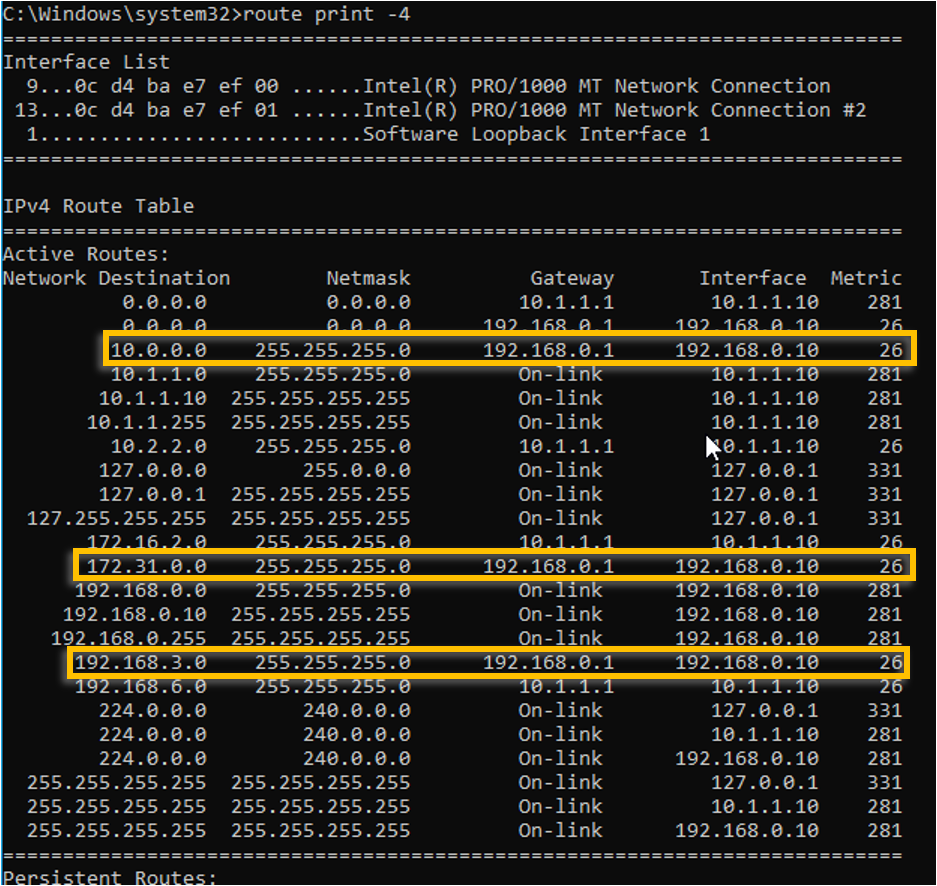
To add the rest of the servers subnet into the routing, you may add the route statement as below.
route add 10.0.0.0 mask 255.255.255.0 192.168.0.1 -p
route add 172.0.0.0 mask 255.255.255.0 192.168.0.1 -p
route add 192.168.3.0 mask 255.255.255.0 192.168.0.1 -p
Validate the routes.