
We have covered multiple blogs related to the OPNsense firewall in the past. In most of the setup, we used to have an OPNsense firewall connected to the internet, and LAN users could go out to the internet using the firewall. Sometimes you would want to configure internet-facing servers on your network. Maybe you want to configure a web server at your home or small office or spin up an FTP server that you want to expose to the public internet, so end-users or customers can upload files to your FTP server over the internet. So how do you expose the public-facing server to the internet in OPNsense?
If you think that’s too easy, just spin up a server on the LAN side and either configure port forwarding or do static NAT to open the port to the untrusted network. However, you should never add an internet-facing public server in your local area network as a good security practice. What if the server that exposes to the internet ever gets compromised? At that time, your entire LAN network will be affected. So the solution to this problem is a DMZ- Demilitarized zone.
What is DMZ in OPNsense?
When you want to expose your server to the public or untrusted network, we use something called DMZ. DMZ is similar to the LAN, while in a LAN network, most of the network traffic will be towards the internet, meaning outbound connection. In DMZ, the traffic will be inbound to the server from the internet. When you want to open a port to the public internet, you should use the DMZ network even if the network is small.
Examples of DMZ servers are – WEB servers, FTP/SFTP servers, Mail servers.. etc.
In this blog, let’s see how to create a DMZ network using an OPNsense firewall.
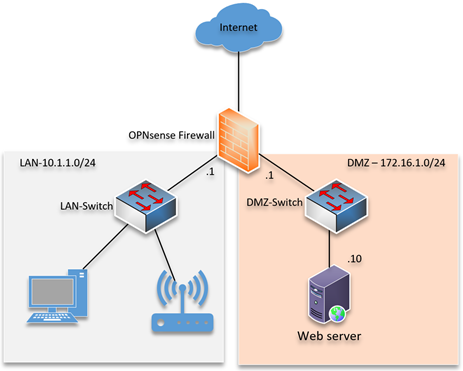
Below is the topology that we are going to use.
We have an OPNsense firewall connected to the internet. The LAN side has the subnet 10.1.1.0/24, and it can go out to the internet, which is already configured. We will now configure DMZ Network on OPNsense with the subnet 172.16.1.0/24. After that, we would deploy a web server and expose the server to the public internet over ports 443. We will test the access from the internet afterward.
You don’t need to have a switch at the DMZ if you are plan to use a single server. You just plugin the server to the DMZ port directly. However, for multiple server connections, a switch is required.

1.Configure the DMZ network.
To configure the DMZ network, we need to add the DMZ interface first.
Goto-> Interfaces-> Assignments
You will get the list of interfaces here.
If you have interfaces available in pfsense which are not used, you should see under the New interface dropdown.
Since I am using a virtual machine, I have vtnet2 available in the new interface, and I can add the description as DMZ and click on the plus icon.
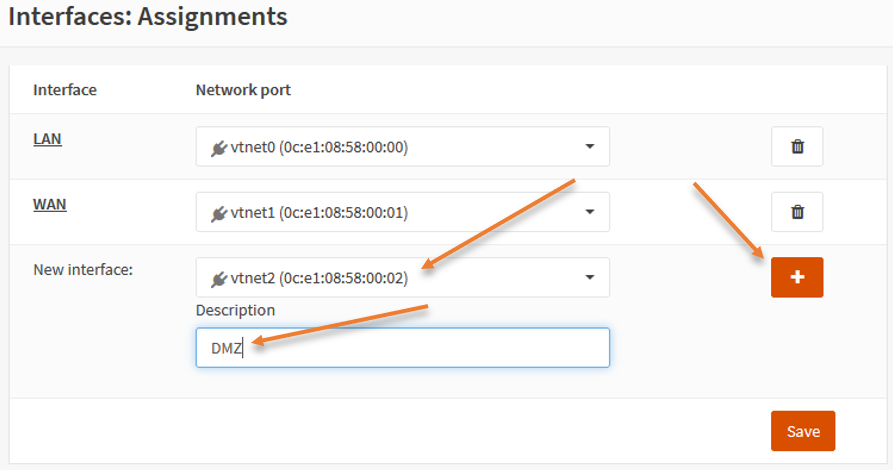
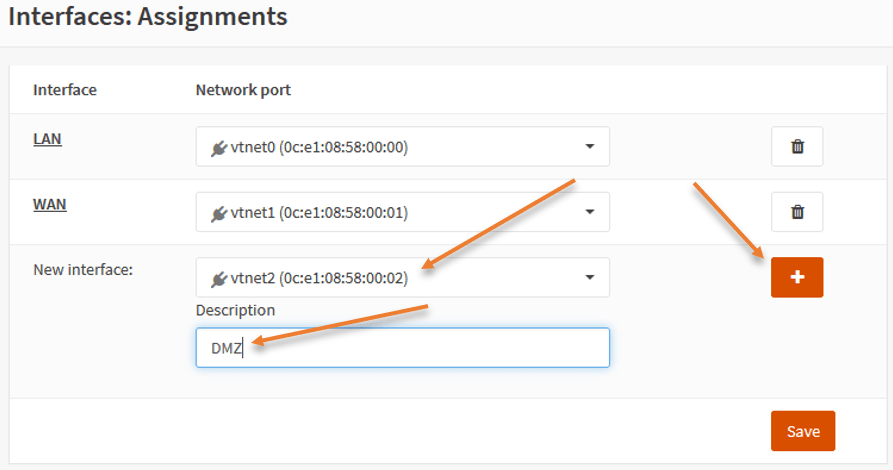
Once it is added, you may click on Save.
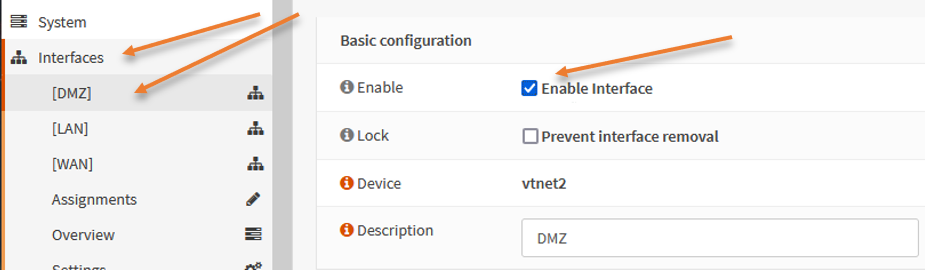
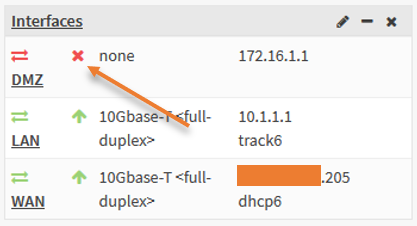
By default, the newly added interface will be disabled. You will have to enable that first.
Under interface, you will see the newly added interface as DMZ

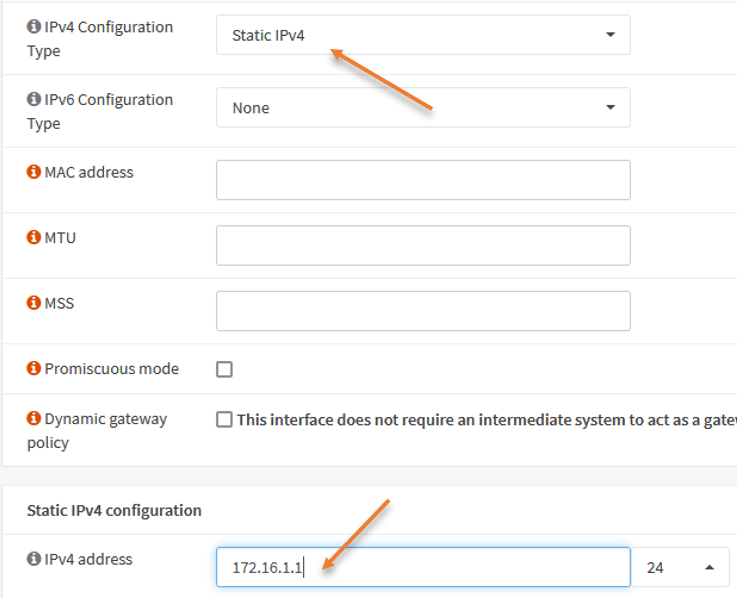
Scroll down and in the IPv4 configuration type, choose static IPv4.
Under Static IPv4 configuration.
Add the interface Ip address of the DMZ, which 172.16.1.1/24 and click on Save. And apply changes.

2. Connect the server to DMZ.
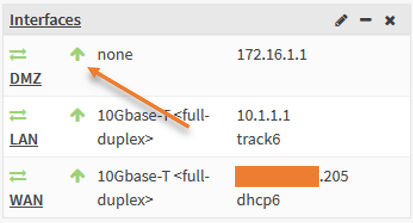
Connect a switch to the firewall on the DMZ port. As soon as it is plugged in, you should see the interface has come up and now connect the server to the DMZ switch.


I have connected the server to the switch, configured with the IP address 172.16.1.10.
3. Enable ICMP on the DMZ gateway.
If you try to ping the default gateway IP address from the DMZ server, you won’t be getting any response now because we have not defined any policy.
We want to define the policy that says any host coming with DMZ network, trying to talk to the DMZ interface, ICMP request should be allowed.
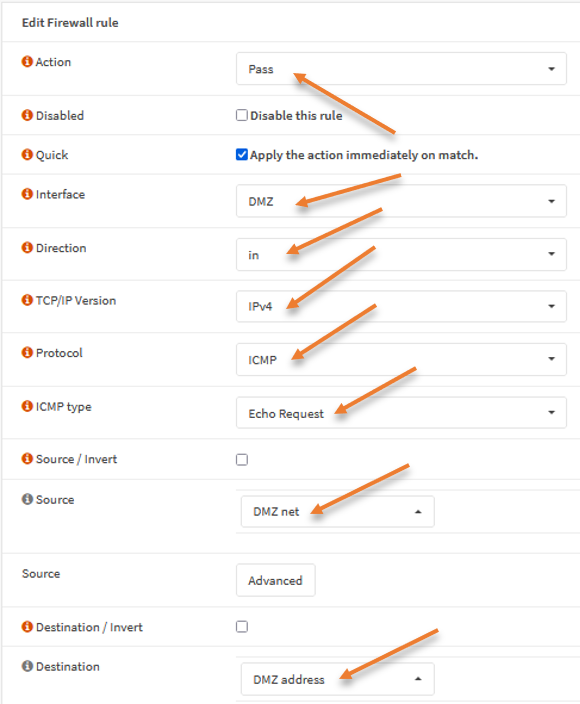
Goto Firewall->Rules-> DMZ-> Click on the plus icon to add the new rule.
Action : Pass.
Interface: DMZ.
Protocol:ICMP.
ICMP Type: Echo Request.
Source: DMZ Net.
Destination : DMZ address.
Click on save-> Apply changes.

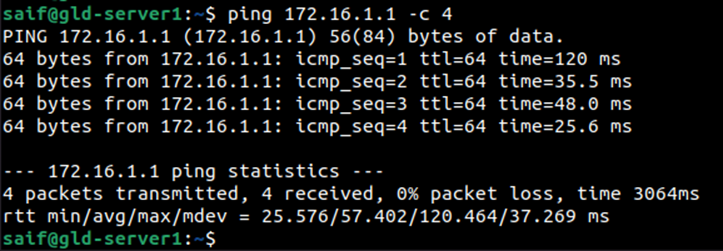
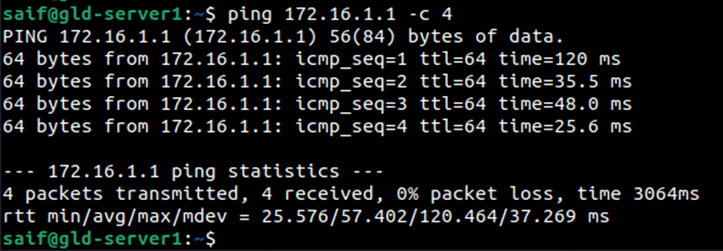
After I made the changes, I can talk to the DMZ interface of the firewall.
4. Allow HTTPS traffic to DMZ inbound.
We just deployed the web server connected to the DMZ network. It can only talk to the DMZ gateway at the moment. We will allow the communication to the webserver from the internet on port HTTPS. usually, protocol http would be permitted to the web server as well; however, we are allowing only HTTPS.
In order for the internet traffic to work, you need to have a public IP address on the firewall, you could either use the public IP address of your firewall. Or if you have got the extra public static address, it is better to use that instead.
From my public IP address subnet, I will choose x.x.x.150, instead of firewall outside IP. I am not hiding the last octet of my public IP for you to make sense of the configuration.
I can use port forwarding or static NAT to expose the webserver to the public internet.
If you are interested in port forwarding, you may check out the article that covers port forwarding on an OPNsense firewall here.
Configure Static NAT/One to One NAT.
Let’s look at configuring the static NAT/one-to-one nat on the OPNsense firewall.
The creation of one-to-one includes three steps.
- Create virtual IP.
- Configure one to one NAT.
- Allow security Policy.
Create Virtual IP.
The IP x.x.x.150 has not been configured anywhere on the firewall. To make this IP reachable from the internet, you need to create a virtual IP first.
Note: If you plan to use your firewall outside the public IP address for the static NAT, you don’t need to create a virtual IP here.
Click on Interfaces-> Virtual Ips-> Settings.
Click on the plus icon to add new virtual IPs.
Mode – IP alias.
Interface – WAN.
Address – x.x.x.150
Click on Save.
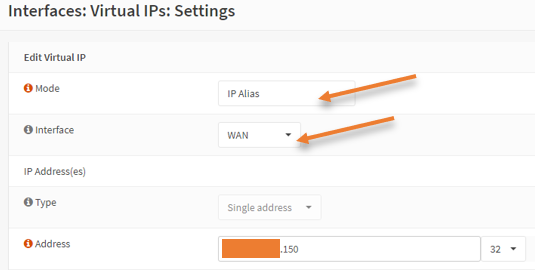

Your virtual IP will look like below.


Configure one-to-one Nat.
We can now configure the static Nat for the webserver.
Goto Firewall->NAT-> One to One.
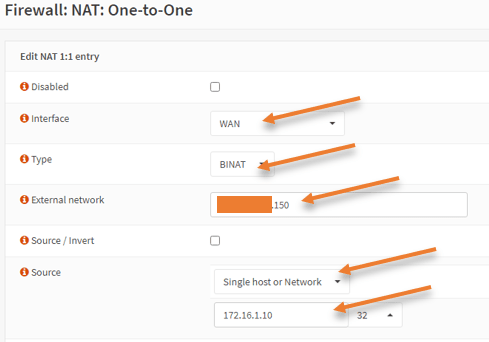
Click on the add icon to add a new NAT rule.
Interface – WAN
Type – BINAT
External network – You need to choose the virtual IP address that we defined earlier, x.x.x.150.
Note: for those who want to use firewall outside IP, you may enter the outside IP address of the firewall instead.
Source – Choose a Single host or network from the dropdown.
The source IP address is the DMZ internal IP address, which is 172.16.1.10
Click on Save and Apply changes.

Configure the OPNsense DMZ Rules.
The NAT rules creation is complete, but we need to define a security policy for the traffic to go through the firewall.
Since the traffic will be coming from the internet, it will hit the WAN interface of the firewall; hence we need to configure the rule on the WAN interface.
Firewall -> Rules -> WAN.
Click on the Plus icon to add new rule.
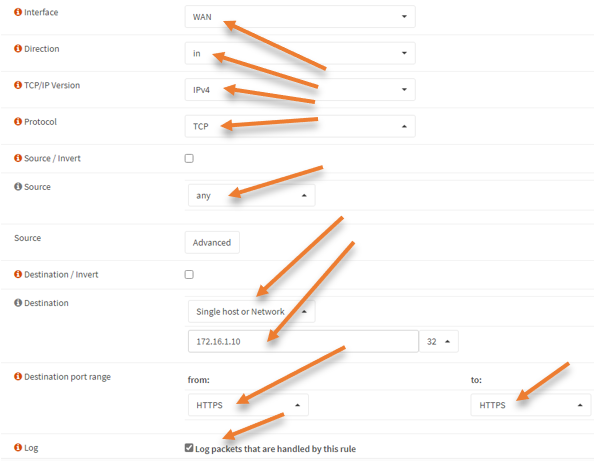
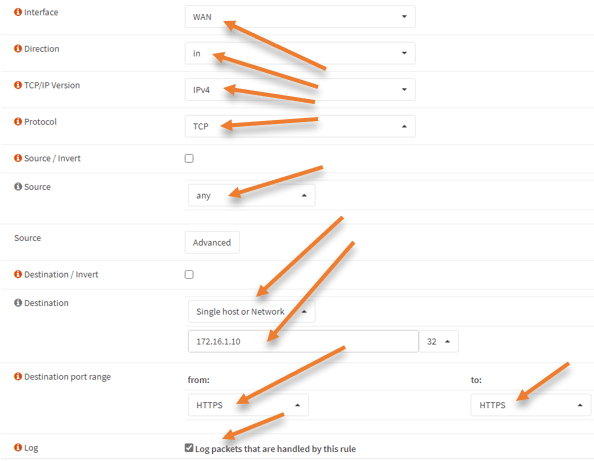
Interfce: WAN
Direction : In
TCP/IP Version: IPv4.
Protocol :TCP
Destination : Single Host or network.
172.16.1.10 – This is our DMZ web server IP.
Destination port range : HTTPS to HTTPS.
To see the logs for this rule, check the option that says ‘Log packets that are handled by this rule’.
Click on Save and apply changes.
Test the connectivity.
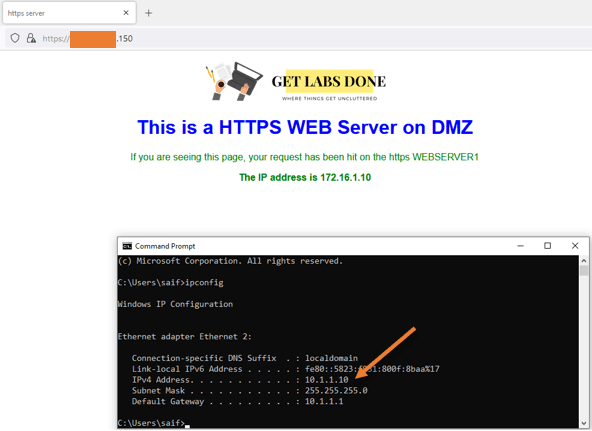
We have configured the static one-to-one NAT and allowed HTTPS service to the webserver. Go to any of the internet hosts and try to access your web server with the public IP address -https://x.x.x.150

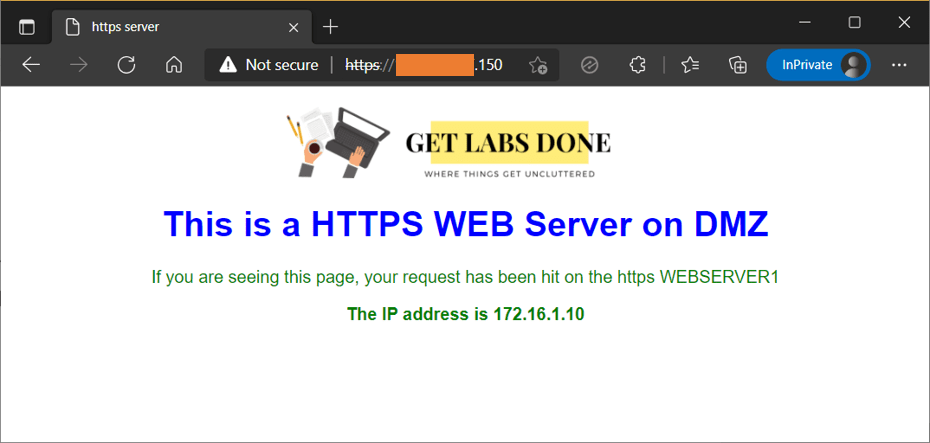
As you can see, I can access the web server from the internet.
5. Allow the communication from LAN to DMZ.
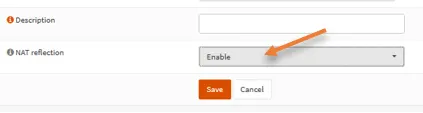
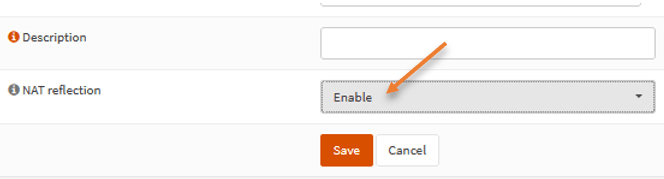
Since it is a web server, your internal users will try to access the webserver using the public IP by default however, it will not work because we don’t have nat reflection enabled.
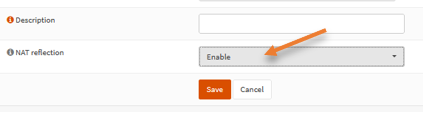
Go back and click on edit on the one-to-one NAT policy we defined for the webserver.
Scroll down.
Under NAT reflection, change it from system default to Enable.
Click on Save, Apply changes.
You may try to access the web server from your LAN network device now.

As you can see, I can access the webserver from the LAN side.

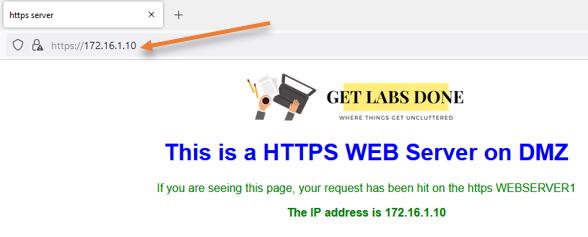
6. Allow Web server access on Private IP.
However, in some scenarios, you would want the LAN users to use the DMZ server’s private IP address. By default, it will work because we already have the rule to allow all the communication from the LAN network to any destination.
And if you try to access the webserver using the private IP address, you should get a response.

7. Allow internet access to the DMZ server.
The internet access on the DMZ depends on each server in your network. Some servers require internet access to go out and get the software update from the internet. However, some don’t need internet access. Instead of allowing internet access to all DMZ servers, it is better to allow access to servers requiring access.
As you can see, I can’t reach the internet from the ubuntu DMZ server.


Let’s fix that.
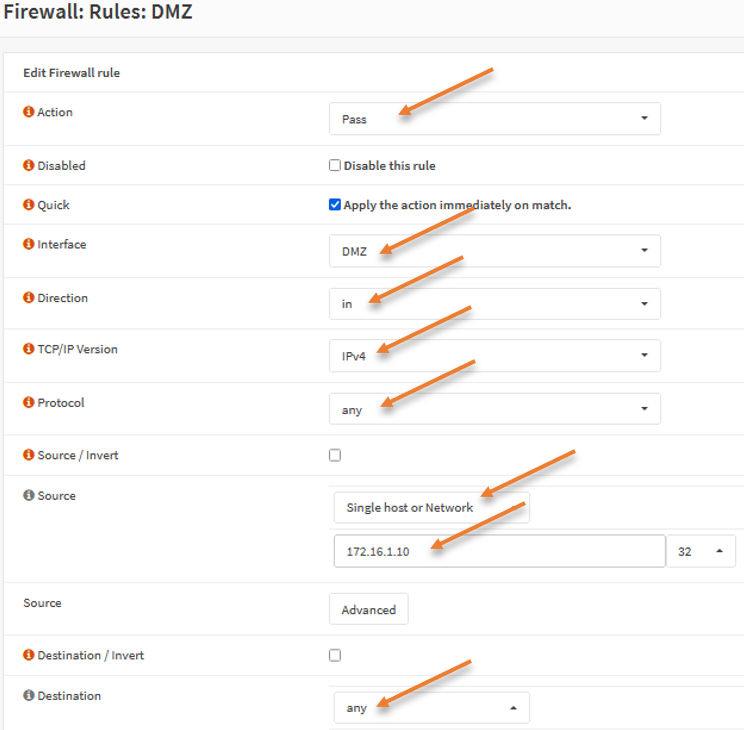
Goto Firewall -> Rules -> DMZ-> click on the Add icon (+)
Action : Pass.
Interface: DMZ.
Direction : In.
TCP/IP Version : IPv4.
Protocol : Any.
Source:
Single host or network.
172.16.1.10
Destination: any.

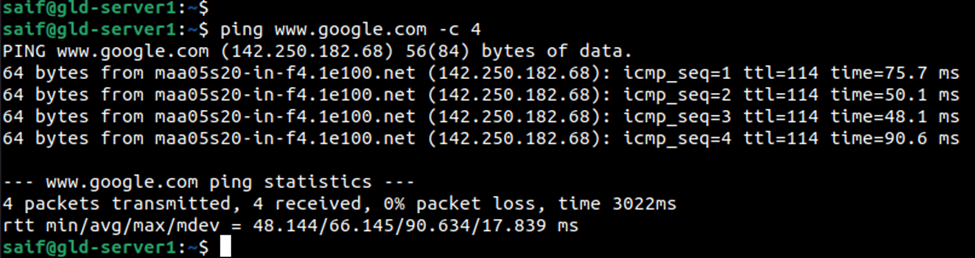
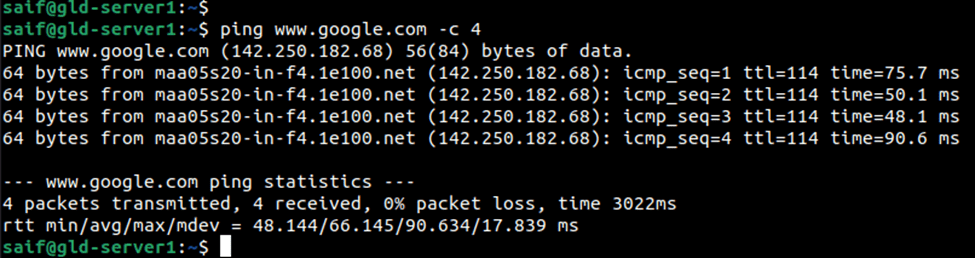
Test the internet access.
Initiate some traffic from the DMZ server, and as you can see, we can access the internet after we added the rule.
Conclusion :
We have successfully implemented the DMZ network in OPNsense firewall. Anytime you want to expose your server to the untrusted public network, you must use DMZ for that. The communication from each server should be controlled with specific rules. In the case of the internet, you should restrict to specific servers instead of allowing internet access to all the servers in DMZ. If the DMZ ever gets compromised, the LAN side will not be affected because it is a different network segment.