
I’ve had pfSense running on my home network for a long time now. You might use it as your home network’s firewall because it is an excellent open-source firewall. However, you should utilize hardware from Netgate if you wish to integrate pfSense to an enterprise network.
I have a PPPoE configured in my network to connect to the internet. Check out this page to learn how to configure PPPoE in pfSense.
Suppose you have an IPsec or MPLS connection from another network that uses BGP as the routing protocol. In that case, you may want to run BGP on pfSense. As your internet service provider instructed, you might also be required to run BGP at the network’s edge.
Although BGP is not supported out of the box in pfsense, you may install it as a separate package and begin using it. In any case, you can run BGP on a pfsense firewall just like you would on any other router.
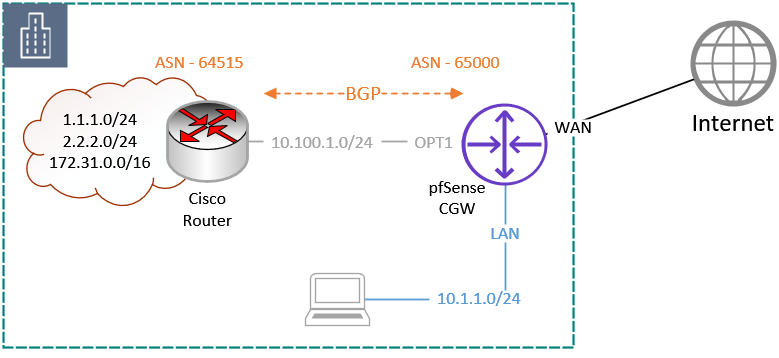
And in this article, we’ll discuss configuring BGP on a link that connects pfsense to the Cisco router. The remote cisco router already has some local routes, and once the BGP configuration between Cisco and pfSense is complete, you should be able to see the routes being exchanged and start communication between the link.

We must install a separate package to enable the BGP capability on pfSense because it isn’t enabled by default.
Enable the BGP feature on pfSense.
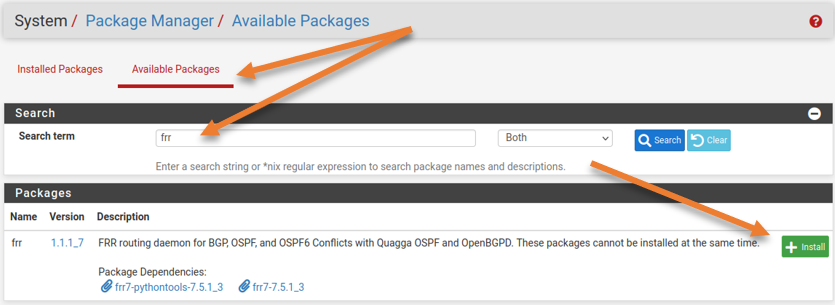
The BGP and OSPF protocols must be enabled by installing the FRR package. So let’s install the FRR package right away.
Goto system-> Package manager-> Available Packages
Search for FRR and click on Install.

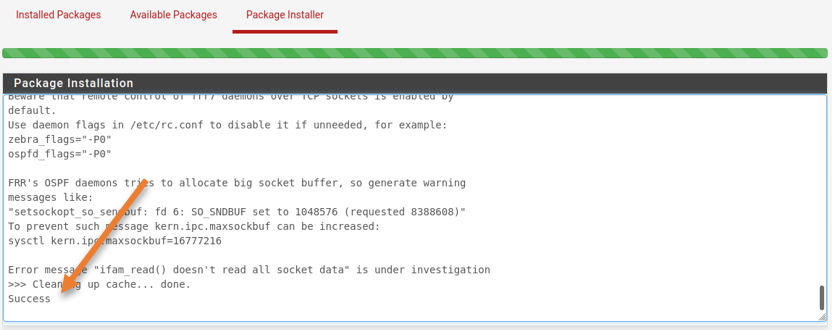
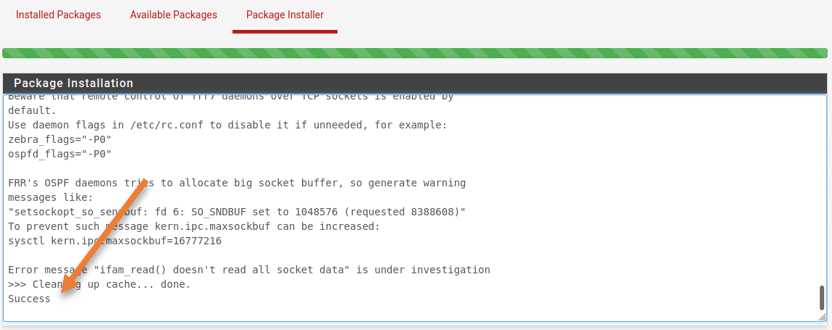
The program’s installation will take some time, and when it is complete, you will see a green progress bar and a success message.
Enable BGP on the Remote Network.
The FRR package has been successfully enabled on the pfSense firewall. Before we even begin configuring pfSense with BGP, we will verify the remote network and enable BGP on the remote Cisco router.
On the remote side, there are several additional networks. The remote network is connected to the pfsense’s OPT1 interface and has an IP address in the 10.100.0.1/24 subnet. You will be able to view and contact every remote network subnet after BGP has been established.
Below is the network on the remote cisco router.
Gateway of last resort is not set
      1.0.0.0/8 is variably subnetted, 2 subnets, 2 masks
C        1.1.1.0/24 is directly connected, Loopback1
L        1.1.1.1/32 is directly connected, Loopback1
      2.0.0.0/8 is variably subnetted, 2 subnets, 2 masks
C        2.2.2.0/24 is directly connected, Loopback2
L        2.2.2.2/32 is directly connected, Loopback2
      10.0.0.0/8 is variably subnetted, 2 subnets, 2 masks
C        10.100.0.0/24 is directly connected, GigabitEthernet0/0
L        10.100.0.10/32 is directly connected, GigabitEthernet0/0
      172.31.0.0/16 is variably subnetted, 2 subnets, 2 masks
C        172.31.0.0/16 is directly connected, Loopback3
L        172.31.0.1/32 is directly connected, Loopback3
RT-to-pfsense#
As you can see there are only local and connected, we are going to advertise all the above routes to the pfSense firewall using BGP.
Configure the BGP on the remote end.
Although the hardware on your end may be different, the BGP is an RFC standard, and I am using a Cisco router to set it up remotely, in the end, everything will still work as it should, irrespective of the hardware and BGP protocol supported.
We would use private ASNs because we use BGP internally in our network.
On the pfSense side, we would use ASN 65000, on the remote cisco router ASN 64515.
The setup of the Cisco router is shown below. The third line of the command specifies any linked devices should be redistributed.
router bgp 64515
neighbor 10.100.0.1 remote-as 65000
redistribute connected
Configure the BGP on pfSense.
The FRR package that we installed is inactive by default; to proceed with the BGP setup, we must first turn on the FRR service.
1. Enable the FRR service on pfSense.
Login to the pfSense firewall GUI, Services -> FRR BGP.
Head to the Global settings tab and check the option Enable FRR.


You must give some random password as well, In the master password, enter some password, I have put 123 here.
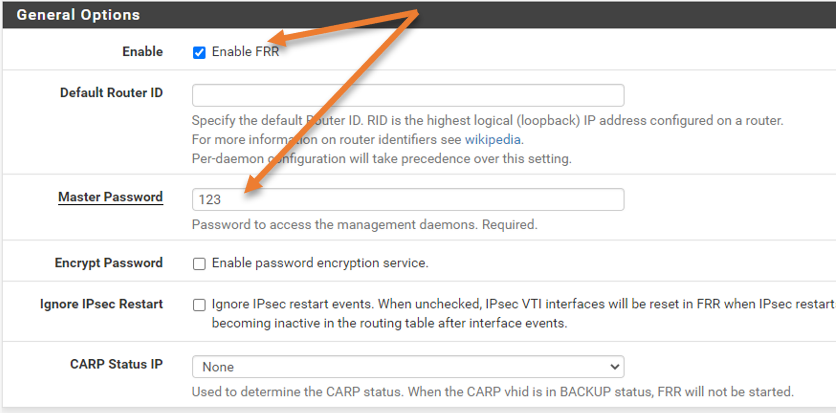

Scroll down and click on Save.
2. Pfsense BGP configuration.
Enable BGP.
Now click on BGP.
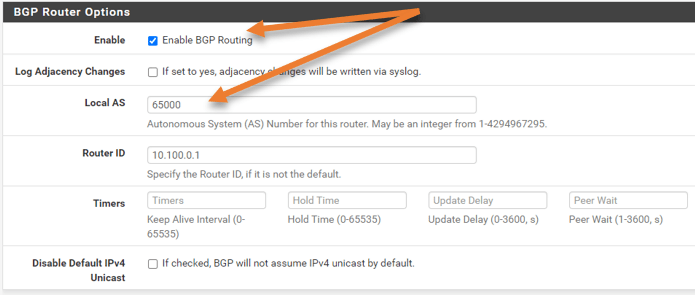
First, check the box to enable BGP routing.
Local AS: As we discussed, 65000 here.
Router ID: I am just keeping it as 10.100.0.1

Advertise the network.
If you want to redistribute any network, you may do it under the redistribute local option.
Scroll down to the Network Distribution.
To advertise my LAN network in pfSense, which is 10.1.1.0/24, I’m only using the Network statement.

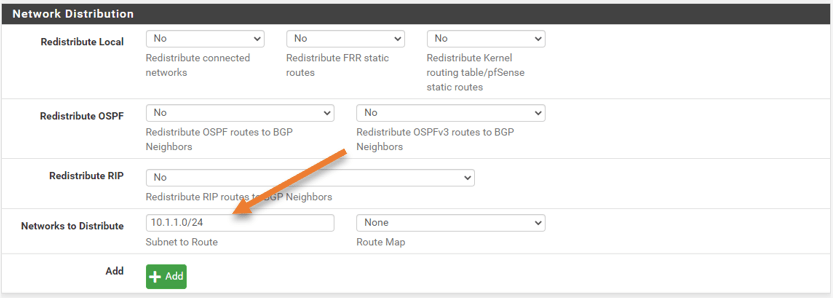
Click on Save.
Configure the Route-map.
If you don’t explicitly configure it, pfSense won’t send or receive any routes to the remote location by default. We will create a route map to allow for all inbound and outbound routes. The BGP will establish if you don’t do this, but your BGP routing table won’t contain any routes received on either side..
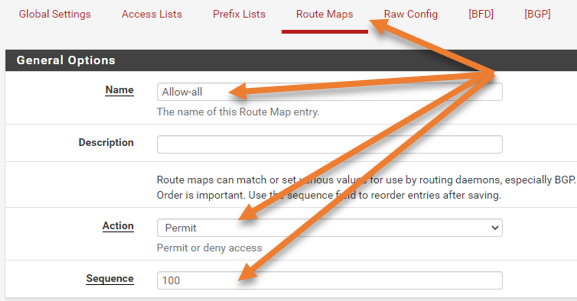
Go back to the Global settings->route-map tab.
Click on Add.
Name: Provide a user-friendly name.
Action: Permit.
Sequence: 100
In this case, we won’t call any access lists or prefix lists, though you are free to do so if you choose.
Click on Save.

Configure the BGP neighbor in Pfsense.
Let’s configure the neighborship on the pfSense. For that click on BGP tab-> Neighbors.
Click on Add.
In the General Options;
Name/Address: Enter the IP address of the cisco remote router. Which is 10.100.0.10.
Description: This is optional, you may add the description if you want to.
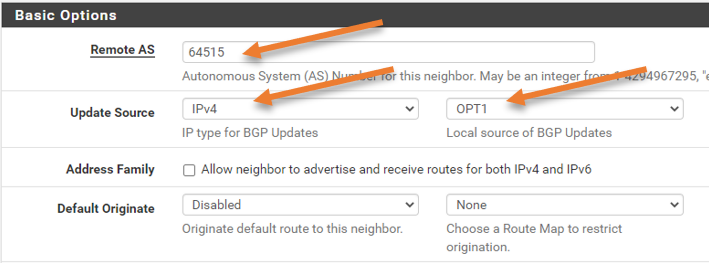
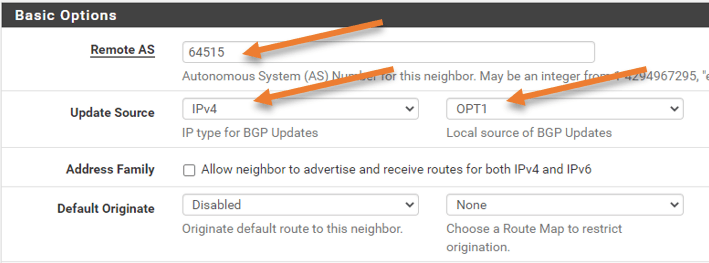
Scroll down to the Basic options.
In the remote AS add the cisco router ASN which is 64515
Update source: WE need to specify the BGP speaking interface, which is OPT1. Choose IPv4 as the BGP updates and Opt1 as the local source.
Default originate: You can advertise the default route to the Cisco router here if it is a downstream device, but we won’t be doing so in this case.
Sending default routes to the upstream telecom routers requires a little caution since it might ruin things if you’re not careful. Even so, most ISPs will have settings to guard against it.
Peer filtering.
Here you need to add the route map filter that we defined earlier.
In the route Map filter, choose the route map on both the inbound and outbound filters.
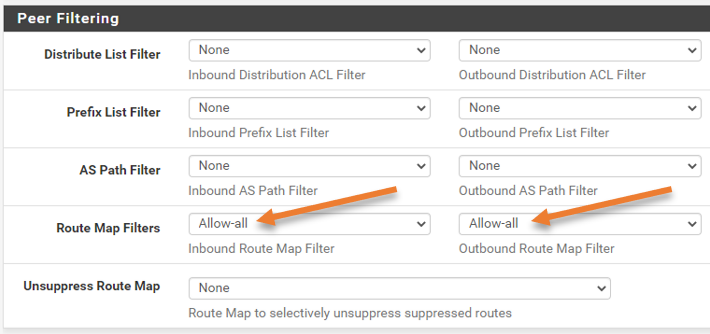

That’s all about it and click on Save.
After a few seconds, I got a cisco router CLI message that the BGP had become up.
*Aug 23 17:12:01.670: %BGP-5-ADJCHANGE: neighbor 10.100.0.1 UpCheck the routing table on Cisco.
You can check the main routing table on the cisco router and see the network 10.1.1.0/24 that we advertised from pfSense, which is the pfSense LAN side.
Gateway of last resort is not set

      1.0.0.0/8 is variably subnetted, 2 subnets, 2 masks
C        1.1.1.0/24 is directly connected, Loopback1
L        1.1.1.1/32 is directly connected, Loopback1
      2.0.0.0/8 is variably subnetted, 2 subnets, 2 masks
C        2.2.2.0/24 is directly connected, Loopback2
L        2.2.2.2/32 is directly connected, Loopback2
      10.0.0.0/8 is variably subnetted, 3 subnets, 2 masks
B        10.1.1.0/24 [20/0] via 10.100.0.1, 00:01:38
C        10.100.0.0/24 is directly connected, GigabitEthernet0/0
L        10.100.0.10/32 is directly connected, GigabitEthernet0/0
      172.31.0.0/16 is variably subnetted, 2 subnets, 2 masks
C        172.31.0.0/24 is directly connected, Loopback3
L        172.31.0.1/32 is directly connected, Loopback3
Rt-to-pfsense#
Additionally, you may look at the advertising routes to pfSense. Four routes are being sent to the pfSense firewall. On the pfSense firewall, the routing table will show the same thing.
Rt-to-pfsense#show ip bgp neighbors 10.100.0.1 advertised-routes
BGP table version is 12, local router ID is 172.31.0.1
Status codes: s suppressed, d damped, h history, * valid, > best, i - internal,
              r RIB-failure, S Stale, m multipath, b backup-path, f RT-Filter,
              x best-external, a additional-path, c RIB-compressed,
Origin codes: i - IGP, e - EGP, ? - incomplete
RPKI validation codes: V valid, I invalid, N Not found

     Network          Next Hop            Metric LocPrf Weight Path
 *>  1.1.1.0/24       0.0.0.0                  0         32768 ?
 *>  2.2.2.0/24       0.0.0.0                  0         32768 ?
 *>  10.100.0.0/24    0.0.0.0                  0         32768 ?
 *>  172.31.0.0/24    0.0.0.0                  0         32768 ?

Total number of prefixes 4
Rt-to-pfsense#
BGP verification on pfSense firewall.
We will verify the BGP status and routing data from the pfSense firewall, in the same manner, we checked the BGP route information in Cisco.
You may view all the BGP-related data by choosing Status from the FRR settings.
Remark: It’s typical for pfSense to provide BGP route information after a little delay.
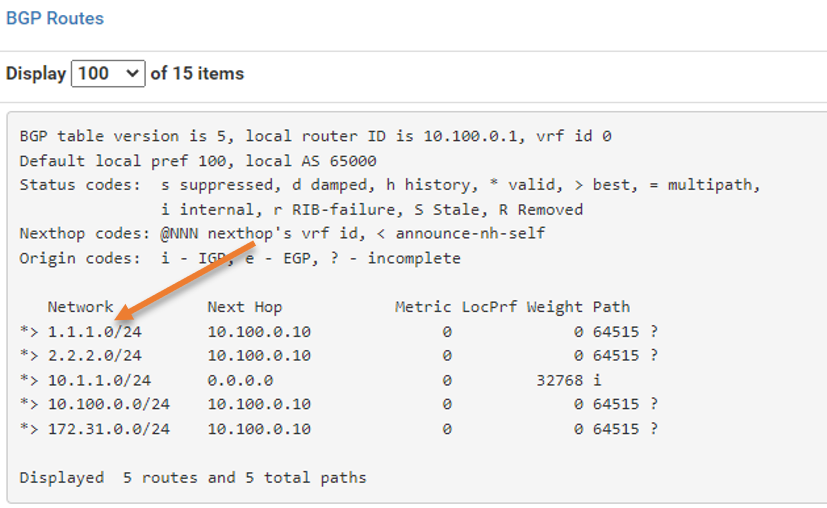
You ought to see the complete routing table at the top. The four routes that we received from Cisco are marked with the letter B to indicate that they are BGP routes.
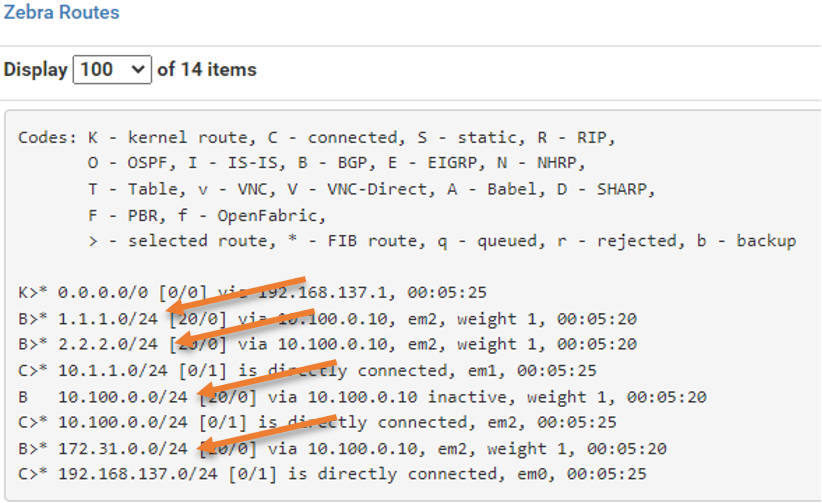

You should see both the received routes and the routes we are advertising under BGP routes. The AS path 64515 from Cisco could be seen on the far right side.

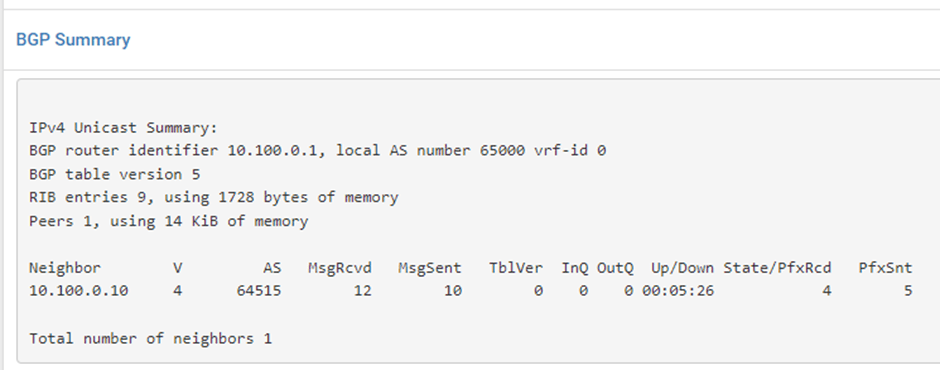
You may view the BGP uptime, the neighborship status, and other information about the pfx sent and received in the typical BGP summary table.

Between pfSense and the Cisco router, BGP has been successfully set up. You can do many complex configurations with the BGP on the pfSense firewall; perhaps I’ll cover those in another blog post.