
PPPOE is a common standard that many ISP’s use for providing internet connectivity. It is very popular for consumer networks but not for enterprise networks. However, you will still see some Internet service providers use PPPOE for enterprise networks.
It is common because it provides automatic IP assignments, authentication, and bandwidth allocation; moreover, it provides ease of management for the ISP’s with respect to managing the customers. The PPP is a point-to-point protocol mainly used in the serial link between routers. And you won’t see much of a serial link these days. The PPP doesn’t natively support the ethernet; hence we use a PPP over Ethernet, PPPoE for short. The PPP protocol basically builds a tunnel in the ethernet.
Does PPPoE work well with pfsense?
Pfsense supports multiple types of WAN connectivity, and PPPOE is among them. Those who start configuring the PPPOE on Pfsense for the first time may face some challenges, especially if the PPPoE link has VLAN tagging. But, PPPoE setup on PFsense is relatively easy. The only requirement is you should know what you’re doing.
You have to remember each ISP configures its PPPoE infrastructure in different ways. Some would use the plane PPPoE network with just a username and password. And some would use VLAN Tag in it, and some would use VLAN tagging plus MAC address caching. So there are different ways to configure PPPoE on pfsense as a WAN interface, and in this blog, let’s take a look at how to configure PPPoE wan interface on pfSense. By the end of this, you’ll be able to configure your PFsense firewall for PPPoE WAN connections. It doesn’t matter what type of configuration you have. After completing this article, I hope you can configure the pfsense firewall for PPPoE connections.
Below is the network where my fiber link is connected to the modem as bridged mode, and from the modem, an ethernet cable connects to the pfsense WAN link.
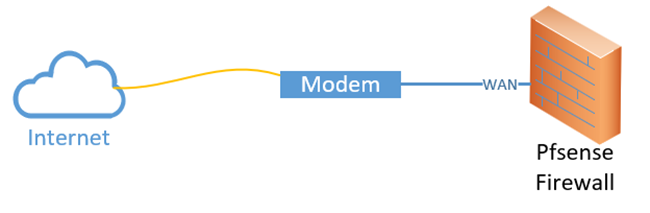

When you get the PPPoE link, most of the ISP’s will have the modem configured as a Layer3 device instead of a bridge, meaning the public IP address will be assigned on the modem, and it will work as a NAT device. Pfsense WAN link will get a private IP address from the modem.
For you to use the pfsense firewall with its full potential, it is recommended to use the modem in bridged mode. So all the PPPoE configuration will happen on the pfsense firewall instead, and once it is connected, the pfsense firewall will have a public WAN IP address.
One of the challenging parts is that most internet service providers don’t really support getting those modems to act as a bridge mode, so you contact the ISP support. If you are lucky, they will help you out. Otherwise, you will have to refer to the modem manufacturer guide or technical support.
1. Clear the MAC address.
For most of the PPPoE configurations, your ISP likely cached the mac address of your previous device that was connected to the internet. So you will have to ask them to clear the mac address cache on the ISP side before installing the pfsense firewall. When I initially moved to the pfsense firewall, I had a wifi router that was connected to the internet. So informed the ISP to clear the MAC address. As soon as they cleared the mac address, the internet connectivity came up just immediately.
There is also a workaround for this; instead of calling the ISP, you could log in to your customer portal, where you should see the details of your connection along with the MAC address cached. If you have got the MAC address you may copy it to a notepad, which you can spoof it later on, on the WAN interface of the pfsense. Instead of using the real mac address from the hardware, we are using a virtual mac address here.
2. Plugin the WAN Link.
My pfsense WAN link is currently configured with the DHCP, and we are going to switch from DHCP to PPPoE.
Plugin the WAN link to the ISP port, the ethernet link came out of the modem.
Once the WAN link is plugged in, you should see the WAN interface on the Dashboard that goes green, which indicates the physical link has just come up.
3. Configure the PPPoE link.
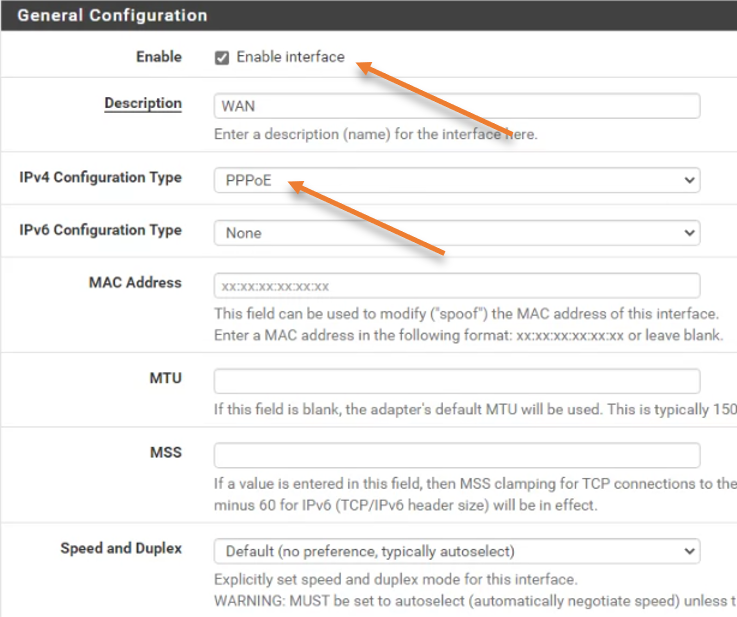
To Enable PPPoE on the WAN interface goto interface-> WAN.
- Make sure Enable interface box is checked.
- IPv4 Configuration Type, change it to PPPoE.
Add the PPPoE credentials.
Scroll down; under PPPoE configuration, you will be asked to enter the username and password of your PPPoE connection.
Enter the username, password, and confirm the password and click on Save ->Apply changes.
Note: If you don’t know the credentials, you will have to reach out to ISP customer support.


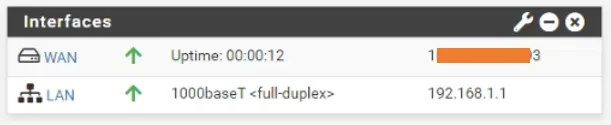
After a few seconds, you will see the ISP interface just come up with its public IP address.

Configure PPPoE with VLAN.
You will have to deal with PPPoE configuration where the internet service provider has tagged VLAN on the internet link, so how do we configure the pfsense firewall WAN link with PPPoE when there is VLAN ID is used? We will look into that now.
Reach out to the internet service provider and get the VLAN ID number.
Configure the VLAN with PPPoE.
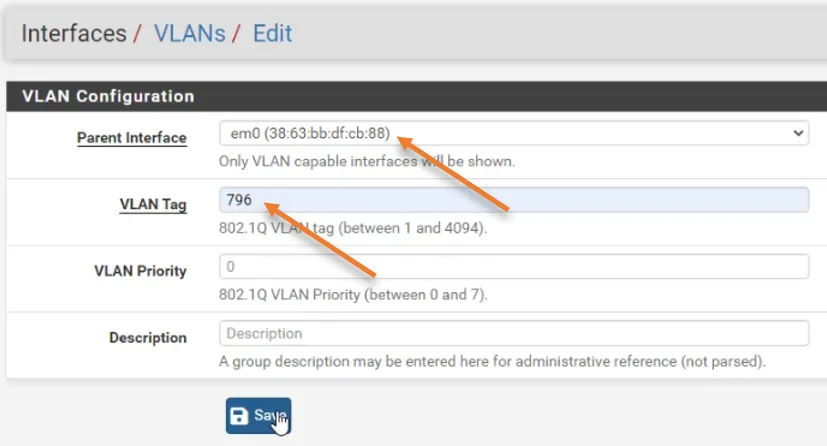
Goto interfaces-> Assignments->VLAN’s-> Add.

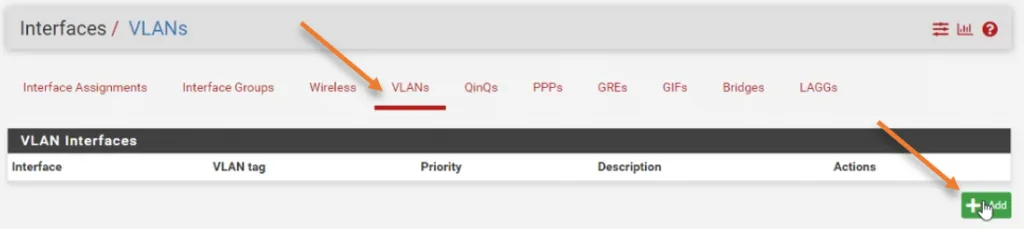
- In the Parent interface, make sure you choose the WAN interface.
- VLAN Tag: Enter the VLAN ID that you got from the ISP. If required, you may add the description, and it is optional though.
- Click on Save.

Goto Interfaces -> Assignments.
Choose the VLAN interface that we just added and click on Save in the WAN interface.

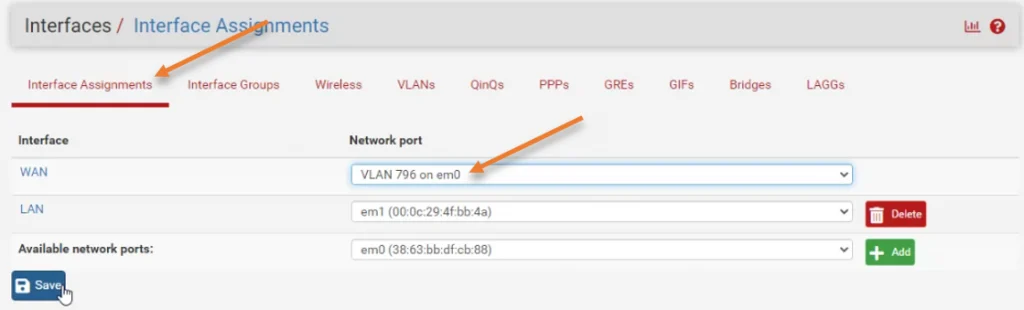
We just configured the PPPoE interface with VLAN, and you need to configure the WAN interface now.
Goto Interfaces -> WAN.
Configure the WAN interface just like we did in step 3.
After few seconds, you will see the interface come up with public IP address.
Remove PPPoE VLAN and configure the WAN interface.
When you have a PPPoE internet connection with VLAN in it, there are specific ways you could get rid of the VLAN tagging.
For that, you need to use a Layer2 switch and connect the internet link on one of the ports in the switch and make the connected port tagged for the VLAN that you got from the ISP.
Connect pfsense WAN link to another port, and make that port access port on the ISP VLAN. You can learn more about pfsense VLAN configuration with a switch here.
After this, you don’t have to worry about the VLAN part, which is taken care of by the Layer2 switch. Now you can configure the PPPoE on pfsense just like we did from step 2 to step 3.