
When you deploy the site-to-site VPN between AWS and pfSense using a static route, a phase1 will come up. However, the phase2 will remains down. As a result, the devices on both ends cannot communicate.
Even if you try to connect phase 2 from Status->IPsec in pfsense manually, you will see the connection is not getting established and stays disconnected.

The AWS setup instructions you obtain to set up an IPsec tunnel with a static route on pfSense are not up to date as of the time of this writing. However, by utilizing the route-vti mode rather than the AWS tunnel mode, I could get IPsec functioning between pfSense and AWS using a static route.
However, there are specific difficulties when configuring the IPsec tunnel with a static route. Therefore, the usage of dynamic routing on IPsec should be the solution.
How does AWS provide resiliency with site-to-site VPN?
AWS would build up two tunnels from two distinct public IP addresses to ensure network resilience. One tunnel would serve as the primary, while the second would serve as a backup. The secondary tunnel would take over the traffic utilizing dynamic routing if the primary tunnel fails.
When dynamic routing is enabled, AWS will configure the tunnel using the BGP routing protocol automatically. In addition to sending the BGP routing advertising to the customer gateway, MED attributes with values of 100 and 200 are also sent for the primary and secondary tunnels. Since the lowest metric will be favored, The primary tunnel would always be used for traffic headed for the AWS. The traffic would failover to the backup tunnel if the primary one were to fail. For the MED to adopt the preference, it’s crucial that you keep the local preference and the weight metric at its default settings.
So in this blog article, we will set up AWS site-to-site VPN to pfSense firewall using dynamic routing. After the tunnel comes up, we will proceed with the BGP configuration and validate AWS’s reachability and failover testing.
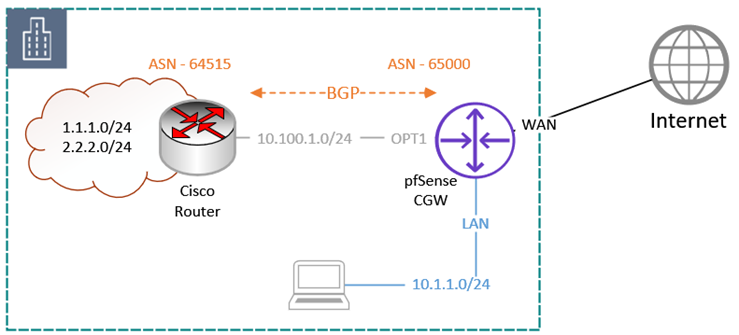
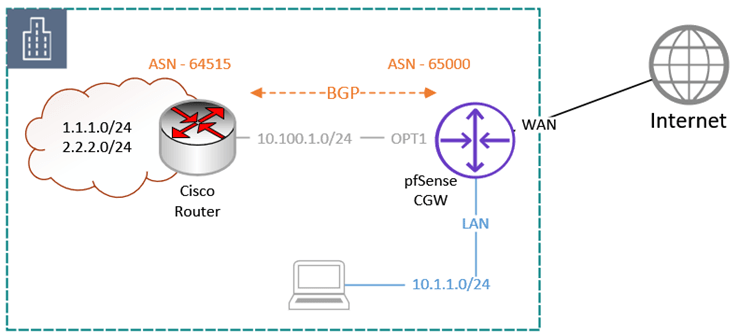
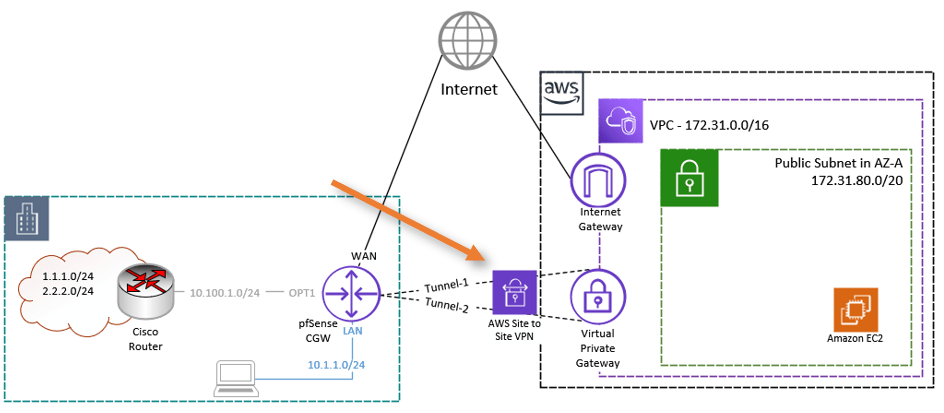
I already have the network shown below. A Cisco router is linked to a pfSense firewall through the OPT1 interface, and a BGP connection is active between them. Regarding 1.1.1.0/24 and 2.2.2.0/24, don’t worry. Those were set up internally for testing; they are not the external public IP address.
You may not have other BGP peers in the network. But that’s okay, It is intended to demonstrate how routing will work once site-to-site BGP is operational.
Steps to configure Site-to-Site VPN between AWS and pfsense.
I have a default VPC, and we will use a dynamic routing protocol to set up an IPsec site-to-site VPN from AWS to the pfSense firewall. When you configure an IPsec tunnel using AWS, it will build two tunnels: one is the primary tunnel, and the other is the standby tunnel. We need to configure BGP on top of it to offer redundancy.
Interestingly, you won’t find pfSense in the list of supported hardware when you set up a site-to-site VPN with dynamic routing on the AWS side. It leads you to believe that it won’t succeed. However, you can still set up a site-to-site VPN with AWS utilizing the pfSense firewall and dynamic BGP routing.
Note: in our setup, we are not using a transit gateway. We are using a single VPC without any transit gateway. And set up a site-to-site VPN from it.
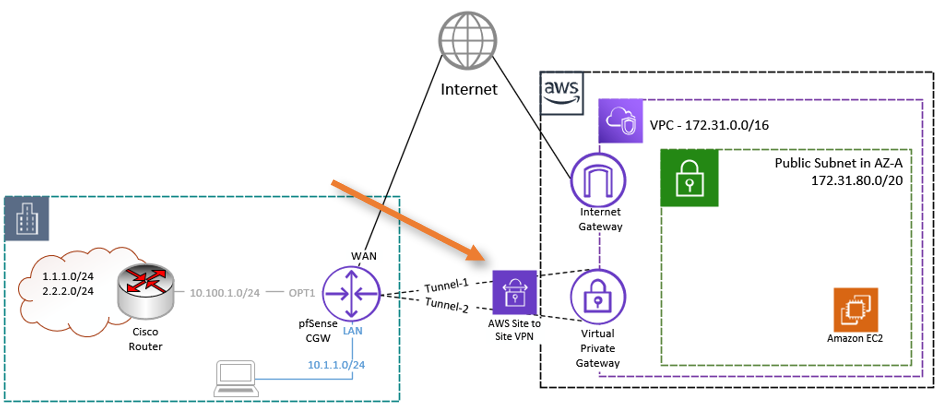
Below is the final topology that we are going to build.
Define the customer gateway.
You must gather certain information about the remote branch network before deploying the AWS site-to-site VPN. Given that we would need to set up the remote branch’s customer gateway in AWS as the site-to-site VPN endpoint, in this instance pfSense. From the pfSense firewall, we must obtain the static public IP address to do so. The creation of the customer gateway in AWS may then be done after you have it.
In AWS-> VPC->Scroll down to the Virtual private network side on the left-> Customer gateway-> Create customer gateway.
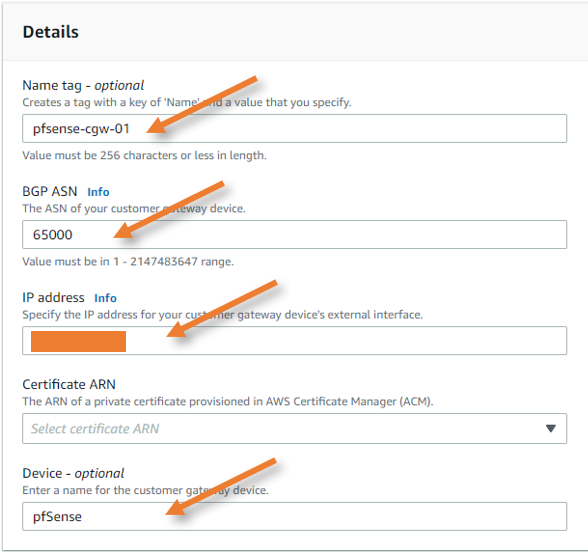
Name tag: Enter the name of the customer gateway.
BGP ASN: we are anyways using 65000 ASN already on pfSense, so I can leave that default. If you have a different BGP ASN, you might want to change it.
IP address: Enter the public routable Ip address of the pfSense firewall.
Device: This field is optional though, and you can add the device name ‘pfSense’ here if you want to.
Click on create customer gateway.

Create Virtual private gateway.
You will notice a virtual private gateway on the left side, just below the customer gateway. Click on that.
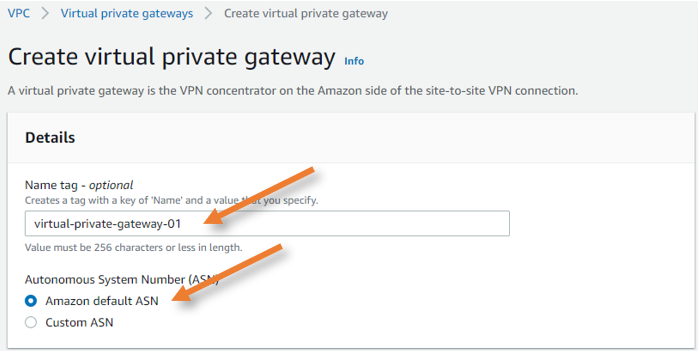
Click on create a virtual private gateway.
Name tag: Provide a name for the Virtual Private gateway.
ASN: Amazon Default ASN.

Attach a Virtual private gateway to the VPC.
By default, the newly created VPG will be separate from the VPC; to join the VPC, we must attach it to the VPC.
Click on Actions at the top after selecting the VPG. Then choose Attach to VPC.


Choose the VPC from the list and click on Attach to VPC.
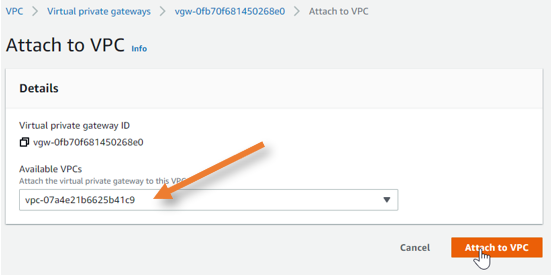

Note: Attaching to the VPC will take some time.
Create a site-to-site VPN towards the pfSense.
Choose site-to-site VPN connections just below the Virtual private gateway configuration.
Click on Create VPN connection.
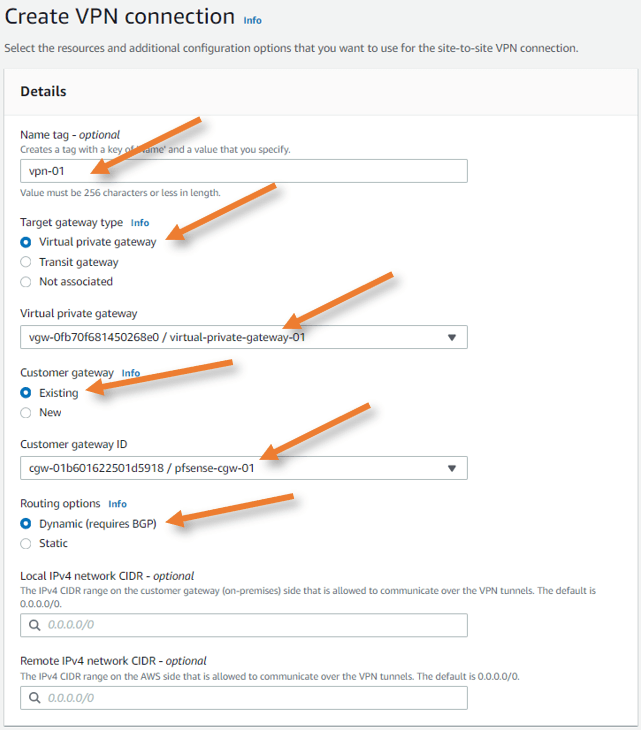
Name tag: Choose a name that is easy to remember.
Target gateway type: Choose a Virtual private gateway. If you are using the Transit gateway, you may choose that here.
Virtual private gateway: Choose the VPG that we created earlier.
Customer gateway: Choose existing and select the gateway from the list.
Routing option: This step is very important as this is the one that defines what kind of routing method you will use with the AWS site-to-site VPN. Choose dynamic here. We will create a separate blog article using the static configuration.
Leave everything default and click on create the VPN connection.

Note: The creation of a VPN connection will take some time. In the meantime, let’s enable route propagation and enable the pfSense side of the configuration.
When the VPN status has become available, the AWS side Tunnel with BGP is ready.
Add the AWS VPN route propagation.
You won’t see the on-premise pfSense routes appear on the AWS side after the tunnel configuration is finished and BGP is established. You must enable a feature known as route propagation on the AWS routing table to allow the routes to advertise to the AWS side.
Goto AWS VPC->Virtual Private Cloud-> Route table-> Select the routing table-> Route Propagation-> Edit route propagation.
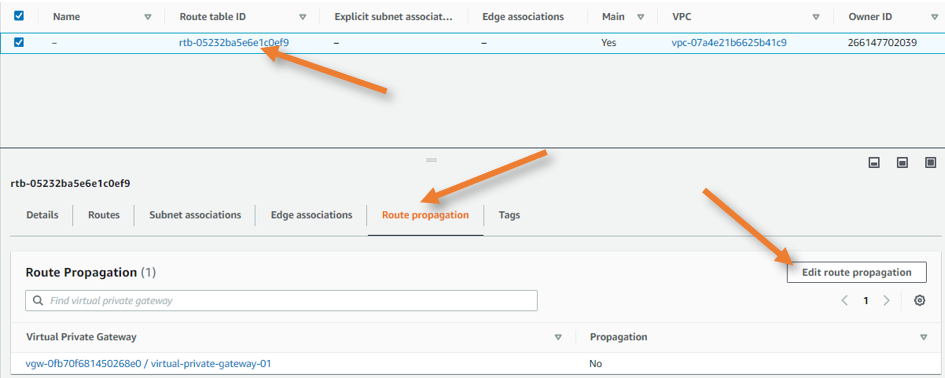
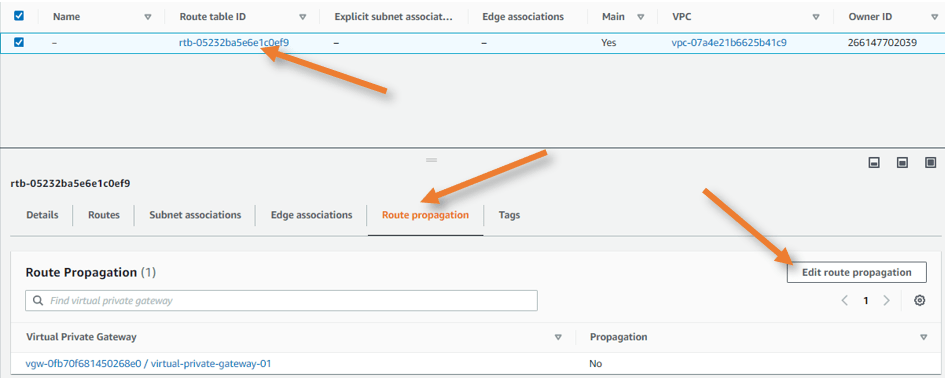
Enable route propagation and click on Save.


Set up EC2 Instance for tunnel monitoring.
Normally in production, you will have some devices IP you could use to monitor the tunnel. In this setup, I have launched an EC2 instance in AWS, The Ip address of the EC2 will be used for tunnel monitoring.
Download the site-to-site VPN configuration for pfSense.
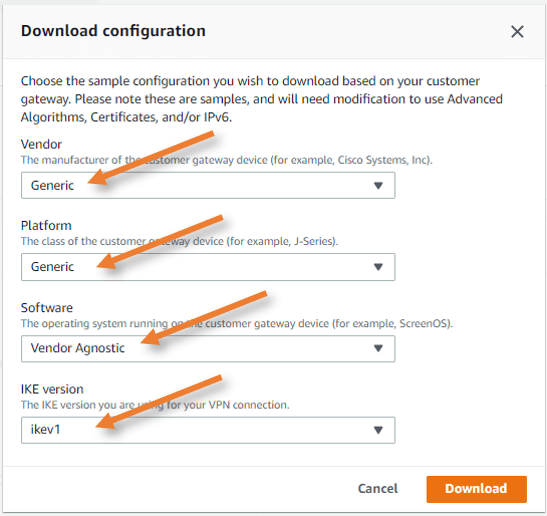
To get the pfSense site-to-site VPN configuration. Select the VPN connection in the same site-to-site VPN section and click on download configuration.
As we have selected the routing as dynamic, you won’t see the pfSense in the list, in case you selected static, you could see the pfSense from the list. Hence let’s choose Generic.
Vendor: From the drop-down choose Generic.
Platform: Generic.
Software: Vendor Agnostic.
IKE version: ikev1.
Click on download. This will download the configuration in a text file.

Configure the AWS IPsec site-to-site tunnel.
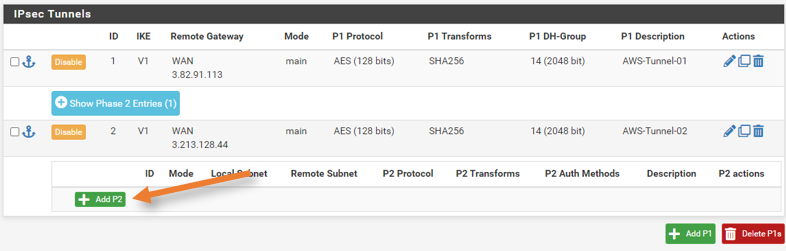
As you can see from the configuration file, we must create two tunnels from the pfSense firewall to AWS’s two IPsec public IP endpoints.
Configure phase1 of the primary tunnel.
To configure the IPsec tunnel on pfSense goto VPN-> IPsec-> Click on AddP1 to create new IPsec tunnels.
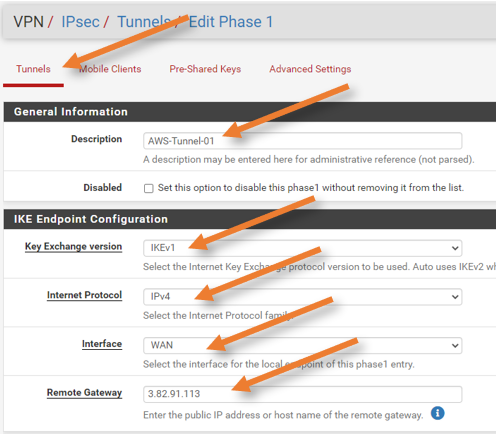
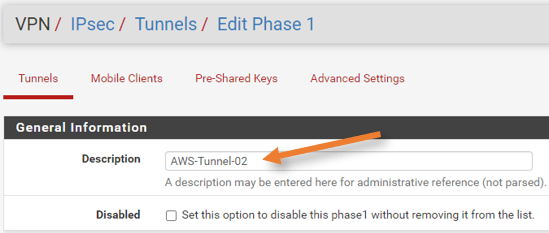
General Information
Enter the description that can help you identify this tunnel easily.
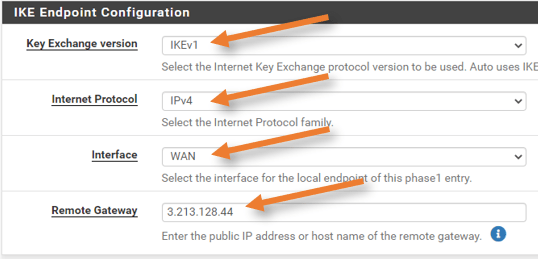
IKE Endpoint configuration.
Choose IKEv1.
Internet protocol: IPv4
Interface: WAN
Remote Gateway: Get the virtual private gateway public IP address from the configuration file and update it here.

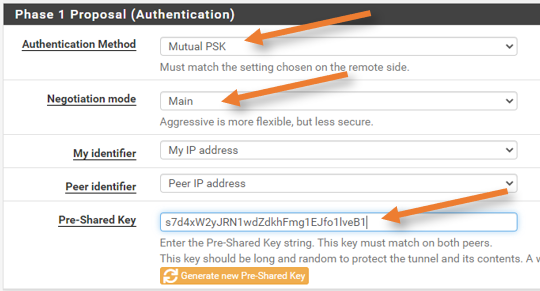
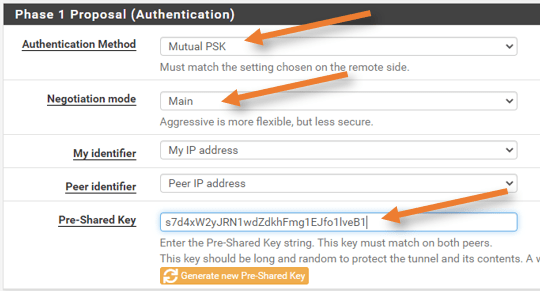
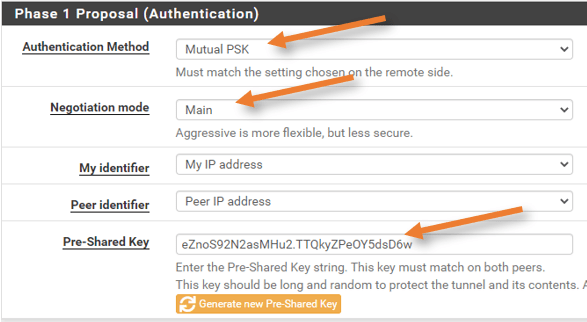
Phase1 proposal (Authentication)
Authentication method: Mutual PSK.
Negotiation method: main.
Pre-shared key: Copy and paste the Pre-shared key from the configuration file.
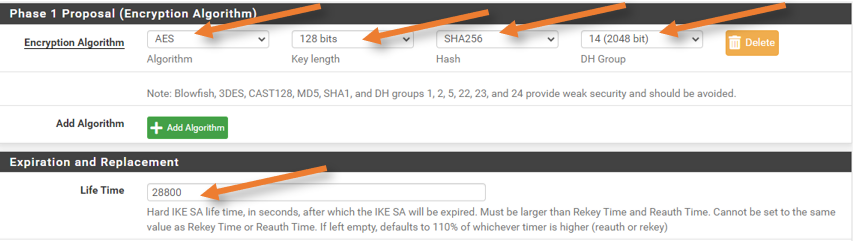
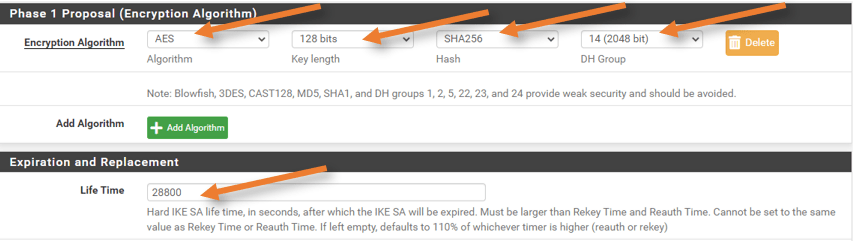
Phase1 Proposal. (Encryption)
In the configuration file, you can see that it has used sha1 as hash and group2 as DH group. Although it is secure, we would want to have more security in the tunnel. So we will configure as below, which is the default in pfSense.
Encryption Algorithm:
Algorithm: AES
Key Length:128bits.
Hash: Sha256
DH group: 14 (2048bit)
Lifetime:28800
Note: Sometimes, you might want to see the available IPsec parameters for both phase1 and 2 on aws side, you can view that by selecting the VPN tunnel->Actions->Modify tunnel options. Choose the tunnel.
Dead peer detection: Enable.
And click on save and apply changes.
Configure the Phase2 parameters.
Click on the option ‘Show Phase2 entries’ in the same VPN configuration screen.
And Click on Add p2.


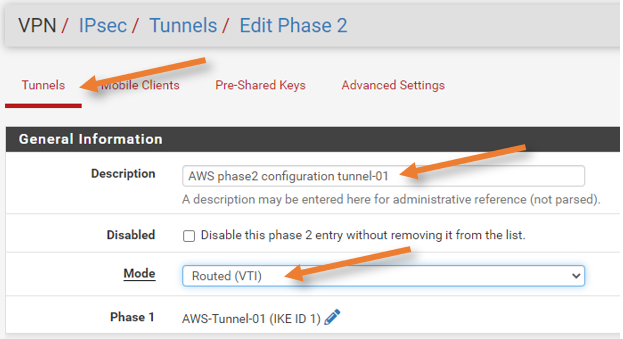
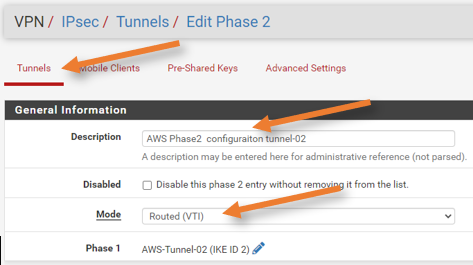
General Information.
Description: Add some user-friendly description.
Disabled: Unchecked.
Mode: Routed (VTI)
Networks.
We use the tunnel IP address to configure the BGP neighborship. You can get this information from the configuration file, which will have an IP address starting with 169.254.x.x. as shown below.
Below are the IP details on my tunnel.
Inside IP Addresses
– Customer Gateway: 169.254.212.98/30
– Virtual Private Gateway: 169.254.212.97/30
Local Network: Choose the customer gateway’s address and IP address.
Remote Network: Choose the address and add the IP address of Virtual Private Gateway.


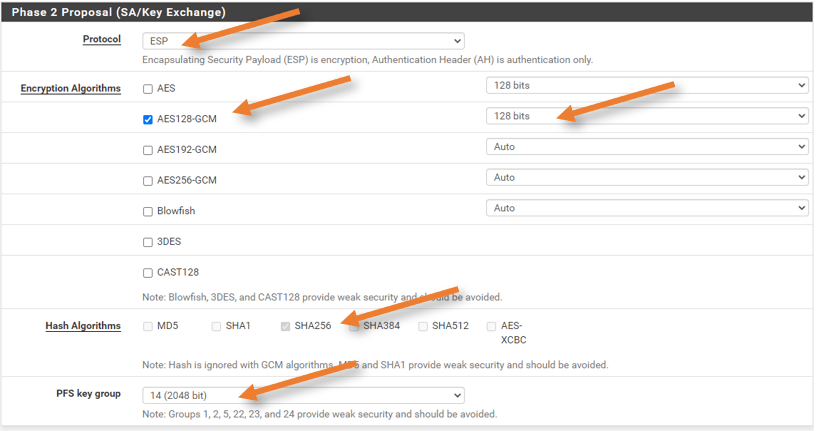
Phase2 Proposal (SA/Key Exchange)
Choose the default as shown below that will provide good security.

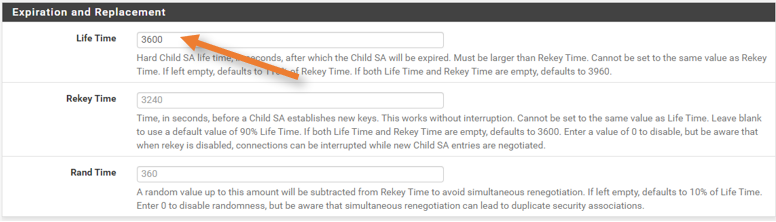
Expiration and replacement.
Enter 3600 in Lifetime.

Keep Alive.
This field is essential, suppose when the IP sec tunnel goes down due to some ISP issue, the tunnel will automatically come up. we are using the already launched EC2 instance in AWS for the purpose.


And click on Save -> Apply changes.
Configure the second AWS IPsec site-to-site tunnel on pfSense.
Like how we configured the Tunnel1 in pfSense, follow the same procedure for Tunnel 2 as well.
Configure Phase1 of the secondary tunnel.
Goto VPN-> IPsec-> Add P1
General Information.
Provide a description to Identify the service.

IKE Endpoint Configuration.
Choose IKE version IKEv1.
Remote Gateway: Enter the virtual private gateway IP address for tunnel2 from the configuration file.

Phase1 Proposal.
Choose the Authentication method as Mutual PSK.
Copy and paste the pre-shared key from the configuration file.

Phase1 Proposal and Expiration and Replacement = Remains the same as Tunnel1.
Enable Dead peer detection.
Click on Save and apply changes.
Create the tunnel2 phase2 in pfSense.
Expand the phase2 configuration by clicking Show Phase2 Entries.
Click on Add P2.

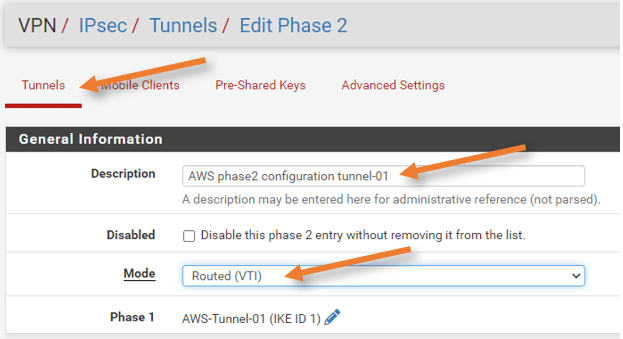
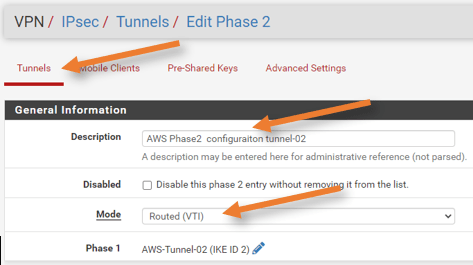
General information.
Enter the description.
Choose the mode as Routed (VTI)
Networks:
Like before, configure the tunnel IP address from the configuration file.
Below is what I have on my file.
Inside IP Addresses
– Customer Gateway: 169.254.217.26/30
– Virtual Private Gateway: 169.254.217.25/30
Local network= Customer Gateway.
Remote Network = Virtua Private Gateway.


Phase2 proposal – Remains the same as tunnel1.
Enable Keep alive – Remains the same as tunnel1.
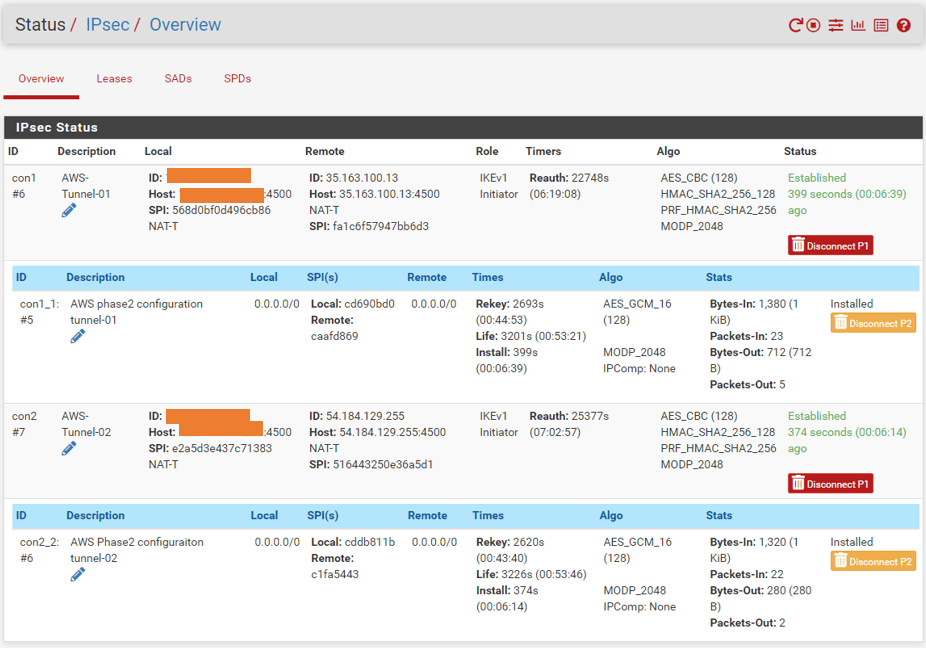
Check the IPsec tunnel status.
Both AWS tunnels should work fine if everything has been set up correctly.
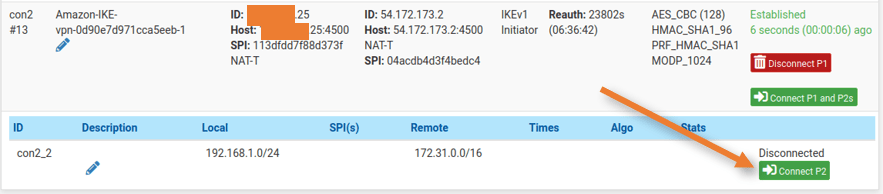
Go to Status->IPsec to determine the status.
You may click Connect to manually establish the IPsec if it isn’t already established.
As you can see, both phases of the two tunnels are now operational.

Check the Tunnel status on AWS.
Similar to how we have checked the IPsec tunnel status in pfSense, you can do the same on the AWS side.
Goto VPC-> Site-to-site VPN Connections -> Choose the tunnel we just created.
As you can see, both the IPsec tunnels are up, however, you will see the status as down; that’s because we have not configured the BGP; hence it is showing it as down.


After successfully deploying the site-to-site IPsec connection to AWS, we must now establish BGP on top of it so that both sides subnet may allow communication. This is covered in the next blog article.