Port forwarding is one of my favorite features on the firewalls and routers. It works great when you want to allow external users to specific services inside the network, be it a local area network or DMZ. We have covered how you can configure port forwarding on pfsense, fortigate firewalls, and routers in our previous article, and if you follow that guide step-by-step, you should be good to go, and I am sure that it will work fine in your environment too. I have personally followed the steps and tested them in my network.
In those articles, we have covered common protocols such as HTTP, HTTPS, RDP and SSH. And if you would like to allow any other services, all you have to do is change the port number to the one you will use, and it will work fine.
Read also,
How to Configure FortiGate Port Forwarding?
Port Forwarding in Router – How to Configure?
How to Configure PfSense Port Forwarding?
Why Port Forwarding not working?
Sometimes things may not work the way you anticipated, and you may be scratching your head to find out why the port forwarding is not working and how you can fix it?
There are many reasons why the port forwarding is not working in your environment, and you cannot pinpoint a specific reason and say this is why it is not working until you troubleshoot the issue. To troubleshoot the issue, you will have to take a step-by-step approach from the source to the destination. Sometimes the problem could be on the source side, or on the destination, it might also be on the configuration side, where you have not configured the port forwarding correctly. but you never know until you start digging and troubleshooting further.
Based on my experience with port forwarding, there are a few possible scenarios in which the port forwarding may not work well. Let’s look at some of them below. Hopefully, by following this, you should be able to figure out what’s going on and fix the issue.
1. Check the port forwarding configuration.
If you have followed my guide on how you can configure port forwarding, I am sure the port forwarding will work, however, there are times as humans we do make mistakes on the configuration, so before we dive into the troubleshooting, first you need to ensure your configuration looks perfect. Once you made sure everything looks perfect in terms of the configuration, you should be good to go and proceed with further troubleshooting.
2. Check the connectivity on the source side.
The first step is to verify, the source side has internet access and able to reach the destination.
Initially, when I used to work on issues with port forwarding, after performing all the troubleshooting, I found out that the source machine doesn’t have internet reachability. So it is best to start pinging the external public IP addresses other than the one you are trying to allow on your WAN side and make sure the user can reach the internet.
For example, In our lab topology, we have enabled port forwarding on the WAN interface of the Firewall. It has the IP address of 3.3.3.3, so instead of pinging the IP 3.3.3.3, we can try to ping the DNS server IP address on the internet, such as 8.8.8.8 or 4.2.2.2, from the source machine.
If it is not working, you know the internet connectivity is down and you have to fix the internet connectivity issue.
If it is responding to the PING, then the problem could be something else.
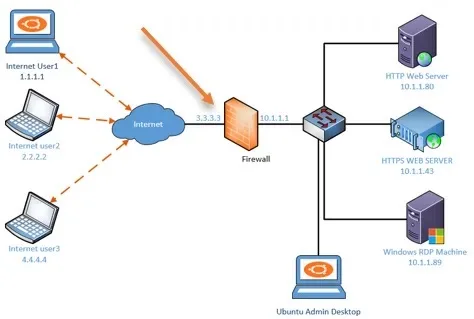
You may also ask the source user to check on the firewall and see if the destination port is allowed on the source side. It is possible that the port might have blocked by the firewall.
3. Check the connectivity on the destination.
We mentioned the connectivity issue on the source side, and everything may be fine on the source side, the problem could be on the destination too. So, just like we tested the internet access on the source side, you may test it on the destination side as well. If the destination is unable to access the internet, there is no way the port forwarding will work fine.
When you have a dual ISP setup, you may have the primary ISP where you configured the port forwarding might have gone down, and users are complaining the port forwarding is not working.
Basically you cannot blame the users, because from their perspective they have internet access (with a second ISP), and one of the services that they used to use is no longer working.
So check the status of your ISP and make sure it is online.
4. Ensure the services are working locally.
When you work with port forwarding, the first important step that you have to perform is whether the services are working locally or not. If the services are not responding locally, you know that the issue could be on the local servers. You may check the following on the local servers.
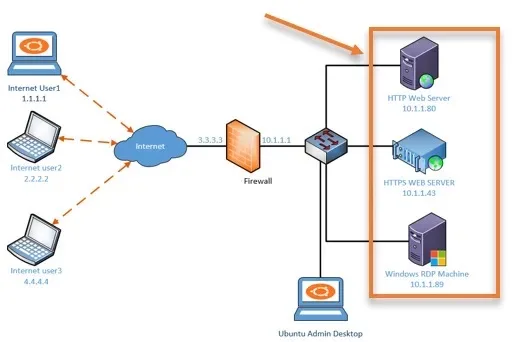
- Check the services are running or not?
- Validate the port number. You might have changed the port number, and you may not remember it. Like we did in our previous setup, you can validate the port number using the telnet command. telnet <server IP> <port number>, if it is web server access the web page locally.
- Has the IP address on the local server changed?
The chances of the IP address getting changed on the local server are very narrow. However, it is best to validate that as well. You never know where the problem lies when it comes to troubleshooting.
5. Check the firewall WAN hit count.
Your firewall WAN side should receive the packet when someone external tries to access the server configured for the port forwarding. After you made sure the services are up and running internally, you can now start looking at the firewall WAN side to see if you are getting any hits. Meaning whether the packet is coming from the source to the destination, which is our WAN link.
So you may go into the firewall logs and see if you are receiving the traffic.
How to enable and check the port forwarding hits on pfsense?
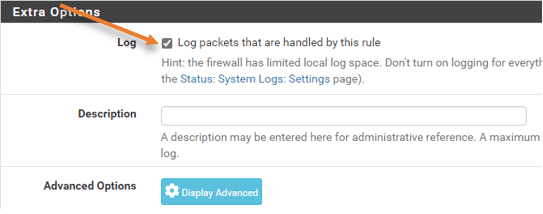
By default, the logs for the port forwarding will be disabled on pfsense, and in our setup, we have enabled traffic logging on the WAN side rule. You can enable the logging by going into, Firewall->Rules->WAN->In the port forwarding rule, click on Edit logs and enable logging.

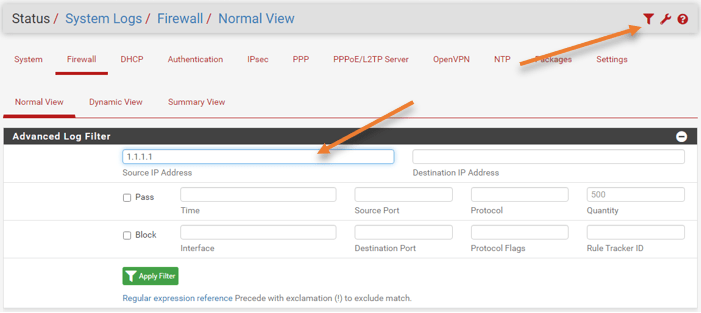
After enabling the logging, you could go to status, system logs->Firewall>And use the filter on top to filter out the specific source IP you are looking for and Apply filter.
How to enable and check port fowarding logs on fortigate?
In fortigate port forwarding policy under – Policy&Objects-> Firewall Policy-> double click on the policy.
Scroll down, under Logging Options, choose All sessions and save the policy.
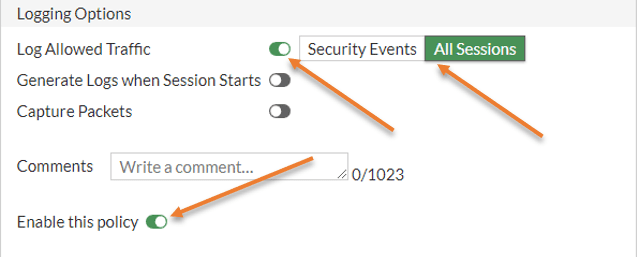
You could go to log and reports->Forward logs , here you could see all the logs associated with the port forwarding, you can use the filter to find out what exactly are you looking for.
how to see port forwarding logs in Paloalto ?
If you have the logging enabled, You could go to the Monitor tab in Paloalto to see the logs related to the port forwarding.
If you do not see the hits on the logs, the issue could be on the source IP has not reached your WAN interface. You have to check why the source IP is unable to speak to your WAN side IP.
If you see the hits from the source IP, you can confirm that the connection from the source to the Firewall is good, and now you need to focus on the firewall port forwarding configuration to see if you have allowed the right source IP for the communication.
6. Is the firewall behind NAT?
Sometimes during the deployment, you might have kept the Firewall behind another device or a router that acts as a NAT device and it has public IP. The firewall might have private IP addresses, so if you enable the port forwarding on the firewall, it will not work because the firewall is behind the NAT, and you have not allowed the port on the WAN side of your local router. So, the fix should be to either replace your router with your firewall and manage the WAN network, or every time you enable the port forwarding on the firewall, you will have to mirror the configuration on the edge router as well.

7. The ISP is using CGN or NAT444.
The other reason why port forwarding is not working is that your ISP might be using CGN shared address space, also known as NAT444, which is a popular practice to preserve the public IPv4 address space these days.
In the CGN network, apart from your private IP translating to the public IP address traditionally using NAT, there will be another set of NATs used by the ISP before sending it to the public internet.
See the example below.
Without CGN, the traditional way.
Your network (192.168.1.0/24) <–>Internet router at home (Public IPv4 address)
With CGN.
Your network (192.168.1.0/24) <–> Internet router at home (CGN shared Address space 100.64.0.0/10) <–> ISP Gateway (Public IPv4 address)
When you check “what is my IP” in the search engine, it will show your public IPv4 routable address used by multiple subscribers. which used to be a single customer in the past.
So, instead of showing the public IP address, it will show CGN shared address space (100.64.0.0/10) on your router.
See the example below captured from a DLink router connected to the internet, where CGN is configured.
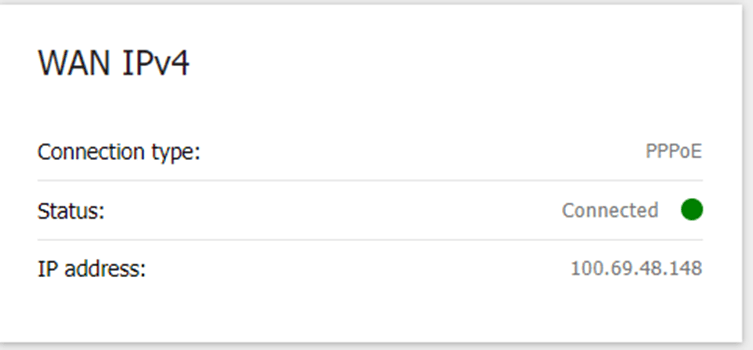
Almost all the mobile carriers use CGN, as you can see below, the output captured from an Android phone.

In the CGN scenario, when you try to do the port forwarding on your public IP, it goes to the ISP NAT gateway. Your edge router will not receive the packet. For the packet to arrive at your edge router, apart from configuring port forwarding on your local router your ISP should as well do the port forwarding. Which I am afraid they will do it.
The permanent solution will be to get a static IP from your ISP that will fix the issue.
8. Has the DNS set up correctly?
For a webserver port forwarding, you most likely would have used a DNS entry for the same, so instead of using the IP address, the source user might be trying with the FQDN, and complaining that it is not working.
You can request them to try with the IP addresses instead of the FQDNS or domain name. If that is working, it is very evident that the problem is with the DNS record. You may validate the DNS record by using the NSLOOKUP and check if it is working correctly or not. Also, try different websites and see if it is responding. The problem could be our first statement as well. The internet might be down on the source machine end.
Conclusion:
Any time I have an issue with the port forwarding, I would follow the steps here, and in the end, I would be able to either fix the issue or take the next plan of action by following the instruction above. I hope this would be useful for many of your out there to fix the issue.