
If you have just acquired a MikroTik router and you’re unfamiliar with it, this blog article will guide you on getting started.
Feeling a bit overwhelmed is completely normal when dealing with a new MikroTik device, especially if it’s your first time setting it up for a small branch office.
In this blog article, we’ll walk you through the step-by-step process of setting up your MikroTik router to connect to the internet and enabling both wired and wireless LAN users to access the internet effortlessly.
Rest assured, the entire setup will be straightforward, and you’ll have a functional network within minutes.
What are the default configurations for a MikroTik ports?
Before we jump into the configuration, let’s take a moment to understand how a MikroTik device works right out of the box.
For this lab, I’ll be using a MikroTik hAP ac3 router, which features 5 ethernet ports. As shown below, you can power on the device either by connecting it to a PoE network via port 1 or by using the charger provided with the box. You may not that, not all the MikroTik devices provide POE functionality.
By default, when you unbox your MikroTik device, ether1, which is the first port, is configured as the WAN port and ether2 is configured as the LAN port.
If your internet service provider (ISP) uses DHCP for the WAN connection, all you need to do is connect the first port of the MikroTik router to the ISP. This will allow it to obtain a DHCP public IP address from the ISP. Additionally, when you connect a switch or PC to the second port, it will act as a DHCP server, assigning IP addresses from the 192.168.88.0/24 network, effectively bringing up your network.
However, if your ISP utilises PPPoE, manual configuration of the internet WAN link is required. Nothing much, just that you need to configure the username and the password you got from the ISP.
Step to configure MikroTik Router.
1. Connect the MikroTik LAN port.
Now, let’s proceed with the step-by-step configuration of your MikroTik device.
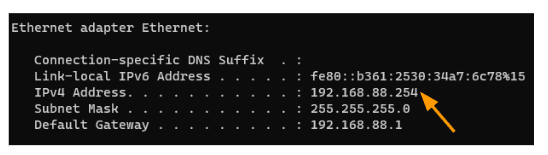
- Power on your MikroTik device and connect your machine to port 2.
- Wait for the device to assign an IP address to your machine.
As you can see, I got an Ip address 192.168.88.254 on my machine.

2. Access the MikroTik management interface.
There are multiple ways to access the MikroTik router, including the https web GUI called WebFig and the terminal option. Both methods require an IP address for the device.
However, personally, I find the best way to access MikroTik is by using Winbox. Winbox is a lightweight tool that allows you to access the MikroTik GUI using either the IP address (L3) or the MAC address (L2).
Since we have already downloaded Winbox on our machine, I recommend using it if you want to make changes to the MikroTik devices.
As we have the default IP address configured and connectivity from the local machine, let’s try to access the web GUI first, and set the password for the router.
To access the web GUI, type http://192.168.88.1 in your browser. Please note that it is not using HTTPS, but rather HTTP. I’m not sure why MikroTik is enabled with http instead of secure https channel.
By default, you will be taken to the Quick Set screen, where you will be prompted to set the password for the MikroTik router.
Leave the old password field blank and enter your new password in the new password and confirm password fields. Then, click on “Change Now.”


3. MikroTik initial setup wizard.
Once you change the password, you will be directed to the default page displayed below. From there, you can set up a device to establish network connectivity.
I personally found the web GUI to be not as user-friendly as Winbox. So, let’s open up Winbox and proceed with the initial setup wizard.
To access the MikroTik GUI using Winbox, simply launch the Winbox utility.
The best part is that you don’t need to install the software; it’s portable, so you can just run it.
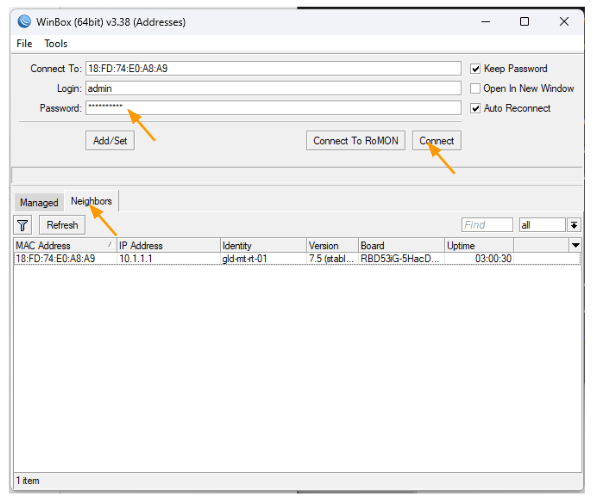
Next, navigate to the neighbours tab.
Here, you’ll find the MikroTik device that you have just configured.
Select the device and enter the password at the top. Then, click on the “Connect” button.

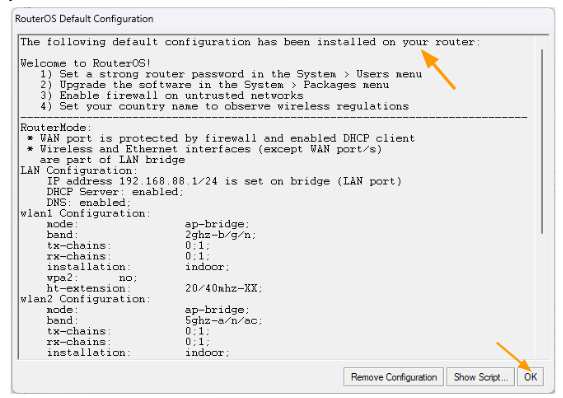
You will be presented with a screen, where it says the following configuration is present on your device. Just click on Ok on that.

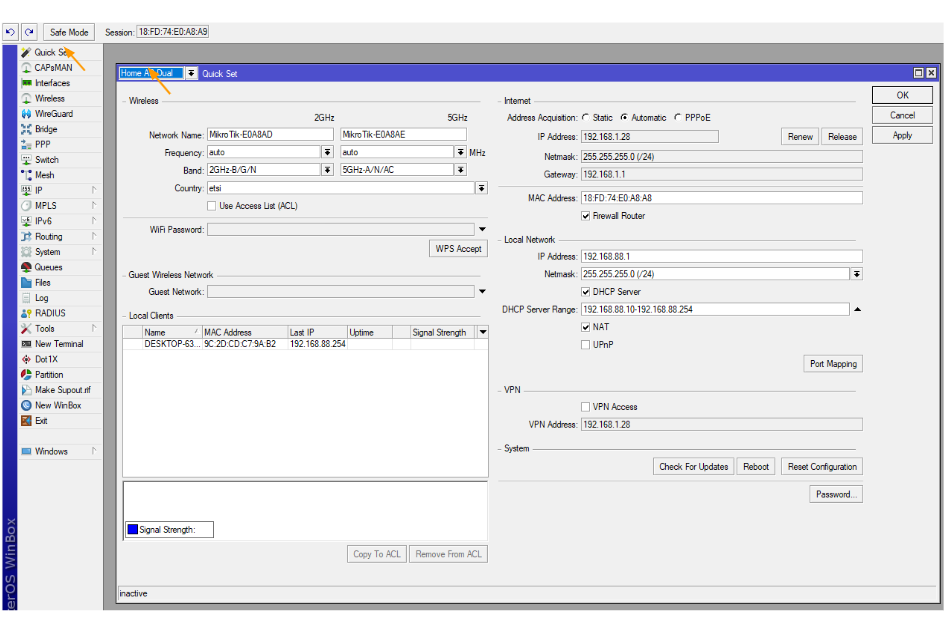
You may now click on Quick set on the top left corner.
And from the quick set drop down change it to Home AP dual.
Where you can change all the default settings.
I am going to change the wifi configuration, and the default network settings.
Here you can configure the entire stuff, like a wizard.

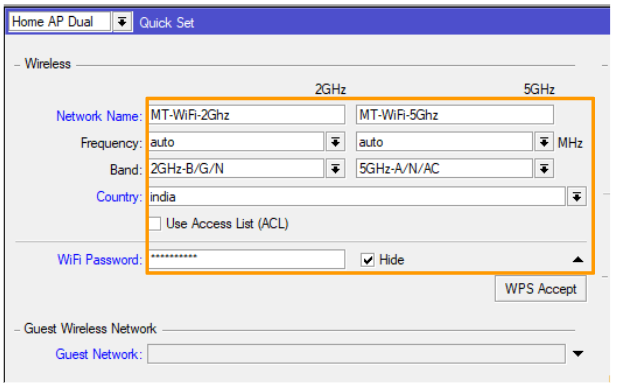
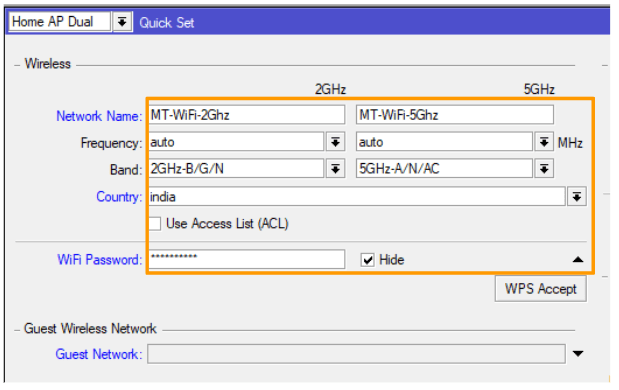
4. Setup MikroTik wifi.
Let’s begin by setting up the Wi-Fi connection.
The device I currently have supports both 2.4GHz and 5GHz frequencies, so we’ll configure both of them.
configure the MikroTik 2.4GHz Wi-Fi.
Network Name: This will be the SSID name for your 2.4GHz Wi-Fi network. By default, MikroTik assigns a name, but you can choose to keep it or change it to your preference. I personally prefer changing the network name.
Band: Select 2.4GHz (B/G/N). Country: Choose your country. Wi-Fi Password: Set a strong password that will be used for both the 2.4GHz and 5GHz SSIDs.
Configure the MikroTik 5GHz Wi-Fi.
Network Name: Assign a name for your 5GHz Wi-Fi SSID.
Frequency: Leave it to auto.
Band: I am selecting, 5Ghz-A/N/AC
5. Configure the router.
Let’s now proceed to the right side, where you can configure this MikroTik device to function as either a bridge or a router.
Since we’re setting up this device as a router, simply select the router option.
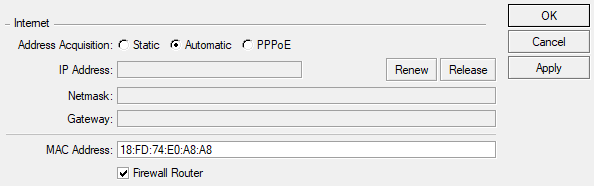
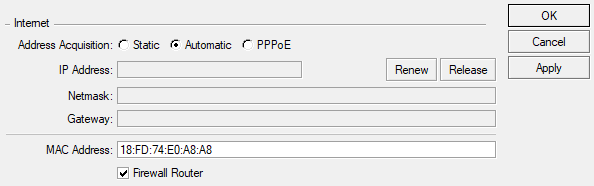
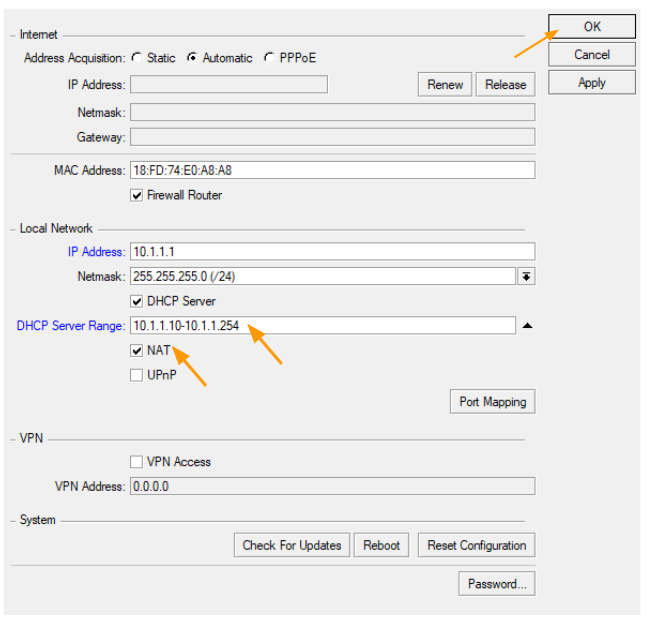
Mikrotik Internet (WAN) configuration.
For Address Acquisition, it’s best to choose the Automatic setting. This will configure the router to act as a DHCP client, allowing the Internet service provider’s DHCP server to assign the IP address.
If you happen to be using PPPoE as your service, you can select PPPoE, which will then prompt you to enter your username and password. Simply enter the credentials provided by your ISP.
In case you have a static IP address, you can manually enter the details here.
Now, let’s move on to the Firewall Router setting. Make sure to check the box to enable it.
Mikrotik Local Network (LAN)configuration.
By default, the local network will be set to 192.168.88.0/24. However, I prefer changing it to 10.1.1.0/24.
Next, enter the new IP address in the designated field.
For the DHCP Server Range, input the range of IP addresses that you wish to allocate.
Don’t forget to enable NAT by checking the corresponding box.
Once you have completed all the necessary configurations, simply click on Apply to save your changes.
Remember, personalising your router’s settings can enhance your network experience.

It may take some time for all the WiFi services to be up and running. In my case, the 2GHz WiFi started showing up immediately, but the 5GHz network took around 10 minutes to appear.
You can try unplugging and plugging back in the LAN cable connected to your computer. Alternatively, you can use the commands “Ipconfig /release” followed by “IPconfig /renew” to refresh your IP configuration.
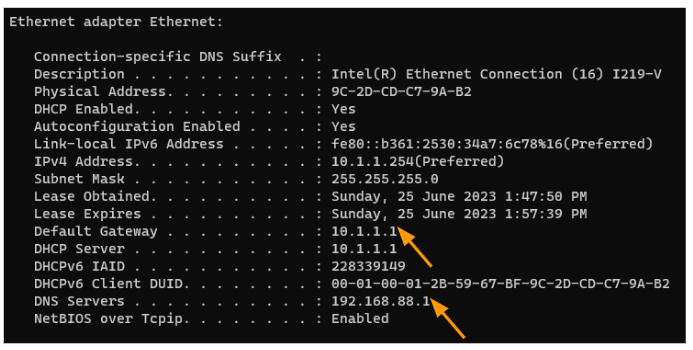
Once you’ve completed the above steps, you should now have a new IP address assigned by the DHCP server.
And the old url no longer works, You can reconnect to the web GUI using the new URL: http://10.1.1.1.
However, there’s still a problem: the DNS server is displaying the old IP address which is 192.168.88.1. This means that I will not be able to access the internet using fully qualified domain names (FQDNs). Once we have the internet connected.
But don’t worry, we’ll fix that right away.

Change the DNS server IP.
If you haven’t changed the IP address to something other than 192.168.88.0/24, the following information may not be applicable to you.
Even though I modified the IP address to 10.1.1.0/24, the default DNS IP address remained unchanged.
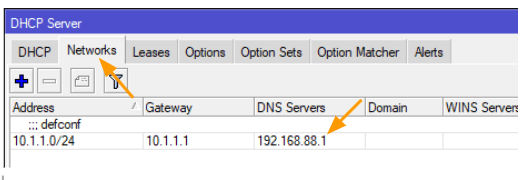
To proceed, go back to WinBox once again and navigate to WebFig.
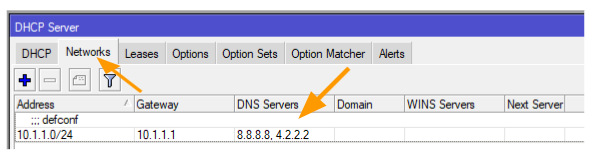
Next, go to IP -> DHCP Server -> Networks.
As you can observe, while we had the option to modify the IP subnet, it did not prompt us to change the DNS server IP. Therefore, it retained the previous IP address by default. Seems like a bug for me.
Please double-click on the IP Address.

In the DNS Servers Change from 192.168.88.1 to google DNS servers 8.8.8.8 and 4.2.2.2
Note: Click on the down arrow to add the secondary IP address.
Click on Ok to make changes.
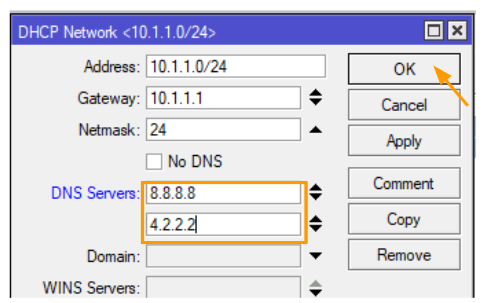

It is now changed.

To ensure the changes take effect on your machine, You can either issue the following commands: “ipconfig /release” and “ipconfig /renew” to obtain the new IP configurations.
Alternatively, you can simply unplug and plug the network cable back in.
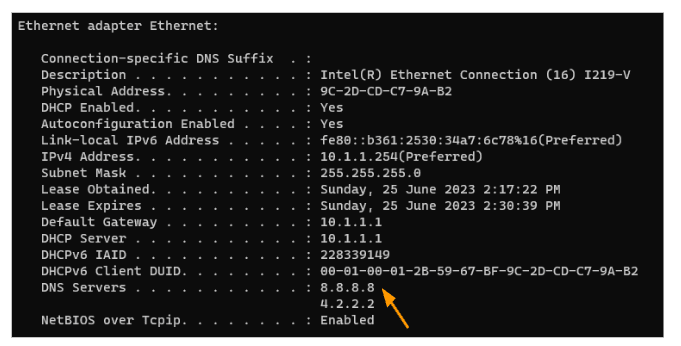
Once you’ve done that, try running “ipconfig /all” again. This time, you should notice the addition of the new DNS IP addresses. That’s great!.

6. Connect MikroTik to the internet.
As MikroTik loads all the configurations, let’s proceed with setting up the internet connection.
Now, you can connect the WAN cable (Port 1) to establish the internet connection.
Since I’m utilising the DHCP service for internet connectivity, the IP address will be assigned automatically.
Access the WebGUI and click on WebFig.
Navigate to the GUI and select IP -> Address.
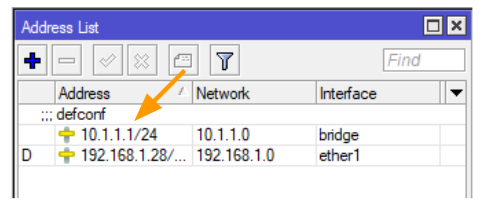
Here, you will find the local address as 10.1.1.0/24 and the public DHCP address provided by your internet service provider.

7. Test the MikroTik Internet connectivity from LAN.
We have successfully configured both wired and wireless networks. If you are currently connected to the internet other than MikroTik, please disconnect from it now.
Personally, I had been using a mobile hotspot for my internet connection, but I have disconnected from it.
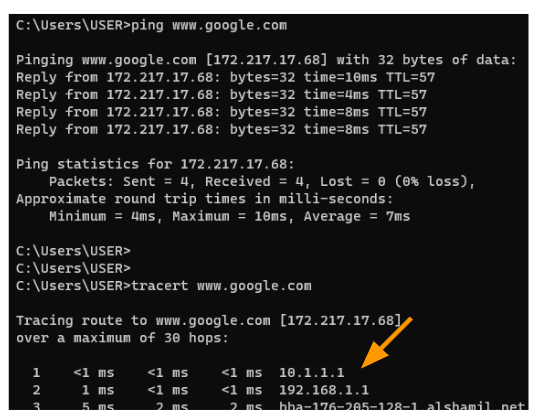
Let’s test the connection by pinging Google and check if we receive any response. As you can see, everything is functioning as expected.
And tracepath shows the traffic is heading to the MikroTik gateway which is 10.1.1.1

Let’s also connect to the Wi-Fi.
On my phone, I can now see two SSIDs.
I connected to the wifi and I was able to access the internet just fine.
Conclusion.
And that’s how you can successfully set up your MikroTik network and connect your devices to the internet. This comprehensive guide has walked you through the entire process, from the initial hardware setup to configuring the router’s settings and establishing Wi-Fi connectivity. Whether you’re a beginner or new to MikroTik devices, following these step-by-step instructions will ensure a smooth and hassle-free setup experience.